2006 INFINITI M35 brake light
[x] Cancel search: brake lightPage 3367 of 5621
FAX-8
FRONT DRIVE SHAFT
Revision: 2006 January2006 M35/M45
FRONT DRIVE SHAFTPFP:39100
On-Vehicle Inspection and ServiceNDS000FH
Check drive shaft mounting point and joint for looseness and other damage.
Check boot for cracks and other damage.
CAUTION:
Replace entire drive shaft assembly when noise or vibration occur from drive shaft.
DRIVE SHAFT BOOT REPLACEMENT
1. Remove tires from vehicle with a power tool.
2. Remove wheel sensor from steering knuckle. Refer to BRC-57, "
WHEEL SENSOR" .
CAUTION:
Do not pull on wheel sensor harness.
3. Remove brake hose bracket. Refer to BR-12, "
BRAKE TUBE AND HOSE" .
4. Remove torque menber fixing bolts with a power tool. Hang torque menber in a place where it will not
interfere with work. Refer to BR-23, "
FRONT DISC BRAKE" .
NOTE:
Do not depress brake pedal while brake caliper is removed.
5. Remove disc rotor. Refer to FA X - 5 , "
Removal and Installation" .
6. Remove cotter pin, then loosen hub lock nut with a power tool.
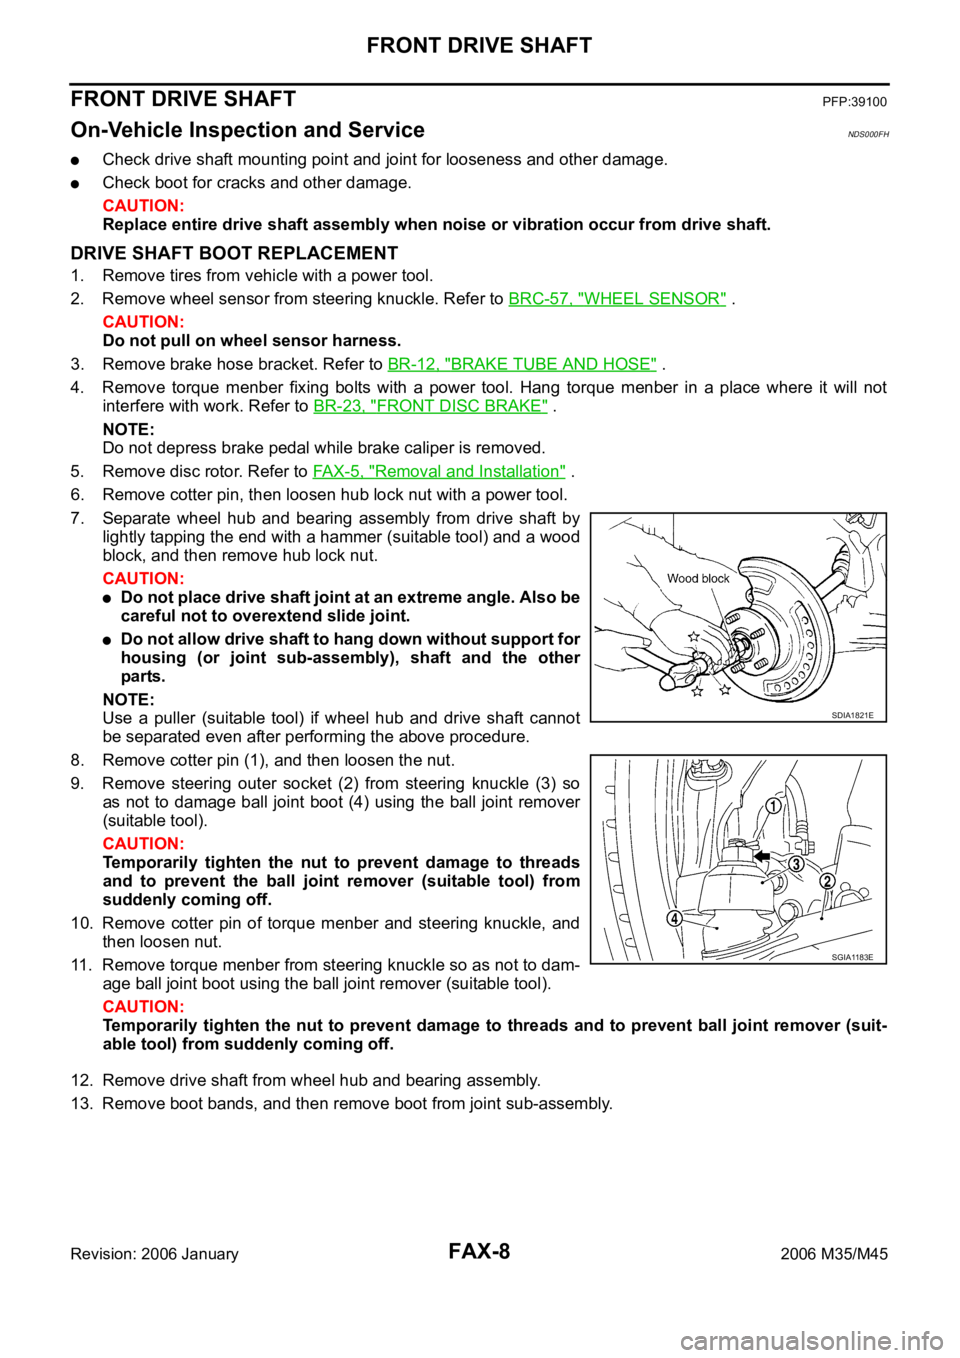
7. Separate wheel hub and bearing assembly from drive shaft by
lightly tapping the end with a hammer (suitable tool) and a wood
block, and then remove hub lock nut.
CAUTION:
Do not place drive shaft joint at an extreme angle. Also be
careful not to overextend slide joint.
Do not allow drive shaft to hang down without support for
housing (or joint sub-assembly), shaft and the other
parts.
NOTE:
Use a puller (suitable tool) if wheel hub and drive shaft cannot
be separated even after performing the above procedure.
8. Remove cotter pin (1), and then loosen the nut.
9. Remove steering outer socket (2) from steering knuckle (3) so
as not to damage ball joint boot (4) using the ball joint remover
(suitable tool).
CAUTION:
Temporarily tighten the nut to prevent damage to threads
and to prevent the ball joint remover (suitable tool) from
suddenly coming off.
10. Remove cotter pin of torque menber and steering knuckle, and
then loosen nut.
11. Remove torque menber from steering knuckle so as not to dam-
age ball joint boot using the ball joint remover (suitable tool).
CAUTION:
Temporarily tighten the nut to prevent damage to threads and to prevent ball joint remover (suit-
able tool) from suddenly coming off.
12. Remove drive shaft from wheel hub and bearing assembly.
13. Remove boot bands, and then remove boot from joint sub-assembly.
SDIA1821E
SGIA1183E
Page 3370 of 5621
FRONT DRIVE SHAFT
FAX-11
C
E
F
G
H
I
J
K
L
MA
B
FA X
Revision: 2006 January2006 M35/M45
34. Install wheel sensor to steering knuckle. Refer to BRC-57, "WHEEL SENSOR" .
35. Tighten the hub lock nut to the specified torque. Refer to FA X - 5 , "
COMPONENT" .
36. Install cotter pin.
37. Install tires to vehicle.
Removal and InstallationNDS000FI
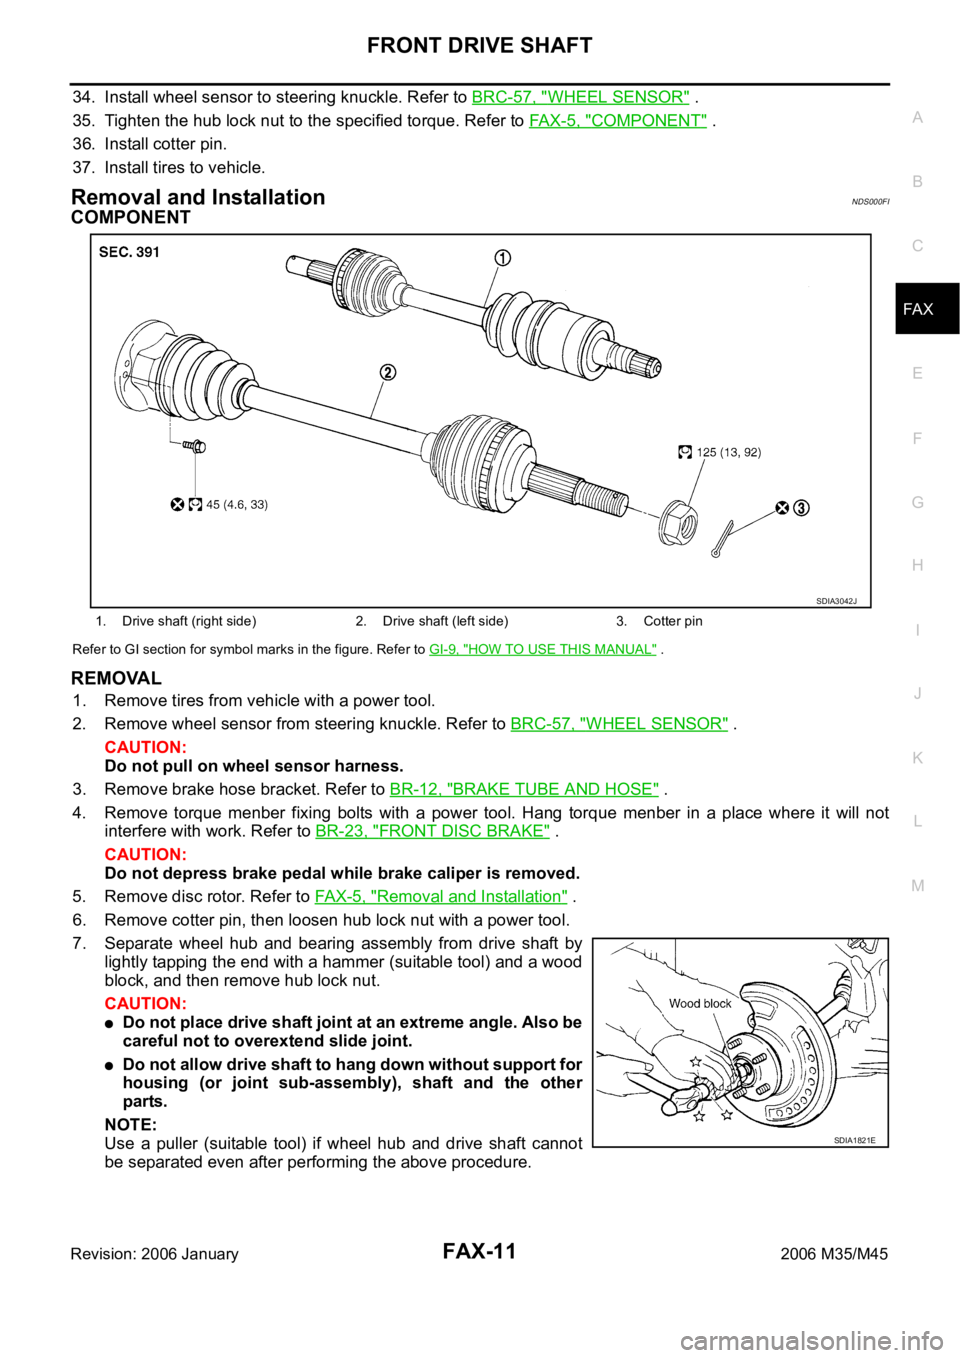
COMPONENT
Refer to GI section for symbol marks in the figure. Refer to GI-9, "HOW TO USE THIS MANUAL" .
REMOVAL
1. Remove tires from vehicle with a power tool.
2. Remove wheel sensor from steering knuckle. Refer to BRC-57, "
WHEEL SENSOR" .
CAUTION:
Do not pull on wheel sensor harness.
3. Remove brake hose bracket. Refer to BR-12, "
BRAKE TUBE AND HOSE" .
4. Remove torque menber fixing bolts with a power tool. Hang torque menber in a place where it will not
interfere with work. Refer to BR-23, "
FRONT DISC BRAKE" .
CAUTION:
Do not depress brake pedal while brake caliper is removed.
5. Remove disc rotor. Refer to FAX-5, "
Removal and Installation" .
6. Remove cotter pin, then loosen hub lock nut with a power tool.
7. Separate wheel hub and bearing assembly from drive shaft by
lightly tapping the end with a hammer (suitable tool) and a wood
block, and then remove hub lock nut.
CAUTION:
Do not place drive shaft joint at an extreme angle. Also be
careful not to overextend slide joint.
Do not allow drive shaft to hang down without support for
housing (or joint sub-assembly), shaft and the other
parts.
NOTE:
Use a puller (suitable tool) if wheel hub and drive shaft cannot
be separated even after performing the above procedure.
1. Drive shaft (right side) 2. Drive shaft (left side) 3. Cotter pin
SDIA3042J
SDIA1821E
Page 3703 of 5621
![INFINITI M35 2006 Factory Service Manual LAN-34
[CAN]
CAN COMMUNICATION
Revision: 2006 January2006 M35/M45
CAN COMMUNICATIONPFP:23710
System DescriptionNKS003XV
CAN (Controller Area Network) is a serial communication line for real time appli INFINITI M35 2006 Factory Service Manual LAN-34
[CAN]
CAN COMMUNICATION
Revision: 2006 January2006 M35/M45
CAN COMMUNICATIONPFP:23710
System DescriptionNKS003XV
CAN (Controller Area Network) is a serial communication line for real time appli](/manual-img/42/57023/w960_57023-3702.png)
LAN-34
[CAN]
CAN COMMUNICATION
Revision: 2006 January2006 M35/M45
CAN COMMUNICATIONPFP:23710
System DescriptionNKS003XV
CAN (Controller Area Network) is a serial communication line for real time application. It is an on-vehicle mul-
tiplex communication line with high data communication speed and excellent error detection ability. Many elec-
tronic control units are equipped onto a vehicle, and each control unit shares information and links with other
control units during operation (not independent). In CAN communication, control units are connected with 2
communication lines (CAN H line, CAN L line) allowing a high rate of information transmission with less wiring.
Each control unit transmits/receives data but selectively reads required data only.
CAN Communication UnitNKS003XW
Go to CAN system, when selecting your CAN system type from the following table.
: Applicable
SYSTEM DIAGRAM
Ty pe 1
Body typeSedan
Axle 2WD AWD
Engine VQ35DE/VK45DE VQ35DE
TransmissionA/T
Brake controlVDC
Navigation system
Pre-crash seat belt
Adaptive front-lighting system
ICC system
Lane departure warning
Rear active steer
CAN system type 12 3456789101112131415
CAN system trouble diagnosisLA
N-
48
LA
N-
89
LA
N-
130
LA
N-
177
LA
N-
224
LA
N-
275
LA
N-
321
LA
N-
367
LA
N-
417
LA
N-
467
LA
N-
521
LA
N-
564
LA
N-
607
LA
N-
656
LA
N-
705
PKIB8588E
Page 4429 of 5621

LT-2Revision: 2006 January2006 M35/M45 ACTIVE TEST ..................................................... 59
CONSULT-II Functions (IPDM E/R) ........................ 60
CONSULT-II BASIC OPERATION ....................... 60
DATA MONITOR .................................................. 61
ACTIVE TEST ..................................................... 61
Headlamp High Beam Does Not Illuminate (Both
Sides) ..................................................................... 62
Headlamp High Beam Does Not Illuminate (One
Side) ....................................................................... 65
High Beam Indicator Lamp Does Not Illuminate ..... 66
Headlamp Low Beam Does Not Illuminate (Both
Sides) ..................................................................... 67
Headlamp Low Beam Does Not Illuminate (One
Side) ....................................................................... 70
Headlamps Do Not Turn OFF ................................. 72
General Information for Xenon Headlamp Trouble
Diagnosis ................................................................ 73
Caution: .................................................................. 73
Xenon Headlamp Trouble Diagnosis ...................... 73
Aiming Adjustment .................................................. 74
PREPARATION BEFORE ADJUSTING .............. 74
LOW BEAM AND HIGH BEAM ........................... 74
ADJUSTMENT USING AN ADJUSTMENT
SCREEN (LIGHT/DARK BORDERLINE) ............ 75
Bulb Replacement ...............................................
... 75
HEADLAMP (INNER) HIGH BEAM ..................... 75
HEADLAMP (OUTER) LOW BEAM .................... 76
PARKING LAMP (CLEARANCE LAMP) .............. 76
FRONT TURN SIGNAL LAMP ............................ 76
FRONT SIDE MARKER LAMP ............................ 76
Removal and Installation ........................................ 76
Disassembly and Assembly .................................... 77
DISASSEMBLY ................................................... 77
ASSEMBLY ......................................................... 78
HEADLAMP (FOR CANADA) - DAYTIME LIGHT
SYSTEM - .................................................................. 79
Component Parts and Harness Connector Location ... 79
System Description ................................................. 79
OUTLINE ............................................................. 80
HEADLAMP OPERATION ................................... 81
DAYTIME LIGHT OPERATION ........................... 82
COMBINATION SWITCH READING FUNCTION ... 82
AUTO LIGHT OPERATION ................................. 82
CAN Communication System Description .............. 82
Schematic ............................................................... 83
Wiring Diagram — DTRL — ................................... 84
Terminals and Reference Values for BCM .............. 89
Terminals and Reference Values for IPDM E/R ...... 91
How to Perform Trouble Diagnosis ......................... 91
Preliminary Check .................................................. 92
INSPECTION FOR POWER SUPPLY AND
GROUND CIRCUIT ............................................. 92
INSPECTION FOR PARKING BRAKE SWITCH
CIRCUIT .............................................................. 93
CONSULT-II Functions (BCM) ................................ 94
CONSULT-II BASIC OPERATION ....................... 94
DATA MONITOR .................................................. 95
ACTIVE TEST ..................................................... 96
CONSULT-II Functions (IPDM E/R) ........................ 97CONSULT-II BASIC OPERATION ....................... 97
DATA MONITOR .................................................. 98
ACTIVE TEST ...................................................... 98
Daytime Light Control Does Not Operate Properly
(Normal Headlamps Operate Properly) .................. 99
Headlamp High Beam Does Not Illuminate (Both
Sides) ....................................................................102
RH High Beam Does Not Illuminate But LH High
Beam Illuminates ..................................................105
LH High Beam Does Not Illuminate But RH High
Beam Illuminates ..................................................107
Headlamp Low Beam Does Not Illuminate (Both
Sides) ....................................................................109
Headlamp Low Beam Does Not Illuminate (One
Side) ......................................................................112
Headlamps Do Not Turn OFF ...............................114
General Information for Xenon Headlamp Trouble
Diagnosis ..............................................................115
CAUTION: .............................................................115
Xenon Headlamp Trouble Diagnosis ....................115
Aiming Adjustment ................................................115
Bulb Replacement .................................................115
Removal and Installation .......................................115
Disassembly and Assembly ..................................115
AUTO LIGHT SYSTEM ...........................................116
Component Parts and Harness Connector Location .116
System Description ...............................................116
OUTLINE ...........................................................116
COMBINATION SWITCH READING FUNCTION .117
EXTERIOR LAMP BATTERY SAVER CONTROL .117
DELAY TIMER FUNCTION ................................117
CAN Communication System Description ............117
CAN Communication Unit .....................................117
Major Components and Functions ........................117
Schematic .............................................................118
Wiring Diagram — AUTO/L — ..............................119
Terminals and Reference Values for BCM ............123
Terminals and Reference Values for IPDM E/R ....125
How to Perform Trouble Diagnoses ......................125
Preliminary Check .................................................126
SETTING CHANGE FUNCTIONS .....................126
CHECK POWER SUPPLY AND GROUND CIR-
CUIT ...................................................................126
CONSULT-II Functions (BCM) .............................
.127
CONSULT-II BASIC OPERATION .....................127
WORK SUPPORT .............................................128
DATA MONITOR ................................................129
ACTIVE TEST ....................................................130
Symptom Chart .....................................................130
Lighting Switch Inspection ....................................131
Optical Sensor System Inspection ........................131
Removal and Installation for Optical Sensor .........133
REMOVAL ..........................................................133
INSTALLATION ..................................................133
ACTIVE AFS ............................................................134
Component Parts and Harness Connector Location .134
System Description ...............................................135
AFS (ADAPTIVE FRONT-LIGHTING SYSTEM) .135
HEADLAMP AUTO AIMING ..............................136
Page 4506 of 5621
HEADLAMP (FOR CANADA) - DAYTIME LIGHT SYSTEM -
LT-79
C
D
E
F
G
H
I
J
L
MA
B
LT
Revision: 2006 January2006 M35/M45
HEADLAMP (FOR CANADA) - DAYTIME LIGHT SYSTEM -PFP:26010
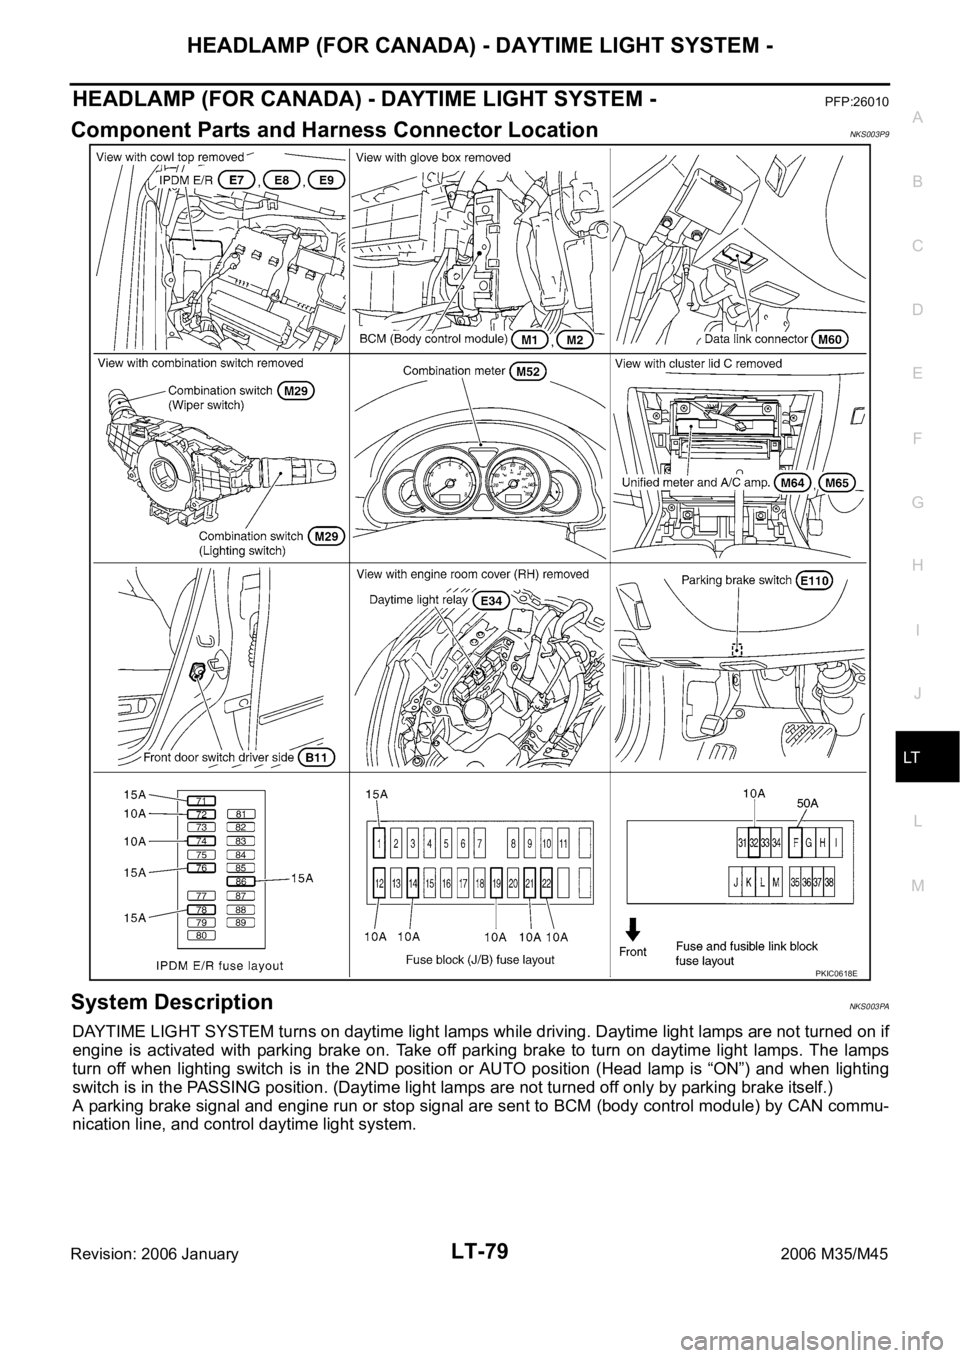
Component Parts and Harness Connector LocationNKS003P9
System DescriptionNKS003PA
DAYTIME LIGHT SYSTEM turns on daytime light lamps while driving. Daytime light lamps are not turned on if
engine is activated with parking brake on. Take off parking brake to turn on daytime light lamps. The lamps
turn off when lighting switch is in the 2ND position or AUTO position (Head lamp is “ON”) and when lighting
switch is in the PASSING position. (Daytime light lamps are not turned off only by parking brake itself.)
A parking brake signal and engine run or stop signal are sent to BCM (body control module) by CAN commu-
nication line, and control daytime light system.
PKIC0618E
Page 4509 of 5621
LT-82
HEADLAMP (FOR CANADA) - DAYTIME LIGHT SYSTEM -
Revision: 2006 January2006 M35/M45
DAYTIME LIGHT OPERATION
With the engine running, the lighting switch in the OFF or AUTO position (headlamp is not illuminate) and
parking brake released, the IPDM E/R receives input request signal from BCM to turn on daytime light. This
input is communicated across the CAN communication lines. The CPU of the IPDM E/R controls the daytime
light relay coil. When energized, this relay directs power
through daytime light relay terminals 5 and 3
through front combination lamp RH terminal 2
through front combination lamp RH terminal 6
through IPDM E/R terminal 27
through 10A fuse (No. 72, located in IPDM E/R)
through 10A fuse (No. 74, located in IPDM E/R)
through IPDM E/R terminal 28
to front combination lamp LH terminal 6.
Ground is supplied
to combination lamp LH terminal 2
through grounds E22 and E43.
With power and grounds supplied, the daytime lights illuminate. The high beam headlamps are now wired in
series and illuminate at a reduced intensity.
COMBINATION SWITCH READING FUNCTION
Refer to BCS-3, "COMBINATION SWITCH READING FUNCTION" .
AUTO LIGHT OPERATION
For auto light operation, refer to LT- 11 6 , "System Description" .
CAN Communication System DescriptionNKS003PB
Refer to LAN-34, "CAN COMMUNICATION" .
Page 4518 of 5621
HEADLAMP (FOR CANADA) - DAYTIME LIGHT SYSTEM -
LT-91
C
D
E
F
G
H
I
J
L
MA
B
LT
Revision: 2006 January2006 M35/M45
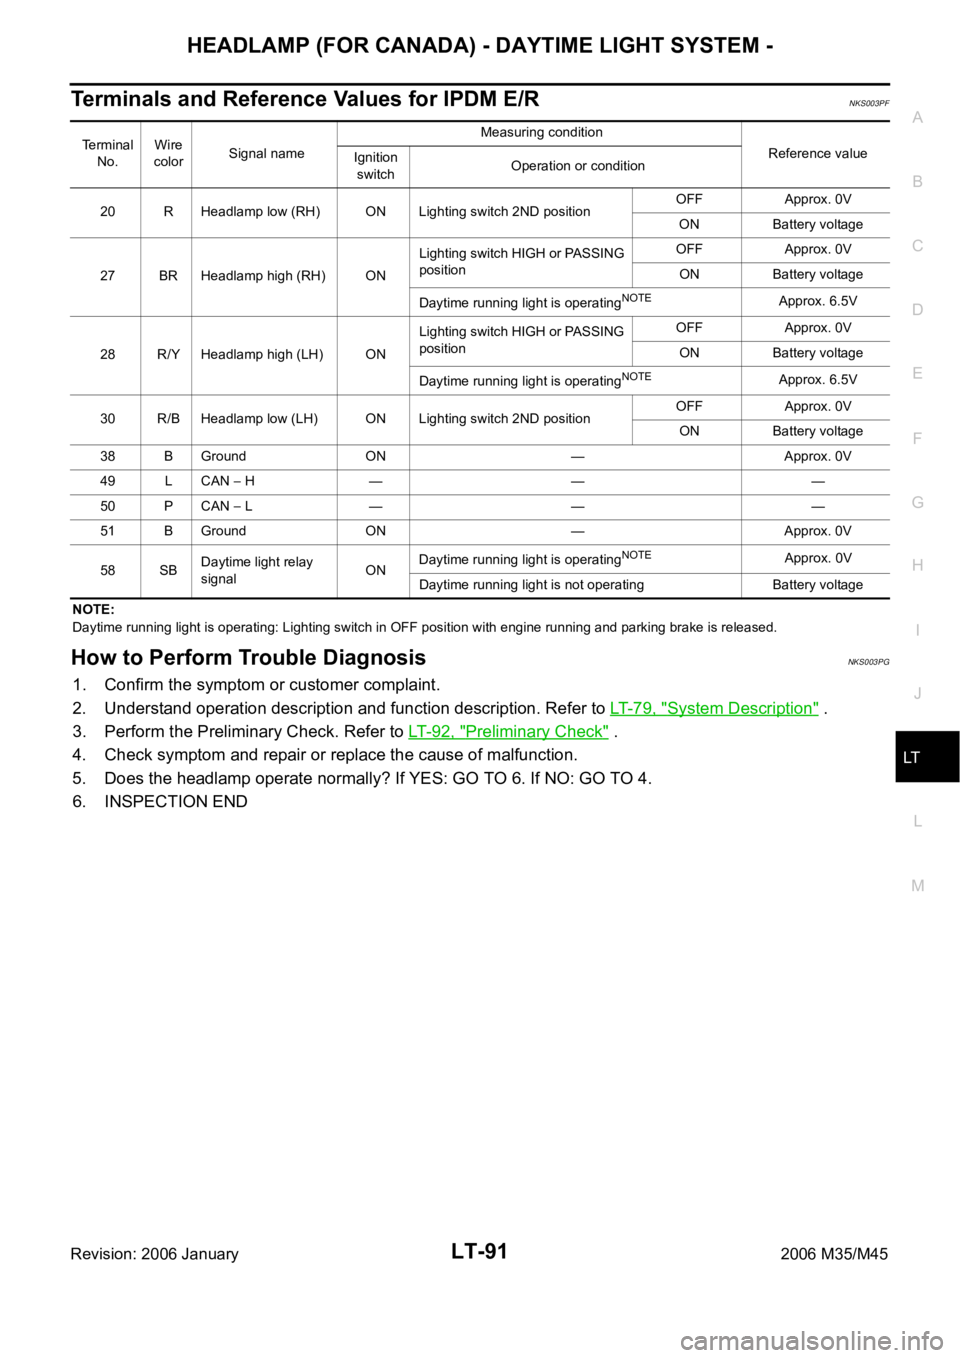
Terminals and Reference Values for IPDM E/RNKS003PF
NOTE:
Daytime running light is operating: Lighting switch in OFF position with engine running and parking brake is released.
How to Perform Trouble DiagnosisNKS003PG
1. Confirm the symptom or customer complaint.
2. Understand operation description and function description. Refer to LT- 7 9 , "
System Description" .
3. Perform the Preliminary Check. Refer to LT-92, "
Preliminary Check" .
4. Check symptom and repair or replace the cause of malfunction.
5. Does the headlamp operate normally? If YES: GO TO 6. If NO: GO TO 4.
6. INSPECTION END
Terminal
No.Wire
colorSignal nameMeasuring condition
Reference value
Ignition
switchOperation or condition
20 R Headlamp low (RH) ON Lighting switch 2ND positionOFF Approx. 0V
ON Battery voltage
27 BR Headlamp high (RH) ONLighting switch HIGH or PASSING
positionOFF Approx. 0V
ON Battery voltage
Daytime running light is operating
NOTEApprox. 6.5V
28 R/Y Headlamp high (LH) ONLighting switch HIGH or PASSING
positionOFF Approx. 0V
ON Battery voltage
Daytime running light is operating
NOTEApprox. 6.5V
30 R/B Headlamp low (LH) ON Lighting switch 2ND positionOFF Approx. 0V
ON Battery voltage
38 B Ground ON — Approx. 0V
49 L CAN
H — — —
50 P CAN
L — — —
51 B Ground ON — Approx. 0V
58 SBDaytime light relay
signalONDaytime running light is operating
NOTEApprox. 0V
Daytime running light is not operating Battery voltage
Page 4520 of 5621
HEADLAMP (FOR CANADA) - DAYTIME LIGHT SYSTEM -
LT-93
C
D
E
F
G
H
I
J
L
MA
B
LT
Revision: 2006 January2006 M35/M45
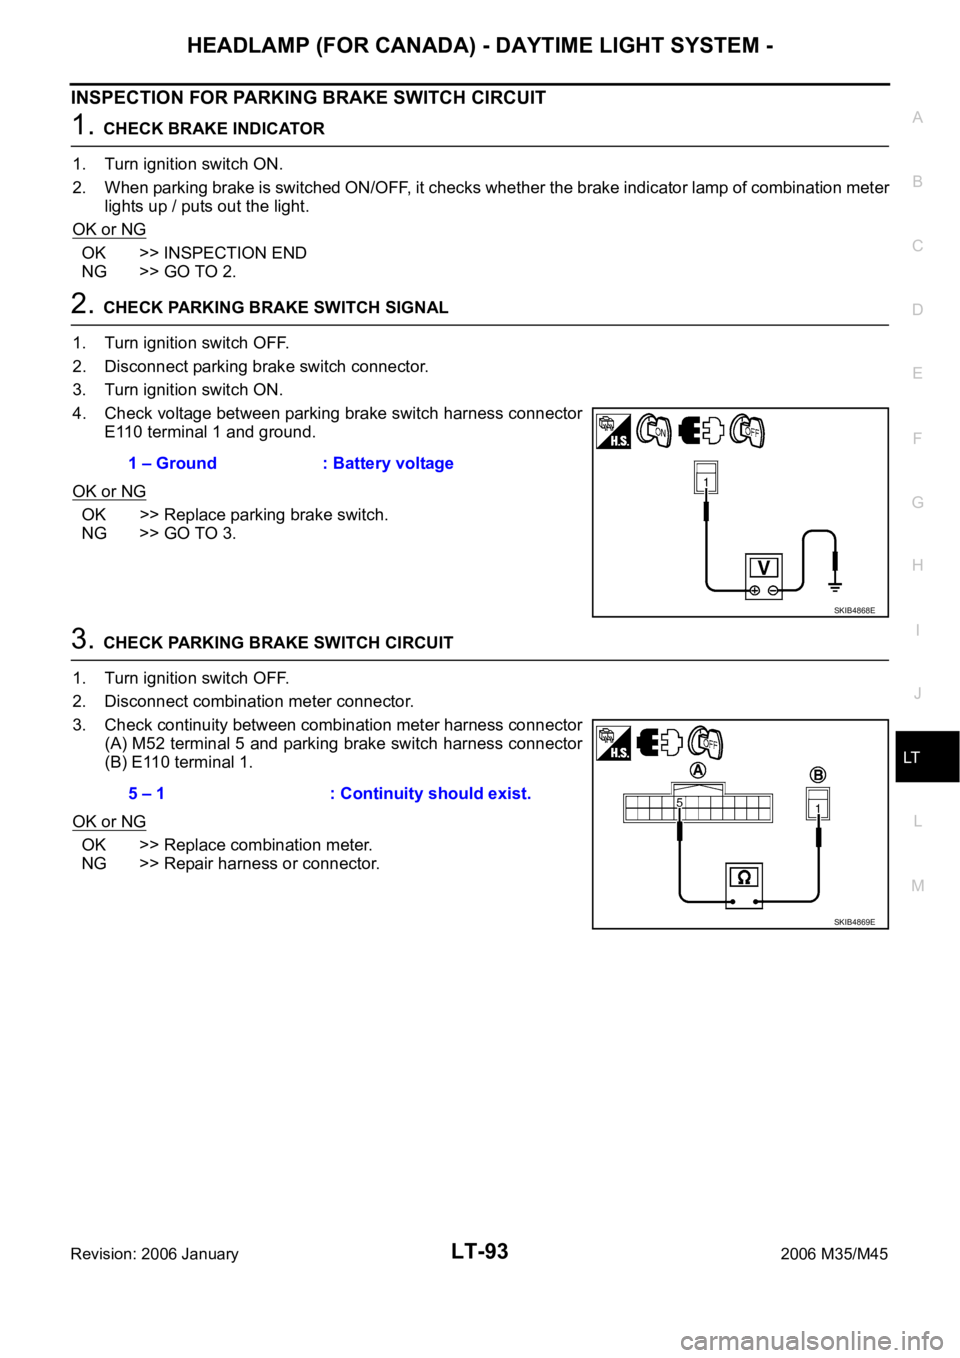
INSPECTION FOR PARKING BRAKE SWITCH CIRCUIT
1. CHECK BRAKE INDICATOR
1. Turn ignition switch ON.
2. When parking brake is switched ON/OFF, it checks whether the brake indicator lamp of combination meter
lights up / puts out the light.
OK or NG
OK >> INSPECTION END
NG >> GO TO 2.
2. CHECK PARKING BRAKE SWITCH SIGNAL
1. Turn ignition switch OFF.
2. Disconnect parking brake switch connector.
3. Turn ignition switch ON.
4. Check voltage between parking brake switch harness connector
E110 terminal 1 and ground.
OK or NG
OK >> Replace parking brake switch.
NG >> GO TO 3.
3. CHECK PARKING BRAKE SWITCH CIRCUIT
1. Turn ignition switch OFF.
2. Disconnect combination meter connector.
3. Check continuity between combination meter harness connector
(A) M52 terminal 5 and parking brake switch harness connector
(B) E110 terminal 1.
OK or NG
OK >> Replace combination meter.
NG >> Repair harness or connector.1 – Ground : Battery voltage
SKIB4868E
5 – 1 : Continuity should exist.
SKIB4869E