Page 954 of 4462
BL-140
INTELLIGENT KEY SYSTEM
Revision: 2006 December 2006 FX35/FX45
2. CHECK STEERING LOCK UNIT GROUND CIRCUIT
Check continuity between steering lock unit connector M26 terminal 4 (Y/B) and ground.
OK or NG
OK >> GO TO 3.
NG >> GO TO 4.
3. CHECK STEERING LOCK COMMUNICATION CIRCUIT
1. Connect steering lock unit connector.
2. Check voltage between Intelligent Key unit connector M34 terminal 1 (R/W) and ground.
3. Immediately after pushing ignition knob, use an oscilloscope to check voltage waveform between Intelli- gent Key unit connector M34 terminal 32 (R/B) and ground.
OK or NG
OK >> GO TO 4.
NG >> Replace Intelligent Key unit. 4 (Y/B) - Ground : Continuity should exist.
PIIA6798E
1 (R/W) - Ground : Approx. 5V
MIIB0385E
Terminal
(Wire color) Condition Signal
(Reference value)
(+) (-)
32
(R/B) Ground Immediately after
ignition knob push-
ing.
MIIB0386ESIIA1911J
Page 955 of 4462
INTELLIGENT KEY SYSTEM BL-141
C
D E
F
G H
J
K L
M A
B
BL
Revision: 2006 December 2006 FX35/FX45
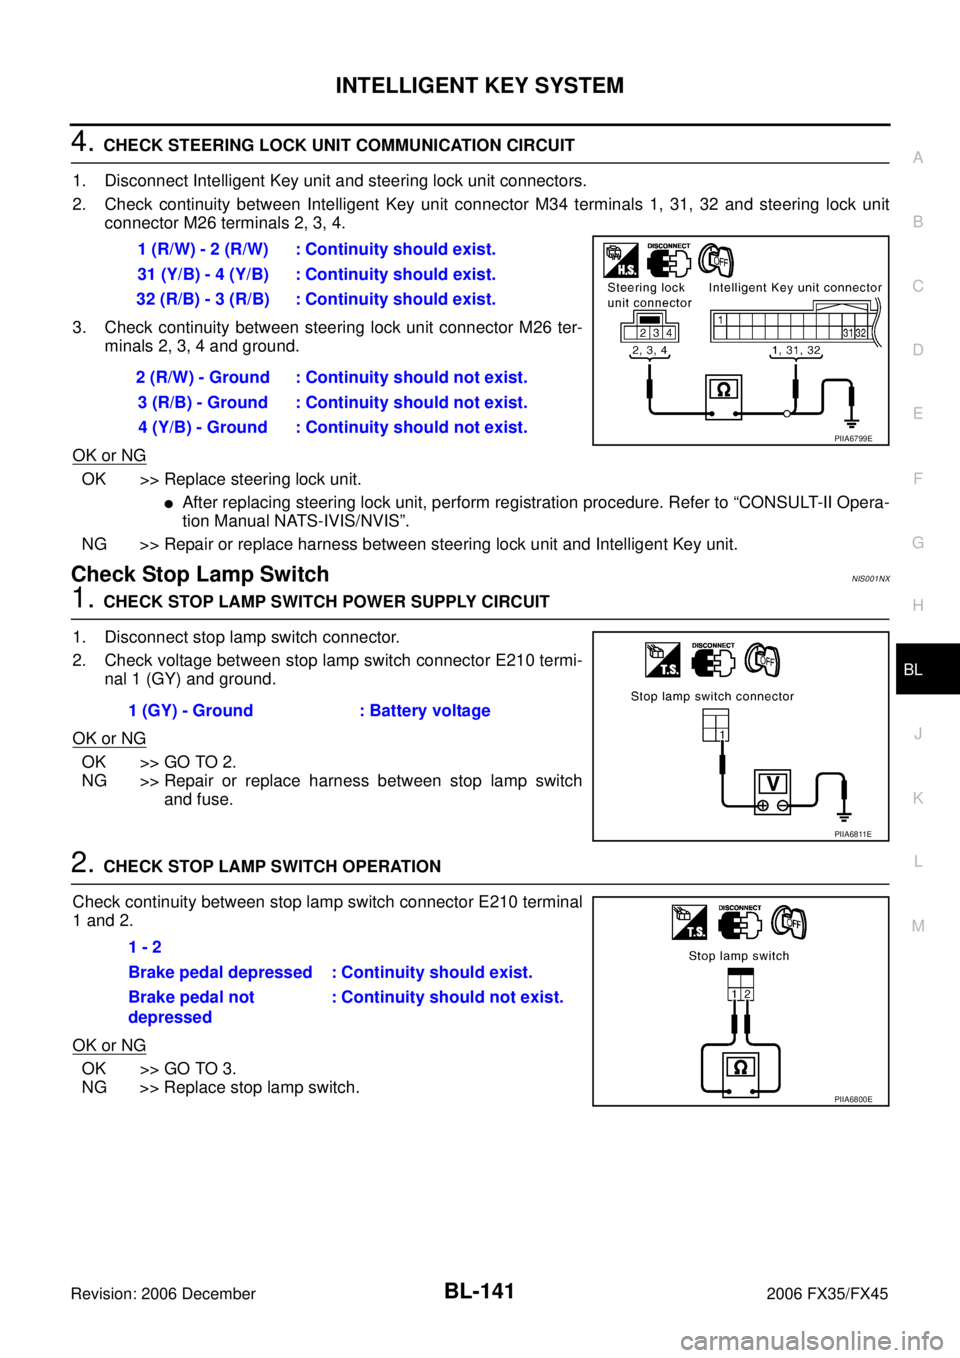
4. CHECK STEERING LOCK UNIT COMMUNICATION CIRCUIT
1. Disconnect Intelligent Key unit and steering lock unit connectors.
2. Check continuity between Intelligent Key unit connector M34 terminals 1, 31, 32 and steering lock unit connector M26 terminals 2, 3, 4.
3. Check continuity between steering lock unit connector M26 ter- minals 2, 3, 4 and ground.
OK or NG
OK >> Replace steering lock unit.
�After replacing steering lock unit, perform registration procedure. Refer to “CONSULT-II Opera-
tion Manual NATS-IVIS/NVIS”.
NG >> Repair or replace harness between steering lock unit and Intelligent Key unit.
Check Stop Lamp SwitchNIS001NX
1. CHECK STOP LAMP SWITCH POWER SUPPLY CIRCUIT
1. Disconnect stop lamp switch connector.
2. Check voltage between stop lamp switch connector E210 termi- nal 1 (GY) and ground.
OK or NG
OK >> GO TO 2.
NG >> Repair or replace harness between stop lamp switch and fuse.
2. CHECK STOP LAMP SWITCH OPERATION
Check continuity between stop lamp switch connector E210 terminal
1 and 2.
OK or NG
OK >> GO TO 3.
NG >> Replace stop lamp switch. 1 (R/W) - 2 (R/W) : Continuity should exist.
31 (Y/B) - 4 (Y/B) : Continuity should exist.
32 (R/B) - 3 (R/B) : Continuity should exist.
2 (R/W) - Ground : Continuity should not exist. 3 (R/B) - Ground : Continuity should not exist.4 (Y/B) - Ground : Continuity should not exist.
PIIA6799E
1 (GY) - Ground : Battery voltage
PIIA6811E
1 - 2
Brake pedal depressed : Continuity should exist.
Brake pedal not
depressed : Continuity should not exist.
PIIA6800E
Page 1021 of 4462
IVIS (INFINITI VEHICLE IMMOBILIZER SYSTEM-NATS) BL-207
C
D E
F
G H
J
K L
M A
B
BL
Revision: 2006 December 2006 FX35/FX45
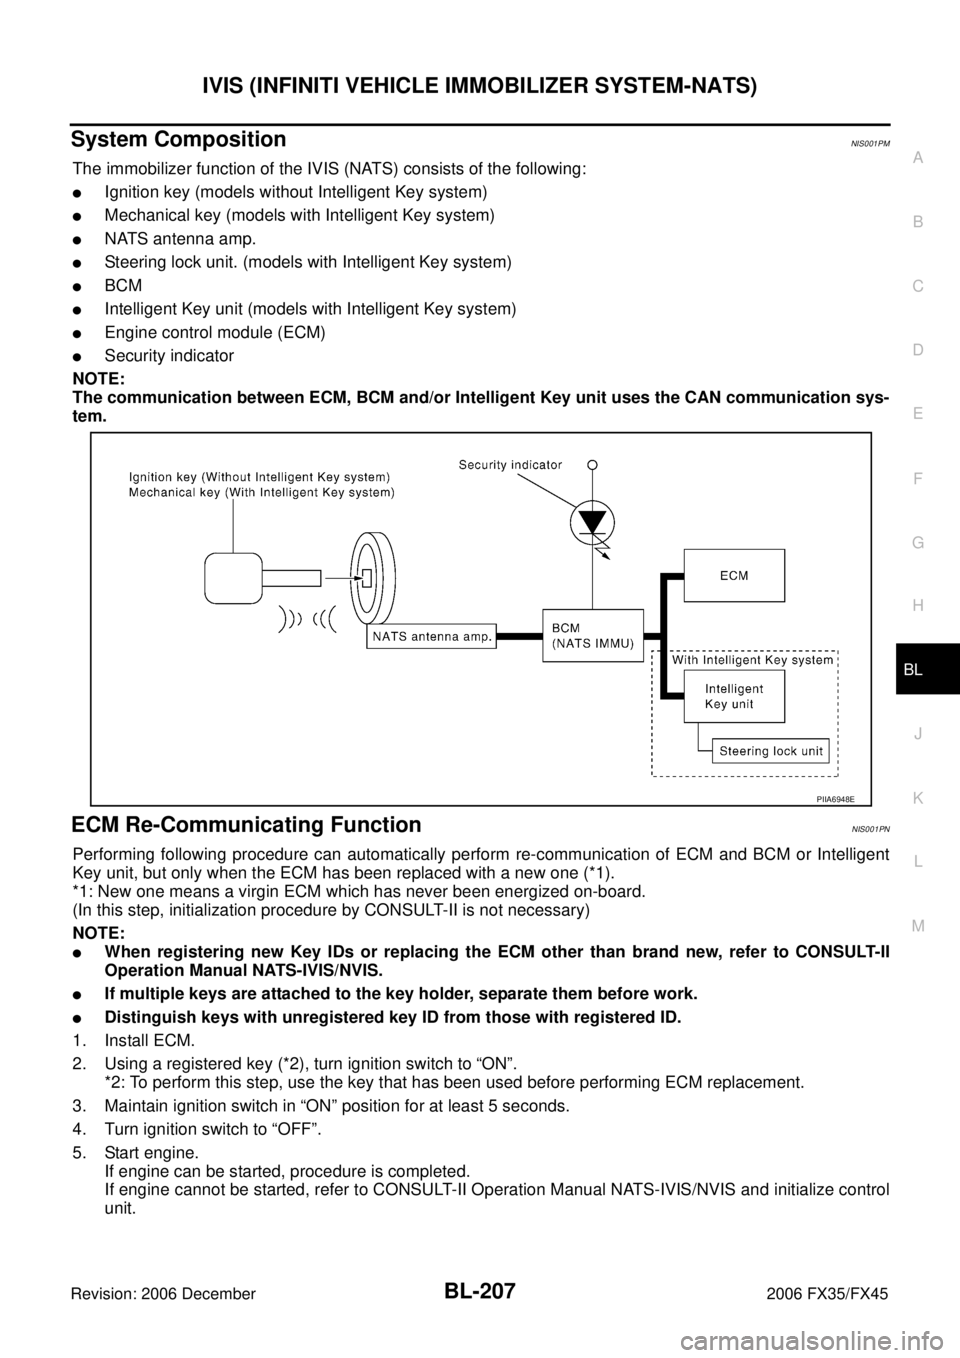
System CompositionNIS001PM
The immobilizer function of the IVIS (NATS) consists of the following:
�Ignition key (models without Intelligent Key system)
�Mechanical key (models with Intelligent Key system)
�NATS antenna amp.
�Steering lock unit. (models with Intelligent Key system)
�BCM
�Intelligent Key unit (models with Intelligent Key system)
�Engine control module (ECM)
�Security indicator
NOTE:
The communication between ECM, BCM and/or Intelligent Key unit uses the CAN communication sys-
tem.
ECM Re-Communicating FunctionNIS001PN
Performing following procedure can automatically perform re-communication of ECM and BCM or Intelligent
Key unit, but only when the ECM has been replaced with a new one (*1).
*1: New one means a virgin ECM which has never been energized on-board.
(In this step, initialization procedure by CONSULT-II is not necessary)
NOTE:
�When registering new Key IDs or replacing the ECM other than brand new, refer to CONSULT-II
Operation Manual NATS-IVIS/NVIS.
�If multiple keys are attached to the key holder, separate them before work.
�Distinguish keys with unregistered key ID from those with registered ID.
1. Install ECM.
2. Using a registered key (*2), turn ignition switch to “ON”. *2: To perform this step, use the key that has been used before performing ECM replacement.
3. Maintain ignition switch in “ON” position for at least 5 seconds.
4. Turn ignition switch to “OFF”.
5. Start engine. If engine can be started, procedure is completed.
If engine cannot be started, refer to CONSULT-II Operation Manual NATS-IVIS/NVIS and initialize control
unit.
PIIA6948E
Page 1025 of 4462
IVIS (INFINITI VEHICLE IMMOBILIZER SYSTEM-NATS) BL-211
C
D E
F
G H
J
K L
M A
B
BL
Revision: 2006 December 2006 FX35/FX45
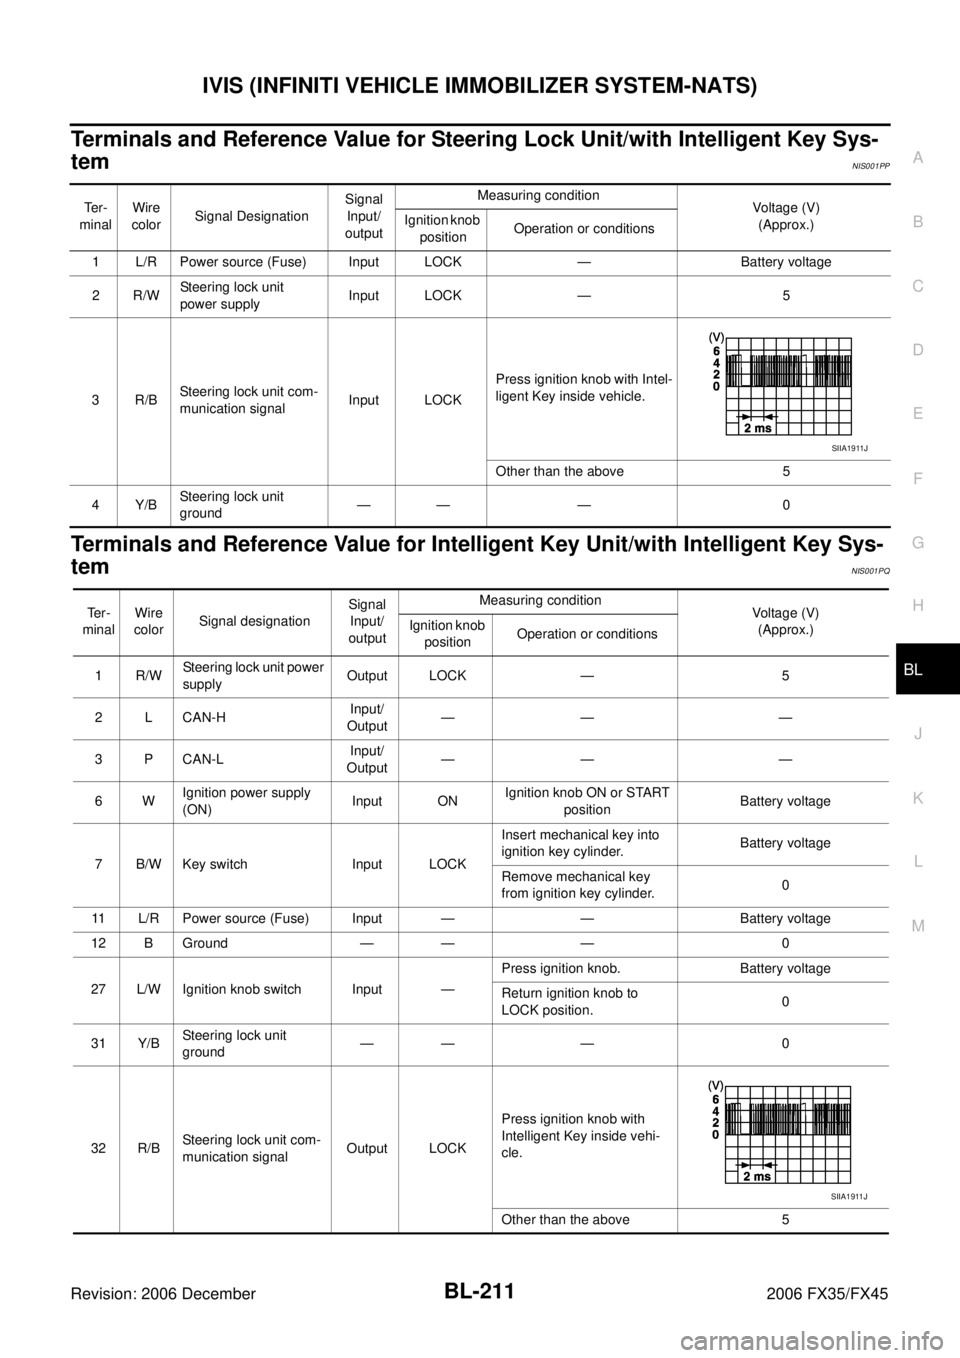
Terminals and Reference Value for Steering Lock Unit/with Intelligent Key Sys-
tem
NIS001PP
Terminals and Reference Value for Intelligent Key Unit/with Intelligent Key Sys-
tem
NIS001PQ
Te r -
minal Wire
color Signal Designation Signal
Input/
output Measuring condition
Voltage (V)
(Approx.)
Ignition knob
position Operation or conditions
1 L/R Power source (Fuse) Input LOCK — Battery voltage
2R/W Steering lock unit
power supply Input LOCK — 5
3R/B Steering lock unit com-
munication signal Input LOCK Press ignition knob with Intel-
ligent Key inside vehicle.
Other than the above 5
4Y/B Steering lock unit
ground —— — 0
SIIA1911J
Te r -
minal Wire
color Signal designation Signal
Input/
output Measuring condition
Voltage (V)
(Approx.)
Ignition knob
position Operation or conditions
1R/W Steering lock unit power
supply Output LOCK — 5
2 L CAN-H Input/
Output —— —
3 P CAN-L Input/
Output —— —
6W Ignition power supply
(ON) Input ONIgnition knob ON or START
position Battery voltage
7 B/W Key switch Input LOCK Insert mechanical key into
ignition key cylinder. Battery voltage
Remove mechanical key
from ignition key cylinder. 0
11 L/R Power source (Fuse) Input — — Battery voltage
12 B Ground — — — 0
27 L/W Ignition knob switch Input — Press ignition knob. Battery voltage
Return ignition knob to
LOCK position. 0
31 Y/B Steering lock unit
ground —— — 0
32 R/B Steering lock unit com-
munication signal Output LOCK Press ignition knob with
Intelligent Key inside vehi-
cle.
Other than the above 5
SIIA1911J
Page 1040 of 4462
BL-226
IVIS (INFINITI VEHICLE IMMOBILIZER SYSTEM-NATS)
Revision: 2006 December 2006 FX35/FX45
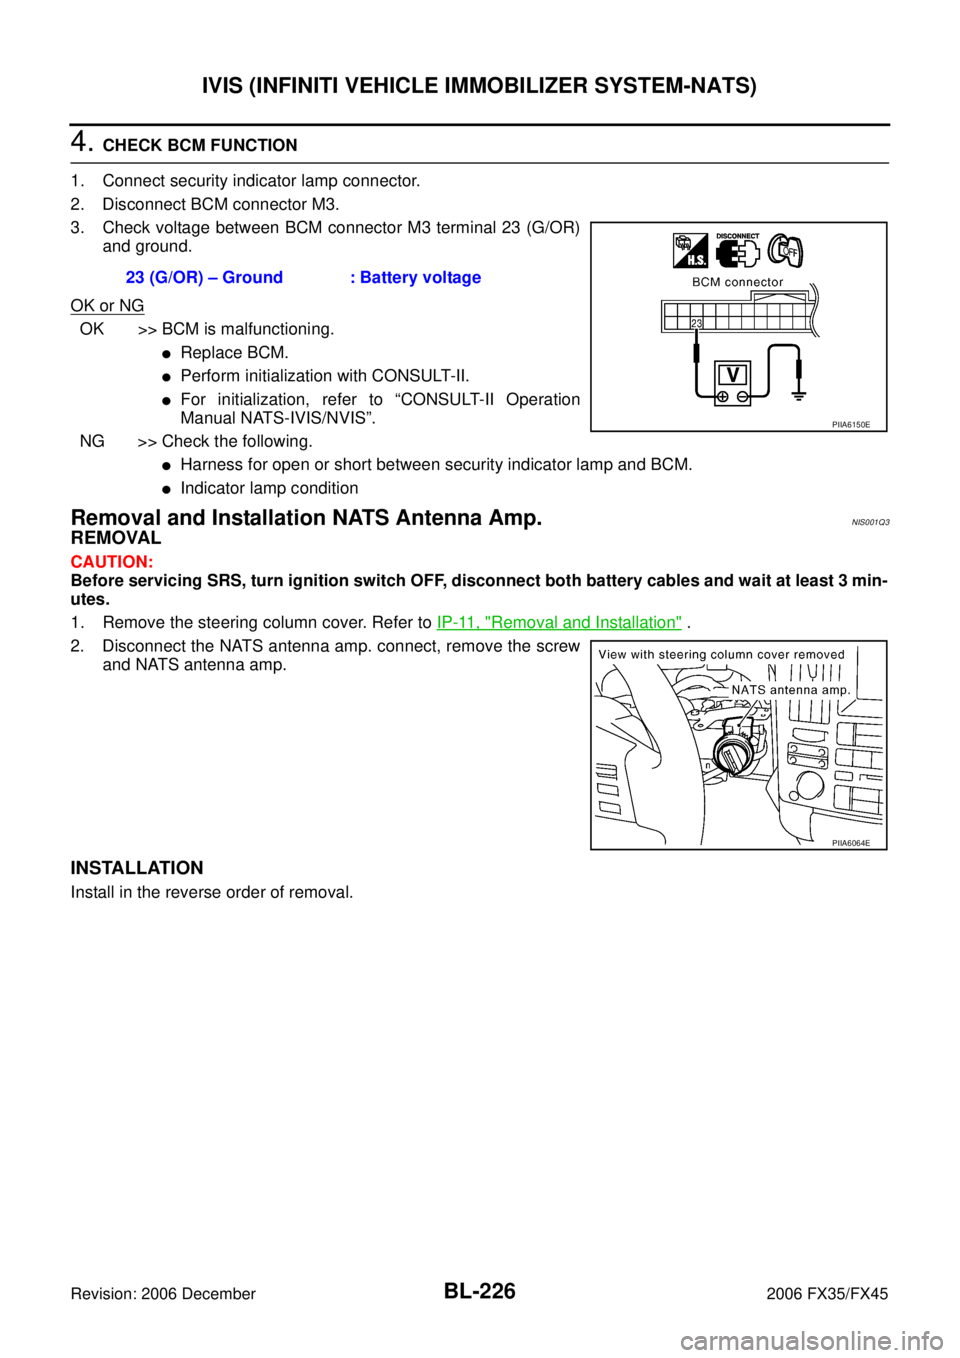
4. CHECK BCM FUNCTION
1. Connect security indicator lamp connector.
2. Disconnect BCM connector M3.
3. Check voltage between BCM connector M3 terminal 23 (G/OR) and ground.
OK or NG
OK >> BCM is malfunctioning.
�Replace BCM.
�Perform initialization with CONSULT-II.
�For initialization, refer to “CONSULT-II Operation
Manual NATS-IVIS/NVIS”.
NG >> Check the following.
�Harness for open or short between security indicator lamp and BCM.
�Indicator lamp condition
Removal and Installation NATS Antenna Amp.NIS001Q3
REMOVAL
CAUTION:
Before servicing SRS, turn ignition switch OFF, disconnect both battery cables and wait at least 3 min-
utes.
1. Remove the steering column cover. Refer to IP-11, "
Removal and Installation" .
2. Disconnect the NATS antenna amp. connect, remove the screw and NATS antenna amp.
INSTALLATION
Install in the reverse order of removal. 23 (G/OR) – Ground : Battery voltage
PIIA6150E
PIIA6064E
Page 1105 of 4462
NOISE, VIBRATION AND HARSHNESS (NVH) TROUBLESHOOTING BR-5
C
D E
G H
I
J
K L
M A
B
BR
Revision: 2006 December 2006 FX35/FX45
NOISE, VIBRATION AND HARSHNESS (NVH) TROUBLESHOOTINGPFP:00003
NVH Troubleshooting ChartNFS000LR
Use the chart below to help you find the cause of the symptom. If necessary, repair or replace these parts.
× : Applicable
Reference page
BR-19
,
BR-25
BR-19
, BR-25
BR-19
, BR-25—
—
BR-24, BR-31—
—
—
BR-24, BR-31—
NVH in PR section
NVH in FFD and RFD section
NVH in FAX, RAX and FSU, RSU section
NVH in WT section
NVH in WT section
NVH in FAX and RAX section
NVH in PS section
Possible cause and
SUSPECTED PARTS
Pads - damaged
Pads - uneven wear
Shims damaged
Rotor imbalance
Rotor damage
Rotor runout
Rotor deformation
Rotor deflection
Rotor rust
Rotor thickness variation
Drum out of round
PROPELLER SHAFT
DIFFERENTIAL
AXLE AND SUSPENSION
TIRES
ROAD WHEEL
DRIVE SHAFT
STEERING
Symptom BRAKE Noise
××× ×× ×××
××
Shake ×××××
××
Shimmy, Judder ××××××× ××× ×
Page 1107 of 4462
BRAKE PEDAL BR-7
C
D E
G H
I
J
K L
M A
B
BR
Revision: 2006 December 2006 FX35/FX45
ComponentsNFS000OA
Removal and InstallationNFS000LT
REMOVAL
1. Remove front kicking plate (driver side). Refer to EI-39, "KICKING PLATE" .
2. Remove dash side finisher (driver side). Refer to EI-38, "
DASH SIDE FINISHER" .
3. Remove instrument lower panel (driver side). Refer to IP-13, "
(K) Instrument Driver Lower Panel" .
4. Remove steering column assembly. Refer to PS-12, "
Removal and Installation" .
5. Remove stop lamp switch and ASCD cancel switch (or brake switch) from pedal assembly.
6. Remove snap pin and clevis pin from brake booster clevis.
7. Remove mounting nuts and bolt from bracket, and remove brake pedal assembly from vehicle.
1. Clevis pin 2. Snap pin 3. Brake pedal assembly
4. Stopper rubber 5. Pedal pad 6. ASCD cancel switch (Models with ASCD)
Brake switch (Models with ICC)
7. Stop lamp switch 8. Clip
SFIA1940E
SFIA0159E
Page 1111 of 4462
BRAKE TUBE AND HOSE BR-11
C
D E
G H
I
J
K L
M A
B
BR
Revision: 2006 December 2006 FX35/FX45
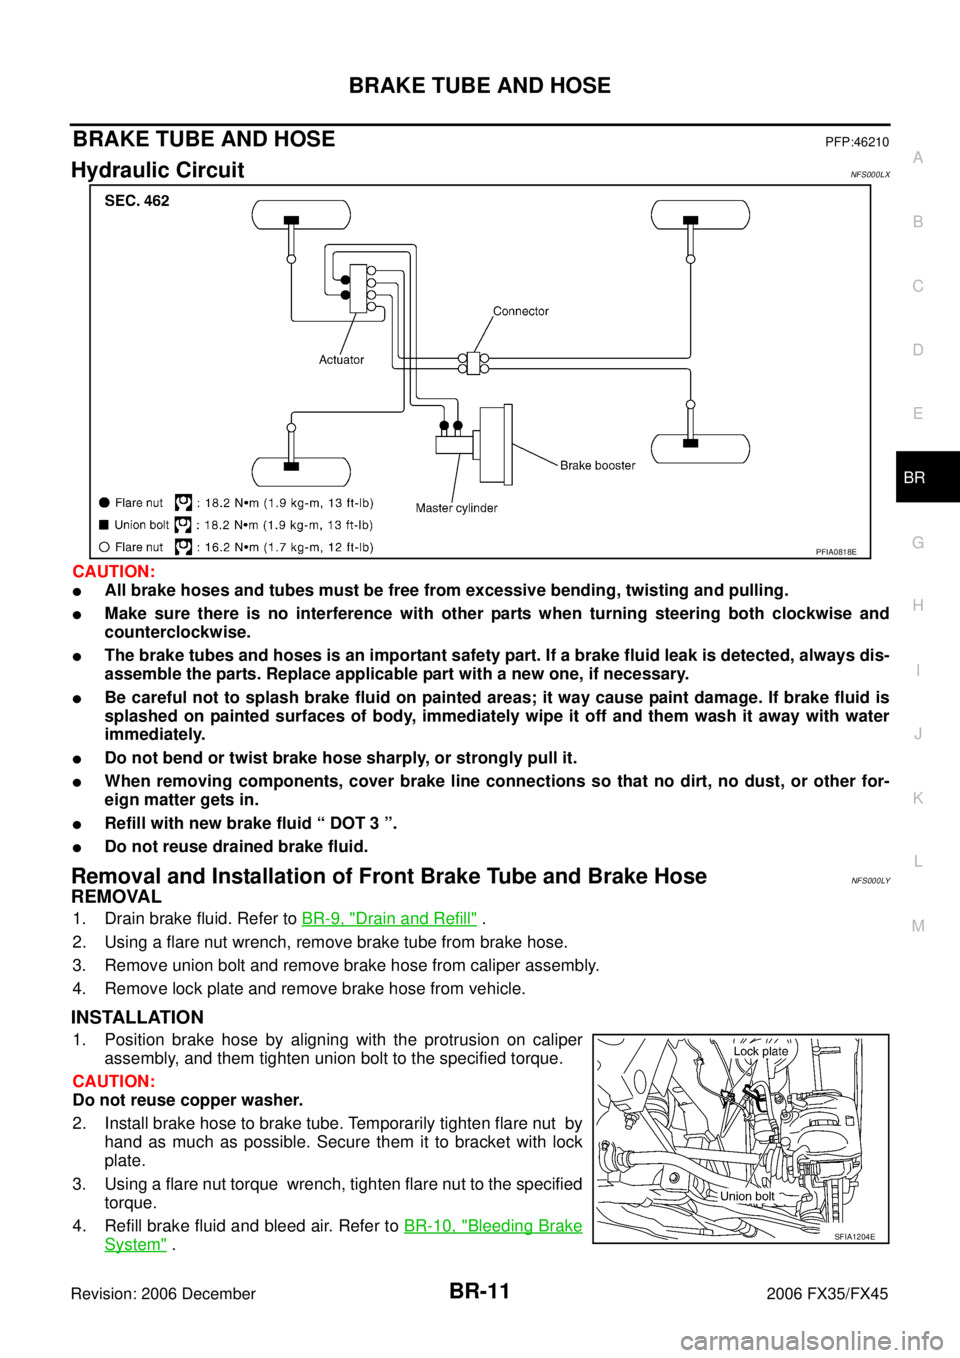
BRAKE TUBE AND HOSEPFP:46210
Hydraulic CircuitNFS000LX
CAUTION:
�All brake hoses and tubes must be free from excessive bending, twisting and pulling.
�Make sure there is no interference with other parts when turning steering both clockwise and
counterclockwise.
�The brake tubes and hoses is an important safety part. If a brake fluid leak is detected, always dis-
assemble the parts. Replace applicable part with a new one, if necessary.
�Be careful not to splash brake fluid on painted areas; it way cause paint damage. If brake fluid is
splashed on painted surfaces of body, immediately wipe it off and them wash it away with water
immediately.
�Do not bend or twist brake hose sharply, or strongly pull it.
�When removing components, cover brake line connections so that no dirt, no dust, or other for-
eign matter gets in.
�Refill with new brake fluid “ DOT 3 ”.
�Do not reuse drained brake fluid.
Removal and Installation of Front Brake Tube and Brake Hose NFS000LY
REMOVAL
1. Drain brake fluid. Refer to BR-9, "Drain and Refill" .
2. Using a flare nut wrench, remove brake tube from brake hose.
3. Remove union bolt and remove brake hose from caliper assembly.
4. Remove lock plate and remove brake hose from vehicle.
INSTALLATION
1. Position brake hose by aligning with the protrusion on caliper assembly, and them tighten union bolt to the specified torque.
CAUTION:
Do not reuse copper washer.
2. Install brake hose to brake tube. Temporarily tighten flare nut by hand as much as possible. Secure them it to bracket with lock
plate.
3. Using a flare nut torque wrench, tighten flare nut to the specified torque.
4. Refill brake fluid and bleed air. Refer to BR-10, "
Bleeding Brake
System" .
PFIA0818E
SFIA1204E