Page 3751 of 4462

ILLUMINATION LT-189
C
D E
F
G H
I
J
L
M A
B
LT
Revision: 2006 December 2006 FX35/FX45
ILLUMINATIONPFP:27545
System DescriptionNKS002Z2
Control of illumination lamps operation is dependent upon position of lighting switch (combination switch).
When lighting switch is placed in the 1ST or 2ND position (or if auto light system is activated), BCM (body con-
trol module) receives input signal requesting illumination lamps to illuminate. This input signal is communi-
cated to IPDM E/R (intelligent power distribution module engine room) through the CAN communication lines.
The CPU (central processing unit) located in the IPDM E/R controls tail lamp relay coil. This relay, when ener-
gized, directs power to illumination lamps, which then illuminate.
Power is supplied at all times
�through 10A fuse (No. 71, located in IPDM E/R)
�to tail lamp relay, located in IPDM E/R, and
�to CPU located in IPDM E/R.
Power is also supplied at all times
�through 50A fusible link (letter M, located in fuse, fusible link and relay box)
�to BCM terminal 55,
�through 15A fuse [No. 22 located in fuse block (J/B)]
�to BCM terminal 42,
�through 15A fuse (No. 78, located in IPDM E/R)
�to CPU located in IPDM E/R,
�through 10A fuse [No. 19 located in fuse block (J/B)]
�to unified meter and A/C amp. terminal 21, and
�to combination meter terminal 8.
With ignition switch in ON or START position, power is supplied
�to ignition relay, located in IPDM E/R, from battery direct,
�through 15A fuse [No. 1 located in fuse block (J/B)]
�to BCM terminal 38,
�through 10A fuse [No. 12, located in fuse block (J/B)]
�to unified meter and A/C amp. terminal 22,
�to combination meter terminal 7.
With ignition switch in ACC or ON position, power is supplied
�through 10A fuse [No. 6, located in fuse block (J/B)]
�to combination meter terminal 4 and
�to BCM terminal 11.
Ground is supplied
�to BCM terminals 49 and 52
�to unified meter and A/C amp. terminals 29 and 30, and
�to combination meter terminals 5, 6, and 15
�through grounds M35, M45, and M85,
�to IPDM E/R terminals 38 and 60
�through grounds E21, E50, and E51.
ILLUMINATION OPERATION BY LIGHTING SWITCH
With lighting switch in the 1ST or 2ND position (or if auto light system is activated), BCM receives input signal
requesting illumination lamps to illuminate. This input signal is communicated to IPDM E/R through the CAN
communication lines. The CPU located in the IPDM E/R controls tail lamp relay coil, which, when energized,
directs power
�through IPDM E/R terminal 22
�to glove box lamp terminal 1
�to A/T device (illumination) terminal 11
�to snow mode switch (illumination) terminal 5
�to VDC off switch (illumination) terminal 3
Page 3752 of 4462

LT-190
ILLUMINATION
Revision: 2006 December 2006 FX35/FX45
�to clock (illumination) terminal 3
�to hazard switch (illumination) terminal 3
�to heated seat switch (driver side) (illumination) terminal 5
�to heated seat switch (passenger side) (illumination) terminal 5
�to door mirror remote control switch (illumination) terminal 16
�to LDW switch (illumination) terminal 5
�to combination switch (spiral cable) terminal 26
�to microphone terminal 2 (with telephone system)
�to A/C and AV switch (illumination) terminal 3
�to DVD player (illumination) terminal 12
�to coin box illumination terminal 2
�to rear power window switch LH and RH (illumination) terminals 6,
�through combination switch (spiral cable) terminal 18
�to audio steering switch (illumination), and
�to icc steering switch (illumination) (with icc)
�to ascd steering switch (illumination) (without icc)
Illumination control
�through combination meter terminal 19
�to A/T device (illumination) terminal 12
�to snow mode switch (illumination) terminal 6
�to VDC off switch (illumination) terminal 4
�to clock (illumination) terminal 4
�to hazard switch (illumination) terminal 4
�to heated seat switch (driver side) (illumination) terminal 6
�to heated seat switch (passenger side) (illumination) terminal 6
�to door mirror remote control switch terminal 15
�to LDW switch (illumination) terminal 4,
�to combination switch (spiral cable) terminal 27
�to A/C and AV switch (illumination) terminal 4
�to DVD player (illumination) terminal 10,
�through combination switch (spiral cable) terminal 21
�to audio steering switch (illumination), and
�to icc steering switch (illumination) (with icc)
�to ascd steering switch (illumination) (without icc)
Ground is supplied at all times
�to glove box lamp terminal 2, and
�to coin box illumination terminal 3
�through grounds M35, M45 and M85,
�to rear power window switch LH and RH (illumination) terminals 7
�through grounds B15 and B45.
With power and ground supplied, illumination lamps illuminate.
EXTERIOR LAMP BATTERY SAVER CONTROL
When the lighting switch is in the 1ST or 2ND position (or if auto light system is activated), and ignition switch
is turned from ON or ACC to OFF, battery saver control function is activated.
Under this condition, illumination lamps remain illuminated for 5 minutes, then illumination lamps are turned
off.
When the lighting switch is turned from OFF to 1ST or 2ND position (or if auto light system is activated) after
illumination lamps are turned off by battery saver control, and illumination lamps illuminate again.
Exterior lamp battery saver control mode can be changed by the function setting of CONSULT-II.
Page 3765 of 4462

ILLUMINATION LT-203
C
D E
F
G H
I
J
L
M A
B
LT
Revision: 2006 December 2006 FX35/FX45
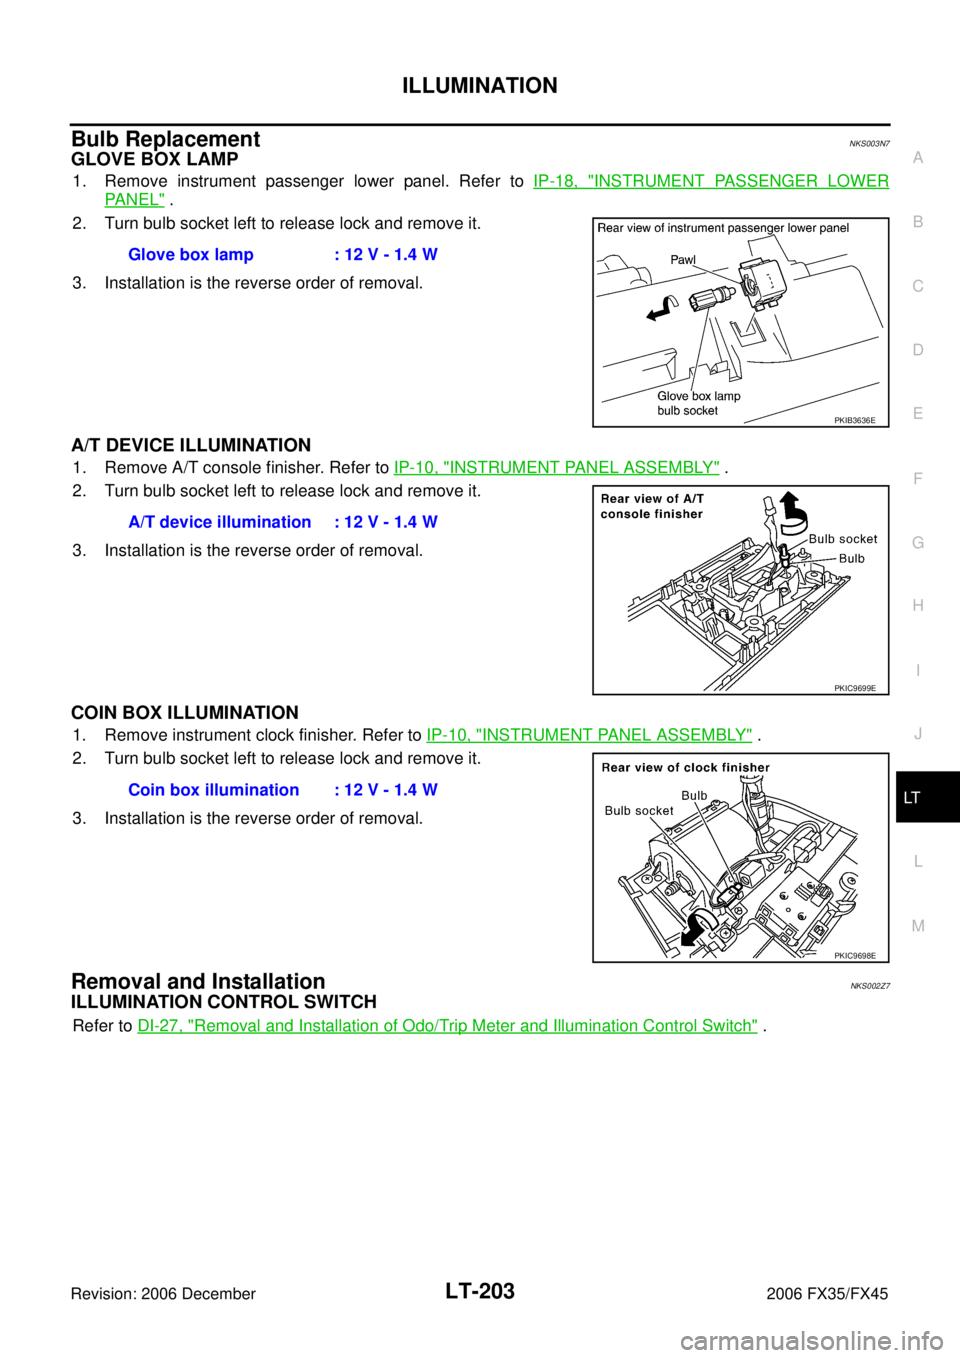
Bulb ReplacementNKS003N7
GLOVE BOX LAMP
1. Remove instrument passenger lower panel. Refer to IP-18, "INSTRUMENT PASSENGER LOWER
PA N E L" .
2. Turn bulb socket left to release lock and remove it.
3. Installation is the reverse order of removal.
A/T DEVICE ILLUMINATION
1. Remove A/T console finisher. Refer to IP-10, "INSTRUMENT PANEL ASSEMBLY" .
2. Turn bulb socket left to release lock and remove it.
3. Installation is the reverse order of removal.
COIN BOX ILLUMINATION
1. Remove instrument clock finisher. Refer to IP-10, "INSTRUMENT PANEL ASSEMBLY" .
2. Turn bulb socket left to release lock and remove it.
3. Installation is the reverse order of removal.
Removal and InstallationNKS002Z7
ILLUMINATION CONTROL SWITCH
Refer to DI-27, "Removal and Installation of Odo/Trip Meter and Illumination Control Switch" .
Glove box lamp : 12 V - 1.4 W
PKIB3636E
A/T device illumination : 12 V - 1.4 W
PKIC9699E
Coin box illumination : 12 V - 1.4 W
PKIC9698E
Page 3766 of 4462
LT-204
BULB SPECIFICATIONS
Revision: 2006 December 2006 FX35/FX45
BULB SPECIFICATIONSPFP:26297
HeadlampNKS002Z8
Exterior LampNKS002Z9
Interior Lamp/IlluminationNKS002ZA
Item Wattage (W)
High/Low (Xenon type) 35 (D2S)
Item Wattage (W)
Front combination lamp Front turn signal lamp 21 (amber)
Daytime/Parking lamp 21/5
Front side marker lamp 3.8
Rear combination lamp Stop/Tail lamp and Rear Turn signal lamp LED
Rear side marker lamp 3.8
Front fog lamp 35 (H8)
Back-up lamp 18
License plate lamp 5
High-mounted stop lamp (back door mount) LED
Item Wattage (W)
Map lamp 8
Interior room lamp 10
Personal lamp 8
Luggage room lamp 8
Step lamp 5
Glove box lamp 1.4
Vanity mirror lamp 1.32
Ignition key hole illumination 0.8
A/T device illumination lamp 1.4
Coin box illumination lamp 1.4
Page 4290 of 4462

SRS-42
FRONT PASSENGER AIR BAG MODULE
Revision: 2006 December 2006 FX35/FX45
FRONT PASSENGER AIR BAG MODULEPFP:K8515
Removal and InstallationNHS0007N
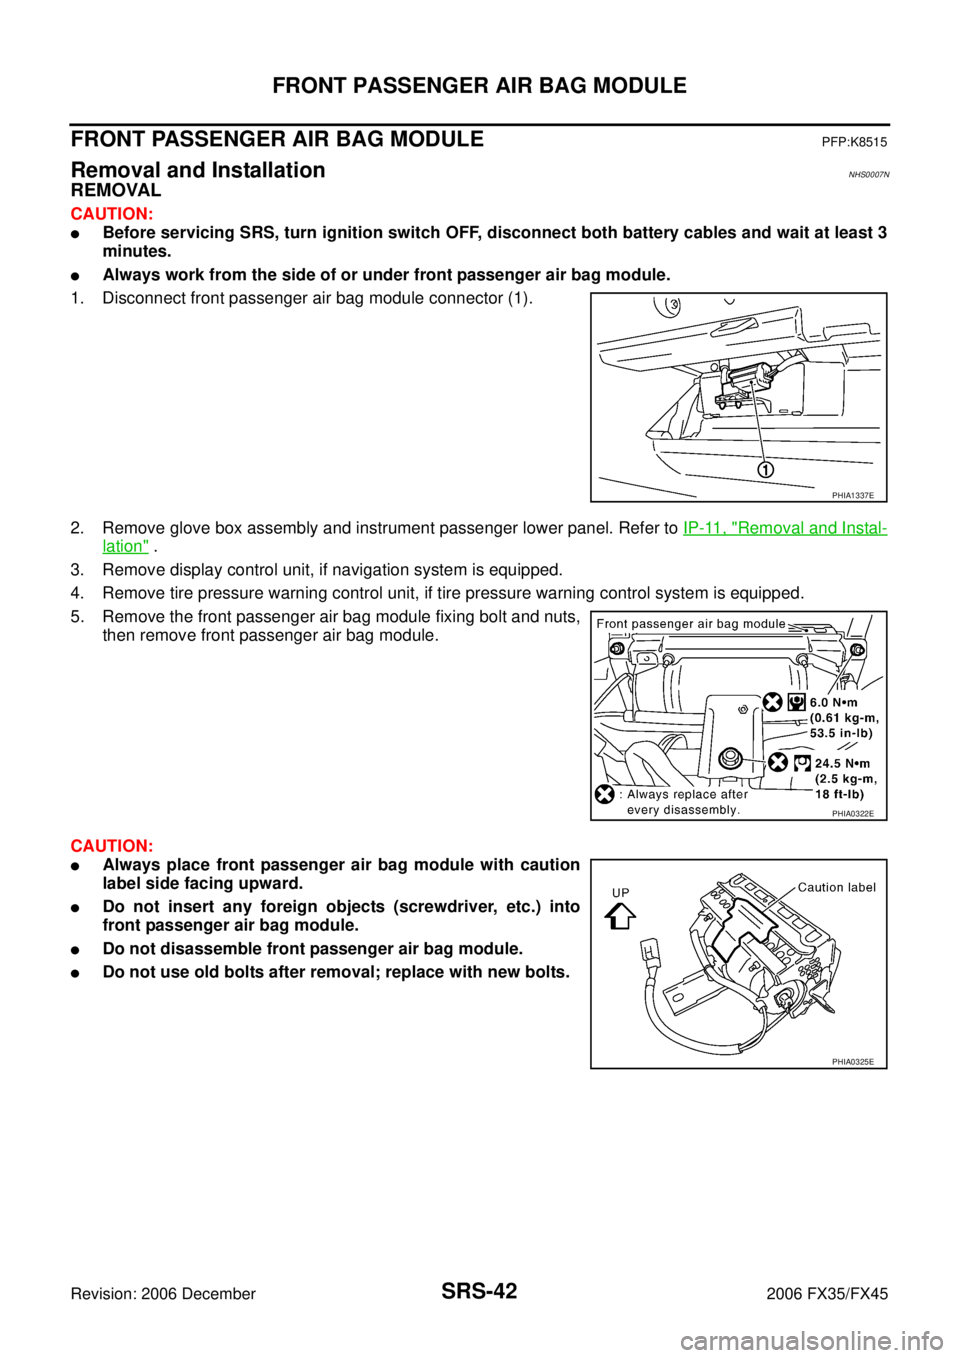
REMOVAL
CAUTION:
�Before servicing SRS, turn ignition switch OFF, disconnect both battery cables and wait at least 3
minutes.
�Always work from the side of or under front passenger air bag module.
1. Disconnect front passenger air bag module connector (1).
2. Remove glove box assembly and instrument passenger lower panel. Refer to IP-11, "
Removal and Instal-
lation" .
3. Remove display control unit, if navigation system is equipped.
4. Remove tire pressure warning control unit, if tire pressure warning control system is equipped.
5. Remove the front passenger air bag module fixing bolt and nuts, then remove front passenger air bag module.
CAUTION:
�Always place front passenger air bag module with caution
label side facing upward.
�Do not insert any foreign objects (screwdriver, etc.) into
front passenger air bag module.
�Do not disassemble front passenger air bag module.
�Do not use old bolts after removal; replace with new bolts.
PHIA1337E
PHIA0322E
PHIA0325E