2006 Hyundai Terracan air condition
[x] Cancel search: air conditionPage 479 of 539
Engine Compartment ................................................... 6-2
Daily Operating Checks ............................................... 6-4
Engine Oil ..................................................................... 6-4
Engine Oil and Filter Replacement .............................. 6-8
Engine Coolant Checking and Replacing .................... 6-9
Changing the Air Cleaner Filter ...................................6-12
Manual Transmission Lubricant ..................................6-15
Automatic Transmission Lubricant ..............................6-16
Brake System Checking ............................................. 6-18
Checking the Clutch Fluid ........................................... 6-19
Air Conditioning System Maintenance ........................ 6-20
Changing the Climate Control Air Filter .. ....................6-22
Checking Engine Drive Belts ...................................... 6-24
Fusible Links ............................................................... 6-25
Battery Mai ntenance ................................................... 6-27
Checking Electric Cooling Fans .................................6-29
Power Steering Fluid Level ......................................... 6-29
Fuel Filter ..................................................................... 6-30
Replacing Headlight Bulbs .......................................... 6-31
Headlight Aiming Adjustment ...................................... 6-33
Bulb Wattages ............................................................. 6-35
Fuse Panel D escription ............................................... 6-36
OWNER MAINTENANCE
6
6
Page 482 of 539
6 OWNER MAINTENANCE
4DAILY OPERATING CHECKS
SG020B1-E The following items should be checked on a daily basis or whenever the vehicle is refuelled, whichever occurssooner.
o Engine oil level.
o Coolant level.
o Power steering fluid level.
o Brake fluid level.
o Windscreen washer fluid level.
o Battery condition.
o Tyre condition and pressures.
o Operation and cleanliness of all lighting equipment.
o Windscreen wiper and washer op-
eration.
o Horn operation.
o Warning light operation.
o Adjustment and cleanliness of mir- rors.
o Seat and seat belt adjustment and operation.
o Fluid leakage. The vehicle must not be driven if the daily operating checks indicate that any item of equipment related to the safety or roadworthiness of the ve-hicle is not functioning correctly.ENGINE OIL
G030A01FC-EAT The correct engine oil level is of para-
mount importance. An excessively high or low oil level may result inirreparable damage being sustained by the engine. The engine oil level must be checked on a daily basis,whenever the vehicle is refuelled or before starting a long trip, whichever occurs sooner.
In addition, it is imperative that only
an approved grade and specificationof oil is used to avoid the possibility ofserious engine damage and prema- ture wear. The use of "budget price" oil is a false economy that must beavoided if the maximum reliability and useful life is to be obtained from the vehicle.MAINTENANCE PRECAU- TIONS
G020D01TG-EAT Improper or incomplete service may
result in problems. This section gives instructions only for the maintenanceitems that are easy to perform.
Several procedures should be done by
Hyundai authorised repairer.
NOTE: Improper owner maintenance dur-
ing the warranty period may affect warranty coverage.
Page 487 of 539
6
OWNER MAINTENANCE
9
!
!
engine and ensure that no oil leaks exist. Turn off the engine and aftera couple minutes, recheck the oil level.
CAUTION:
Slowly pour the recommended oil by using a funnel. Do not overfill to prevent engine damage.
WARNING:
Prolonged and repeated contact withused engine oils may result in seri- ous skin disorders including der-matitis and cancer. Avoid contact with skin as far as possible and always wash thoroughly after anycontact. Keep used oils out of reach of children. It is illegal to pollute drains, water courses and soil. Useonly authorisedwaste collection fa- cilities including civic amenity sites and garages for the disposalof used oil and oil filters. If in doubt, contact the local authority for dis- posal instructions. WARNING:
Do not remove the radiator cap when
the engine is hot, since the system is pressurised and coolant may be ejected from the radiator resultingin scalding.
SG050B1-E
Coolant recommendations
Only ethylene glycol based coolant
with a corrosion inhibitor suited toaluminium alloy engine componentsshould be used in the cooling system. No further additives or inhibitors should be used. The coolant specificgravity should be checked as pre- scribed in the maintenance schedule to ensure adequate frost and corro-sion protection. In addition, the en- gine coolant must be replaced at the specified interval since the corrosioninhibitor properties deteriorate with time.
ENGINE COOLANT CHECK- ING AND REPLACING
SG050A1-E
! It is important to note that whilst an increase in the concentration of antifreeze gives an increase in the level of frost protection, a solution which is in excess of 65% anti freeze will resultin reduced frost protection and engine overheating. Therefore the recom- mended concentration of 50% shouldnot be exceeded for general use.The use of methanol based anti freezecompounds may result in engine over-heating and will invalidate the vehicle warranty. NOTE: It is imperative that vehicles fitted with an air conditioning systemhave a coolant concentration of the recommended strength at all times. The use of the air condition-ing system when the cooling sys- tem is filled with water only will result in the heater matrix freezingand subsequently bursting.
Page 489 of 539
6
OWNER MAINTENANCE
11
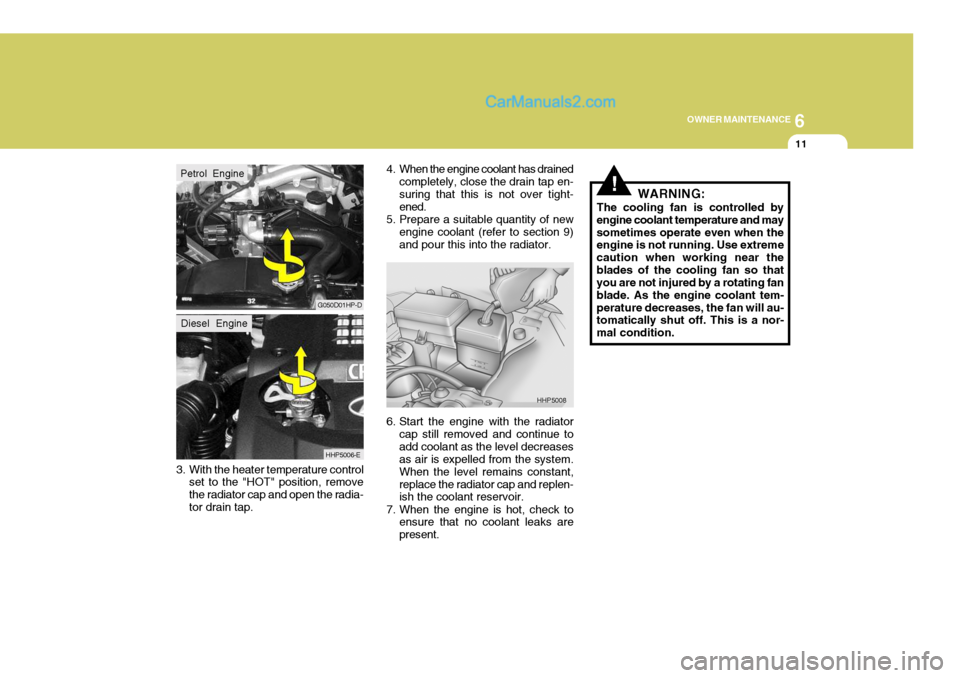
3. With the heater temperature control set to the "HOT" position, remove the radiator cap and open the radia-tor drain tap. 4. When the engine coolant has drained
completely, close the drain tap en-suring that this is not over tight- ened.
5. Prepare a suitable quantity of new engine coolant (refer to section 9)and pour this into the radiator.
6. Start the engine with the radiator cap still removed and continue to add coolant as the level decreases as air is expelled from the system. When the level remains constant,replace the radiator cap and replen- ish the coolant reservoir.
7. When the engine is hot, check to ensure that no coolant leaks are present.
G050D01HP-D
HHP5006-E
HHP5008
Petrol EngineDiesel Engine
!WARNING:
The cooling fan is controlled by engine coolant temperature and maysometimes operate even when the engine is not running. Use extreme caution when working near theblades of the cooling fan so that you are not injured by a rotating fan blade. As the engine coolant tem-perature decreases, the fan will au- tomatically shut off. This is a nor- mal condition.
Page 497 of 539
6
OWNER MAINTENANCE
19
!
SG120D1-E
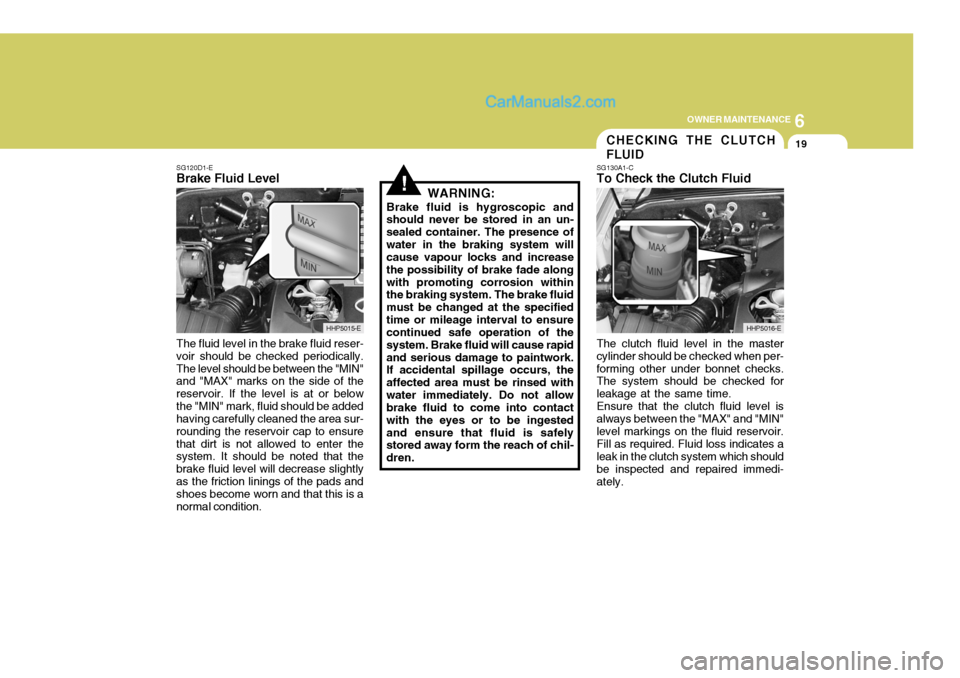
Brake Fluid Level
The fluid level in the brake fluid reser- voir should be checked periodically.The level should be between the "MIN" and "MAX" marks on the side of the reservoir. If the level is at or belowthe "MIN" mark, fluid should be added having carefully cleaned the area sur- rounding the reservoir cap to ensurethat dirt is not allowed to enter the system. It should be noted that the brake fluid level will decrease slightlyas the friction linings of the pads and shoes become worn and that this is a normal condition. WARNING:
Brake fluid is hygroscopic and
should never be stored in an un-sealed container. The presence ofwater in the braking system will cause vapour locks and increase the possibility of brake fade alongwith promoting corrosion within the braking system. The brake fluid must be changed at the specifiedtime or mileage interval to ensure continued safe operation of the system. Brake fluid will cause rapidand serious damage to paintwork. If accidental spillage occurs, the affected area must be rinsed withwater immediately. Do not allow brake fluid to come into contact with the eyes or to be ingestedand ensure that fluid is safely stored away form the reach of chil- dren. The clutch fluid level in the mastercylinder should be checked when per-forming other under bonnet checks. The system should be checked for leakage at the same time. Ensure that the clutch fluid level is always between the "MAX" and "MIN" level markings on the fluid reservoir.Fill as required. Fluid loss indicates a leak in the clutch system which should be inspected and repaired immedi-ately.
HHP5015-E
CHECKING THE CLUTCH FLUID
SG130A1-C To Check the Clutch Fluid
HHP5016-E
Page 498 of 539
6 OWNER MAINTENANCE
20
!
!
SG130B2-E Adding Fluid Recommended brake fluid conform- ing to DOT 3 or DOT 4 should be used. The reservoir cap must be fully tightened to avoid contamination fromforeign matter or moisture.
CAUTION:
Brake fluid is hygroscopic andshould never be stored in an un- sealed container. Do not allow petroleum base fluid to contami- nate the brake fluid since damage to the rubber seals of the systemmay result. WARNING:
Brake fluid will cause rapid and
serious damage to paintwork. If accidental spillage occurs, the af- fected area must be rinsed withwater immediately. Do not allow brake fluid to come into contact with the eyes or to be ingestedand ensure that fluid is safely stored away form the reach of chil- dren. SG140C2-E
Checking the Refrigerant
1. Start the engine and run at idle for
several minutes with the refrigera- tion system running at the coldest setting.
2. If the air coming out of the in-dash vents is not cold, have the air con- ditioning system inspected by yourHyundai authorised repairer.
CAUTION:
Running the air conditioning sys-
tem for extended periods of time with a low refrigerant level may damage the compressor.
!
AIR CONDITIONING SYSTEM MAINTENANCE
SG140A1-E
Condenser
Ensure that the condenser is periodi- cally inspected and that accumula- tions of dirt, dead insects and leaves etc, are removed to ensure that theefficiency of the system is not im- paired. Care must be exercised to ensure that the condenser fins arenot damaged during cleaning.
Page 499 of 539
6
OWNER MAINTENANCE
21
SG140D1-E
Off Season Maintenance
The air conditioning must be run for ten minutes or so weekly during peri- ods when the system would not nor- mally be used to ensure that thecompressor and seals are lubricated. If this precaution is not observed the compressor seals may become stuckto the compressor shaft and dam- aged when the system is next used resulting in a loss of refrigerant anddamage to the compressor. HPG140B1-E
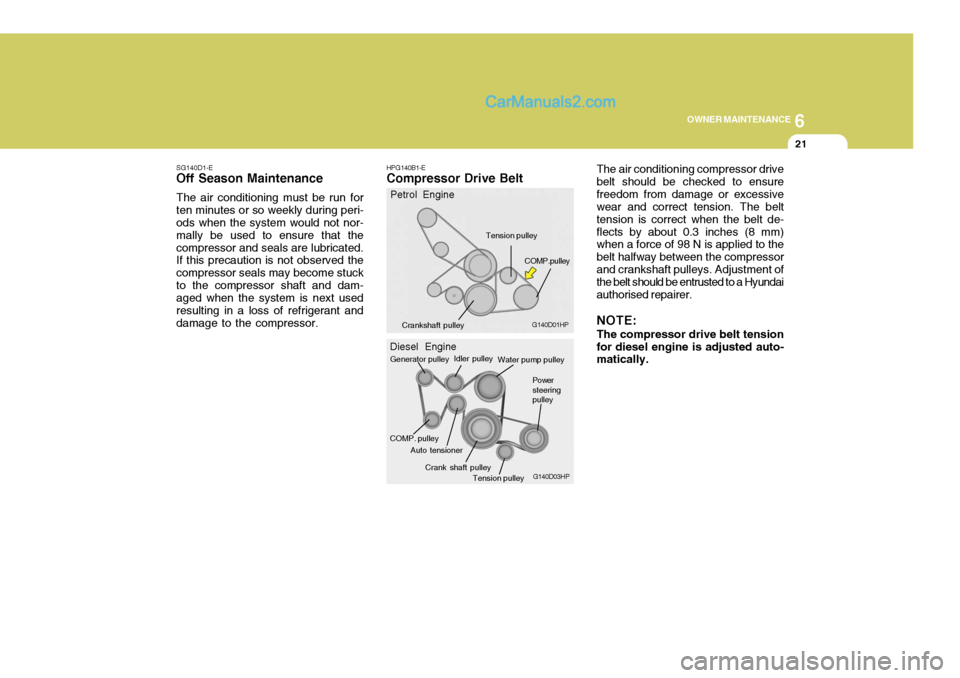
Compressor Drive Belt The air conditioning compressor drivebelt should be checked to ensurefreedom from damage or excessive wear and correct tension. The belt tension is correct when the belt de-flects by about 0.3 inches (8 mm) when a force of 98 N is applied to the belt halfway between the compressorand crankshaft pulleys. Adjustment of the belt should be entrusted to a Hyundai authorised repairer. NOTE: The compressor drive belt tension for diesel engine is adjusted auto- matically.
G140D01HP
Crankshaft pulley
Petrol Engine
COMP.pulley
Tension pulley
G140D03HP
Diesel Engine
Generator pulley
Water pump pulley
Tension pulley
COMP. pulley Power steeringpulley
Idler pulley
Auto tensioner Crank shaft pulley
Page 502 of 539
6 OWNER MAINTENANCE
24
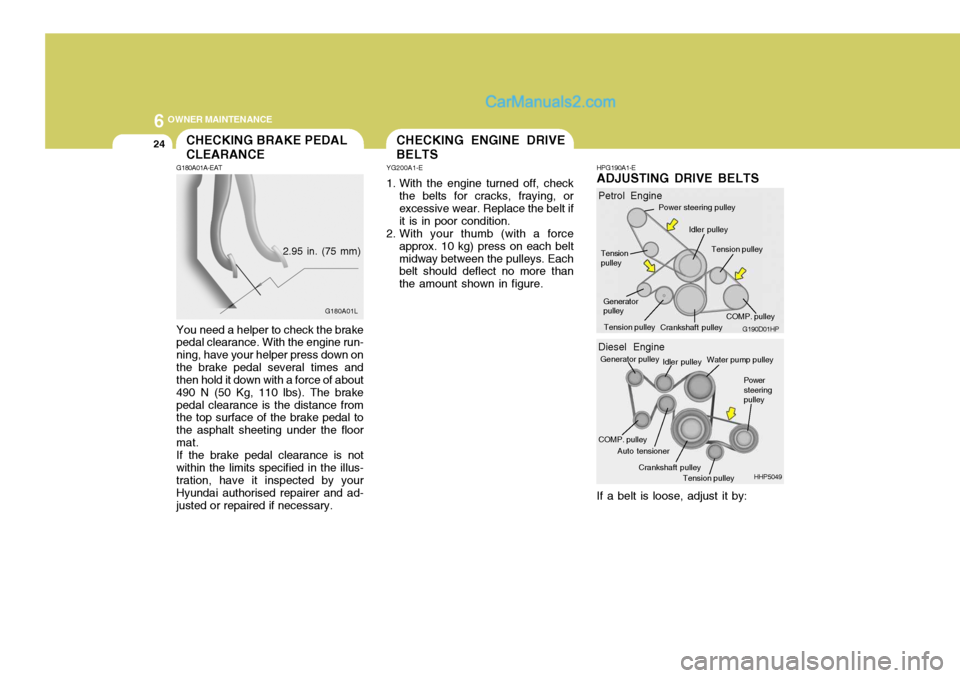
You need a helper to check the brake pedal clearance. With the engine run- ning, have your helper press down onthe brake pedal several times and then hold it down with a force of about 490 N (50 Kg, 110 lbs). The brakepedal clearance is the distance from the top surface of the brake pedal to the asphalt sheeting under the floormat.If the brake pedal clearance is notwithin the limits specified in the illus- tration, have it inspected by your Hyundai authorised repairer and ad-justed or repaired if necessary. HPG190A1-E
ADJUSTING DRIVE BELTS
If a belt is loose, adjust it by:CHECKING BRAKE PEDAL CLEARANCE
2.95 in. (75 mm) G180A01L
G190D01HP
Petrol Engine
Idler pulley
Power steering pulley
Crankshaft pulley
Generator pulley Tension pulley
Tension pulley
Tension pulley
COMP. pulley
HHP5049
Diesel Engine
Generator pulley
Tension pulley
COMP. pulley Power steeringpulley
Idler pulley
Auto tensioner Crankshaft pulley Water pump pulley
G180A01A-EAT
CHECKING ENGINE DRIVE BELTS
YG200A1-E
1. With the engine turned off, check the belts for cracks, fraying, or excessive wear. Replace the belt ifit is in poor condition.
2. With your thumb (with a force
approx. 10 kg) press on each beltmidway between the pulleys. Each belt should deflect no more than the amount shown in figure.