2006 Hyundai Terracan Car jack
[x] Cancel search: Car jackPage 177 of 539
2 DRIVING YOUR HYUNDAI
22
!
C130A01HP-GAT
WARNING:
Nothing should be carried on top of the cargo area cover behind the rear seat. If there were an accident or a sudden stop, such objectscould move forward and cause dam- age to the vehicle or injure the oc- cupants.
o After being parked, check to be sure the parking brake is not engaged and that the parking brake indicator light is out before driving away.
o Driving through water may get the brakes wet. They can also get wetwhen the car is washed. Wet brakes can be dangerous! Your car will notstop as quickly if the brakes are wet. Wet brakes cause the car to pull to one side. To dry the brakes, applythe brakes lightly until the braking action returns to normal, taking care to keep the car under control at alltimes. If the braking action does not return to normal, stop as soon as it is safe to do so and call your Hyundaidealer for assistance.
GOOD BRAKING PRAC- TICES
LIMITED-SLIP DIFFEREN- TIAL (LSD)
D190A01HP-GAT (If Installed) A limited-slip differential, if equipped, is for the rear wheel differential only.The features of this limited-slip differ- ential are described below: Just as with a conventional differential,the wheel on one side is allowed to turn at a different speed from the wheel on the other side when the vehicle iscornering. The difference between the limited-slip differential and a conven- tional differential is that if the wheel onone side of the vehicle loses traction, a greater amount of torque is applied to the rear wheel on the other side toimprove traction. CAUTION:
o Never start the engine with the gearshift lever placed in the for-ward or reverse while one of therear wheels is jacked up and the other in contact with the ground; doing so may cause the vehicleto jump forward.
o Use only recommended oil for
LSD in the rear axle.See page 9-5 for the recom- mended oil descriptions.
!
Page 178 of 539
2
DRIVING YOUR HYUNDAI
23
o Don't coast down hills with the car out of gear. This is extremely haz- ardous. Keep the car in gear at all times, use the brakes to slow down, then shift to a lower gear so thatengine braking will help you main- tain a safe speed.
o Don't "ride" the brake pedal. Rest- ing your foot on the brake pedalwhile driving can be dangerous be- cause it can result in the brakesoverheating and losing their effec- tiveness. It also increases the wear of thebrake components.
o If a tire goes flat while you are
driving, apply the brakes gently andkeep the car pointed straight ahead while you slow down. When you are moving slowly enough for it to besafe to do so, pull off the road and stop in a safe place.
o If your car is equipped with an auto- matic transmission, don't let yourcar creep forward. To avoid creep- ing forward, keep your foot firmly onthe brake pedal when the car is stopped.
o Use caution when parking on a hill. Engage the parking brake and place the gear selector lever in "P" (auto- matic transmission) or in first orreverse gear (manual transmission). If your car is facing downhill, turn the front wheels into the curb to helpkeep the car from rolling. If your car is facing uphill, turn the front wheels away from the curb to help keep thecar from rolling. If there is no curb or if it is required by other conditions to keep the car from rolling, block thewheels.
o Under some conditions your park-
ing brake can freeze in the engagedposition. This is most likely to hap- pen when there is an accumulation of snow or ice around or near therear brakes or if the brakes are wet. If there is a risk that the parking brake may freeze, apply it only tem-porarily while you put the gear se- lector lever in "P" (automatic) or in first or reverse gear (manual trans-mission) and block the rear wheels so the car cannot roll. Then release the parking brake.
o Do not hold the vehicle on the up- grade with the accelerator pedal.This can cause the transmission tooverheat. Always use the brake pedal or parking brake.DRIVING FOR ECONOMY
C140A02A-AAT You can save fuel and get more miles from your car if you follow these sug- gestions:
o Drive smoothly. Accelerate at a moderate rate. Don't make "jack- rabbit" starts or full-throttle shiftsand maintain a steady cruising speed. Don't race between stop- lights. Try to adjust your speed tothat of the other traffic so you don't have to change speeds unneces- sarily. Avoid heavy traffic wheneverpossible. Always maintain a safe distance from other vehicles so you can avoid unnecessary braking. Thisalso reduces brake wear.
o Drive at a moderate speed. The
faster you drive, the more fuel yourcar uses. Driving at a moderate speed, especially on the highway, is one of the most effective ways toreduce fuel consumption.
Page 195 of 539
3 WHAT TO DO IN AN EMERGENCY
8
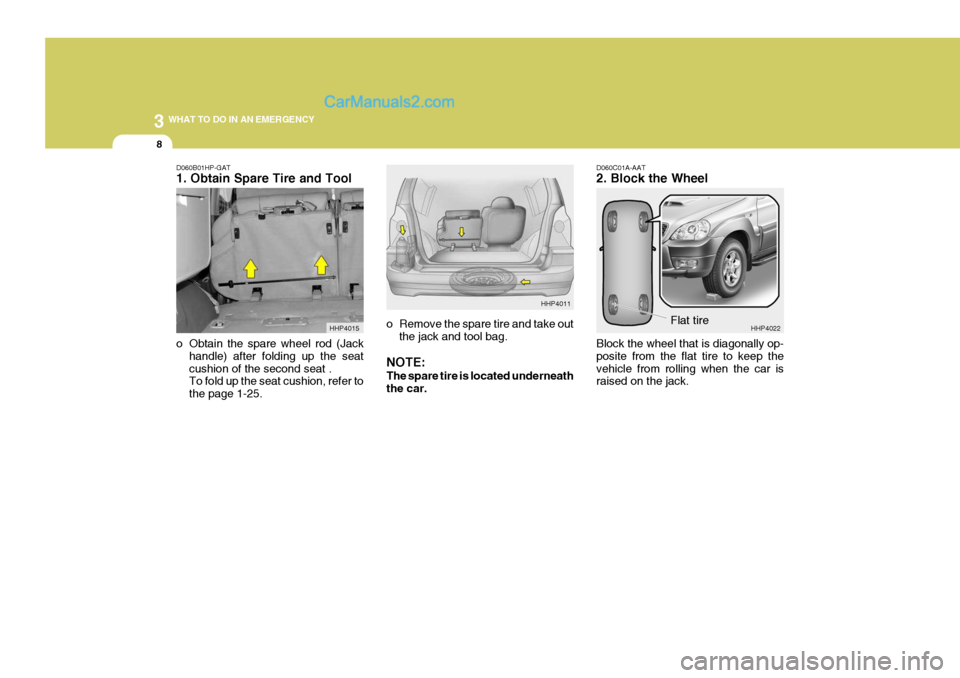
o Remove the spare tire and take out
the jack and tool bag.
NOTE: The spare tire is located underneath the car. D060C01A-AAT 2. Block the Wheel Block the wheel that is diagonally op- posite from the flat tire to keep thevehicle from rolling when the car is raised on the jack.
HHP4011
Flat tireHHP4022
D060B01HP-GAT 1. Obtain Spare Tire and Tool
o Obtain the spare wheel rod (Jack
handle) after folding up the seat cushion of the second seat . To fold up the seat cushion, refer to the page 1-25. HHP4015
Page 196 of 539
3
WHAT TO DO IN AN EMERGENCY
9
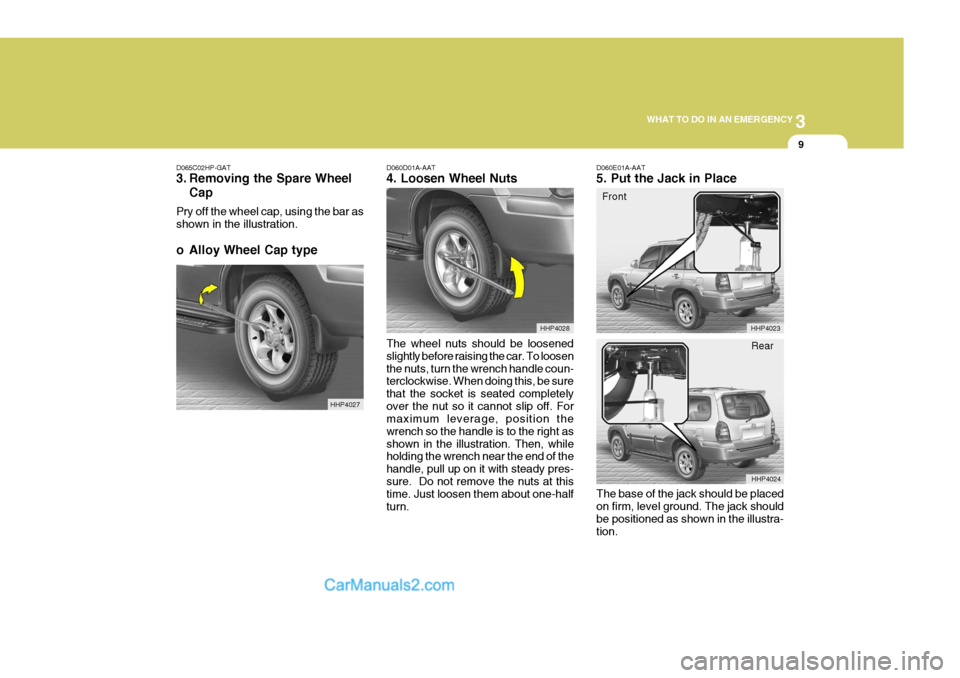
D060D01A-AAT 4. Loosen Wheel Nuts
D065C02HP-GAT
3. Removing the Spare Wheel
Cap
Pry off the wheel cap, using the bar as shown in the illustration.
o Alloy Wheel Cap type
The wheel nuts should be loosened slightly before raising the car. To loosenthe nuts, turn the wrench handle coun- terclockwise. When doing this, be sure that the socket is seated completelyover the nut so it cannot slip off. For maximum leverage, position the wrench so the handle is to the right asshown in the illustration. Then, while holding the wrench near the end of the handle, pull up on it with steady pres-sure. Do not remove the nuts at this time. Just loosen them about one-half turn.D060E01A-AAT 5. Put the Jack in Place The base of the jack should be placed on firm, level ground. The jack should be positioned as shown in the illustra- tion.
Front
HHP4027 HHP4028
HHP4023
HHP4024
Rear
Page 197 of 539

3 WHAT TO DO IN AN EMERGENCY
10
Using the jack handle, turn the release valve clockwise until it reaches a stop. Move the jack handle up and down toraise the ram until just before the jack contacts the jacking point of the car. Position the jack with the jack handle. Position it only at the specified pointsindicated in the "Put the Jack in Place". Use of the jack at other points could damage the car.Moving the jack handle up and down to raise the ram.
Then fit the jack handle into the holder, and align the groove of the jack handle with the notch of the holder. HHP4016
HHP4017 HHP4018
D060F02HP-GAT 6. Raising the Car
o Open the lid at the left corner of the
luggage compartment.
o Loosen the hexagonal bolt, and then take out the jack. D060F01HP
Page 198 of 539
3
WHAT TO DO IN AN EMERGENCY
11
!
!
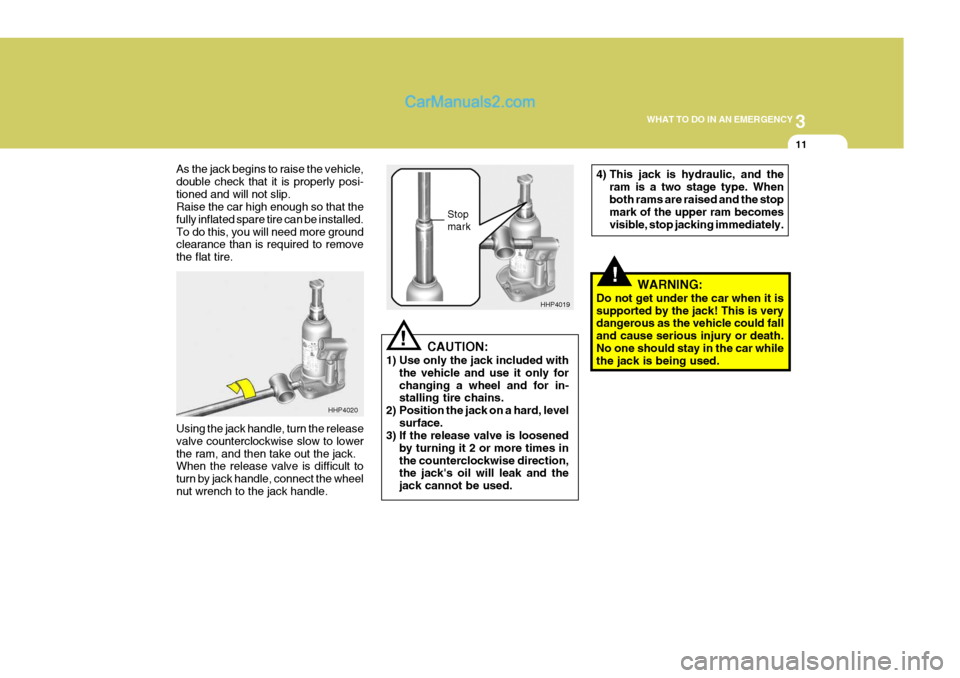
As the jack begins to raise the vehicle, double check that it is properly posi-tioned and will not slip. Raise the car high enough so that the fully inflated spare tire can be installed.To do this, you will need more ground clearance than is required to remove the flat tire. Using the jack handle, turn the release valve counterclockwise slow to lowerthe ram, and then take out the jack. When the release valve is difficult to turn by jack handle, connect the wheelnut wrench to the jack handle. CAUTION:
1) Use only the jack included with the vehicle and use it only forchanging a wheel and for in- stalling tire chains.
2) Position the jack on a hard, level surface.
3) If the release valve is loosened
by turning it 2 or more times in the counterclockwise direction, the jack's oil will leak and the jack cannot be used. Stop mark
HHP4020 HHP4019
WARNING:
Do not get under the car when it is supported by the jack! This is very dangerous as the vehicle could fall and cause serious injury or death.No one should stay in the car while the jack is being used.
4) This jack is hydraulic, and the
ram is a two stage type. When both rams are raised and the stop mark of the upper ram becomes visible, stop jacking immediately.
Page 200 of 539
3
WHAT TO DO IN AN EMERGENCY
13
D060I02HP-GAT 9. Lower Vehicle and Tighten
Nuts
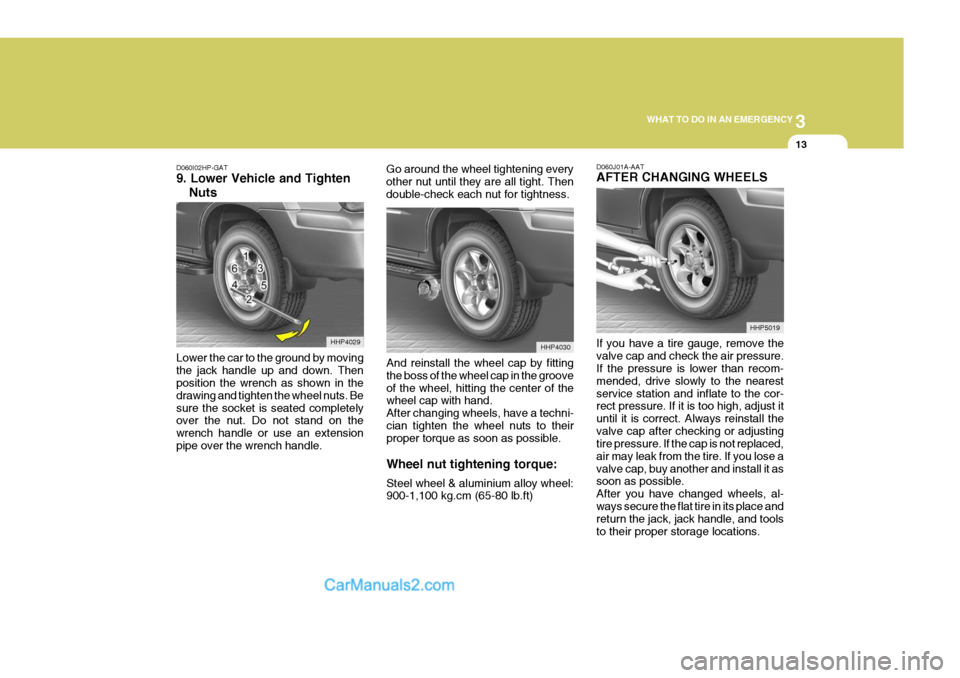
Lower the car to the ground by moving the jack handle up and down. Then position the wrench as shown in the drawing and tighten the wheel nuts. Besure the socket is seated completely over the nut. Do not stand on the wrench handle or use an extensionpipe over the wrench handle. Go around the wheel tightening everyother nut until they are all tight. Thendouble-check each nut for tightness.
D060J01A-AAT AFTER CHANGING WHEELS If you have a tire gauge, remove the valve cap and check the air pressure. If the pressure is lower than recom- mended, drive slowly to the nearestservice station and inflate to the cor- rect pressure. If it is too high, adjust it until it is correct. Always reinstall thevalve cap after checking or adjusting tire pressure. If the cap is not replaced, air may leak from the tire. If you lose avalve cap, buy another and install it as soon as possible. After you have changed wheels, al-ways secure the flat tire in its place and return the jack, jack handle, and tools to their proper storage locations.
HHP4029
HHP5019
And reinstall the wheel cap by fittingthe boss of the wheel cap in the grooveof the wheel, hitting the center of the wheel cap with hand. After changing wheels, have a techni-cian tighten the wheel nuts to their proper torque as soon as possible. Wheel nut tightening torque: Steel wheel & aluminium alloy wheel: 900-1,100 kg.cm (65-80 lb.ft) HHP4030
Page 438 of 539
2 DRIVING YOUR HYUNDAI
22
!
EFFECTIVE BRAKING
HPC141A1-E Braking system performance and fric- tion material life are greatly affected by the driving style adopted. The follow- ing suggestions are made to assist inachieving the best results from the braking system.
o Anticipate the road and conditions ahead in order that heavy braking may be avoided.
o When descending long gradients,
use the engine to assist in retardingthe vehicle to minimise the possibil- ity of brake fade occurring.
o When trailer towing, ensure that the trailer brakes function correctly anduse engine braking to assist the vehicle braking system.
o Use only genuine Hyundai replace- ment brake pads and shoes to en-sure consistent friction characteris-tics and wear rates.
o After driving through deep water (e.g.
fording), the brakes may becomewet and performance reduced. Al- ways check brake efficiency after emerging from the water and dry thebrakes by lightly depressing the brake pedal several times whilst driv- ing slowly.LIMITED-SLIP DIFFEREN- TIAL (LSD)
D190A01HP-EAT (Not all models) A limited-slip differential, if equipped, is for the rear wheel differential only.The features of this limited-slip differ- ential are described below: Just as with a conventional differential,the wheel on one side is allowed to turn at a different speed from the wheel on the other side when the vehicle iscornering. The difference between the limited-slip differential and a conven- tional differential is that if the wheel onone side of the vehicle loses traction, a greater amount of torque is applied to the rear wheel on the other side toimprove traction.
WARNING:
ABS will not prevent accidents dueto improper or dangerous drivingmanoeuvres. Even though vehicle control is improved during emer- gency braking, always maintain asafe distance between you and ob- jects ahead. Vehicle speeds should always be reduced during extremeroad conditions. The braking distance for cars equipped with an anti-lock braking system may be longer than for those without it, in the following road con-ditions. These roads should be driven at reduced speeds.
o Rough, gravel or snow-covered roads.
o With tyre chains installed.
o On roads where the road surface is pitted or has different surfaceheight.
The safety features of an ABSequipped vehicle should not be testedby high speed driving or cornering. This could endanger the safety of yourself or others.
! CAUTION:
o Never start the engine with the gearshift lever placed in the for- ward or reverse whilst one of therear wheels is jacked up and the other in contact with the ground; doing so may cause the vehicle tojump forward.
o Use only recommended oil for
LSD in the rear axle.See page 9-4 for the recommended oil descriptions.