Page 453 of 539
3
IN CASE OF EMERGENCY
7
!
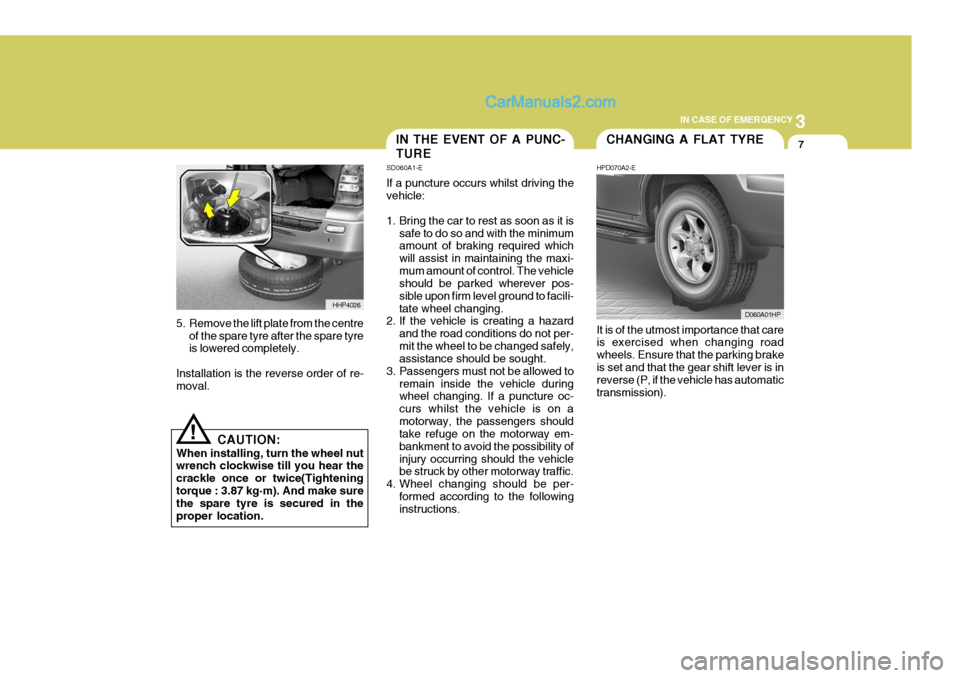
5. Remove the lift plate from the centre
of the spare tyre after the spare tyre is lowered completely.
Installation is the reverse order of re-moval.
CAUTION:
When installing, turn the wheel nutwrench clockwise till you hear the crackle once or twice(Tighteningtorque : 3.87 kg·m). And make sure the spare tyre is secured in the proper location. It is of the utmost importance that care is exercised when changing road wheels. Ensure that the parking brakeis set and that the gear shift lever is in reverse (P, if the vehicle has automatic transmission).
HHP4026
IN THE EVENT OF A PUNC- TURE
SD060A1-E If a puncture occurs whilst driving the vehicle:
1. Bring the car to rest as soon as it is
safe to do so and with the minimum amount of braking required which will assist in maintaining the maxi-mum amount of control. The vehicle should be parked wherever pos- sible upon firm level ground to facili-tate wheel changing.
2. If the vehicle is creating a hazard
and the road conditions do not per-mit the wheel to be changed safely, assistance should be sought.
3. Passengers must not be allowed to remain inside the vehicle duringwheel changing. If a puncture oc- curs whilst the vehicle is on amotorway, the passengers should take refuge on the motorway em- bankment to avoid the possibility ofinjury occurring should the vehicle be struck by other motorway traffic.
4. Wheel changing should be per- formed according to the followinginstructions.CHANGING A FLAT TYRE
HPD070A2-E
D060A01HP
Page 455 of 539
3
IN CASE OF EMERGENCY
9
ZD070D1-E 2. Block the Wheel Block the wheel that is diagonally op- posite from the flat tyre to prevent thevehicle from rolling when the car is raised on the jack.
Flat tyre HHP4022D065C02HP-GAT
3. Removing the Spare Wheel Cap Pry off the wheel cap, using the bar as shown in the illustration.
o Alloy Wheel Cap type
HHP4027 ZD070F1-E 4. Loosen Wheel Nuts The wheel nuts should be loosened slightly before raising the car. To loosenthe nuts, turn the wheel nut wrench counterclockwise. When doing this, be sure that the socket is seated com-pletely over the nut so it cannot slip off. For maximum leverage, position the wheel nut wrench so the handle is to theright as shown in the drawing. Then, whilst holding the wheel nut wrench near the end of the handle, pull up on itwith steady pressure. Do not remove the nuts at this time. Just loosen them about one-half turn.
HHP4028
Page 456 of 539
3 IN CASE OF EMERGENCY
10
D060F02HP-EAT 6. Raising the Car
o Open the lid at the left corner of theluggage compartment.
o Loosen the hexagonal bolt, and then take out the jack. Using the jack handle, turn the release valve clockwise until it reaches a stop.
Then fit the jack handle into the holder, and align the groove of the jack handlewith the notch of the holder.
D060E01A-AAT 5. Put the Jack in Place The base of the jack should be placed on firm, level ground. The jack should be positioned as shown in the illustra- tion.
Front
HHP4023
HHP4024
Rear
D060F01HP
HHP4016
HHP4017
Page 457 of 539

3
IN CASE OF EMERGENCY
11
Move the jack handle up and down to raise the ram until just before the jack contacts the jacking point of the car. Position the jack with the jack handle.Position it only at the specified points indicated in the "Put the Jack in Place". Use of the jack at other points coulddamage the car. Moving the jack handle up and down to raise the ram.
HHP4018 As the jack begins to raise the vehicle, double check that it is properly posi-tioned and will not slip. Raise the car high enough so that the fully inflated spare tyre can be installed.To do this, you will need more ground clearance than is required to remove the flat tire. Using the jack handle, turn the release valve counterclockwise slow to lowerthe ram, and then take out the jack. When the release valve is difficult to turn by jack handle, connect the wheelnut wrench to the jack handle.
HHP4020
Stop mark
HHP4019
!CAUTION:
(1) Use only the jack included with the vehicle and use it only for changing a wheel and for install- ing tyre chains.
(2) Position the jack on a hard, level surface.
(3) If the release valve is loosened by turning it 2 or more times in the counterclockwise direction, the jack's oil will leak and the jackcannot be used.
Page 460 of 539
3 IN CASE OF EMERGENCY
14
D060J02O-EAT AFTER CHANGING WHEELS If you have a tyre gauge, remove the valve cap and check the air pressure.If the pressure is lower than recom- mended, drive slowly to the nearest service station and inflate to the cor-rect pressure. If it is too high, adjust it until it is correct. Always reinstall the valve cap after checking or adjustingtyre pressure. If the cap is not re- placed, air may leak from the tyre. If you lose a valve cap, buy another andinstall it as soon as possible. After you have changed wheels, al- ways secure the flat tyre in its placeand return the jack and tools to their proper storage locations.
HHP5019
IF YOUR VEHICLE MUST BE TOWED
D080A02HR-GAT If your vehicle has to be towed, it should be done by your Hyundai authorisedrepairer or a commercial tow truck ser- vice. This will help assure that your vehicle is not damaged in towing. Also,professionals are generally aware of local laws governing towing. In any case, rather than risk damage to yourcar, it is suggested that you show this information to the tow truck operator. Be sure that a safety chain system isused and that all local laws are ob- served. It is recommended that your vehicle betowed with a wheel lift and dollies or flatbed equipment with all the wheels off the ground.
! CAUTION:
o Your vehicle can be damaged if towed incorrectly!
o Be sure the transmission is in neutral.
o When the engine will not start, be
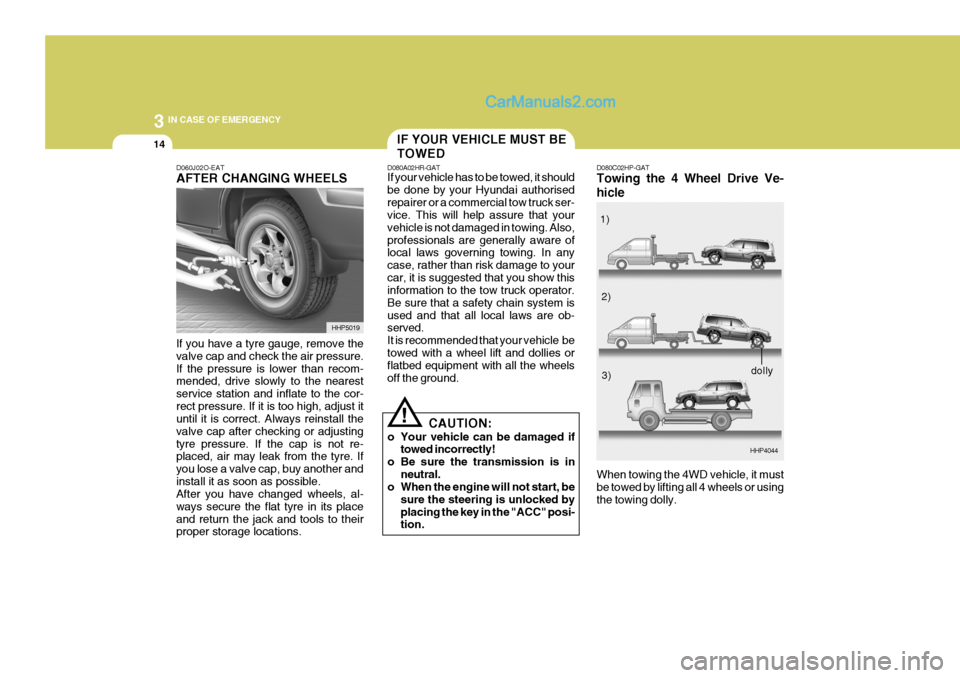
sure the steering is unlocked by placing the key in the "ACC" posi- tion. D080C02HP-GAT Towing the 4 Wheel Drive Ve- hicle
HHP4044
When towing the 4WD vehicle, it must be towed by lifting all 4 wheels or using the towing dolly. 1)
2)
3)
dolly
Page 473 of 539
5
VEHICLE MAINTENANCE REQUIREMENTS
5
20 24
I
R II I I
RR II I I I I I I I I I I I I I I I
R
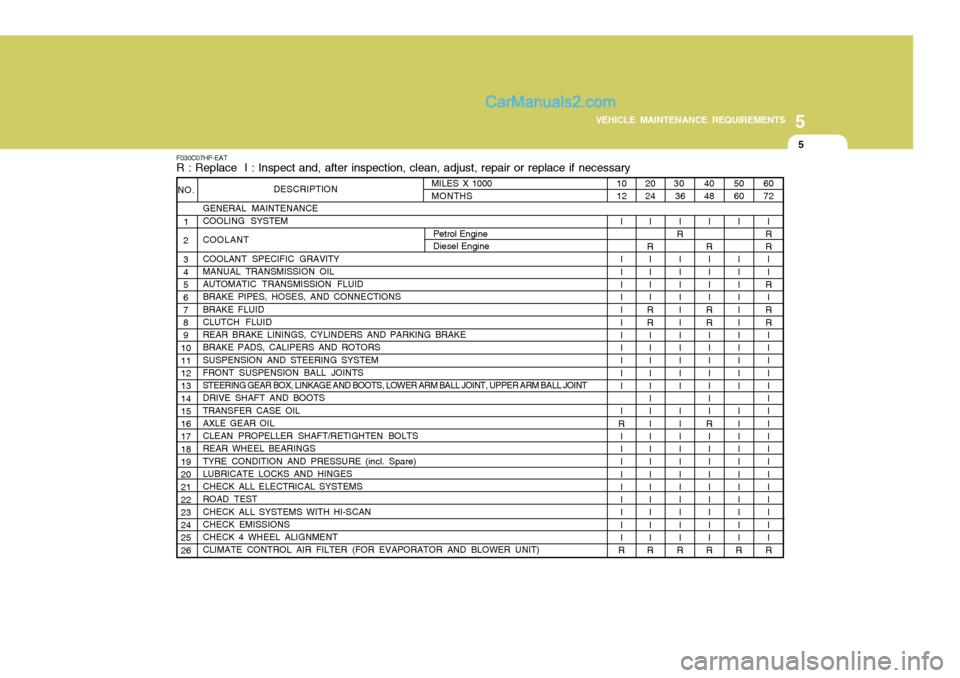
F030C07HP-EAT R : Replace I : Inspect and, after inspection, clean, adjust, repair or replace if necessary
DESCRIPTION
GENERAL MAINTENANCE COOLING SYSTEM COOLANT COOLANT SPECIFIC GRAVITY MANUAL TRANSMISSION OIL AUTOMATIC TRANSMISSION FLUID BRAKE PIPES, HOSES, AND CONNECTIONS BRAKE FLUID CLUTCH FLUID
REAR BRAKE LININGS, CYLINDERS AND PARKING BRAKE BRAKE PADS, CALIPERS AND ROTORS SUSPENSION AND STEERING SYSTEM FRONT SUSPENSION BALL JOINTS
STEERING GEAR BOX, LINKAGE AND BOOTS, LOWER ARM BALL JOINT, UPPER ARM BALL JOINT
DRIVE SHAFT AND BOOTS TRANSFER CASE OIL AXLE GEAR OIL CLEAN PROPELLER SHAFT/RETIGHTEN BOLTS REAR WHEEL BEARINGS TYRE CONDITION AND PRESSURE (incl. Spare) LUBRICATE LOCKS AND HINGES CHECK ALL ELECTRICAL SYSTEMS ROAD TEST CHECK ALL SYSTEMS WITH HI-SCAN CHECK EMISSIONS CHECK 4 WHEEL ALIGNMENT CLIMATE CONTROL AIR FILTER (FOR EVAPORATOR AND BLOWER UNIT)
NO.
1
2 3 4 5 6 7 8 9
1011 12 13 14 15 16 17 18 19 20 21 22 23 24 25 26
60 72
I
RR II
R
I
RR II I I I I I I I I I I I I I I I
R
50 60
I I I I I I I I I I I I I I I I I I I I I I I
R
40 48
I
R II I I
RR II I I I I I
R I I I I I I I I I
R
30
36
I
R
I I I I I I I I I I I I I I I I I I I I I I
R
10 12
I I I I I I I I I I I I I
R I I I I I I I I I
R
MILES X 1000MONTHS
Petrol Engine Diesel Engine
Page 485 of 539
6
OWNER MAINTENANCE
7
G350A01A-EAT
ENGINE OIL CONSUMPTION Function of engine oil
Engine oil has the primary function of
lubricating and cooling the inside of the engine.
HPG030C2-E
ENGINE OIL REPLENISHMENT
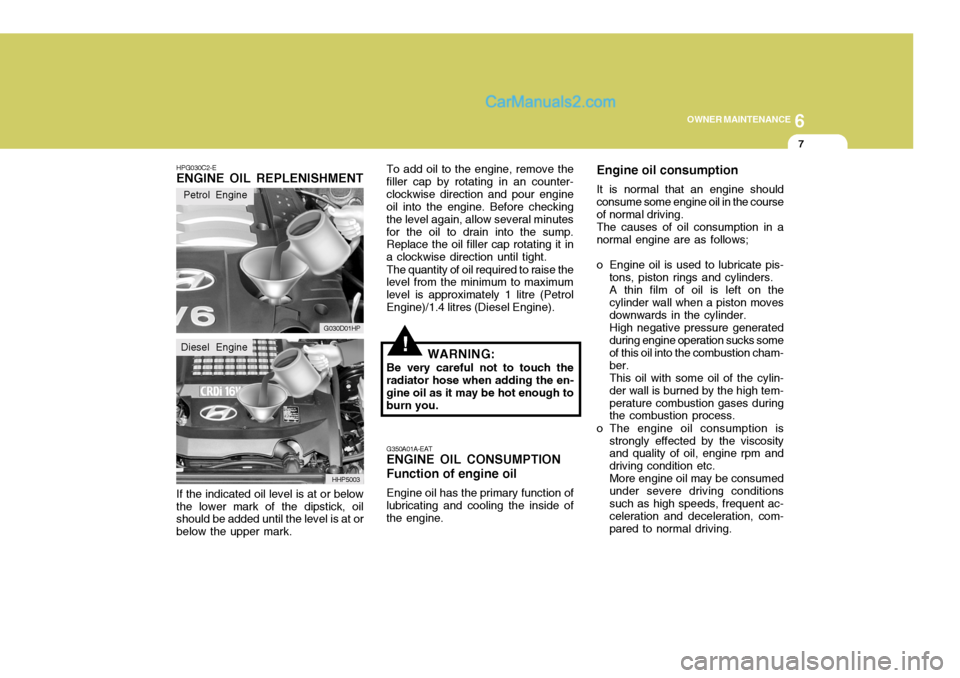
If the indicated oil level is at or below the lower mark of the dipstick, oil should be added until the level is at or below the upper mark. Engine oil consumption It is normal that an engine should consume some engine oil in the course of normal driving.The causes of oil consumption in anormal engine are as follows;
o Engine oil is used to lubricate pis-
tons, piston rings and cylinders. A thin film of oil is left on thecylinder wall when a piston movesdownwards in the cylinder.High negative pressure generatedduring engine operation sucks some of this oil into the combustion cham- ber.This oil with some oil of the cylin-der wall is burned by the high tem-perature combustion gases during the combustion process.
o The engine oil consumption is strongly effected by the viscosityand quality of oil, engine rpm and driving condition etc.More engine oil may be consumedunder severe driving conditionssuch as high speeds, frequent ac- celeration and deceleration, com- pared to normal driving.
HHP5003
G030D01HP
Petrol Engine
Diesel Engine!
To add oil to the engine, remove the filler cap by rotating in an counter-clockwise direction and pour engine oil into the engine. Before checking the level again, allow several minutesfor the oil to drain into the sump. Replace the oil filler cap rotating it in a clockwise direction until tight. The quantity of oil required to raise the level from the minimum to maximum level is approximately 1 litre (PetrolEngine)/1.4 litres (Diesel Engine).
WARNING:
Be very careful not to touch the
radiator hose when adding the en-gine oil as it may be hot enough toburn you.
Page 486 of 539
6 OWNER MAINTENANCE
8
!
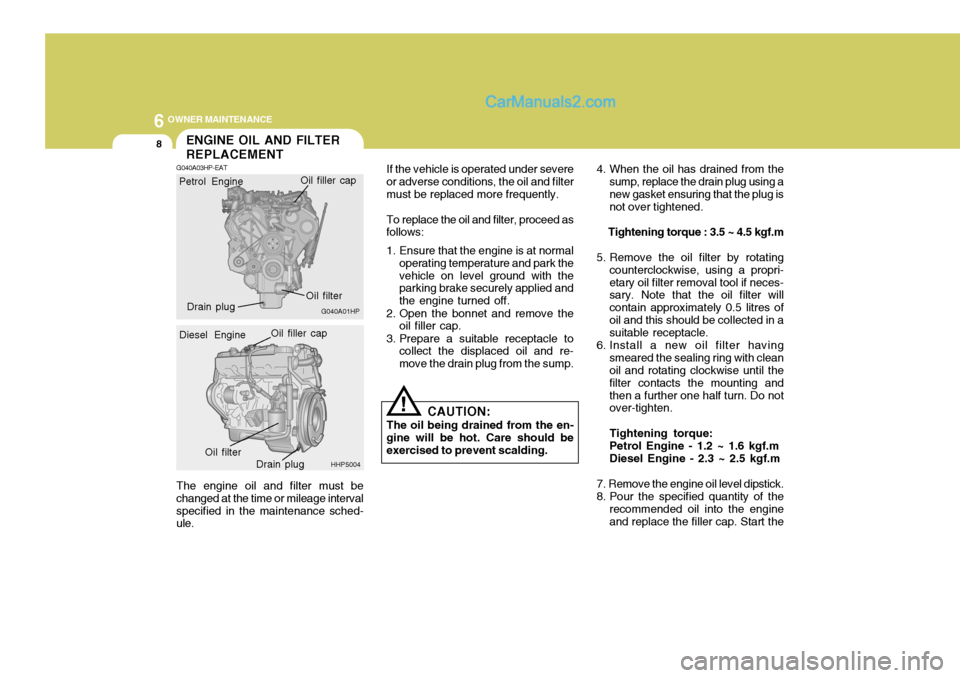
The engine oil and filter must be changed at the time or mileage intervalspecified in the maintenance sched- ule. If the vehicle is operated under severe
or adverse conditions, the oil and filter must be replaced more frequently.
To replace the oil and filter, proceed as
follows:
1. Ensure that the engine is at normal
operating temperature and park the vehicle on level ground with the parking brake securely applied and the engine turned off.
2. Open the bonnet and remove the oil filler cap.
3. Prepare a suitable receptacle to collect the displaced oil and re-move the drain plug from the sump. 4. When the oil has drained from the
sump, replace the drain plug using anew gasket ensuring that the plug is not over tightened.
Tightening torque : 3.5 ~ 4.5 kgf.m
5. Remove the oil filter by rotating counterclockwise, using a propri- etary oil filter removal tool if neces- sary. Note that the oil filter will contain approximately 0.5 litres ofoil and this should be collected in a suitable receptacle.
6. Install a new oil filter having smeared the sealing ring with cleanoil and rotating clockwise until the filter contacts the mounting andthen a further one half turn. Do not over-tighten. Tightening torque: Petrol Engine - 1.2 ~ 1.6 kgf.m Diesel Engine - 2.3 ~ 2.5 kgf.m
7. Remove the engine oil level dipstick.
8. Pour the specified quantity of the recommended oil into the engine and replace the filler cap. Start the
CAUTION:
The oil being drained from the en-
gine will be hot. Care should be exercised to prevent scalding.
ENGINE OIL AND FILTER REPLACEMENT
G040A03HP-EAT
G040A01HP
Petrol Engine
Oil filter
Drain plug Oil filler cap
HHP5004
Diesel Engine
Oil filler capOil filter
Drain plug