Page 305 of 490

1
CONTROLS AND EQUIPMENT
25
o Never use an infant carrier or child
safety seat that "hooks" over a seatback; it may not provide ad- equate security in an accident.
o Never allow a child to be held in a person's arms whilst they are in amoving vehicle, as this could re-sult in serious injury to the child in the event of an accident or a sudden stop. Holding a child in amoving vehicle does not provide the child with any means of pro- tection during an accident, even ifthe person holding the child is wearing a seat belt.
o If the child restraint seat is not
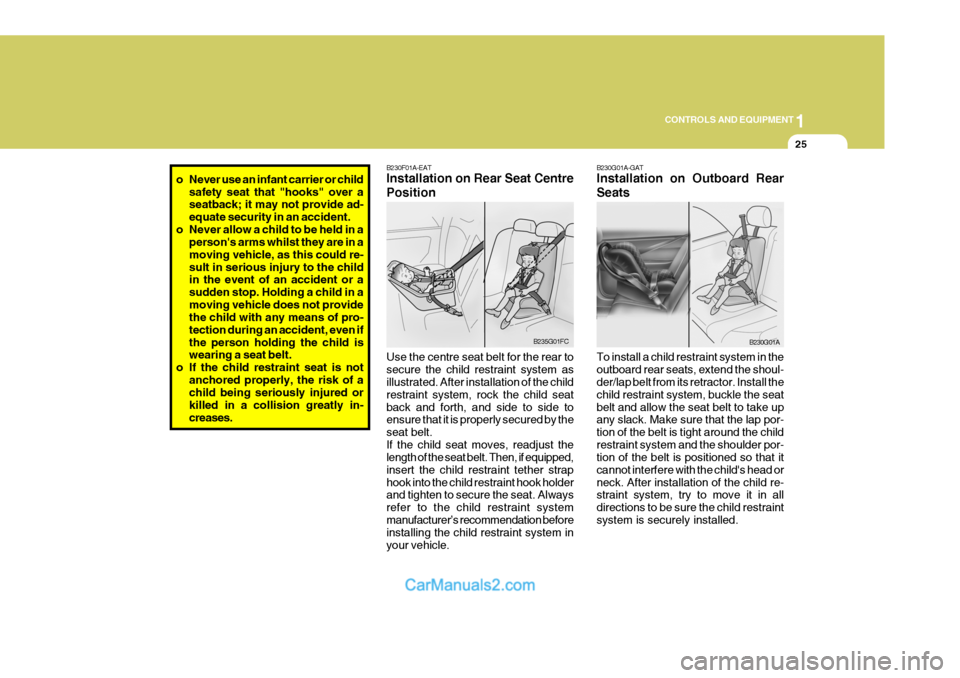
anchored properly, the risk of achild being seriously injured or killed in a collision greatly in-creases. B230F01A-EAT Installation on Rear Seat Centre Position Use the centre seat belt for the rear to secure the child restraint system as illustrated. After installation of the child restraint system, rock the child seatback and forth, and side to side to ensure that it is properly secured by the seat belt.If the child seat moves, readjust the length of the seat belt. Then, if equipped, insert the child restraint tether straphook into the child restraint hook holder and tighten to secure the seat. Always refer to the child restraint systemmanufacturer’s recommendation before installing the child restraint system in your vehicle.
B235G01FC
B230G01A-GAT Installation on Outboard Rear Seats To install a child restraint system in the outboard rear seats, extend the shoul- der/lap belt from its retractor. Install the child restraint system, buckle the seatbelt and allow the seat belt to take up any slack. Make sure that the lap por- tion of the belt is tight around the childrestraint system and the shoulder por- tion of the belt is positioned so that it cannot interfere with the child's head orneck. After installation of the child re- straint system, try to move it in all directions to be sure the child restraintsystem is securely installed.
B230G01A
Page 306 of 490

1CONTROLS AND EQUIPMENT
26
!
If you need to tighten the belt, pull more webbing toward the retractor. When youunbuckle the seat belt and allow it to retract, the retractor will automatically revert back to its normal seated pas-senger emergency locking usage con- dition. NOTE:
o Before installing the child restraint
system, read the instructions sup- plied by the child restraint system manufacturer.
o If the seat belt does not operate as described, have the systemchecked immediately by yourHyundai authorised repairer. WARNING:
Do not install any child restraint sys-tem in the front passenger seat.Should an accident occur and cause the passenger side airbag to deploy, it could severely injure or kill aninfant or child seated in an infant or child seat. Therefore, only use a child restraint system in the rear seat ofyour vehicle.B230B02A-GAT Using a Child Restraint System
with "Tether Anchorag e"System
For small children and babies, the use of a child seat or infant seat is strongly recommended. This child seat or infant seat should be of appropriate size forthe child and should be installed in accordance with the manufacturer's in- structions. It is further recommendedthat the seat be placed in the vehicle's rear seat since this can make an impor- tant contribution to safety. Your vehicleis provided three child restraint hook holders for installing the child seat or infant seat. B230B01FC
Cover, Child Restraint Hook Holder (4 door only)
Bolt, Holder (5/16"-30 mm) Washer, Conical Spring
Holder, Child Restraint Hook
Spacer (10 mm), Child Restraint Hook Holder Retainer Washer
Page 307 of 490
1
CONTROLS AND EQUIPMENT
27
B230E02FC-EAT Securing a Child Restraint Sys- tem with "Tether Anchorage"System Three child restraint hook holders are located on the vertical back panel (be- hind rear bumper bar). To install the child restraint seat
1. Route the child restraint seat strap over the seatback. For vehicles with adjustable head-rests, route the tether strap under the headrest and between the headrest posts, otherwise route the tether strapover the top of the seatback.
!
2. Connect the tether strap hook to the
child restraint seat hook holder and tighten to secure the seat. WARNING:
To install the Child Restraint Seat,for safety reasons the Seat should be positioned rearmost with the seatback in a vertical position, notreclined.
B230E01FC
Front of Vehicle
Back panel
Covering shelf
Tether strap hook
Page 308 of 490

1CONTROLS AND EQUIPMENT
28
This enables a much more secure and positive location with the added benefitof easier and quicker installation. An ISOFIX-seat can only be installed if it has vehicle-specific approval in ac- cordance with the requirements of ECE- R44. For your Hyundai, the HyundaiISOFIX GR1 / Hyundai Duo / Römer ISOFIX GR1 and the Römer Duo ISOFIX / Britax Duo ISOFIX is approved ac-cording to the requirement ECE-R44. This seat has been tested extensively by Hyundai and is recommended foryour Hyundai. NOTE: At present, this seat is the only one complying with that provision. Incase that other manufacturers will furnish proof of a respective certifi- cation, Hyundai is going to evaluatethis seat carefully and will give a recommendation provided that seat complies to the law. Please ask yourHyundai authorised repairer in this respect.On each side of the rear seat, between the cushion and backrest, are located a pair of ISOFIX anchorage points to- gether with a top tether mounting lo-cated in the luggage compartment. During the installation, the seat has to be engaged at the anchorage-points insuch a way whereby you can hear it click (check by pulling!) and has to be fixed with the Top Tether-belt to the toptether mounting located in the luggage compartment. The installing and the use of a child-seat has to be doneaccording to the installation manual for the ISOFIX-seat, whilst using the ISOFIX-child-seat, the rear-bench notallowed to be moved beyond the middle position to the forward direction.
B230D02FC-1
ISOFIX Anchor
B230C03FC-EAT Using a Child Restraint System with "ISOFIX" System and"Tether Anchorage" System
B230F01FC
ISOFIX is a standardised method of fitting child seats that eliminates the need to use the standard adult seat belt to secure the seat in the vehicle.
Page 309 of 490

1
CONTROLS AND EQUIPMENT
29
NOTE: An ISOFIX-child-seat can only be installed if the seat has a vehicle- specific approval according to ECE-R44. Before using the ISOFIX-child- seat, which was bought for another car, ask your Hyundai authorisedrepairer whether this seat-type is ap- proved and recommended for your Hyundai. To secure the child restraint seat 1. To engage the child restraint seat to
the ISOFIX anchor, insert the child restraint seat latch into the ISOFIX anchor. Listen for the audible "click"sound. 2. Connect the tether strap hook to the
child restraint hook holder and tightento secure the seat. Refer to "Secur- ing a Child Restraint System with the Tether Anchorage System" on page1-27.
WARNING:
o Do not install a child restraint seat at the centre of the rear seat usingthe vehicle's ISOFIX anchors. TheISOFIX anchors are only provided for the left and right outboard rear seating positions. Do not misuse the ISOFIX anchors by attempting to attach a child restraint seat inthe middle of the rear seat to the ISOFIX anchors. In a crash, the child restraint seat ISOFIX attach-ments may not be strong enough to secure the child restraint seat properly in the centre of the rearseat and may break, causing seri- ous injury or death.
!
B230D03FC
o When using the vehicle’s “ISOFIX”
system to install a child restraint system in the rear seat, all unused vehicle rear seat belt metal latchplates or tabs must be latched securely in their seat belt buckles and the seat belt webbing must beretracted behind the child restraint to prevent the child from reaching and taking hold of unretracted seatbelts.
o Do not mount more than one child
restraint to a child restraint loweranchorage point. Over-loading may cause the anchorage points or tether anchor to break, causingserious injury or death.
o Attach the ISOFIX or ISOFIX-com-
patible child restraint seat only tothe appropriate locations shown in the illustration.
o Always follow the installation and use instructions provided by themanufacturer of the child restraint.
Page 310 of 490

1CONTROLS AND EQUIPMENT
30
Rear
Centre
Age Group Seating Position
UX
XUX
X U, L1 U XU FUF
Rear
Outboard
Front
Passenger
0 : Up to 10 kg (0 ~ 9 months) 0+ : Up to 13 kg (0 ~ 2 years)I : 9kg to 18kg(9 months ~ 4 years) II & III : 15kg to36kg (4 ~ 12 years) X
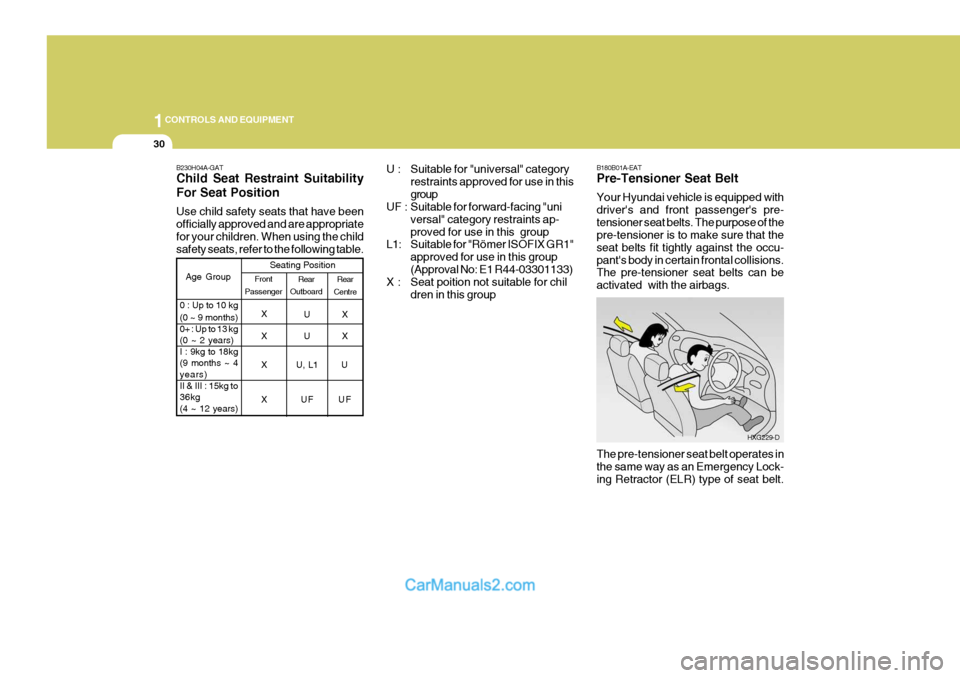
B230H04A-GAT Child Seat Restraint Suitability For Seat Position Use child safety seats that have been officially approved and are appropriatefor your children. When using the child safety seats, refer to the following table.
U : Suitable for "universal" category
restraints approved for use in this group
UF : Suitable for forward-facing "uni
versal" category restraints ap-proved for use in this group
L1: Suitable for "Römer ISOFIX GR1"
approved for use in this group(Approval No: E1 R44-03301133)
X : Seat poition not suitable for chil
dren in this group B180B01A-EAT Pre-Tensioner Seat Belt Your Hyundai vehicle is equipped with driver's and front passenger's pre-tensioner seat belts. The purpose of the pre-tensioner is to make sure that the seat belts fit tightly against the occu-pant's body in certain frontal collisions. The pre-tensioner seat belts can be activated with the airbags.
HXG229-D
The pre-tensioner seat belt operates in the same way as an Emergency Lock-ing Retractor (ELR) type of seat belt.
Page 311 of 490

1
CONTROLS AND EQUIPMENT
31
!
When the vehicle stops suddenly, or if the occupant tries to lean forward tooquickly, the seat belt retractor will lock into position. However, in certain frontal collisions, the pre-tensioner will acti-vate and pull the seat belt into tighter contact against the occupant's body. The seat belt pre-tensioner system consists mainly of the following compo-nents. Their locations are shown in the illustration.
1.SRS airbag warning light
2.Seat belt pre-tensioner assembly
3.SRS control module WARNING:
To obtain maximum benefit from apre-tensioner seat belt:
1. The seat belt must be worn cor- rectly.
2. The seat belt must be adjusted to
the correct position. NOTE:
o Both the driver's and front
passenger's pre-tensioner seat belts will be activated in certain frontal collisions. The pre- tensioner seat belts can be acti-vated with the airbags. The pre- tensioners will be activated under these conditions even if the seatbelts are not being worn at the time of the collision.
o When the pre-tensioner seat belts are activated, a loud noise may beheard and fine dust, which may appear to be smoke, may be vis-ible in the passenger compart- ment. These are normal operating conditions and are not hazard-ous.
o Although it is harmless, the fine
dust may cause skin irritation andshould not be breathed for pro- longed periods. Wash your hands and face thoroughly after an acci-dent in which the pre-tensioner seat belts were activated.
1
2
3Passenger's airbagDriver's airbag
B180B01O-D
Page 312 of 490

1CONTROLS AND EQUIPMENT
32
!!
AIR
BAG
CAUTION:
o Because the sensor that activates the SRS airbag is connected with the pre-tensioner seat belt, the SRS airbag warning light on theinstrument panel will blink for approximately 6 seconds after the ignition key has been turned to the"ON" position and then it should turn off.
o If the pre-tensioner seat belt is not
working properly, this warninglight will illuminate even if there is no malfunction of the SRS airbag system. If the SRS airbag warning lightdoes not illuminate when the igni- tion key is turned to "ON", or if it remains illuminated after blinkingfor approximately 6 seconds, or if it illuminates whilst the vehicle is being driven, please have anHyundai authorised repairer in- spect the pre-tensioner seat belt or SRS airbag system as soon aspossible. WARNING:
o Pre-tensioners are designed to operate only one time. After acti- vation, pre-tensioner seat belts must be replaced. All seat belts, ofany type, should always be re- placed after they have been worn during a collision.
o The pre-tensioner seat belt assem- bly mechanisms become hot dur-ing activation. Do not touch thepre-tensioner seat belt assemblies for several minutes after they have been activated.
o Do not attempt to inspect or re-
place the pre-tensioner seat beltsyourself. This must be done by an Hyundai authorised repairer.
o Do not strike the pre-tensioner seat belt assemblies.
o Do not attempt to service or repair
the pre-tensioner seat belt system in any manner. o Improper handling of the pre-
tensioner seat belt assemblies, and failure to heed the warnings to not strike, modify, inspect, replace,service or repair the pre-tensioner seat belt assemblies may lead to improper operation or inadvertentactivation and serious injury.
o Always wear the seat belts when
driving or travelling in a motorvehicle.