Page 78 of 316

The knob on the instrument panel
controls the brightness of the instru-
ment panel lights. Turn the knob to
adjust the brightness.
The lights will turn on again when
you unlock or open the driver’s door.
With the headlight switch off, the
high beam headlights come on with
reduced brightness when you turn
the ignition switch to the ON (II)
position and release the parking
brake. They remain on until you turn
the ignition switch of f , even if you
set the parking brake.
The headlights revert to normal
operation when you turn the switch
to the ‘‘ ’’ position. If you unlock the door, but do not
open it within 15 seconds, the lights
will go off. With the driver’s door
open, you will hear a lights-on
reminder chime.
This f eature turns of f the headlights,
parking lights, taillights, side marker
lights, license plate lights, and
instrument panel lights within 15
seconds of removing the key f rom
the ignition switch and closing the
driver’s door.
This feature activates if you leave
the headlight switch in the or
position, remove the key, then
open and close the driver’s door.
If you remove the key f rom the
ignition switch with the headlight
switch on, but do not open the door
and get out, the lights will turn of f
af ter 10 minutes.
On EX and EX-L models
Instrument Panel Brightness
Daytime Running L ights
(Canadian Models)
Automatic Lighting Of f Feature
Headlights, Instrument Panel Brightness
76
INSTRUMENT PANEL BRIGHTNESS
CONTROL KNOB
Page 79 of 316
. This causes all four
outside turn signals and both
indicators in the instrument panel to
f lash. Use the hazard warning lights
i")
Pushtheredbuttontoturnonthe
hazard warning lights (f our-way
flashers). This causes all four
outside turn signals and both
indicators in the instrument panel to
f lash. Use the hazard warning lights
if you need to park in a dangerous
area near heavy traffic, or if your
vehicle is disabled.The rear window def ogger will clear
fog, frost, and thin ice from the
window. Push the def ogger button to
turn it on and off. The indicator
above the button comes on to show
the def ogger is on. If you do not turn
it of f , the def ogger will shut itself of f
af ter about 15 minutes. It also shuts
of f when you turn of f the ignition
switch. You have to turn the
def ogger on again when you restart
the vehicle.
The def ogger wires on the inside of
the rear window can be accidentally
damaged. When cleaning the glass,
always wipe side-to-side. Make sure the rear window is clear
and you have good visibility bef ore
starting to drive.
Hazard Warning Button
Rear Window Def ogger
Hazard Warning Button, Rear Window Def ogger
Instruments and Controls
77
HAZARD WARNING BUTTON
EX and EX-L models
LX models
Page 83 of 316
, ACCESSORY
(I), ON (II), and START (III).
You can insert or
remove the key only in this position.
To turn the key, the shift lever must")
�µ�µ
�µ
�µ
The ignition switch has f our
positions: LOCK (0), ACCESSORY
(I), ON (II), and START (III).
You can insert or
remove the key only in this position.
To turn the key, the shift lever must
be in Park, and you must push the
key in slightly. This is the normal key
position when driving. Several of the
lights on the instrument panel come
on as a test when you turn the
ignition switch f rom the
ACCESSORY (I) to the ON (II)
position. You can
operate the audio system and the
accessory power sockets in this
position. If the f ront wheels are turned, the
anti-theft lock may make it difficult
to turn the key. Firmly turn the
steering wheel to the lef t or right as
you turn the key.
Use this position
only to start the engine. The switch
returns to the ON (II) position when
you let go of the key. You will hear a reminder beeper if
you leave the key in the LOCK (0) or
the ACCESSORY (I) position and
open the driver’s door. Remove the
key to turn of f the beeper.
TheshiftlevermustbeinPark
bef ore you can remove the key f rom
the ignition switch.
LOCK (0) ON (II) A CCESSORY (I)
ST A RT (III)
Ignition Switch
Instruments and Controls
81
Page 85 of 316

�µ
�µ
The childproof door locks are
designed to prevent children seated
in the rear f rom accidentally opening
the rear doors. Each rear door has a
lock lever near the edge. With the
lever in the LOCK position, the door
cannot be opened f rom the inside
regardless of the position of the lock
tab. To open the door, pull the lock
tab up, and use the outside door
handle. Pressthisbuttononce
to unlock the driver’s door. Push it
twice to unlock the other doors and
the tailgate. Some exterior lights will
f lash twice each time you press the
button.
Press this button once to
lock all doors and the tailgate. Some
exterior and interior lights will f lash.
When you push LOCK twice within 5
seconds, you will hear a beep to
verify that the security system has
set. You cannot lock it if any door is
not f ully closed or the key is in the
ignition switch. When you press the UNLOCK
button, the f ront and rear individual
map lights, depending on the interior
light control switch position, will
come on (see page ). If you do
not open any door, the lights stay on
f or about 30 seconds, then go out. If
you relock the doors and the tailgate
with the remote transmitter before
30 seconds have elapsed, the lights
will go of f immediately.
If you do not open any door within 30
seconds, the doors automatically
relock and the security system sets.
102
CONT INUED
Childproof Door L ocks
UNL OCK
LOCK Remote Transmitter
Childproof Door L ocks, Remote T ransmitter
Instruments and Controls
83
PANIC
BUTTON LOCK
BUTTON UNLOCK
BUTTON
LED
LOCK LEVER Unlock
Lock
Page 86 of 316
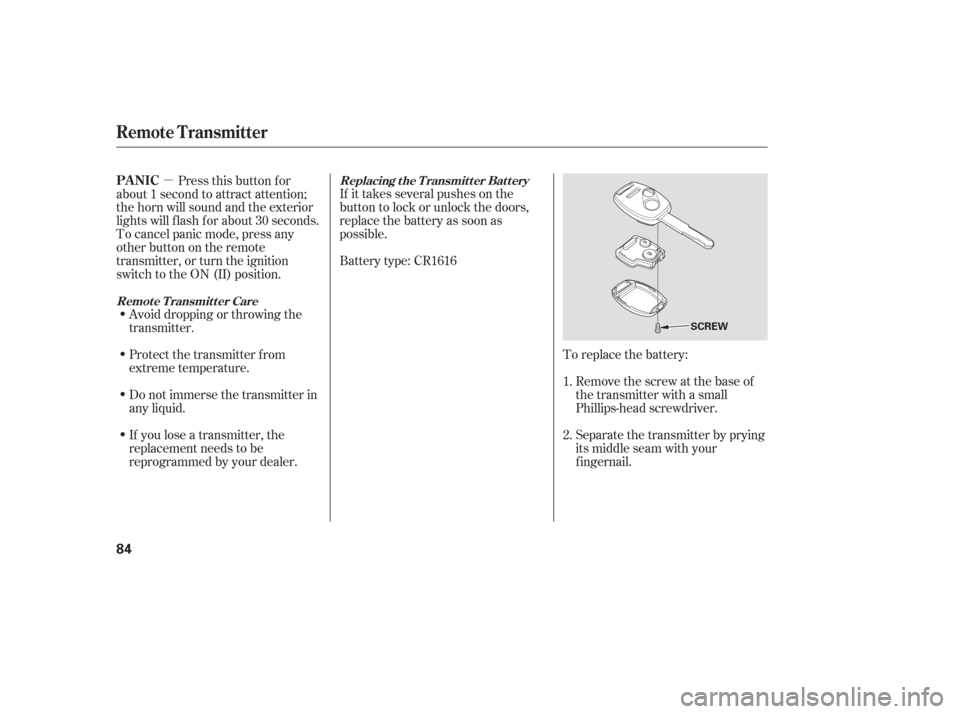
�µTo replace the battery:Remove the screw at the base of
the transmitter with a small
Phillips-head screwdriver.
Separate the transmitter by prying
its middle seam with your
f ingernail.
Battery type: CR1616 If it takes several pushes on the
button to lock or unlock the doors,
replace the battery as soon as
possible.
Pressthisbuttonfor
about 1 second to attract attention;
thehornwillsoundandtheexterior
lights will f lash f or about 30 seconds.
To cancel panic mode, press any
other button on the remote
transmitter, or turn the ignition
switch to the ON (II) position.
Avoid dropping or throwing the
transmitter.
If you lose a transmitter, the
replacement needs to be
reprogrammed by your dealer. Do not immerse the transmitter in
any liquid. Protect the transmitter from
extreme temperature. 1.
2.Replacing the Transmitter Battery
Remote Transmitter CarePA NIC
Remote Transmitter
84
SCREW
Page 94 of 316
Keeptheinsideandoutsidemirrors
clean and adjusted f or best visibility.
Be sure to adjust the mirrors bef ore
you start driving.
The inside mirror has day and night
positions. The night position reduces
glare f rom headlights behind you.
Flip the tab on the bottom edge of
the mirror to select the day or night
position.Therearviewmirrorhasacompass
function to indicate the vehicle’s
direction.
Refer to on page .
177
If equipped
Seats, Mirrors
Mirrors
Compass
92
TAB
Page 101 of 316

Be caref ul when you are using the
beverage holders. A spilled liquid
that is very hot can scald you or your
passengers. Liquid can also spill
f rom the rear door pocket beverage
holders when you close the rear
doors. Use only resealable
containers in the door pockets. The
f ront beverage holders can be
installed under the slide.
Spilled liquids can damage the
upholstery, carpeting, and electrical
components in the interior.Open the glove box by pulling the
bottom of the handle. Close it with a
f irm push. Lock or unlock the glove
box with the master key.
The glove box light comes on only
when the parking lights are on.
To open the console compartment,
pull up on the lever, and lif t the lid.
Pivot the door of the console f orward
and you can store a cellular phone, a
small notepad, and business cards in
it.
Interior Convenience Items
Beverage Holders Console CompartmentGlove Box
Instruments and Controls
99
An open glove box can cause
serious injury to your passenger
inacrash,evenifthe
passenger is wearing the seat
belt.
Always keep the glove box
closed while driving.
Page 104 of 316

There is a 115 volt AC power outlet
in the rear compartment on the
driver’s side. To use the AC power
outlet, open the rear compartment
lid and open the outlet cover. Insert
the plug into the receptacle slightly,
turn it 90° clockwise, then push in
the plug all the way.
Always run the engine when you use
the AC Power Outlet.The maximum capacity f or this
power outlet is 115 volt AC at 100
watts or less. If you use an appliance
which requires more than 100 watts,
it automatically stops supplying the
power. If this happens, turn the
ignition switch of f and turn it on
again.
The AC power outlet is not
designed f or electric appliances
which require high initial peak
wattage such as cathode-ray tube
type televisions, ref rigerators,
electric pumps, etc. It is also not
suitable f or devices that process
precise data such as medical
equipment or measuring instruments.
Any appliances that require an
extremely stable power supply such
as microcomputer-controlled electric
blankets, touch sensor lamps, etc.,
should not be connected to this
outlet. ON
All the individual map lights come
on.
None of the lights come on when a
door or the tailgate is opened.
The individual map lights in the
frontcanbeturnedonandoff with
the switches next to the lights.
When this switch is in the position:
When the switch is in the OFF position:
If equipped
Interior Convenience Items, Interior L ights
AC Power Outlet
Light Control Switch
102
NOTE:
DOOR
ACTIVATED
POSITIONOFF
ON