Page 105 of 316

The individual map lights in the
second and third rows cannot be
turned on.Door
Activated
The courtesy light between the map
lights comes on when you turn the
parking lights on. To adjust its
brightness, turn the Select/Reset
knob on the instrument panel.
The individual map lights come on
whenanydoororthetailgateis
opened, or when the remote
transmitter is used to unlock the
doors.
The individual map lights in the
second and third rows can be
turned on and of f by pressing the
lens.
The tailgate light comes on when
you open the tailgate if the light
switch is in the ON position.
The lights go out about 6 seconds
after all the doors and the tailgate
are closed. With any door or the
tailgate lef t open, the lights stay
on about 3 minutes, then go out. Turn on the f ront and second row
individual map lights by pushing the
lens. Push the lens again to turn it
off. You can also operate these lights
with the light control switch (see
page ).
The light in the tailgate has an on-of f
switch to control if the light comes
on when the tailgate is opened.
The courtesy lights in the f ront
doors and around the ignition switch
come on when you open any door.
Af ter you close the door, the ignition
switch light stays on f or several
seconds.
102
When the switch is in the
position:
Interior Lights
Courtesy Lights
Individual Map L ights
Tailgate Light
Individual Interior L ights
Instruments and Controls
103
Page 121 of 316

�µ�µ
�µ
If you are
traveling far from home and can no
longer receive your preset stations,
you can use the auto select feature to
find stations in the local area. Use the TRE/BAS
modes to adjust the tone to your
liking.
You can use the instrument panel
brightness control knob to adjust the
illumination of the audio system (see
page ). The audio system
illuminates when the parking lights
are on, even if the radio is of f .
These two
modes adjust the strength of the
sound coming f rom each speaker.
BAL adjusts the side-to-side strength,
while FAD adjusts the f ront-to-back
strength. Eachmodeisshowninthedisplayas
it changes. Turn the MODE knob to
adjust the setting to your liking.
When the level reaches the center,
you will see ‘‘C’’ in the display. The
system will automatically return the
display to the selected audio mode
about f ive seconds af ter you stop
adjusting a mode. ,pressthe
A. SEL button. This restores the
presets you originally set.
Press the A. SEL button. ‘‘A.SEL’’
f lashes in the display, and the system
goes into scan mode f or several
seconds. It stores the f requencies of
six AM and twelve FM stations in
the preset buttons.
You will see a ‘‘0’’ displayed af ter
pressing a preset button if auto
select cannot f ind a strong station f or
every preset button. Press the MODE (TUNE) knob
repeatedly to display the Bass (BAS),
Treble (TRE), Fader (FAD), and
Balance (BAL) settings.
If you do not like the stations auto
select has stored, you can store
other f requencies on the preset
buttons. Use the TUNE, SEEK, or
SCAN f unction to f ind stations, then
store them in the preset buttons as
described previously. 76To turn of f auto selectAUTO SELECT
A udio System L ighting Treble/Bass
Balance/Fader Adjusting the Sound
Playing the Radio
Features
119
Page 123 of 316
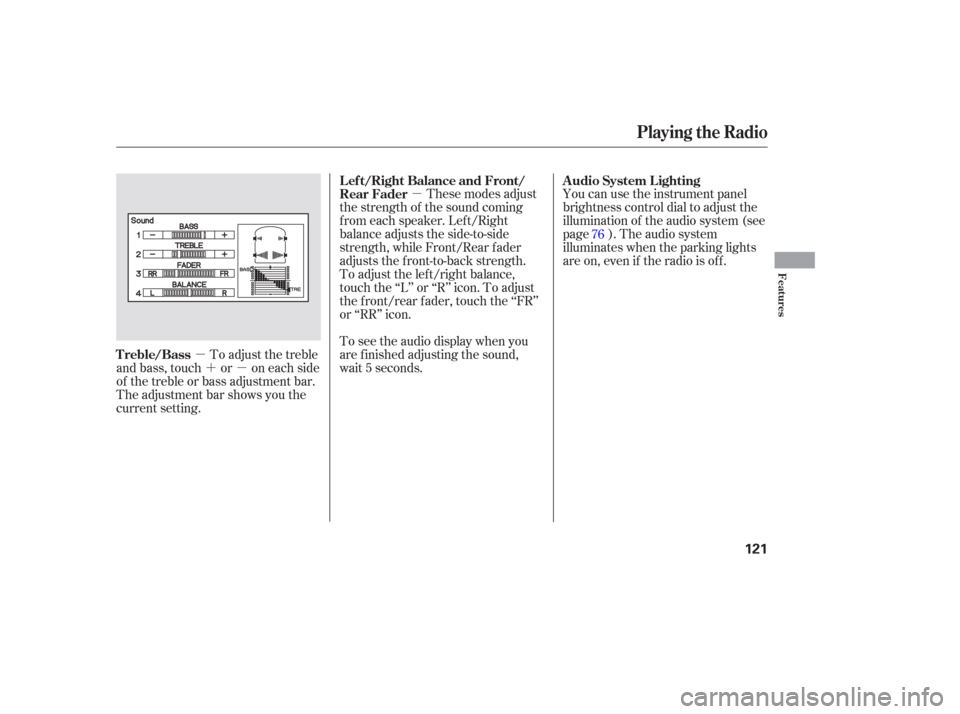
�µ
�µ �´�µ You can use the instrument panel
brightness control dial to adjust the
illumination of the audio system (see
page ). The audio system
illuminates when the parking lights
are on, even if the radio is of f .
These modes adjust
the strength of the sound coming
f rom each speaker. Lef t/Right
balance adjusts the side-to-side
strength, while Front/Rear f ader
adjusts the front-to-back strength.
To adjust the left/right balance,
touch the ‘‘L’’ or ‘‘R’’ icon. To adjust
the f ront/rear f ader, touch the ‘‘FR’’
or ‘‘RR’’ icon.
To see the audio display when you
are f inished adjusting the sound,
wait 5 seconds.
To adjust the treble
and bass, touch or on each side
of the treble or bass adjustment bar.
The adjustment bar shows you the
current setting. 76
A udio System L ighting
L ef t/Right Balance and Front/
Rear Fader
Treble/Bass
Playing the Radio
Features
121
Page 176 of 316

The security system helps to protect
your vehicle and valuables f rom thef t.
The horn sounds and a combination
of headlights, parking lights, side
marker lights, and taillights f lash if
someone attempts to break into your
vehicle. This alarm continues for 2
minutes, then the system resets. To
reset an alarm system bef ore the 2
minutes have elapsed, unlock the
driver’s f ront door with the key or
the remote transmitter.Once the security system is set,
opening any door without using the
key or the remote transmitter, or the
hood, will cause it to alarm. It also
alarms if the radio is removed from
the dashboard or the wiring is cut.The security system will not set if
the hood, the tailgate, or any door is
not f ully closed. If the system will not
set, check the Door and Tailgate
Open Monitor on the instrument
panel (see page ) to see if the
doors and the tailgate are f ully
closed. Since it is not part of the
monitor display, manually check the
hood.
Do not attempt to alter this system
or add other devices to it.
The security system automatically
sets 15 seconds after you lock the
doors, hood, and the tailgate. For the
system to activate, you must lock the
doors f rom the outside with the key,
lock tab, door lock switch, or remote
transmitter. The security system
indicator next to the driver’s door
lock starts blinking immediately to
show you the system is setting itself . 66
On EX and EX-L models
Security System
174
SECURITY SYSTEM INDICATOR
Page 193 of 316

Your dealer has Honda accessories
that allow you to personalize your
vehicle. These accessories have
been designed and approved f or your
vehicle, and are covered by warranty.When properly installed, cellular
phones, alarms, two-way radios, and
low-powered audio systems should
not interf ere with your vehicle’s
computer controlled systems, such
as your airbags and anti-lock brakes.Bef ore installing any accessory:
Make sure the accessory does not
obscure any lights, or interf ere
with proper vehicle operation or
perf ormance.
Modif ying your vehicle, or installing
some non-Honda accessories, can
make your vehicle unsaf e. Bef ore
you make any modif ications or add
anyaccessories,besuretoreadthe
f ollowing inf ormation.
Bef ore installing any electronic
accessory, have the installer
contact your dealer for assistance.
If possible, have your dealer
inspect the f inal installation.
Although non-Honda accessories
may f it on your vehicle, they may not
meet f actory specif ications, and
could adversely af f ect your vehicle’s
handling and stability. (See
‘‘Modif ications’’ on page f or
additional information.) Be sure electronic accessories do
not overload electrical circuits
(see page ) or interf ere with
proper operation of your vehicle.
192 283
A ccessories
A ccessories and Modif ications
Bef ore Driving
191
Improper accessories or
modifications can affect your
vehicle’s handling, stability, and
performance, and cause a
crash in which you can be hurt
or killed.
Follow all instructions in this
owner’s manual regarding
accessories and modifications.
Page 200 of 316

Your vehicle has a higher ground
clearance that allows you to travel
over bumps, obstacles, and rough
terrain. It also provides good
visibility so you can anticipate
problems earlier.
Because your vehicle rides higher
of f the ground, it has a high center
of gravity that can cause it to roll
over if you make abrupt turns. Utility
vehicles have a signif icantly higher
roll over rate than other types of
vehicles.
To prevent rollovers or loss of
control:Take corners at slower speeds
than you would with a passenger
vehicle.
Avoid sharp turns and abrupt
maneuvers whenever possible. Make sure the doors and the
tailgate are securely closed and
locked. Check the steering wheel
adjustment (see page ). Check the adjustment of the
inside and outside mirrors (see
page ). Check the seat adjustment (see
page ). Check that any items you may be
carrying are stored properly or
f astened down securely.
Make sure all windows, mirrors,
and outside lights are clean and
unobstructed. Remove f rost, snow,
or ice.
Youshoulddothefollowingchecks
and adjustments bef ore you drive
your vehicle. Do not carry heavy cargo on the
roof . Do not modif y your vehicle in any
way that would raise the center of
gravity.
Fasten your seat belt. Check that
your passengers have f astened
their seat belts (see page ).
When you start the engine, check
the gauges and indicators in the
instrument panel (see page ).
Visually check the tires. If a tire
looks low, use a gauge to check its
pressure (see page ). 3.
2. 1. 4.
5.
6.
7.
8.
9.
15
92
61
78
87
258
See page f or additional driving of f - highway guidelines. 223
Driving Guidelines
Preparing to Drive
198
Page 209 of 316

Always use the parking brake when
you park your vehicle. Make sure
the parking brake is set f irmly or
your vehicle may roll if it is on an
incline.
Set the parking brake bef ore you put
the transmission in Park. This keeps
the vehicle from moving and putting
pressure on the parking mechanism
in the transmission.Make sure the parking brake is
f ully released bef ore driving away.
Driving with the parking brake
partially set can overheat or
damage the rear brakes. If the vehicle is f acing downhill,
turn the front wheels toward the
curb. If the vehicle is f acing uphill, turn
the front wheels away from the
curb.
Turn of f the lights.
Place any packages, valuables, etc.
in the cargo area or take them
with you.
Lock the doors.
Check the indicator on the driver’s
door to verify that the security
system is set.
Never park over dry leaves, tall
grass, or other f lammable
materials. The hot three way
catalytic converter could cause
these materials to catch on fire. Make sure the moonroof (if
equipped) and the windows are
closed.
On vehicles with security system
Parking T ips
Parking Tips
Driving
207
Page 210 of 316

Check the brakes after driving
through deep water. Apply the
brakes moderately to see if they f eel
normal. If not, apply them gently and
f requently until they do. Be extra
cautious in your driving.
Resting your f oot on the pedal keeps
the brakes applied lightly, builds up
heat, and reduces their ef f ectiveness.
It also keeps your brake lights on all
the time, conf using drivers behind
you.
Constant application of the brakes
when going down a long hill builds
up heat and reduces their ef f ective-
ness. Use the engine to assist the
brakes by taking your f oot of f the
accelerator and downshif ting to a
lower gear. Your vehicle is equipped with disc
brakes at all f our wheels. A power
assist helps reduce the ef f ort needed
on the brake pedal. The anti-lock
brake system (ABS) helps you retain
steering control when braking very
hard. The hydraulic system that operates
the brakes has two separate circuits.
Each circuit works diagonally across
the vehicle (the lef t-f ront brake is
connected with the right-rear brake,
etc.). If one circuit should develop a
problem, you will still have braking
at two wheels. Braking System Design
Braking System
208