Page 174 of 420
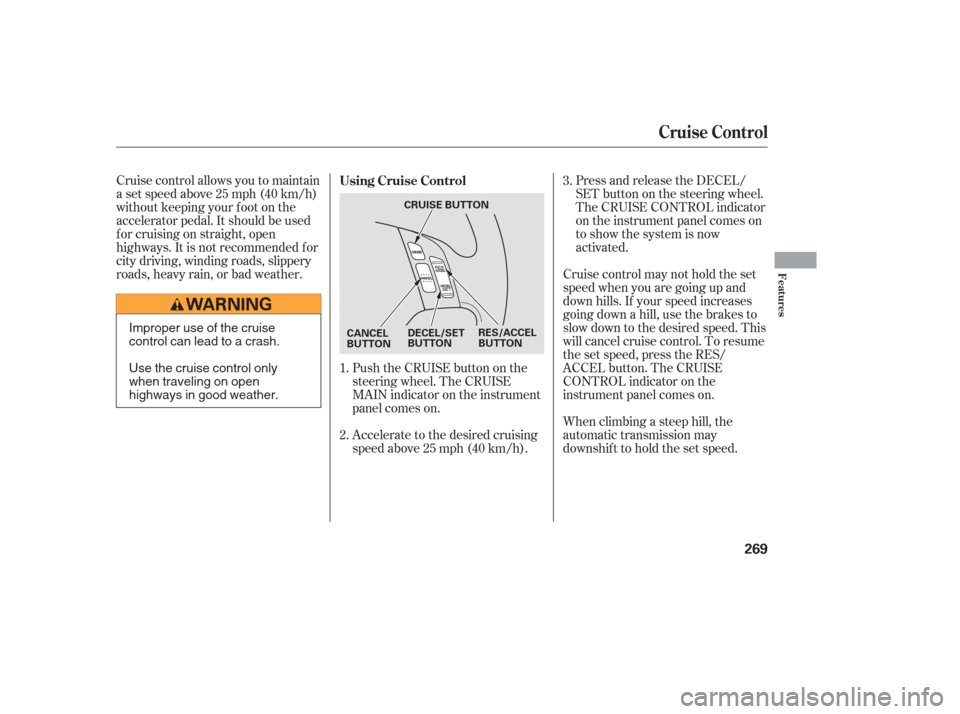
You can adjust the position of the
brake pedal, and accelerator pedal
when the shif t lever is in the Park
position. Push the top of the
adjustment switch to move the
pedals f orward, and the bottom to
move them backward.To adjust the pedals:
Pushandholdthetopof the
adjustment switch until pedals are
closest to you.
Adjust your seat and the steering
wheel so you can operate the
controls and steering wheel easily.
Pushandholdthebottomof the
adjustment switch until pedals are
in the position you can press them
f ully and comf ortably.
Do not adjust the pedals with your
f oot on or under either pedal. 1.
2.
3.
On Touring models only
Parking Brake, Adjustable Driver’s Foot Pedals
A djustable Driver’s Foot Pedals
Inst rument s and Cont rols
173
PEDAL POSITION
ADJUSTMENT SWITCHDriving the vehicle with the parking
brake applied can damage the rear
brakes and axles.
Page 192 of 420

The standard audio system has
many f eatures. This section
describes those f eatures and how to
use them. (If you selected an
optional audio system, ref er to the
operating instructions that came
with it.) The heating and air conditioning
system in your vehicle provides a
comf ortable driving environment in
all weather conditions.
The security system helps to
discourage vandalism and thef t of
your vehicle. Your vehicle has an anti-theft audio
system that requires a code number
to enable it..............
Vents, Heating, and A/C .192
Using Automatic Climate ...................................
Control .197
.........
Using the Rear A/C Unit .198
...................
Rear Climate Control .201
..............
Climate Control Sensors .202
..........
Playing the AM/FM Radio .203
............
AM/FM Radio Reception .209
...
Playing the XM Satellite Radio .211
..................................
Playing a CD .217
...................................
CD Changer .220
....................
Protecting Your CDs .226
.....
CD Changer Error Messages .227
...............................
Playing a Tape .228
.............
Steering Wheel Controls .233
.................
Radio Thef t Protection .234
........
Rear Entertainment System .235
..........................
Playable DVDs .263
............................
Security System .268
...............................
Cruise Control .269
HomeLink Universal ................................
Transceiver .272
................
Parking Sensor System .277
.
Rear View Camera and Monitor .281
Features
Features
191
Page 203 of 420
The direction and quantity of airf low
f rom each rear ceiling vent is
adjustable.
To adjust the direction of air coming
f rom a rear ceiling vent, move the
tab in the center of each vent back-
and-forth, and rotate the vent with
the tab. The lever next to each vent
can be opened and closed to regulate
the amount of airf low.Theclimatecontrolsystemhasthree
sensors. A sunlight sensor is in the
top of the dashboard, and a
temperature sensor is next to the
steering column. There is also a rear
sensor on the rear sidewall near the
exhaust vent. Do not cover the
sensors or spill any liquid on them. Sunlight and T emperature
Sensors
Rear Ceiling Vents
Rear Climate Control, Climate Control Sensors
202
SUNLIGHT SENSOR TEMPERATURE SENSOR
TAB
LEVER
Page 234 of 420

�´
�µ �´
�µ
�´ �µ
�Û�Ý
The MODE button changes the
mode. Pressing the button
repeatedly selects FM1, FM2, AM,
XM Radio (U.S. models), CD (if a
disc is loaded) or a tape (if the
optional tape player is installed and a
tape is loaded).
If you are listening to the radio, use
the CH button to change stations.
Each time you press the top ( ) of
the button, the system goes to the
next preset station on the band you
are listening to. Press the bottom
( ) to go back to the previous
station. If youareplayingaCD,thesystem
skips to the beginning of the next
track each time you press the top
( ) of the CH button. Press the
bottom ( ) to return to the
beginning of the current track. Press
it again to return to the previous
track. You will see the disc and track
numbers in the display.
Three controls f or the audio system
are mounted in the steering wheel
hub. They let you control basic
f unctions without removing your
hand f rom the steering wheel. If youareplayingatape,pressthe
top ( ) of the CH button to advance
to the next selection. Press the
bottom( )togobacktothe
previous selection. The system
senses a silent period, then goes
back to play mode.
The VOL button adjusts the volume
up ( ) or down ( ). Press the top
or bottom of the button and hold it
until the desired volume is reached,
then release it.
On EX, EX-L and Touring models
Steering Wheel Controls
Features
233
MODE BUTTON
VOL BUTTON
CH BUTTON
Page 270 of 420

Press and release the DECEL/
SET button on the steering wheel.
The CRUISE CONTROL indicator
on the instrument panel comes on
to show the system is now
activated.
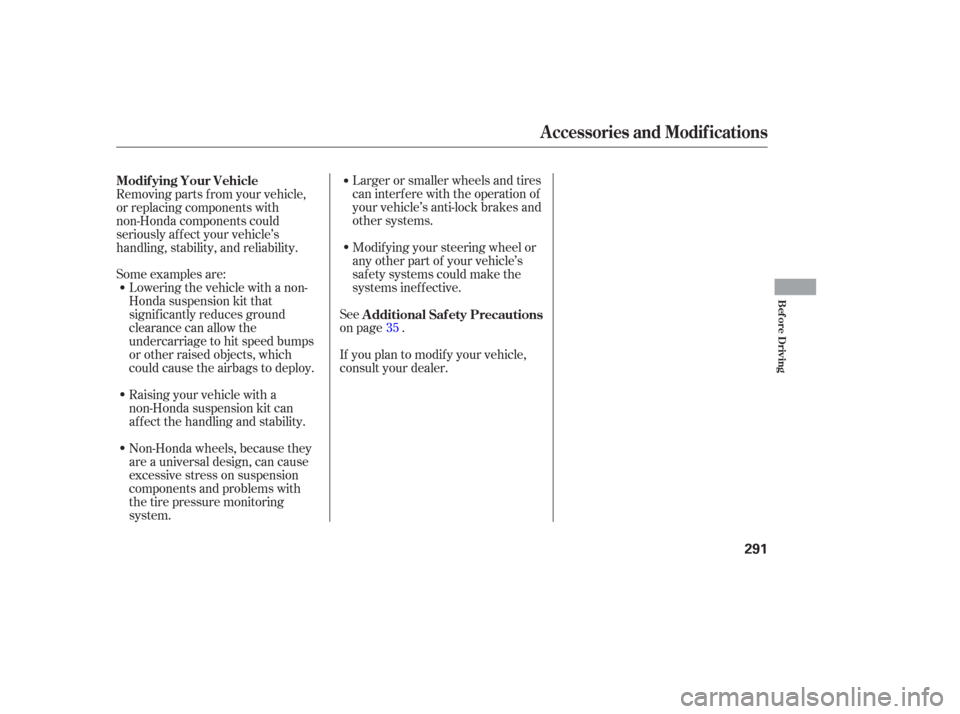
Cruise control allows you to maintain
asetspeedabove25mph(40km/h)
without keeping your f oot on the
accelerator pedal. It should be used
f or cruising on straight, open
highways. It is not recommended f or
city driving, winding roads, slippery
roads, heavy rain, or bad weather.
When climbing a steep hill, the
automatic transmission may
downshifttoholdthesetspeed.
Accelerate to the desired cruising
speedabove25mph(40km/h). Cruise control may not hold the set
speed when you are going up and
down hills. If your speed increases
going down a hill, use the brakes to
slow down to the desired speed. This
will cancel cruise control. To resume
the set speed, press the RES/
ACCEL button. The CRUISE
CONTROL indicator on the
instrument panel comes on.
Push the CRUISE button on the
steering wheel. The CRUISE
MAIN indicator on the instrument
panel comes on.
1.
2. 3.
Using Cruise Control
Cruise Control
Features
269
DECEL/SET
BUTTON
CANCEL
BUTTON RES/ACCEL
BUTTON
CRUISE BUTTONImproper use of the cruise
control can lead to a crash.
Use the cruise control only
when traveling on open
highways in good weather.
Page 272 of 420
Tap the brake pedal.
Push the CANCEL button on the
steering wheel.When you push the CANCEL button
or tap the brake pedal, the system
remembers the previously set speed.
To return to that speed, accelerate to
above25mph(40km/h),andthen
press and release the RES/ACCEL
button. The CRUISE CONTROL
indicator comes on. The vehicle
accelerates to the same speed as
bef ore.
You can cancel cruise control in any
of these ways: Pressing the CRUISE button turns
the system completely of f and erases
the previous set speed.
Push the CRUISE button on the
steering wheel. Resuming the Set Speed
Cancelling Cruise Control
Cruise Control
Features
271
CANCEL BUTTON CRUISE BUTTON
Page 292 of 420

Some examples are:Larger or smaller wheels and tires
can interf ere with the operation of
your vehicle’s anti-lock brakes and
other systems.
Lowering the vehicle with a non-
Honda suspension kit that
signif icantly reduces ground
clearance can allow the
undercarriage to hit speed bumps
or other raised objects, which
could cause the airbags to deploy.
Raising your vehicle with a
non-Honda suspension kit can
af f ect the handling and stability. Modif ying your steering wheel or
any other part of your vehicle’s
saf ety systems could make the
systems inef f ective.
If you plan to modif y your vehicle,
consult your dealer. See
on page .
Removing parts f rom your vehicle,
or replacing components with
non-Honda components could
seriously af f ect your vehicle’s
handling, stability, and reliability.
Non-Honda wheels, because they
are a universal design, can cause
excessive stress on suspension
components and problems with
the tire pressure monitoring
system. 35
Modif ying Your Vehicle
Additional Saf ety Precautions
A ccessories and Modif ications
Bef ore Driving
291
Page 299 of 420
Youshoulddothefollowingchecks
and adjustments bef ore you drive
your vehicle.Make sure all windows, mirrors,
and outside lights are clean and
unobstructed. Remove f rost, snow,
or ice.
Check that the hood is f ully closed.
Visually check the tires. If a tire
looks low, use a gauge to check its
pressure.
Check that any items you may be
carrying are stored properly or
f astened down securely. Check the seat adjustment (see
page ).
Check the adjustment of the
inside and outside mirrors (see
page ).
Check the steering wheel
adjustment (see page ).
Make sure the doors and the
tailgate are securely closed and
locked.
Fasten your seat belt. Check that
your passengers have f astened
their seat belts (see page ).
When you start the engine, check
the gauges and indicators in the
instrument panel (see page ).
3.
2.
1.
4. 5.
6.
7.
8.
9.
10. 16
61
153
131
171
Preparing to Drive
298