Page 261 of 420
To change the password, select
‘‘Password.’’ You will see the above
menu displayed. Select ‘‘Yes’’ by
pressing the or button,
then press the ENT button.
If you select ‘‘No,’’ and press the
ENT button, the display returns to
the ‘‘Others’’ menu.Select the f irst digit by pressing the
, , , or button,
and enter it by pressing the ENT
button. Repeat this until all f our
digits are entered. When you enter
the f ourth number, the cursor
automatically moves to ‘‘ENT’’ on the
display. Press the ENT button on the
control panel. If the system does not recognize the
password you entered, you will see
the above display. Repeat the
password setting steps until you
enter the correct password.
Rear Entertainment System
260
Page 262 of 420
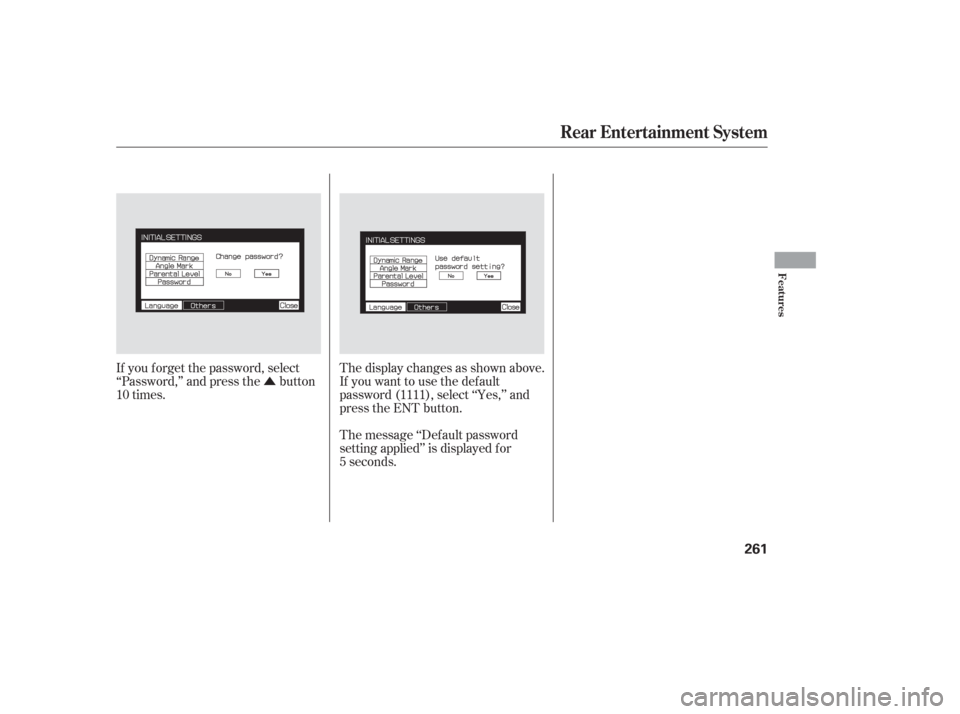
�Û
If you f orget the password, select
‘‘Password,’’ and press the button
10 times. The display changes as shown above.
If you want to use the def ault
password (1111), select ‘‘Yes,’’ and
press the ENT button.
The message ‘‘Def ault password
setting applied’’ is displayed f or
5 seconds.
Rear Entertainment System
Features
261
Page 263 of 420

If it takes several pushes on the
button to operate the rear
entertainment system, have your
dealer replace the batteries as soon
as possible.
The rear control panel can be
detached f rom the ceiling unit and
used as a remote control. To remove
it f rom the ceiling unit, press the
release button. The control panel will
swing down partway. Pivot it down
f urther past the detent until it
detaches f rom the hinge. To reinstall
it, reverse the procedure.
Battery type: BR3032
As required by the FCC: This device
complies with Part 15 of the FCC rules.Operation is subject to the f ollowing twoconditions: (1) This device may notcause harmf ul interf erence, and (2) thisdevice must accept any interf erencereceived, including interf erence thatmay cause undesired operation.
Changes or modif ications not expresslyapproved by the party responsible f orcompliance could void the user’sauthority to operate the equipment.
This device complies with IndustryCanada Standard RSS-210. Operation issubject to the f ollowing two conditions:(1) this device may not causeinterf erence, and (2) this device mustaccept any interf erence that may causeundesired operation of the device.Remote Control Replacing the Remote Control
Batteries
Rear Entertainment System
262
COVER
RELEASE BUTTON
Page 270 of 420

Press and release the DECEL/
SET button on the steering wheel.
The CRUISE CONTROL indicator
on the instrument panel comes on
to show the system is now
activated.
Cruise control allows you to maintain
asetspeedabove25mph(40km/h)
without keeping your f oot on the
accelerator pedal. It should be used
f or cruising on straight, open
highways. It is not recommended f or
city driving, winding roads, slippery
roads, heavy rain, or bad weather.
When climbing a steep hill, the
automatic transmission may
downshifttoholdthesetspeed.
Accelerate to the desired cruising
speedabove25mph(40km/h). Cruise control may not hold the set
speed when you are going up and
down hills. If your speed increases
going down a hill, use the brakes to
slow down to the desired speed. This
will cancel cruise control. To resume
the set speed, press the RES/
ACCEL button. The CRUISE
CONTROL indicator on the
instrument panel comes on.
Push the CRUISE button on the
steering wheel. The CRUISE
MAIN indicator on the instrument
panel comes on.
1.
2. 3.
Using Cruise Control
Cruise Control
Features
269
DECEL/SET
BUTTON
CANCEL
BUTTON RES/ACCEL
BUTTON
CRUISE BUTTONImproper use of the cruise
control can lead to a crash.
Use the cruise control only
when traveling on open
highways in good weather.
Page 271 of 420

Press and hold the DECEL/SET
button. Release the button when
you reach the desired speed.
To slow down in very small
amounts, tap the DECEL/SET
button repeatedly. Each time you
do this, your vehicle will slow
down about 1 mph (1.6 km/h).
Tap the brake pedal lightly with
your f oot. The CRUISE
CONTROL indicator on the
instrument panel goes out. When
the vehicle slows to the desired
speed, press the DECEL/SET
button.Resting your f oot on the brake pedal
causes cruise control to cancel.
You can increase the set speed in
any of these ways:
Press and hold the RES/ACCEL
button. When you reach the
desired speed, release the button.
Push the accelerator pedal,
accelerate to the desired speed,
and press the DECEL/SET button.
To increase the speed in very
small amounts, tap the RES/
ACCEL button. Each time you do
this, your vehicle will speed up
about 1 mph (1.6 km/h). You can decrease the set speed in
any of these ways:
Even with cruise control turned on,
you can still use the accelerator
pedal to speed up f or passing. Af ter
completing the pass, take your foot
of f the accelerator pedal. The vehicle
will return to the set speed.
Changing the Set Speed
Cruise Control
270
Page 272 of 420
Tap the brake pedal.
Push the CANCEL button on the
steering wheel.When you push the CANCEL button
or tap the brake pedal, the system
remembers the previously set speed.
To return to that speed, accelerate to
above25mph(40km/h),andthen
press and release the RES/ACCEL
button. The CRUISE CONTROL
indicator comes on. The vehicle
accelerates to the same speed as
bef ore.
You can cancel cruise control in any
of these ways: Pressing the CRUISE button turns
the system completely of f and erases
the previous set speed.
Push the CRUISE button on the
steering wheel. Resuming the Set Speed
Cancelling Cruise Control
Cruise Control
Features
271
CANCEL BUTTON CRUISE BUTTON
Page 273 of 420

�µ
The HomeLinkUniversal
Transceiver built into your vehicle
canbeprogrammedtooperateupto
three remote controlled devices
around your home, such as garage
doors, lighting, or home security
systems.
If you are training HomeLink to
operate a garage door or gate, you
should unplug the motor f or that
device during training. Repeatedly
pressing the remote control button
could burn out the motor. Always ref er to the opening
instructions and saf ety inf ormation
that came with your garage door
opener or other equipment you
intend to operate with HomeLink. If
you do not have this inf ormation,
contact the manuf acturer of the
equipment.
If you are training the second or
third buttons, go directly to step 1.
HomeLink stores the code in a
permanent memory. There should
be no need to retrain HomeLink if
your vehicle’s battery goes dead or is
disconnected. If your garage door
opener was manuf actured bef ore
April 1982, you may not be able to
program HomeLink to operate it.
They do not have the saf ety f eature that causes the motor to stop and
reverse if an obstacle is detected
during closing, increasing the risk of
injury.
For quick and accurate training,
make sure the remote control
transmitter for the device (garage
door, automatic gate, security
system, etc.) has a fresh battery.
If you just
received your vehicle and have not
trained any of the buttons in
HomeLink bef ore, you should erase
any previously learned codes bef ore
training the first button.
Todothis,pressandholdthetwo
outside buttons on the HomeLink
Transceiver for about 20 seconds
until the red indicator f lashes.
Release the buttons, then proceed to
step 1.
On EX, EX-L and Touring models
General Inf ormation T raining HomeL ink
Important Saf ety Precautions Bef ore you begin
HomeL ink Universal Transceiver
272
Page 274 of 420

Unplug the garage door opener
motor f rom the electrical outlet.
Holdtheendof thegaragedoor
opener remote transmitter 2 to 5
inches f rom HomeLink. Make
sure you are not blocking your
view of the red indicator in
HomeLink.Press and hold the remote
transmitter button and one of the
HomeLink buttons at the same
time.
Press and hold the remote
transmitter button and one of the
HomeLink buttons at the same
time. While continuing to hold the
HomeLink button, press and
release the remote transmitter
button every 2 seconds.
Plug in the garage door opener
motor, then test the HomeLink
button by pushing it f or about 1
second.
If the red indicator in HomeLink
continues to f lash slowly (does
not f lash rapidly), your remote
transmitter may stop
transmitting after a short time.
Go to step 4.
If the button does not work go
to step 6. If the button works,
programming is complete. If the red indicator in HomeLink
continues to f lash slowly (does
not begin to f lash rapidly),
repeat steps 2 thru 4.
If the red indicator in HomeLink
begins to f lash slowly at f irst,
then rapidly, release both
buttons, and go to step 5.
If the red indicator in HomeLink
begins to f lash slowly at f irst,
then rapidly, release both
buttons, and go to step 5.
2. 3.
1. 4.
5.
CONT INUED
HomeL ink Universal Transceiver
Features
273