Page 43 of 253

Af ter conf irming that the belt is
locked, grab the shoulder part of
the belt near the buckle, and pull
up to remove any slack from the
lap part of the belt. Remember, if
the lap part of the belt is not tight,
the child seat will not be secure.Push and pull the child seat
f orward and f rom side-to-side to
verif y that it is secure enough to
stay upright during normal driving
maneuvers. If the child seat is not
secure, unlatch the belt, allow it to
retract f ully, then repeat these
steps.
To remove slack, it may help to
putweightonthechildseat,or
push on the back of the seat while
pulling up on the belt. To deactivate the locking
mechanism and remove a child seat,
unlatch the buckle, unroute the seat
belt, and let the belt f ully retract. Since a tether can provide additional
security to the lap/shoulder belt
installation, we recommend using a
tether whenever one is required or
available.
A child seat with a tether can be
installed in any seating position in
the back seat, using one of the
anchorage points shown above.
4.
5.
CONT INUED
Installing a Child Seat with a
Tether
Installing a Child Seat
Driver and Passenger Saf ety
47
COVER
ANCHORAGE POINTS
ANCHOR
�����—�����—�����y�
����
��������y���
�(�#���������y���������y
Page 53 of 253
�Î
�Î
�Î �Î
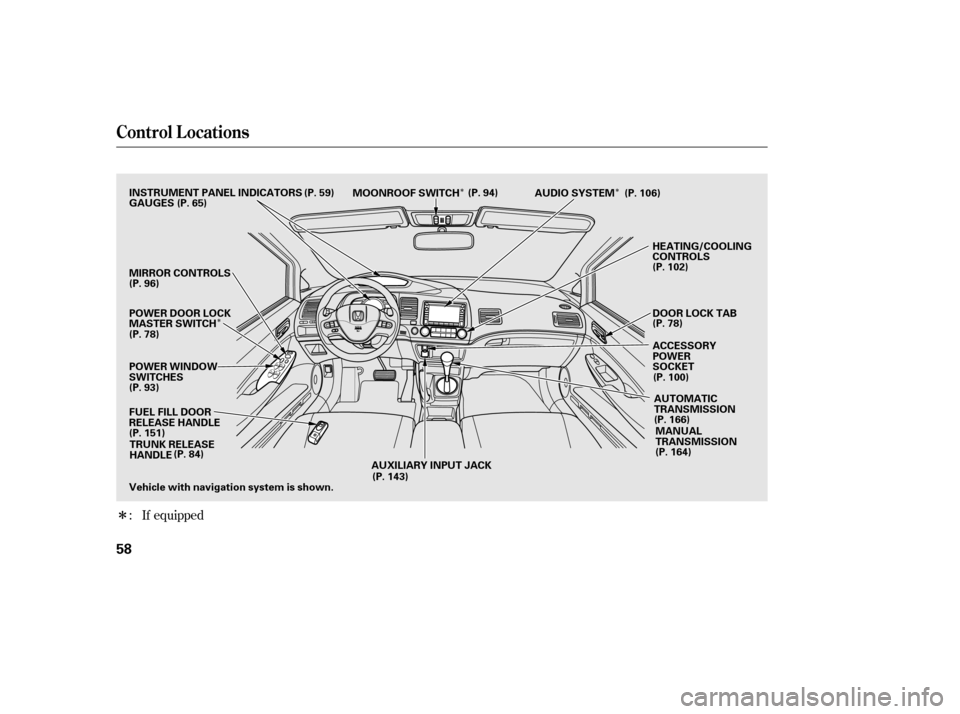
: If equipped
Control L ocat ions
58
POWER WINDOW
SWITCHES AUDIO SYSTEM
HEATING/COOLING
CONTROLS
POWER DOOR LOCK
MASTER SWITCH
MIRROR CONTROLS
FUEL FILL DOOR
RELEASE HANDLE
AUTOMATIC
TRANSMISSION
MANUAL
TRANSMISSION
MOONROOF SWITCH
(P. 94)
(P. 96)
(P. 78)
(P. 93)
(P. 151) (P. 106)
(P. 102)
(P. 78)
(P. 166)(P. 164)
(P. 100)
(P. 65)
TRUNK RELEASE
HANDLE (P. 84)
Vehicle with navigation system is shown. INSTRUMENT PANEL INDICATORS (P. 59)
ACCESSORY
POWER
SOCKET
AUXILIARY INPUT JACK (P. 143) DOOR LOCK TAB
GAUGES
�����—�����—���
�y�
����
��������y���
�(�#���������y�������
�y
Page 54 of 253
The U.S. instrument panel is shown. Dif f erences f or Canadian models are noted inthe text.
Instrument Panel
Inst rument s and Cont rols
59
IMMOBILIZER SYSTEM
INDICATOR
CHARGING SYSTEM
INDICATOR
LOW OIL PRESSURE
INDICATOR SEAT BELT REMINDER
INDICATOR
MAINTENANCE MINDER INDICATOR SUPPLEMENTAL
RESTRAINT SYSTEM
INDICATOR
PARKING BRAKE AND BRAKE SYSTEM
INDICATOR
LIGHTS ON
INDICATOR
CRUISE CONTROL
INDICATOR
CRUISE MAIN
INDICATOR SECURITY SYSTEM INDICATOR
LOW FUEL
INDICATOR
SIDE AIRBAG
OFF INDICATOR
DOOR-OPEN
INDICATOR
TRUNK-OPEN
INDICATOR
ANTI-LOCK BRAKE
SYSTEM INDICATOR
MALFUNCTION INDICATOR
LAMP HIGH BEAM
INDICATOR
(P. 64)
(P. 63) (P. 63)
(P. 61) (P. 61)
(P. 62)
(P. 62) (P. 61)(P. 60)(P. 63)
(P. 61) (P. 60)
(P. 62)
(P. 62)
(P. 63)
(P. 62)
DAYTIME RUNNING
LIGHTS
INDICATOR
(P. 64)(P. 64)
(P. 64)
�����—�����—�����y�
����
����
���y���
�(�#���������y���������y
Page 56 of 253
 position. It will then go of f if
you have inserted a properly-coded
ignition key. If it is not a properly-
coded key")
This indicator comes on brief ly when
you turn the ignition switch to the
ON (II) position. It will then go of f if
you have inserted a properly-coded
ignition key. If it is not a properly-
coded key, the indicator will blink,
and the engine will not start (see
page ).
This indicator normally comes on f or
a f ew seconds when you turn the
ignition switch to the ON (II)
position. If it comes on at any other
time, there is a problem with the
ABS. If this happens, have your
vehicle checked at a dealer. With
this on, your vehicle still has normal
braking ability but no anti-lock
brakes. For more inf ormation, see
page .
This indicator comes on f or several
seconds when you turn the ignition
switch to the ON (II) position. If it
comes on at any other time, it
indicates a potential problem with
your f ront airbags. This indicator will
also alert you to a potential problem
with your side airbags, passenger’s
side airbag automatic cutoff system,
side curtain airbags, automatic seat
belt tensioners, driver’s seat position
sensor, or the f ront passenger’s
weight sensors. For more
inf ormation, see page .
This indicator comes on f or several
seconds when you turn the ignition
switch to the ON (II) position. If it
comes on at any other time, it
indicates that the passenger’s side
airbag has automatically shut off.
For more inf ormation, see page . 76
172 32
31
Supplemental Restraint
System Indicator
Immobilizer System
Indicator
Anti-lock Brake System
(A BS) Indicator Side Airbag Of f
Indicator
Instrument Panel Indicators
Inst rument s and Cont rols
61
U.S. Canada
�����—�����—���
�y�
����
��������y���
�(�#���������y���������y
Page 57 of 253

This indicator comes on if the trunk
lid is not closed tightly.
This indicator comes on if any door
is not closed tightly.
This indicator reminds you that the
exterior lights are on. It comes on
when the light switch is in either the
or position. If you turn the
ignition switch to the ACCESSORY
(I) or LOCK (0) position without
turning of f the light switch, this
indicator will stay on. A reminder
chime will also sound when you open
the driver’s door.
The lef t or right turn signal indicator
blinks when you signal a lane change
or turn. If an indicator does not blink
or blinks rapidly, it usually means
one of the turn signal bulbs is
burned out (see pages and ).
Replace the bulb as soon as possible,
since other drivers cannot see that
you are signaling.
When you press the hazard warning
button, both turn signal indicators
and all turn signals on the outside of
the vehicle f lash. If this indicator comes on when the
ignition switch is turned to the ON
(II) position and the parking brake is
released, it means there is a problem
in a circuit. Have your vehicle
checked by your dealer.
This indicator comes on with the
high beam headlights. For more
inf ormation, see page .
This indicator also comes on with
reduced brightness when the
daytime running lights (DRL) are on
(see page ).
202 203
71
72
Instrument Panel Indicators
Turn Signal and
Hazard Warning
Indicators
Trunk-open Indicator
Door-open Indicator
Lights On Indicator
‘‘Daytime Running
Lights’’ Indicator
High Beam Indicator
62
�����—�����—�����y�
����
��������y���
�(�#���������y���������y
Page 66 of 253

�µ
�µ �µ
Push down on the
lef t lever to signal a lef t turn and up
to signal a right turn. To signal a lane
change, push lightly on the lever,
and hold it. The lever will return to
center when you release it or
complete a turn.
Turning the switch to
the ‘‘ ’’ position turns on the
parking lights, taillights, instrument
panel lights, side-marker lights, and
rear license plate lights.
Turn signal
Of f
Parking and interior lights
Headlights
High beams
Flashhighbeams Turning the switch to the ‘‘ ’’
position turns on the headlights. If you leave the lights on with the
key removed f rom the ignition
switch, you will hear a reminder
chime when you open the driver’s
door.
When the light switch is in the
‘‘ ’’ or ‘‘ ’’ position, the
lights on indicator comes on as a
reminder. This indicator stays on if
you leave the light switch on and
turn the ignition switch to the
ACCESSORY (I) or LOCK (0)
position. Push the lever
f orward until you hear a click. The
high beam indicator will come on
(see page ). Pull it back to return
to low beams.
To f lash the high beams, pull the
lever back lightly, then release it.
The high beams will stay on as long
as you hold the lever back.
1.2.3.4.5.6. 62
Turn Signal
Headlights
High Beams
Turn Signal and Headlights
Inst rument s and Cont rols
71
�����—�����—�����y�
����
��������y���
�(�#���������y���������y
Page 69 of 253
Push the lever under the steering
column all the way down.
Move the steering wheel up or
down, and in or out to the desired
position. Make sure you can see
the instrument panel gauges and
the indicators.Push the lever up to lock the
steering wheel in that position.
Make sure you have securely
locked the steering wheel in place
by trying to move it up, down, in,
and out.
The master key fits all the locks on
your vehicle.
1. 4.
2. 3.
Steering Wheel A djustment, K eys and L ocks
Keys and Locks
74
U.S. EX model
MASTER KEY
WITH REMOTE
TRANSMITTER VALET
KEY
(Gray)
KEY
NUMBERTAG
�����—�����—�����y�
����
��������y���
�(�#���������y���������y
Page 70 of 253

These keys contain electronic
circuits that are activated by the
immobilizer system. They will not
work to start the engine if the
circuits are damaged.Protect the keys f rom direct
sunlight, high temperature, and
high humidity.
Donotdropthekeysorsetheavy
objects on them.
Keep the keys away f rom liquids.
If they get wet, dry them
immediately with a sof t cloth.
Youshouldhavereceivedakey
number tag with your set of keys.
You will need this key number if you
ever have to get a key replaced. Use
only Honda-approved key blanks. The keys do not contain batteries.
Do not try to take them apart.
The valet key works only in the
ignition and the door locks. You can
keep the trunk and trunk release
handle locked when you leave your
vehicle and the valet key at a parking
f acility.
On DX model
Keys and Locks
Inst rument s and Cont rols
75
KEY
NUMBERTAG
MASTER KEY
WITH REMOTE
TRANSMITTER VALET
KEY
(Gray)KEY
NUMBERTAG
DX model
VALET
KEY
(Gray)
MASTER
KEY
(Black)
All LX models, and Canadian DX-G and
EX models
�����—�����—�����y�
����
��������y���
�(�#���������y���������y