Page 105 of 390

15. Wrap the hook and loop strap around the cross
bar as shown to secure the middle portion of the
cargo net.
Notice:Loading items that weigh more than
75 lbs (34 kg) in the cargo net could cause damage
to the cargo net and/or your vehicle. Do not load
heavy items in the cargo net.
Be sure to load items in the cargo area according to the
proper load limits. SeeLoading Your Vehicle on
page 4-29for more information.
The cargo net system can be removed by reversing the
installation procedure.
Side-Saddle Storage
Your vehicle may have a side-saddle storage system to
store items on either side of the rear cargo area. The
side-saddle storage system is attached to the side rails
of the cargo area and is removable.
To install the side-saddle storage bags, insert the
three clips on the rear of the bag to the three clips on
the side rail. Once attached, use the strap on each
clip to tighten the bag to the side of the vehicle.
To open the bag, unfasten the three clips located on the
front of the bag.
Cargo Management System
Your vehicle may be equipped with a cargo
management system located in the cargo area. On the
outside of the system are several pouches for storing
smaller items and on the inside are two removable
dividers for storing larger items. The entire system can
be removed by using the two handles located on
the opposite ends of the system.
Convertible Top
Operate the convertible top by pressing the convertible
top switch located on the console switchbank. See
Center Console Switchbank on page 3-19for more
information on location.
2-45
Page 106 of 390

Windscreen
A. Windscreen
B. Bevelled Notch in Carpeted Seatback Bumper
C. Protective Cap on Carpeted Seatback Bumper
The vehicle may have a windscreen (A) installed to the
rear of each seat to lessen wind noise while the
convertible roof is retracted. The convertible roof can be
opened or closed with the windscreen installed. The
vehicle must have the correct seatback bumpers
to install the windscreen.The correct seatback bumpers have a bevelled
notch (B) above the seat’s inboard protective cap (C).
The notch allows the bumper to fit over the windscreen
bracket which mounts to the inboard mounting studs.
Install the windscreen by following these steps:
1. Before installing the windscreen, the convertible top
must be fully retracted and the seats moved forward.
2. Remove the windscreen from its protective bag.
3. Locate the carpeted seatback bumper behind
each seat.
4. Remove protective caps from the bumpers.
5. Loosen the four seatback bumper nuts from
each seat. It is not necessary to remove the
bumpers completely.
6. With the seatback bumpers loosened, slide the
windscreen mounting brackets behind the
seatback bumpers. The angled portion of the
mounting brackets should rest tightly into the bevels
of the seatback bumpers.
7. Tighten the bumper nuts and reinstall the protective
molding caps.
When not using the windscreen, store it in its protective
bag. To remove the windscreen, reverse the steps
listed previously. Rear View of Seatback
2-46
Page 107 of 390

Lowering the Convertible Top
Notice:If you operate the convertible top switch
continuously while the ignition is in ACCESSORY,
the battery will drain and you might not be able
to start your vehicle. Do not use the convertible top
switch for extended periods of time when the
ignition is in ACCESSORY.
The ignition must be in RUN or ACCESSORY, your foot
must be on the brake, and the vehicle must be
stopped in order to lower the convertible top.
a(Top Open):Press and hold this symbol on
the convertible top switch located on the center console
switchbank to open the convertible top. The windows
will lower automatically when the top begins to
lower. Two chimes will sound when the convertible top
is fully opened.
A “Roof Cycle Timeout” message will display on the
Driver Information Center (DIC) and the convertible top
will stop moving when the programmed time limit is
exceeded for the lowered position. See “Roof Cycle
Timeout” underDIC Warnings and Messages on
page 3-45.
If the convertible top cannot be lowered using the
convertible top switch, the fuse may need to be
replaced. SeeFuses and Circuit Breakers on page 5-86
for more information.If the convertible top still does not operate, contact
your GM dealer.
Notice:Leaving the convertible top down and
exposing the interior of your vehicle to outdoor
conditions may cause damage. Always close
the convertible top if leaving your vehicle outdoors.
Roof Tonneau
Notice:Opening the cargo cover manually when
the convertible top is not in the full-open or
full-closed position could damage the tonneau
cover and the convertible top. Always make sure
the convertible top is in the full-closed or
full-opened position before manually opening the
cargo cover.
The vehicle has a roof tonneau that is raised or lowered
along with the convertible top using the convertible
top switch.
If roof tonneau does not raise or lower when using the
convertible top switch, verify that the cargo cover is
closed. The roof tonneau will not raise or lower if the
cargo cover is open. SeeCargo Cover on page 2-35and
for more information. There will also be a message
displayed on the on the Driver Information Center (DIC).
SeeDIC Warnings and Messages on page 3-45for more
information on possible DIC messages and how to clear
them from the display.
2-47
Page 108 of 390

If the cargo area is closed and the roof tonneau does
not raise or lower, check to see if a fuse is blown.
SeeFuses and Circuit Breakers on page 5-86for
more information.
Contact your GM dealer if the roof tonneau still does not
raise or lower after replacing the fuse.
The roof tonneau can manually be raised or lowered in
the event of a power loss. SeeRaising the Convertible
Top on page 2-48for instructions.
Raising the Convertible Top
Notice:If you operate the convertible top switch
continuously while the ignition is in ACCESSORY,
the battery will drain and you might not be able
to start your vehicle. Do not use the convertible top
switch for extended periods of time when the
ignition is in ACCESSORY.
The ignition must be in RUN or ACCESSORY, your foot
must be on the brake, and the vehicle must be
stopped in order to raise the convertible top.
b(Top Closed):Press and hold this symbol on
the convertible top switch located on the center console
switchbank to close the convertible top. Two chimes
will sound when the top is fully closed.A “Roof Cycle Timeout” message will display on the
Driver Information Center (DIC) and the convertible top
will stop moving when the programmed time limit is
exceeded for the raised position. See “Roof Cycle
Timeout” underDIC Warnings and Messages on
page 3-45.
If the convertible top cannot be raised by using the
convertible top switch, the fuse may need to be
replaced. SeeFuses and Circuit Breakers on page 5-86
for more information.
If the convertible top still cannot be lowered or raised,
contact your GM dealer.
The roof tonneau and convertible top can be raised in
the event of a power loss. Two people are needed to lift
the roof tonneau and convertible top when using the
following procedure.
1. Turn the ignition to OFF.
2. Open both doors.
3. In the area behind the seats, locate the two sets of
cables behind the carpet flaps. The cables on the
driver’s side are located behind the tire inflator
kit. The tire inflator kit must be removed to access
the cables. SeeTire In ator Kit on page 5-68
for instructions on how to remove the tire inflator kit.
2-48
Page 109 of 390
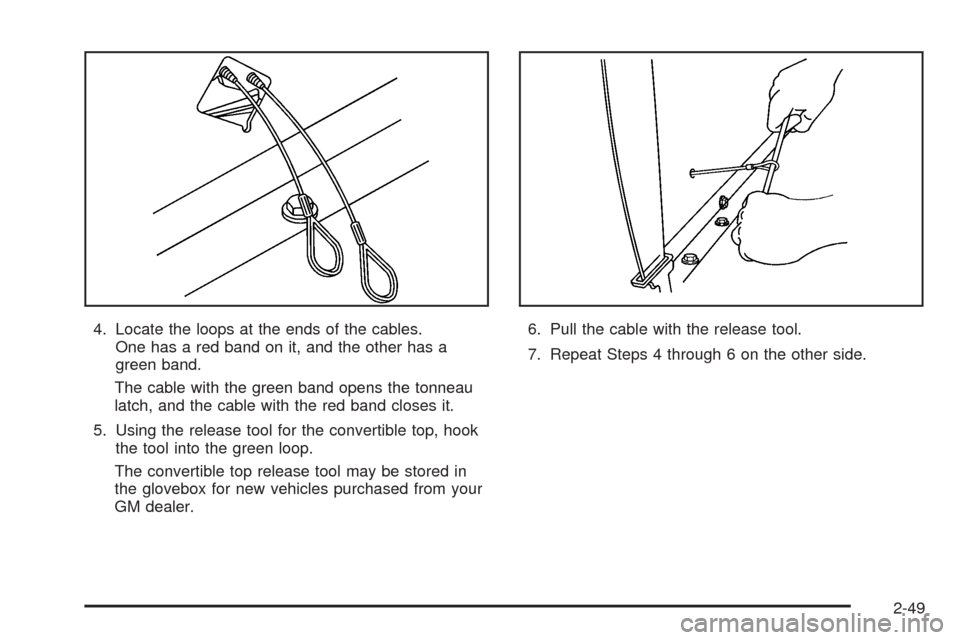
4. Locate the loops at the ends of the cables.
One has a red band on it, and the other has a
green band.
The cable with the green band opens the tonneau
latch, and the cable with the red band closes it.
5. Using the release tool for the convertible top, hook
the tool into the green loop.
The convertible top release tool may be stored in
the glovebox for new vehicles purchased from your
GM dealer.6. Pull the cable with the release tool.
7. Repeat Steps 4 through 6 on the other side.
2-49
Page 110 of 390
8. For steps 8 and 9, more than one person is needed
to do this. One person working on each side is
best. Lift up on the roof tonneau and raise it to the
upright position.9. Grasp the front panel of the convertible top and
pull up.
2-50
Page 111 of 390
10. Insert the front panel into the roof latches.
One person should hold the convertible top up from
the rear in the closed position while another
person performs the next steps.11. Remove the plastic cap
located between the
sun visors by turning it
one quarter turn.
12. Slide the tool side of
the convertible release
tool until the entire
tool forms a right angle
as shown. Driver’s side latches shown,
passenger’s side similar
2-51
Page 112 of 390
13. Insert the convertible top release tool into the latch
closing mechanism between the sun visors and turn
it counterclockwise until the latches are secured
and the convertible top is fully closed.14. From the upright position, push down on the outer
area of the boot cover panel where the hinges and
hydraulic cylinders are located to separate it
from the roof tonneau. Then, continue to push the
boot cover panel down as far as it will go.
2-52