2006 CHEVROLET SILVERADO fuel
[x] Cancel search: fuelPage 227 of 594
Driver Information Center (DIC)
The Driver Information Center (DIC) display is located
on the instrument panel cluster, below the speedometer.
If your vehicle has DIC buttons, they are located on
the steering wheel. The DIC can display information
such as the trip odometer, fuel economy, customization
features, and warning/status messages.
If your vehicle does not have DIC steering wheel
buttons, you will not have all of the features listed. Scroll
through the odometer, trip odometer, engine hours,
and selected range if your vehicle has an Allison
Transmission
®by pressing the trip odometer reset stem
located on the instrument panel cluster. Turn off, or
acknowledge, DIC messages by pressing the trip
odometer reset stem. SeeSpeedometer and Odometer
on page 3-32for information on features for vehicles
without DIC buttons.
If your vehicle has an Allison Transmission
®and the
shift lever is in the MANUAL MODE (M) position,
the DIC will display the current gear range. The DIC
will also display the gear range as it is shifted up
or down. For example, if the gear range is currently set
to 6, the DIC will display (6)54321. When the
gear range is shifted down one time, the DIC will display
6(5)4321. SeeAutomatic Transmission Operation
on page 2-24for more information.
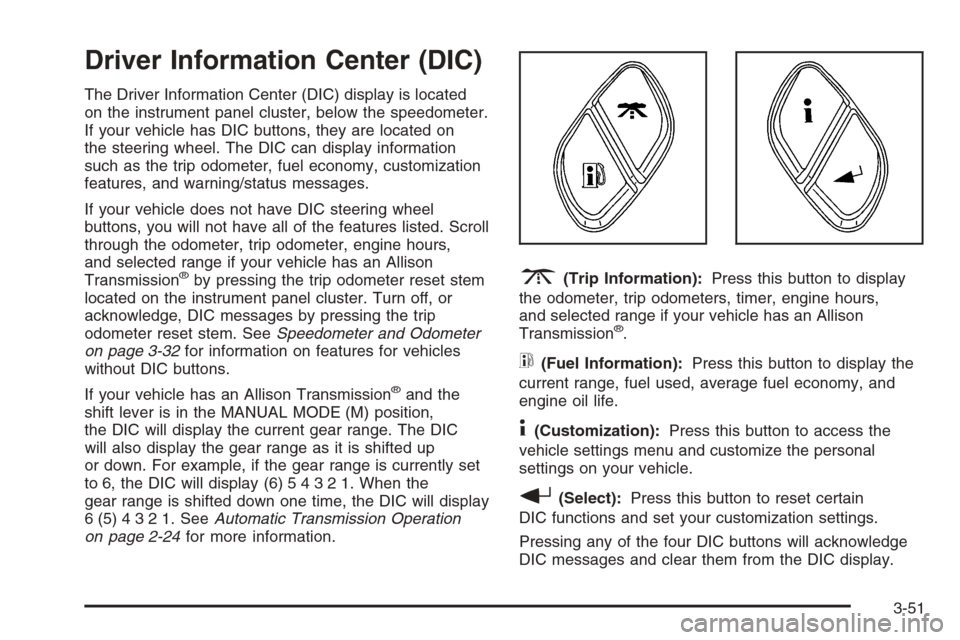
3(Trip Information):Press this button to display
the odometer, trip odometers, timer, engine hours,
and selected range if your vehicle has an Allison
Transmission
®.
t(Fuel Information):Press this button to display the
current range, fuel used, average fuel economy, and
engine oil life.
4(Customization):Press this button to access the
vehicle settings menu and customize the personal
settings on your vehicle.
r(Select):Press this button to reset certain
DIC functions and set your customization settings.
Pressing any of the four DIC buttons will acknowledge
DIC messages and clear them from the DIC display.
3-51
Page 228 of 594

DIC Operation and Displays
The Driver Information Center (DIC) comes on when the
ignition is on. After a short delay, the DIC will display
the information that was last displayed before the engine
was turned off.
The DIC has different modes which can be accessed by
pressing the four DIC buttons located on the steering
wheel. These buttons are trip information, fuel
information, customization, and select. The button
functions are detailed in the following pages.
Trip Information Button
3
(Trip Information):Press the trip information
button to scroll through the ODOMETER, TRIP A,
TRIP B, TIMER, ENGINE HOURS, and SELECTED
RANGE.
Odometer:Press the trip information button until
ODOMETER appears on the display. This mode shows
the total distance the vehicle has been driven in
either miles or kilometers. Pressing the reset stem
located on the instrument cluster with the vehicle off will
also display the odometer.
Trip A:Press the trip information button until TRIP A
appears on the display. This mode shows the current
distance traveled since the last reset for TRIP A in either
miles or kilometers.Trip B:Press the trip information button until TRIP B
appears on the display. This mode shows the current
distance traveled since the last reset for TRIP B in either
miles or kilometers.
To reset TRIP A or TRIP B information, press and hold
the select button for one second while in one of the
trip modes. This will reset the information for TRIP A
or TRIP B.
You can also reset TRIP A or TRIP B while they are
displayed by pressing the reset stem on the cluster.
If you press and hold the reset stem or the select button
for four seconds, the display will show the distance
traveled since the last ignition cycle for TRIP A
or TRIP B.
SeeTrip Odometer on page 3-32for more information.
Timer:The DIC can be used as a timer. Press the
select button while TIMER is displayed to start the timer.
The display will show the amount of time that has
passed since the timer was last reset, not including time
the ignition is off. Time will continue to be counted as
long as the ignition is on, even if another display is being
shown on the DIC. The timer will record up to 99 hours,
59 minutes and 59 seconds (99:59:59) after which
the display will roll back to zero.
To stop the counting of time, press the select button
brie�y while TIMER is displayed.
To reset the timer to zero, press and hold the select
button while TIMER is displayed.
3-52
Page 229 of 594
Engine Hours:Press the trip information button until
ENGINE HOURS appears on the display. This
mode shows the total number of hours the engine has
run. Pressing and holding the reset stem located on
the instrument cluster for about four seconds will also
display the engine hour information after the odometer is
displayed when the vehicle is off.
Selected Range:If your vehicle has an Allison
Transmission
®and the vehicle is in the MANUAL
MODE (M) position, press the trip information button
until SELECTED RANGE: M# appears on the display.
The DIC will display the current gear range. For
example, if the gear range is set to 6, the DIC will
display SELECTED RANGE: M6. SeeAutomatic
Transmission Operation on page 2-24for more
information.
Fuel Information Button
t
(Fuel Information):Press the fuel information
button to scroll through the range, fuel used, average
fuel economy, and the engine oil life system.
Fuel Range:Press the fuel information button until
RANGE appears on the display. This mode shows the
remaining distance you can drive without refueling.
It is based on fuel economy and the fuel remaining in
the fuel tank. The display will show LOW if the fuel
level is low.The fuel economy data used to determine fuel range
is an average of recent driving conditions. As your
driving conditions change, this data is gradually updated.
Fuel range cannot be reset.
Fuel Used:Press the fuel information button until
FUEL USED appears on the display. This mode shows
the number of gallons or liters of fuel used since the
last reset of this menu item. To reset the fuel used
information, press and hold the select button for
one second while FUEL USED is displayed.
Average Fuel Economy:Press the fuel information
button until AVG ECON appears on the display.
This mode shows how many miles per gallon (MPG) or
liters per 100 kilometers (L/100 km) your vehicle is
getting based on current and past driving conditions.
Press and hold the select button for one second
while AVG ECON is displayed to reset the average fuel
economy. Average fuel economy will then be calculated
starting from that point. If the average fuel economy
is not reset, it will be continually updated each time
you drive.
3-53
Page 230 of 594
Engine Oil Life System:Press the fuel information
button until ENGINE OIL LIFE appears on the display.
The engine oil life system shows an estimate of the
oil’s remaining useful life. It will show 100% when the
system is reset after an oil change. It will alert you
to change your oil on a schedule consistent with your
driving conditions.
Always reset the engine oil life system after an oil
change. To reset the engine oil life system, seeEngine
Oil Life System (Gasoline Engine) on page 5-23.
In addition to the engine oil life system monitoring the
oil life, additional maintenance is recommended in
the Maintenance Schedule in this manual. SeeEngine
Oil (Gasoline Engine) on page 5-20andScheduled
Maintenance (Gasoline Engine) on page 6-4.
Customization Button
4
(Customization):Press the customization button to
access the VEHICLE SETTINGS menu and customize
the settings to your vehicle. SeeDIC Vehicle
Customization on page 3-64for more information.
Select Button
r
(Select):Press the select button to reset certain
DIC functions and set your customization settings.
For example, this button will reset the trip odometers
and enables you to scroll through and select the
language in which the DIC information will appear.
DIC Warnings and Messages
Warning messages are displayed on the Driver
Information Center (DIC) to notify the driver that the
status of the vehicle has changed and that some action
may be needed by the driver to correct the condition.
If there is more than one message that needs to
be displayed, they will appear one after another. Some
messages may not require immediate action, but
you should press any of the four DIC buttons on the
steering wheel to acknowledge that you received
the messages and to clear them from the display. If
your vehicle does not have DIC buttons on the steering
wheel, press the trip odometer reset stem, located
on the instrument panel cluster, to acknowledge
messages and clear them from the display.
Some messages cannot be cleared from the display
because they are more urgent. These messages require
action before they can be removed from the DIC
display. You should take any messages that appear on
the display seriously and remember that clearing the
messages will only make the messages disappear, not
correct the problem.
3-54
Page 234 of 594

FUEL LEVEL LOW
If the fuel level is low, this message will appear on the
DIC and you will hear a chime. Refuel as soon as
possible. Pressing any of the four DIC buttons will
acknowledge the message and clear it from the
DIC display. If your vehicle does not have the four DIC
buttons, pressing the trip odometer reset stem will
acknowledge the message and clear it from the DIC
display. SeeLow Fuel Warning Light on page 3-50,
Fuel Gage on page 3-50, andFuel on page 5-6.
KEYFOB X BATTERY LOW
If a remote keyless entry transmitter battery is low, this
message will appear on the DIC. The battery needs
to be replaced in the transmitter. See “Battery
Replacement” underRemote Keyless Entry System
Operation on page 2-5. Pressing any of the
four DIC buttons will acknowledge the message and
clear it from the DIC display. If your vehicle does
not have the four DIC buttons, pressing the trip
odometer reset stem will acknowledge the message
and clear it from the DIC display.
LEFT REAR DOOR AJAR (Crew Cab)
If the driver’s side rear door is not fully closed, this
message will appear on the display and you will hear a
chime. Stop and turn off the vehicle, check the door
for obstacles and close the door again. Check to see if
the message still appears on the DIC. Pressing any
of the four DIC buttons will acknowledge the message
and clear it from the DIC display. If your vehicle does not
have the four DIC buttons, pressing the trip odometer
reset stem will acknowledge the message and clear
it from the DIC display.
LOW COOLANT LEVEL
Notice:Engine damage from running your engine
without coolant is not covered by your warranty. See
“Overheated Engine Protection Operating Mode”
in the Index for information on driving to a safe
place in an emergency.
If your vehicle has a low coolant level sensor, this
message will appear on the DIC if the engine coolant
level is low. Adding coolant to the coolant recovery
tank will clear the message. SeeCooling System
on page 5-40. Pressing any of the four DIC buttons
will acknowledge the message and clear it from the
DIC display. If your vehicle does not have the four DIC
buttons, pressing the trip odometer reset stem will
acknowledge the message and clear it from the
DIC display.
3-58
Page 238 of 594
SERVICE CHARGING SYSTEM
On some vehicles, if there is a problem with the battery
charging system, this message will appear on the
DIC. Under certain conditions, the battery warning light
may also turn on in the instrument panel cluster.
SeeBattery Warning Light on page 3-39. The battery
will not be charging at an optimal rate and the vehicle
will lose the ability to enter the fuel economy mode. The
vehicle is safe to drive, however you should have the
electrical system checked by your GM dealer. Pressing
any of the four DIC buttons will acknowledge the
message and clear it from the DIC display. If your
vehicle does not have the four DIC buttons, pressing
the trip odometer reset stem will acknowledge the
message and clear it from the DIC display.
TIGHTEN FUEL CAP
If the vehicle’s fuel cap is not tightened properly, this
message may appear along with the check engine light
on the instrument panel. SeeMalfunction Indicator
Lamp on page 3-45. Fully reinstall the fuel cap.
SeeFilling the Tank on page 5-10. The diagnostic
system can determine if the fuel cap has been left off or
improperly installed. A loose or missing fuel cap will
allow fuel to evaporate into the atmosphere. A few
driving trips with the cap properly installed should turn
the light and message off.
TRACTION ACTIVE
When the traction control system had detected that any
of the vehicle’s wheels are slipping, the traction
control system will activate and this message will appear
on the DIC. For more information, seeTraction Assist
System (TAS) on page 4-9.
TRANS (Transmission) HOT IDLE
ENGINE
Notice:If you drive your vehicle while the
transmission �uid is overheating and the
transmission temperature warning is displayed on
the instrument panel cluster and/or DIC, you
can damage the transmission. This could lead to
costly repairs that would not be covered by
your warranty. Do not drive your vehicle with
overheated transmission �uid or while the
transmission temperature warning is displayed.
If the transmission �uid in the vehicle gets hot,
this message will appear on the DIC along with a
continuous chime. Driving with the transmission �uid
temperature high can cause damage to the vehicle. Stop
the vehicle and let it idle to allow the transmission to
cool. This message will clear and the chime will
stop when the �uid temperature reaches a safe level.
SeeTransmission Temperature Gage on page 3-43.
3-62
Page 245 of 594
Language
To select your preference for display language, press
the select button while LANGUAGE is displayed on the
DIC. Pressing the select button will scroll through the
following languages:
ENGLISH
FRANCAIS (French)
ESPANOL (Spanish)
Choose one of the available options and press the
customization button while it is displayed on the DIC to
select it.
If you accidentally choose a language that you do not
want or understand, press and hold the customization
button and the trip information button at the same
time. The DIC will begin scrolling through the languages
in their particular language. English will be in English,
Francais will be in French and Espanol will be in
Spanish. When you see the language that you would
like, release both buttons. The DIC will then display the
information in the language you chose.
You can also scroll through the different languages by
pressing and holding the trip reset stem for four seconds,
as long as you are in the odometer mode.
Display Units
Press the customization button until DISPLAY UNITS
appears in the display. To select English or metric, press
the select button while DISPLAY UNITS is displayed
on the DIC. Pressing the select button will scroll through
the following choices:
DISPLAY UNITS: ENGLISH
DISPLAY UNITS: METRIC
If you choose English, all information will be displayed
in English units. For example, distance in miles and fuel
economy in miles per gallon. If you choose metric, all
information will be displayed in metric units. For
example, distance in kilometers and fuel economy in
liters per 100 kilometers.
Choose one of the available options and press the
customization button while it is displayed on the DIC to
select it and end out of the customizable options.
3-69
Page 326 of 594
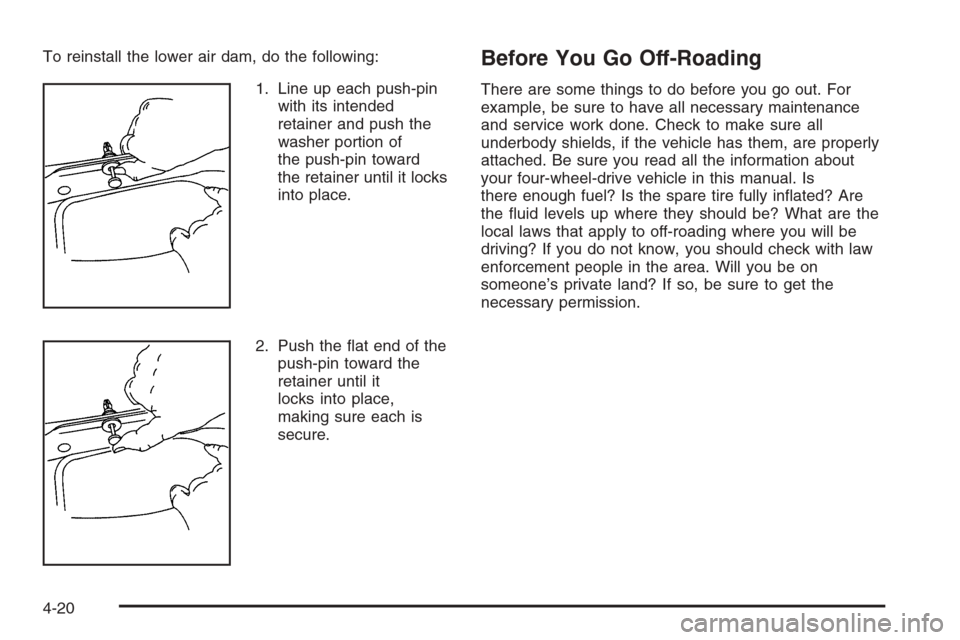
To reinstall the lower air dam, do the following:
1. Line up each push-pin
with its intended
retainer and push the
washer portion of
the push-pin toward
the retainer until it locks
into place.
2. Push the �at end of the
push-pin toward the
retainer until it
locks into place,
making sure each is
secure.Before You Go Off-Roading
There are some things to do before you go out. For
example, be sure to have all necessary maintenance
and service work done. Check to make sure all
underbody shields, if the vehicle has them, are properly
attached. Be sure you read all the information about
your four-wheel-drive vehicle in this manual. Is
there enough fuel? Is the spare tire fully in�ated? Are
the �uid levels up where they should be? What are the
local laws that apply to off-roading where you will be
driving? If you do not know, you should check with law
enforcement people in the area. Will you be on
someone’s private land? If so, be sure to get the
necessary permission.
4-20