2006 CHEVROLET SILVERADO ECO mode
[x] Cancel search: ECO modePage 57 of 594
Regular Cab Models
1. If the child restraint manufacturer recommends that
the top tether be attached, attach and tighten the
top tether to the top tether anchor, if equipped.
Refer to the child restraint instructions and
the following steps:
1.1. Pull the passenger seatback forward by
pulling the recliner handle upward to access
the top tether anchor. SeeReclining
Seatbacks on page 1-6for additional
information.
1.2. Find the top tether anchor.
1.3. Remove the trim cover to expose the anchor.
1.4. Route, attach and tighten the top tether
according to your child restraint instructions
and the following instructions:
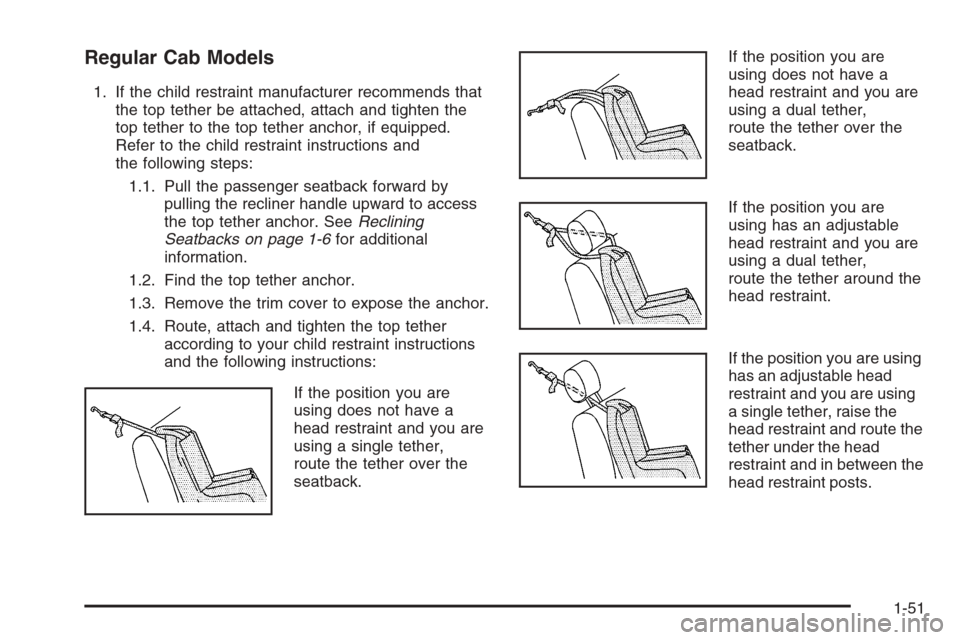
If the position you are
using does not have a
head restraint and you are
using a single tether,
route the tether over the
seatback.If the position you are
using does not have a
head restraint and you are
using a dual tether,
route the tether over the
seatback.
If the position you are
using has an adjustable
head restraint and you are
using a dual tether,
route the tether around the
head restraint.
If the position you are using
has an adjustable head
restraint and you are using
a single tether, raise the
head restraint and route the
tether under the head
restraint and in between the
head restraint posts.
1-51
Page 58 of 594
2. SeeSecuring a Child Restraint in the Right Front
Seat Position (Regular and Extended Cab) (With
Airbag Off Switch) on page 1-60orSecuring a Child
Restraint in the Right Front Seat Position (Regular
and Extended Cab) (With Passenger Sensing
System) on page 1-66for instructions on installing
the child restraint using the safety belts.
3. Push and pull the child restraint in different
directions to be sure it is secure.
Extended Cab Models
1. Attach and tighten the lower attachments to the
lower anchors. If the child restraint does not have
lower attachments or the desired seating position
does not have lower anchors, secure the child
restraint with the top tether and the safety belts.
Refer to your child restraint manufacturer
instructions and the instructions in this manual.
1.1. Find the lower anchors for the desired
seating position.
1.2. Put the child restraint on the seat.
1.3. Attach and tighten the lower attachments on
the child restraint to the lower anchors.2. If the child restraint manufacturer recommends that
the top tether be attached, attach and tighten the
top tether to the top tether anchor, if equipped.
Refer to the child restraint instructions and
the following steps:
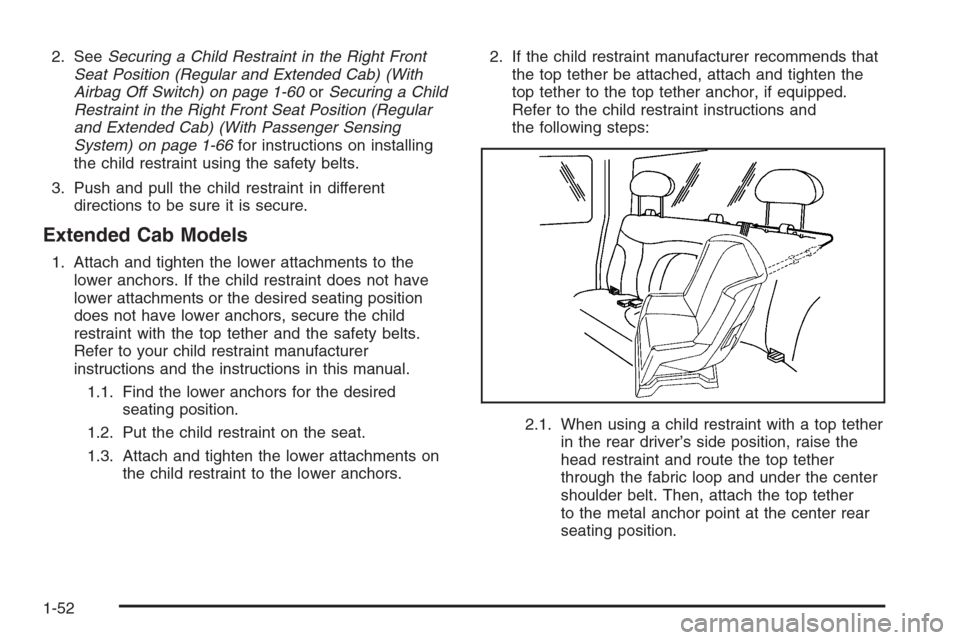
2.1. When using a child restraint with a top tether
in the rear driver’s side position, raise the
head restraint and route the top tether
through the fabric loop and under the center
shoulder belt. Then, attach the top tether
to the metal anchor point at the center rear
seating position.
1-52
Page 59 of 594
2.2. When using a child restraint with a top tether
in the rear passenger position, raise the
head restraint and route the top tether
through the fabric loop. Then, attach the top
tether to the metal anchor point at the
center rear seating position.
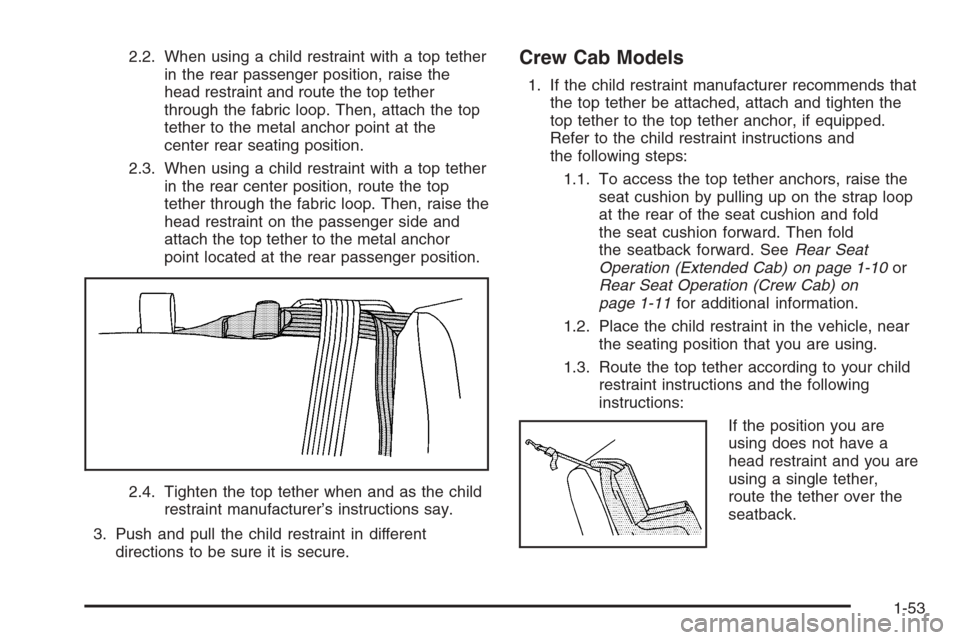
2.3. When using a child restraint with a top tether
in the rear center position, route the top
tether through the fabric loop. Then, raise the
head restraint on the passenger side and
attach the top tether to the metal anchor
point located at the rear passenger position.
2.4. Tighten the top tether when and as the child
restraint manufacturer’s instructions say.
3. Push and pull the child restraint in different
directions to be sure it is secure.Crew Cab Models
1. If the child restraint manufacturer recommends that
the top tether be attached, attach and tighten the
top tether to the top tether anchor, if equipped.
Refer to the child restraint instructions and
the following steps:
1.1. To access the top tether anchors, raise the
seat cushion by pulling up on the strap loop
at the rear of the seat cushion and fold
the seat cushion forward. Then fold
the seatback forward. SeeRear Seat
Operation (Extended Cab) on page 1-10or
Rear Seat Operation (Crew Cab) on
page 1-11for additional information.
1.2. Place the child restraint in the vehicle, near
the seating position that you are using.
1.3. Route the top tether according to your child
restraint instructions and the following
instructions:
If the position you are
using does not have a
head restraint and you are
using a single tether,
route the tether over the
seatback.
1-53
Page 106 of 594

Programmable Automatic
Door Locks
Your vehicle may be equipped with an automatic
lock/unlock feature which enables you to program your
vehicle’s power door locks. You can program this
feature through the Driver Information Center (DIC), or
by the following method. SeeDIC Vehicle Customization
on page 3-64.
Programmable Locking Feature
Following are the two available programming options:
Mode 1:All doors lock when the transmission is shifted
into gear. This is the mode that is pre-programmed in
the factory for your vehicle for automatic transmission
vehicles.
Mode 2:All doors lock when the vehicle speed is
greater than 8 mph (13 km/h). This is the mode that is
pre-programmed in the factory for manual transmission
vehicles.
The following instructions tell you how to change the
automatic door lock mode (automatic transmission only).
Choose one of the two programming options listed
above before entering the program mode.To enter the program mode, do the following:
1. Begin with the ignition off. Then pull the turn
signal/multifunction lever toward you and hold
it there while you perform the next step.
2. Turn the key to RUN then back to LOCK twice.
Then, with the key in LOCK, release the turn
signal/multifunction lever. Once you do this, the
doors will lock and unlock, the horn will chirp twice,
and a 30-second timer will begin. You are now
ready to program the automatic door lock feature.
3. Press the door lock switch once. You will hear either
one or two chimes. The number of chimes tells you
which lock mode is currently selected. Continue
to press the door lock switch until the number
of chimes that you hear matches the number of the
mode that you want. If you take longer than
30 seconds, the locks will automatically lock and
unlock and the horn will chirp twice to indicate that
you have left the program mode. If this occurs,
you can repeat the procedure beginning with Step 1
to re-enter the programming mode.
You can exit the program mode any time by turning the
ignition to RUN (the doors will automatically lock and
unlock and the horn will chirp twice to indicate that you
are leaving the program mode). If the lock/unlock
switches are not pressed while in the programming mode,
the current automatic settings will not be modi�ed.
See your dealer for more information.
2-10
Page 107 of 594

Programmable Unlocking Feature
The following is the list of available programming
options:
Mode 1:Driver’s door unlocks when the transmission is
shifted into PARK (P), for automatic transmission
vehicles only.
Mode 2:All doors unlock when the transmission is
shifted into PARK (P), for automatic transmission
vehicles only. This is the mode that is pre-programmed
in the factory for your vehicle.
Mode 3:All doors unlock when the key is removed
from the ignition. This is the mode that is
pre-programmed in the factory for manual transmission
vehicles.
Mode 4:No automatic door unlock.
The following instructions tell you how to change the
automatic door unlock mode (automatic transmission
only). Choose one of the four programming options
listed above before entering the program mode.
To enter the program mode, do the following:
1. Begin with the ignition off. Then pull the turn
signal/multifunction lever toward you and hold
it there while you perform the next step.2. Turn the key to RUN and LOCK twice. Then,
with the key in LOCK, release the turn signal/
multifunction lever. Once you do this, the doors will
lock and unlock, the horn will chirp twice, and a
30-second timer will begin. You are now ready to
program the automatic door unlock feature.
3. Press the door unlock switch once. You will hear
one, two, three, or four chimes. The number of
chimes tells you which unlock mode is currently
selected. Continue to press the door unlock switch
until the number of chimes that you hear matches the
number of the mode that you want. If you take longer
than 30 seconds, the locks will automatically lock
and unlock and the horn will chirp twice to indicate
that you have left the program mode. If this occurs,
you can repeat the procedure beginning with Step 1
to re-enter the programming mode.
You can exit the program mode any time by turning the
ignition to RUN. The doors will automatically lock
and unlock and the horn will chirp twice to indicate that
you are leaving the program mode. If the lock/unlock
switches are not pressed while in the programming
mode, the current automatic settings will not be
modi�ed.
See your dealer for more information.
2-11
Page 123 of 594
By doing this, the vehicle shifts down to the next gear
and has more power.
DRIVE (D) can be used when towing a trailer, carrying a
heavy load, driving on steep hills, or for off-road
driving. You may want to shift the transmission to
THIRD (3) or, if necessary, a lower gear selection if the
transmission shifts too often.
If your vehicle has the Allison Transmission
®, it will shift
into �rst range when DRIVE (D) is selected. As
vehicle speed increases, the transmission will upshift
automatically through each available range up to
SIXTH (6). As the vehicle slows, the transmission will
downshift automatically.
The Allison Transmission
®uses a shift stabilization
feature that adjusts the transmission shifting to
the current driving conditions in order to reduce rapid
upshifts and downshifts. This shift stabilization feature is
designed to determine before making an upshift if the
engine will be able to maintain vehicle speed by
analyzing things such as throttle position, vehicle load,
and hill grade. If the shift stabilization feature
determines that current vehicle speed cannot be
maintained, the transmission does not upshift and
instead holds the current gear. In some cases, this may
appear to be a delayed shift, however the transmission
is operating normally.The Allison Transmission
®also uses adaptive shift
controls. Adaptive shift controls continually compares
key shift parameters to pre-programmed ideal shift
conditions. The Allison Transmission
®constantly makes
adjustments to improve vehicle performance according
to the way the vehicle is being used, such as with a
heavy load. During this adaptive shift controls process,
some shifts may feel different as the transmission
determines optimum settings for a particular shift.
MANUAL MODE (M):This position, is available on
vehicles with the Allison Transmission
®. It lets drivers
select the range of gears appropriate for current
driving conditions. If your vehicle has this feature, see
Range Select Mode (Allison Transmission
®) later in this
section.
THIRD (3):This position is also used for normal driving,
however it offers more power and lower fuel economy
than DRIVE (D).
2-27
Page 124 of 594
SECOND (2):This position gives you more power but
lower fuel economy. You can use SECOND (2) on
hills. It can help control your speed as you go down
steep mountain roads, but then you would also want to
use your brakes off and on.
If you manually select SECOND (2) in an automatic
transmission, the transmission will start in second gear.
You may use this feature for reducing the speed of
the rear wheels when you are trying to start your vehicle
from a stop on slippery road surfaces.
FIRST (1):This position gives you even more power
(but lower fuel economy) than SECOND (2). You
can use it on very steep hills, or in deep snow or mud.
If the shift lever is put in FIRST (1) while the vehicle
is moving forward, the transmission will not shift into �rst
gear until the vehicle is going slowly enough.
Notice:Spinning the tires or holding the vehicle in
one place on a hill using only the accelerator
pedal may damage the transmission. If you are
stuck, do not spin the tires. When stopping on a hill,
use the brakes to hold the vehicle in place.Range Selection Mode
(Allison Transmission®)
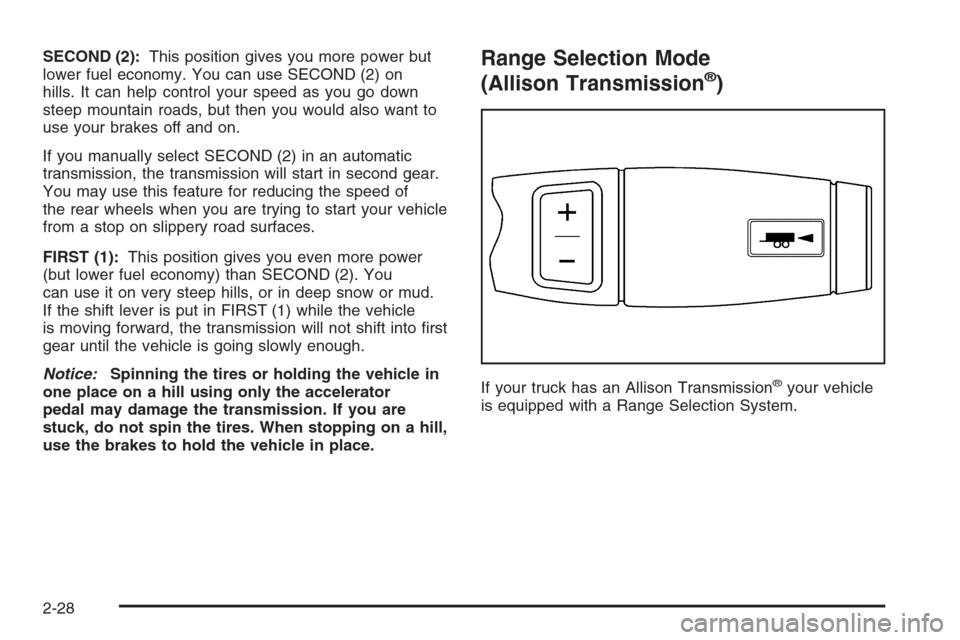
If your truck has an Allison Transmission®your vehicle
is equipped with a Range Selection System.
2-28
Page 125 of 594
To use this feature, do the following:
1. Move the shift lever to the MANUAL MODE (M).
When in the MANUAL MODE, the transmission’s
current gear range will be the highest attainable
range with all the lower gears available.
2. Press the plus/minus buttons to upshift or downshift
selecting the desired range of gears for your current
driving conditions.
The Range Selection Mode allows you to control the
vehicle’s engine and vehicle speed while driving
down hill by allowing you to select a desired gear.
The DIC shows the six available ranges with the highest
attainable range shown in brackets. SeeDriver
Information Center (DIC) on page 3-51andDIC
Operation and Displays on page 3-52for more
information.
While using the Range Selection mode feature, cruise
control and the Tow/Haul mode can be used.
Low Traction Mode
(Allison Transmission®)
If your vehicle has the DURAMAX®diesel engine and
the Allison Transmission®, it is equipped with a Low
Traction Mode that assists in vehicle acceleration when
road conditions are slippery, such as ice or snow.While at a stop, selecting the second gear range using
the Range Selection system, will allow the Allison
Transmission
®to limit torque to the wheels after it
detects wheel slip, preventing the tires from spinning.
Notice:Spinning the tires or holding the vehicle in
one place on a hill using only the accelerator
pedal may damage the transmission. If you are
stuck, do not spin the tires. When stopping on a hill,
use the brakes to hold the vehicle in place.
Cold Weather Operation
(Allison Transmission®)
On cold days, approximately 32°F (0°C) or colder, your
automatic transmission is designed to shift differently.
The transmission uses a warm-up mode shift schedule
until the engine reaches normal operating temperature.
While the transmission is in warm-up mode it is
normal for transmission upshifts to be delayed or held
longer. This feature improves heater performance
by giving quicker vehicle warm-ups.
When temperatures are below−13°F (−25°C), the
transmission will prevent certain operations to protect
against damage. When active the DIC will display
the message “Trans in Warm-up”.
SeeDIC Warnings and Messages on page 3-54for
more information.
2-29