Page 503 of 594
5. Use the wheel wrench
hook which allows you
to pull the hoist
cable towards you to
assist in reaching
the spare tire.
6. Tilt the retainer (D) at
the end of the cable (C)
when the tire has
been lowered, so it can
be pulled up through
the wheel opening.
7. Put the spare tire near the �at tire.Removing the Flat Tire and
Installing the Spare Tire
Use the following pictures and instructions to remove
the �at tire and raise the vehicle.
The tools you will be using include the jack (A), the
wheel blocks (B), the jack handle (C), the jack handle
extensions (D), and the wheel wrench (E).
5-99
Page 504 of 594
1. If your vehicle has
wheel nut caps, loosen
them by turning the
wheel wrench
counterclockwise.
If the vehicle has a center cap with wheel nut caps,
the wheel nut caps are designed to stay with the
center cap after they are loosened. Remove
the entire center cap.If the wheel has a smooth center cap, place the
chisel end of the wheel wrench in the slot on
the wheel, and gently pry it out.
5-100
Page 505 of 594
2. Use the wheel wrench and turn it counterclockwise
to loosen the wheel nuts. Do not remove the wheel
nuts yet.A. Front Location (Two-Wheel-Drive 1500 Model)
B. Front Location (All Other Models)
C. Rear Location (All Models)
3. Position the jack under the vehicle as shown. If the
�at tire is on the front of the vehicle (two-wheel-drive
1500 Model vehicles), position the jack under the
bracket attached to the vehicle’s frame, behind
the �at tire. If the �at tire is on the front of the
vehicle (all other models), position the jack on the
frame behind the �at tire.
Jacking Locations
5-101
Page 508 of 594
4. Make sure the jack head is positioned so that the
rear axle is resting securely between the grooves
that are on the jack head.5. Turn the wheel wrench clockwise to raise the
vehicle. Raise the vehicle far enough off the ground
so there is enough room for the spare tire to �t
under the wheel well.
6. Remove all the wheel
nuts and take off the
�at tire.
Rear Position — All Other Models
5-104
Page 511 of 594
11. Turn the wheel wrench counterclockwise to lower
the vehicle. Lower the jack completely. Front Position — 2WD 1500 Model
Rear Position
5-107
Page 512 of 594

{CAUTION:
Incorrect wheel nuts or improperly tightened
wheel nuts can cause the wheel to come loose
and even come off. This could lead to an
accident. Be sure to use the correct wheel
nuts. If you have to replace them, be sure to
get new GM original equipment wheel nuts.
Stop somewhere as soon as you can and have
the nuts tightened with a torque wrench to the
proper torque speci�cation. SeeCapacities
and Specifications on page 5-134for wheel nut
torque speci�cation.
Notice:Improperly tightened wheel nuts can lead
to brake pulsation and rotor damage. To avoid
expensive brake repairs, evenly tighten the wheel
nuts in the proper sequence and to the proper
torque speci�cation. SeeCapacities and
Specifications on page 5-134for the wheel nut
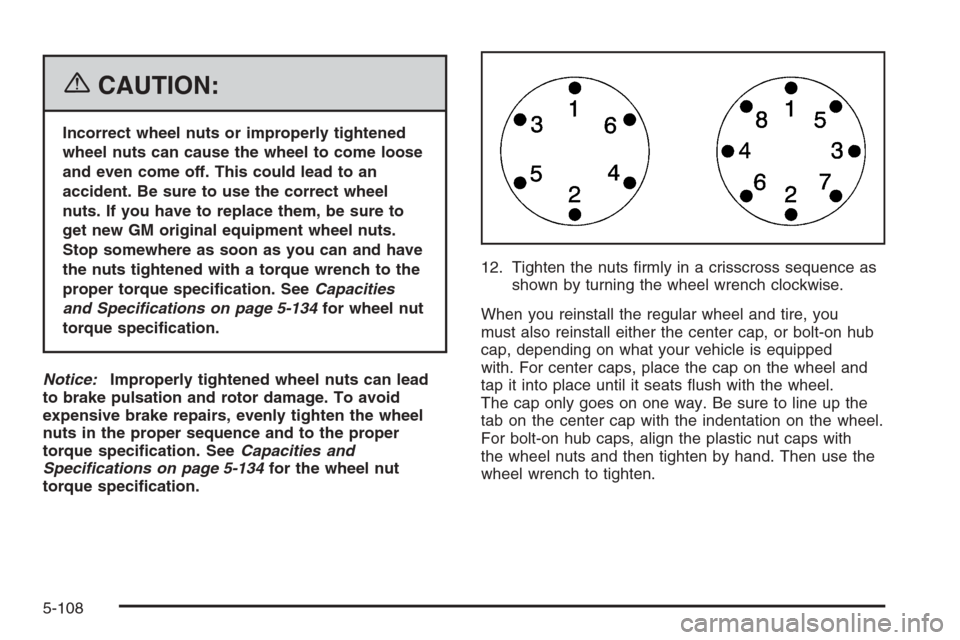
torque speci�cation.12. Tighten the nuts �rmly in a crisscross sequence as
shown by turning the wheel wrench clockwise.
When you reinstall the regular wheel and tire, you
must also reinstall either the center cap, or bolt-on hub
cap, depending on what your vehicle is equipped
with. For center caps, place the cap on the wheel and
tap it into place until it seats �ush with the wheel.
The cap only goes on one way. Be sure to line up the
tab on the center cap with the indentation on the wheel.
For bolt-on hub caps, align the plastic nut caps with
the wheel nuts and then tighten by hand. Then use the
wheel wrench to tighten.
5-108
Page 513 of 594

Secondary Latch System
Your vehicle has an underbody-mounted tire hoist
assembly equipped with a secondary latch system. It is
designed to stop the spare tire from suddenly falling
off your vehicle. For the secondary latch to work,
the spare must be installed with the valve stem pointing
down. SeeStoring a Flat or Spare Tire and Tools on
page 5-112.
{CAUTION:
Before beginning this procedure read all the
instructions. Failure to read and follow the
instructions could damage the hoist assembly
and you and others could get hurt. Read and
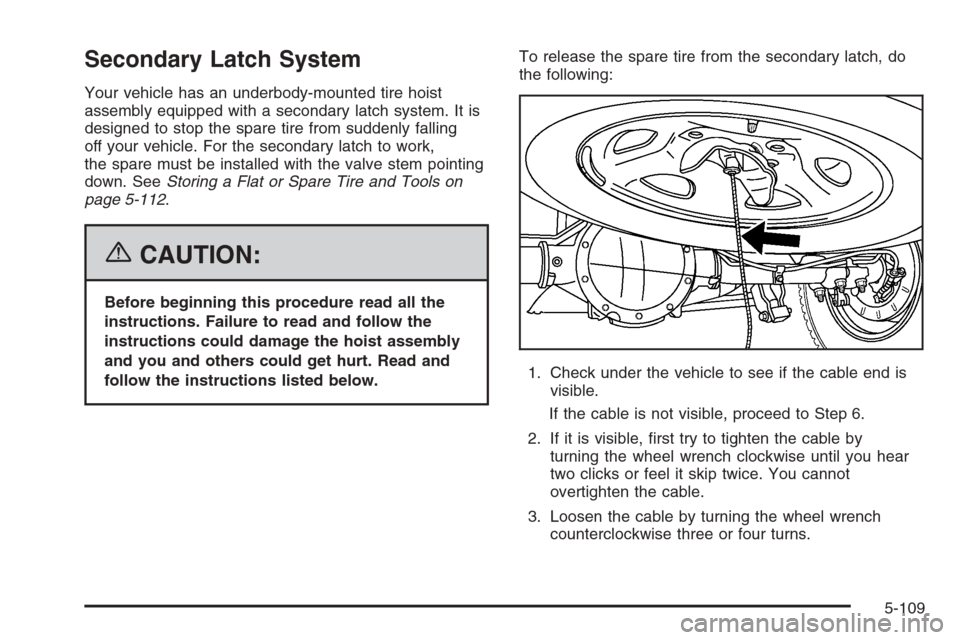
follow the instructions listed below.To release the spare tire from the secondary latch, do
the following:
1. Check under the vehicle to see if the cable end is
visible.
If the cable is not visible, proceed to Step 6.
2. If it is visible, �rst try to tighten the cable by
turning the wheel wrench clockwise until you hear
two clicks or feel it skip twice. You cannot
overtighten the cable.
3. Loosen the cable by turning the wheel wrench
counterclockwise three or four turns.
5-109
Page 514 of 594
4. Repeat this procedure at least two times. If the
spare tire lowers to the ground, continue with
Step 5 ofRemoving the Spare Tire and Tools
on page 5-95.
5. Turn the wrench counterclockwise until
approximately 6 inches (15 cm) of cable is exposed.
6. Stand the wheel blocks on their shortest ends, with
the backs facing each other.
7. Place the bottom edge
of the jack (A) on the
wheel blocks (B),
separating them so that
the jack is balanced
securely.
8. Attach the jack handle, extension, and wheel
wrench to the jack and place it (with the wheel
blocks) under the vehicle towards the front of the
rear bumper.
5-110