Page 475 of 594
Taillamps (Chassis Cab Models)
A. Turn Signal Lamp
B. Taillamp/Stoplamp
C. Back-up Lamp
To replace one of these bulbs, do the following:
1. Peel the rubber seal away from the lens using
your hands.
2. Lift the lens off the lamp assembly.
3. Pull the old bulb straight out from the socket.
4. Install a new bulb into the socket and press it in
until it is tight.
5. Reinstall the lens and the lens seal.
License Plate Lamp
To replace one of these bulbs, do the following:
1. Reach under the rear bumper for the bulb socket.
2. Twist the bulb socket counterclockwise and pull the
bulb socket out of the connector.
3. Pull the old bulb from the bulb socket, keeping the
bulb straight as you pull it out.
4. Install the new bulb.
5. Reverse steps 1 – 3 to reinstall the license
plate lamp.
5-71
Page 485 of 594

In�ation - Tire Pressure
Tires need the correct amount of air pressure to operate
effectively.
Notice:Do not let anyone tell you that
under-in�ation or over-in�ation is all right. It is not.
If your tires do not have enough air (under-in�ation),
you can get the following:
Too much �exing
Too much heat
Tire overloading
Premature or irregular wear
Poor handling
Reduced fuel economy
If your tires have too much air (over-in�ation), you
can get the following:
Unusual wear
Poor handling
Rough ride
Needless damage from road hazardsA Tire and Loading Information label is attached to the
vehicle’s center pillar (B-pillar), below the driver’s
door lock post (striker). This label lists your vehicle’s
original equipment tires and their recommended cold tire
in�ation pressures. The recommended cold tire
in�ation pressure, shown on the label, is the minimum
amount of air pressure needed to support your vehicle’s
maximum load carrying capacity.
For additional information regarding how much weight
your vehicle can carry, and an example of the tire
and loading information label, seeLoading Your Vehicle
on page 4-48.
When to Check
Check your tires once a month or more. Do not forget to
check the spare tire. For additional information
regarding the spare tire, seeSpare Tire on page 5-116.
How to Check
Use a good quality pocket-type gage to check tire
pressure. You cannot tell if your tires are properly in�ated
simply by looking at them. Radial tires may look properly
in�ated even when they’re underin�ated. Check the tire’s
in�ation pressure when the tires are cold. Cold means
your vehicle has been sitting for at least three hours or
driven no more than 1 mile (1.6 km).
5-81
Page 492 of 594

{CAUTION:
If you use bias-ply tires on your vehicle, the
wheel rim �anges could develop cracks after
many miles of driving. A tire and/or wheel
could fail suddenly, causing a crash. Use only
radial-ply tires with the wheels on your vehicle.
If you must replace your vehicle’s tires with those that
do not have a TPC Spec number, make sure they
are the same size, load range, speed rating, and
construction type (radial and bias-belted tires) as your
vehicle’s original tires.
Your vehicle’s original equipment tires are listed on the
Tire and Loading Information Label. This label is
attached to the vehicle’s center pillar (B-pillar). See
Loading Your Vehicle on page 4-48, for more information
about the Tire and Loading Information Label and its
location on your vehicle.
Different Size Tires and Wheels
If you add wheels or tires that are a different size than
your original equipment wheels and tires, this may
affect the way your vehicle performs, including its
braking, ride and handling characteristics, stability, and
resistance to rollover. Additionally, if your vehicle
has electronic systems such as, anti-lock brakes,
traction control, and electronic stability control, the
performance of these systems can be affected.
{CAUTION:
If you add different sized wheels, your vehicle
may not provide an acceptable level of
performance and safety if tires not
recommended for those wheels are selected.
You may increase the chance that you will
crash and suffer serious injury. Only use GM
speci�c wheel and tire systems developed for
your vehicle, and have them properly installed
by a GM certi�ed technician.
SeeBuying New Tires on page 5-87andAccessories
and Modi�cations on page 5-4for additional information.
5-88
Page 498 of 594

Changing a Flat Tire
If a tire goes �at, avoid further tire and wheel damage by
driving slowly to a level place. Turn on your hazard
warning �ashers. SeeHazard Warning Flashers on
page 3-6for more information.
{CAUTION:
Changing a tire can be dangerous. The vehicle
can slip off the jack and roll over or fall on you
or other people. You and they could be badly
injured or even killed. Find a level place to
change your tire. To help prevent the vehicle
from moving:
1. Set the parking brake �rmly.
2. Put an automatic transmission shift lever in
PARK (P), or shift a manual transmission to
FIRST (1) or REVERSE (R).
3. If you have a four-wheel-drive vehicle,
be sure the transfer case is in a drive
gear — not in NEUTRAL.
4. Turn off the engine and do not restart while
the vehicle is raised.
5. Do not allow passengers to remain in
the vehicle.
CAUTION: (Continued)
CAUTION: (Continued)
To be even more certain the vehicle will not
move, put blocks at the front and rear of the
tire farthest away from the one being changed.
That would be the tire on the other side, at the
opposite end of the vehicle.
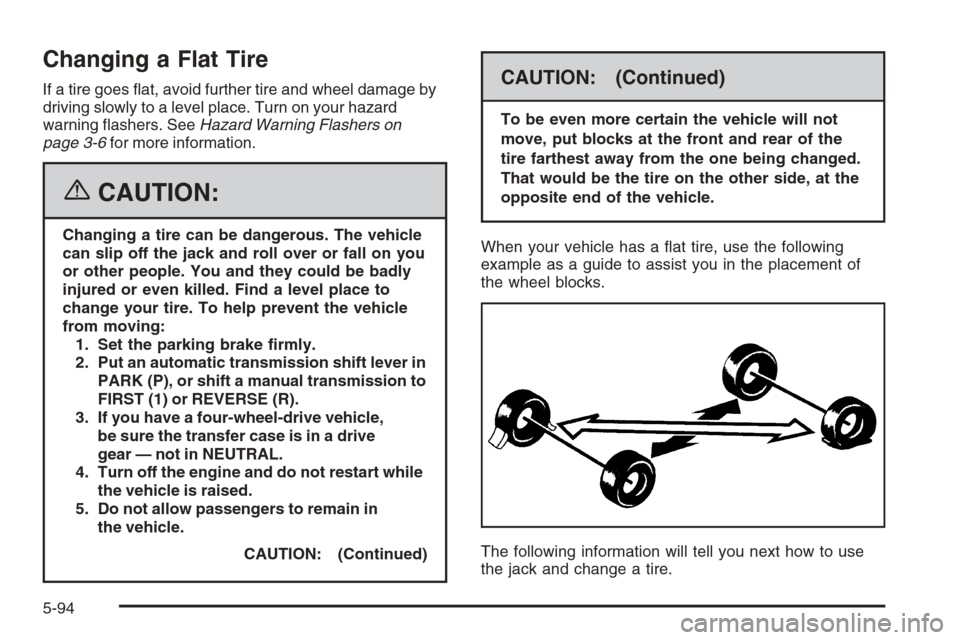
When your vehicle has a �at tire, use the following
example as a guide to assist you in the placement of
the wheel blocks.
The following information will tell you next how to use
the jack and change a tire.
5-94
Page 499 of 594
Removing the Spare Tire and Tools
A. Knob
B. Retaining Hook
C. Wheel BlocksD. Wing Nut Retaining
Wheel Blocks
E. JackA. Wing Nut Retaining
Wheel Blocks
B. Wheel Blocks
C. Retaining Bracket
and Wing NutD. Tool Kit and Jack
Tools
E. Retaining Hook
F. Jack
G. Knob 1500 Crew Cab
Regular Cab and Crew Cab (Except 1500 Crew Cab)
5-95
Page 500 of 594
A. Wing Nut Retaining
Wheel Blocks
B. Wheel Blocks
C. Retaining Hook
D. JackE. Knob
F. Tool Kit and Jack
Tools
G. Retaining Bracket
and Wing NutA. Wing Nut Retaining
Wheel Blocks
B. Wheel Blocks
C. Jack
D. Retaining HookE. Knob
F. Retaining Bracket
and Wing Nut
G. Tool Kit and
Jack Tools Extended Cab
Extended Cab Short Box
5-96
Page 501 of 594

For regular cab models, the equipment you will need is
behind the passenger’s seat. For extended and crew
cab models, the equipment is on the shelf behind
the passenger’s side second row seat.
1. If there is a cover, move the seats forward and turn
the wing nut on the cover counterclockwise to
remove it. For crew cab models, pull up the
second row seat with the loop at the base of the
seat cushion to access the tools.
2. Turn the knob on the jack counterclockwise to lower
the jack head to release the jack from its holder.
3. Remove the wheel blocks and the wheel block
retainer by turning the wing nut counterclockwise.
4. Remove the wing nut used to retain the storage
bag and tools by turning it counterclockwise.
You will use the jack handle extensions and the wheel
wrench to remove the underbody-mounted spare tire.A. Spare Tire (Valve
Stem Pointed Down)
B. Hoist Assembly
C. Hoist Cable
D. Tire/Wheel Retainer
E. Hoist ShaftF. Hoist End of
Extension Tool
G. Hoist Shaft Access Hole
H. Wheel Wrench
I. Jack Handle Extensions
J. Spare Tire Lock
(If Equipped)
1. Open the spare tire lock cover on the bumper and
use the ignition key to remove the lock, if equipped
with a spare tire lock (J). TO remove the spare tire
lock, insert the ignition key turn and pull straight out.
5-97
Page 502 of 594
2. Assemble the wheel wrench (H) and the two jack
handle extensions (I) as shown.3. Insert the hoist end
(open end) (F) of the
extension through
the hole (G) in the rear
bumper.
Be sure the hoist end of the extension (F) connects
to the hoist shaft (E). The ribbed square end of
the extension is used to lower the spare tire.
4. Turn the wheel wrench (H) counterclockwise to
lower the spare tire to the ground. Continue to
turn the wheel wrench until the spare tire can be
pulled out from under the vehicle.
If the spare tire does not lower to the ground, the
secondary latch is engaged causing the tire
not to lower. SeeSecondary Latch System on
page 5-109.
5-98