2006 CHEVROLET HHR manual radio set
[x] Cancel search: manual radio setPage 148 of 394

If you start your vehicle in a dark garage, the automatic
lamp system will come on immediately. Once you leave
the garage, it will take about 20 seconds for the automatic
lamp system to change to DRL if it is light outside.
During that delay, your instrument panel cluster may not
be as bright as usual. Make sure your instrument panel
brightness control is in the full bright position.
SeeInstrument Panel Brightness on page 3-16.
To idle your vehicle with the system off, turn the ignition
on and rotate the exterior light switch to the off/on
position. For Canadian vehicles, the transaxle must stay
in PARK (P) for this function or the parking brake
must be set for vehicles with manual transaxles.
As with any vehicle, you should turn on the regular
headlamps when you need them.
Fog Lamps
If your vehicle is equipped
with a fog lamp button, it is
located to the right of
the steering wheel
and above the radio.
The ignition must be on to turn your fog lamps on.Push the button to turn the fog lamps on. An indicator
light on the cluster will come on when the fog lamps are
on. Push the button again to turn the fog lamps off.
The parking lamps will automatically turn on and
off when the fog lamps are turned on and off.
The fog lamps will turn off while the high-beam
headlamps are turned on.
Some localities have laws that require the headlamps to
be on along with the fog lamps.
Instrument Panel Brightness
The control for this feature
is located to the right of
the steering wheel
and above the radio.
Slide the switch to the left or right to brighten or dim
the lights.
3-16
Page 183 of 394

Audio System(s)
Determine which radio your vehicle has and then read
the pages following to familiarize yourself with its
features.
Driving without distraction is a necessity for a safer
driving experience. SeeDefensive Driving on page 4-2.
By taking a few moments to read this manual and
get familiar with your vehicle’s audio system, you can
use it with less effort, as well as take advantage of
its features. While your vehicle is parked, set up your
audio system by presetting your favorite radio stations,
setting the tone, and adjusting the speakers. Then,
when driving conditions permit, you can tune to
your favorite stations using the presets and steering
wheel controls if the vehicle has them.{CAUTION:
This system provides you with a far greater
access to audio stations and song listings.
Giving extended attention to entertainment
tasks while driving can cause a crash and you
or others can be injured or killed. Always keep
your eyes on the road and your mind on the
drive — avoid engaging in extended searching
while driving.
Keeping your mind on the drive is important for safe
driving. For more information, seeDefensive Driving
on page 4-2.
3-51
Page 186 of 394

If your vehicle has a radio with a six-disc CD player, the
radio will have a MENU button instead of the clock
button to set the time and date. Press the MENU button.
Once the clock option is displayed, press the pushbutton
located under that label. The HR, MIN, MM, DD,
YYYY will appear on the display. To change the time
or date, follow the instructions given earlier in this
section.
To change the time default setting from 12 hour to
24 hour or to change the date default setting from
month/day/year to day/month/year, press the clock
button and then the pushbutton located under the
forward arrow label. Once the time 12H and 24H, and
the date MM/DD/YYYY (month, day, and year) and
DD/MM/YYYY (day, month, and year) are displayed,
press the pushbutton located under the desired option.
Press the clock or MENU button again to apply the
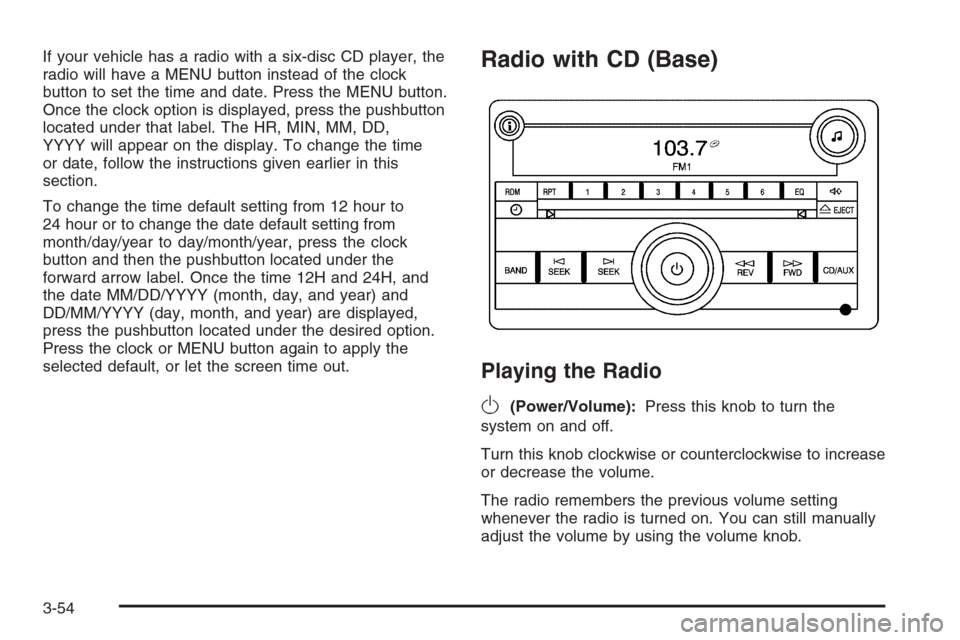
selected default, or let the screen time out.Radio with CD (Base)
Playing the Radio
O
(Power/Volume):Press this knob to turn the
system on and off.
Turn this knob clockwise or counterclockwise to increase
or decrease the volume.
The radio remembers the previous volume setting
whenever the radio is turned on. You can still manually
adjust the volume by using the volume knob.
3-54
Page 187 of 394

Finding a Station
BAND:Press this button to switch between FM1, FM2
or AM. The display will show the selection.
f(Tune):Turn this knob to select radio stations.
©SEEK¨:Press the right or left SEEK arrow to go
to the next or to the previous station and stay there.
To scan stations, press and hold either SEEK arrow for
a few seconds until you hear a beep. The radio will
go to a station, play for a few seconds, then go on to the
next station. Press either SEEK arrow again to stop
scanning.
The radio will only seek and scan stations with a strong
signal that are in the selected band.
4(Information):Press this button to switch the display
between the radio station frequency and the time. While
the ignition is off, press this button to display the time.
Setting Preset Stations
Up to 18 stations (six FM1, six FM2, and six AM), can
be programmed on the six numbered pushbuttons,
by performing the following steps:
1. Turn the radio on.
2. Press BAND to select FM1, FM2, or AM.3. Tune in the desired station.
4. Press and hold one of the six numbered
pushbuttons for three seconds until you hear a
beep. Whenever that pushbutton is pressed
and released, the station that was set will return.
5. Repeat the Steps 2-4 for each pushbutton.
Setting the Tone (Bass/Treble)
BASS/TREB (Bass/Treble):To adjust the bass or
treble, press the tune knob or the BASS/TREBLE
pushbutton until the desired tone control label appears
on the display. Turn the tune knob clockwise or
counterclockwise to increase or decrease the setting.
You can also adjust the setting by pressing either
the SEEK, FWD, or REV buttons. The display will show
the current bass or treble level. If a station’s frequency
is weak, or if there is static, decrease the treble.
EQ (Equalization):Press this button to select preset
equalization settings.
To return to the manual mode, press the EQ button until
Manual appears on the display or start to manually
adjust the bass or treble by pressing the tune knob.
3-55
Page 293 of 394

Jump Starting
If your vehicle’s battery has run down, you may want to
use another vehicle and some jumper cables to start your
vehicle. Be sure to use the following steps to do it safely.
{CAUTION:
Batteries can hurt you. They can be dangerous
because:
They contain acid that can burn you.
They contain gas that can explode or
ignite.
They contain enough electricity to burn you.
If you do not follow these steps exactly, some or
all of these things can hurt you.
Notice:Ignoring these steps could result in costly
damage to your vehicle that would not be covered
by your warranty.
Trying to start your vehicle by pushing or pulling it
will not work, and it could damage your vehicle.
1. Check the other vehicle. It must have a 12-volt
battery with a negative ground system.Notice:If the other vehicle’s system is not a 12-volt
system with a negative ground, both vehicles can
be damaged. Only use vehicles with 12-volt systems
with negative grounds to jump start your vehicle.
2. Get the vehicles close enough so the jumper cables
can reach, but be sure the vehicles are not touching
each other. If they are, it could cause a ground
connection you do not want. You would not be
able to start your vehicle, and the bad grounding
could damage the electrical systems.
To avoid the possibility of the vehicles rolling, set
the parking brake �rmly on both vehicles involved
in the jump start procedure. Put an automatic
transaxle in PARK (P) or a manual transaxle in
NEUTRAL before setting the parking brake.
Notice:If you leave your radio or other accessories
on during the jump starting procedure, they could
be damaged. The repairs would not be covered
by your warranty. Always turn off your radio and
other accessories when jump starting your vehicle.
3. Turn off the ignition on both vehicles. Unplug
unnecessary accessories plugged into the cigarette
lighter or the accessory power outlet. Turn off
the radio and all lamps that are not needed.
This will avoid sparks and help save both batteries.
And it could save the radio!
5-33