2006 CHEVROLET HHR battery
[x] Cancel search: batteryPage 78 of 394
Aftermarket equipment, such as seat covers, can affect
how well the passenger sensing system operates.
You may want to consider not using seat covers or other
aftermarket equipment if your vehicle has the passenger
sensing system. SeeAdding Equipment to Your
Airbag-Equipped Vehicle on page 1-73for more
information about modi�cations that can affect how the
system operates.
{CAUTION:
Stowing of articles under the passenger’s seat
or between the passenger’s seat cushion and
seatback may interfere with the proper
operation of the passenger sensing system.
Servicing Your Airbag-Equipped
Vehicle
Airbags affect how your vehicle should be serviced.
There are parts of the airbag system in several places
around your vehicle. You do not want the system to
in�ate while someone is working on your vehicle.
Your dealer and the service manual have information
about servicing your vehicle and the airbag system.
To purchase a service manual, seeService Publications
Ordering Information on page 7-14.
{CAUTION:
For up to 10 seconds after the ignition key is
turned off and the battery is disconnected, an
airbag can still in�ate during improper service.
You can be injured if you are close to an airbag
when it in�ates. Avoid yellow connectors. They
are probably part of the airbag system. Be sure
to follow proper service procedures, and make
sure the person performing work for you is
quali�ed to do so.
The airbag system does not need regular maintenance.
1-72
Page 87 of 394
At times you may notice a decrease in operating range.
This is normal for any remote keyless entry system.
If the transmitter does not work or if you have to stand
closer to your vehicle for the transmitter to work, try this:
Check the distance. You may be too far from your
vehicle. You may need to stand closer during rainy
or snowy weather.
Check the location. Other vehicles or objects may
be blocking the signal. Take a few steps to the left
or right, hold the transmitter higher, and try again.
Check to determine if battery replacement is
necessary. See “Battery Replacement” under
Remote Keyless Entry System Operation on
page 2-5.
If you are still having trouble, see your dealer or
a quali�ed technician for service.
Remote Keyless Entry System
Operation
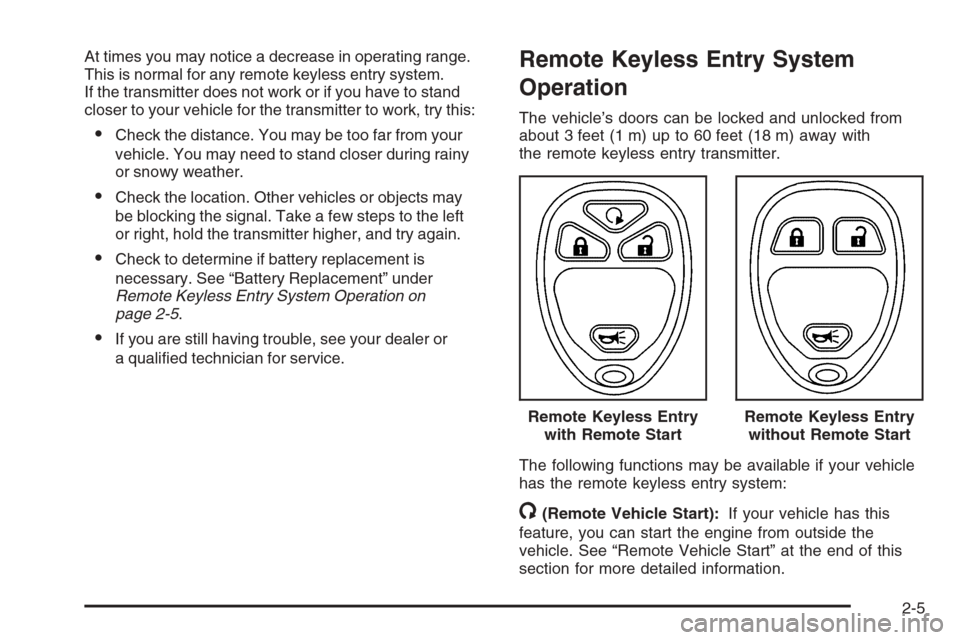
The vehicle’s doors can be locked and unlocked from
about 3 feet (1 m) up to 60 feet (18 m) away with
the remote keyless entry transmitter.
The following functions may be available if your vehicle
has the remote keyless entry system:
/(Remote Vehicle Start):If your vehicle has this
feature, you can start the engine from outside the
vehicle. See “Remote Vehicle Start” at the end of this
section for more detailed information.Remote Keyless Entry
with Remote Start
Remote Keyless Entry
without Remote Start
2-5
Page 89 of 394
Battery Replacement
Under normal use, the battery in your remote keyless
entry transmitter should last about four years.
You can tell the battery is weak if the transmitter will not
work at the normal range in any location. If you have
to get close to your vehicle before the transmitter works,
it is probably time to change the battery.
The KEY FOB BATT LOW message in the vehicle’s
DIC will display if the remote keyless entry transmitter
battery is low.
Notice:When replacing the battery, use care not to
touch any of the circuitry. Static from your body
transferred to these surfaces may damage the
transmitter.
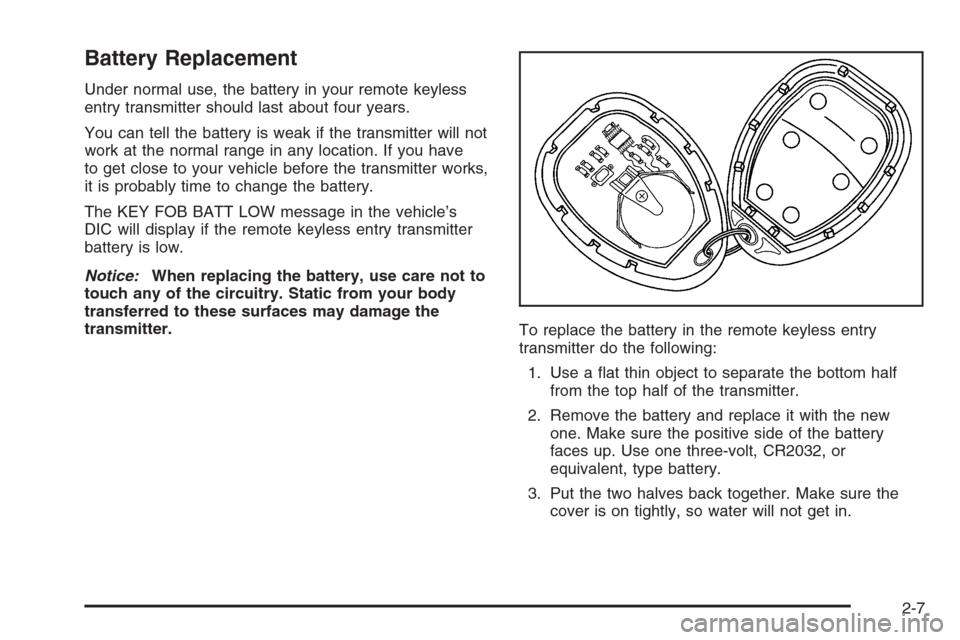
To replace the battery in the remote keyless entry
transmitter do the following:
1. Use a �at thin object to separate the bottom half
from the top half of the transmitter.
2. Remove the battery and replace it with the new
one. Make sure the positive side of the battery
faces up. Use one three-volt, CR2032, or
equivalent, type battery.
3. Put the two halves back together. Make sure the
cover is on tightly, so water will not get in.
2-7
Page 96 of 394
Manual Liftgate Release
If the liftgate cannot be opened by pressing the switch
on the outside handle, the battery may be run down.
SeeJump Starting on page 5-33.
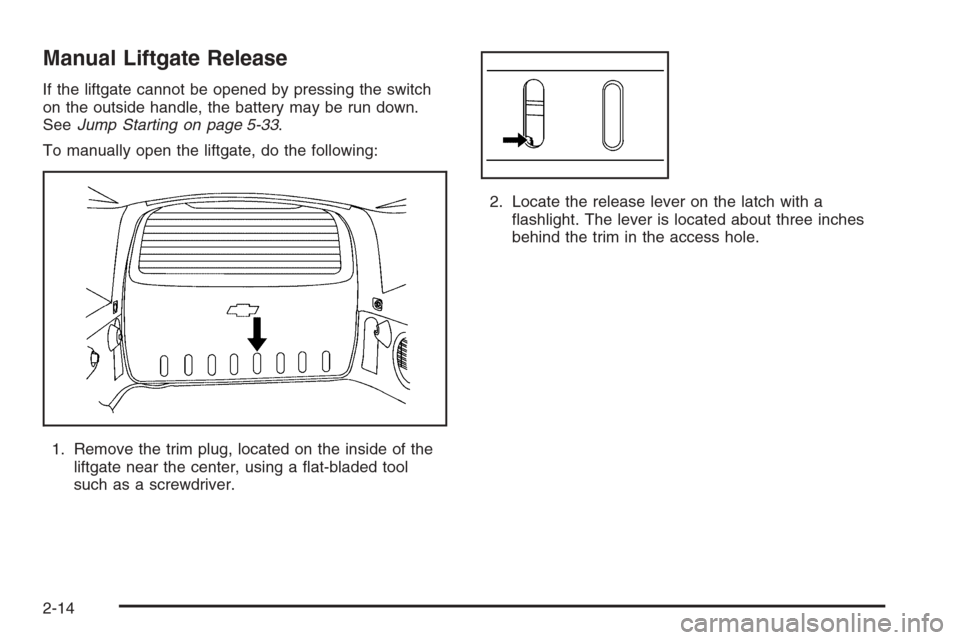
To manually open the liftgate, do the following:
1. Remove the trim plug, located on the inside of the
liftgate near the center, using a �at-bladed tool
such as a screwdriver.2. Locate the release lever on the latch with a
�ashlight. The lever is located about three inches
behind the trim in the access hole.
2-14
Page 105 of 394
ACC (ACCESSORY):This position operates some of
your electrical accessories. It unlocks the steering wheel
and ignition.
R(RUN):This is the position the switch returns to after
you start your engine and release the switch. The
switch stays in the RUN position when the engine is
running. But even when the ignition is not running, you
can use RUN to operate your electrical accessories
and to display some warning and indicator lights.
/(START):This position starts the engine. When the
engine starts, release the key. The ignition switch
will return to RUN for normal driving.
A warning tone will sound if you open the driver’s door
while in LOCK or ACC, when the key has not been
removed from the ignition.
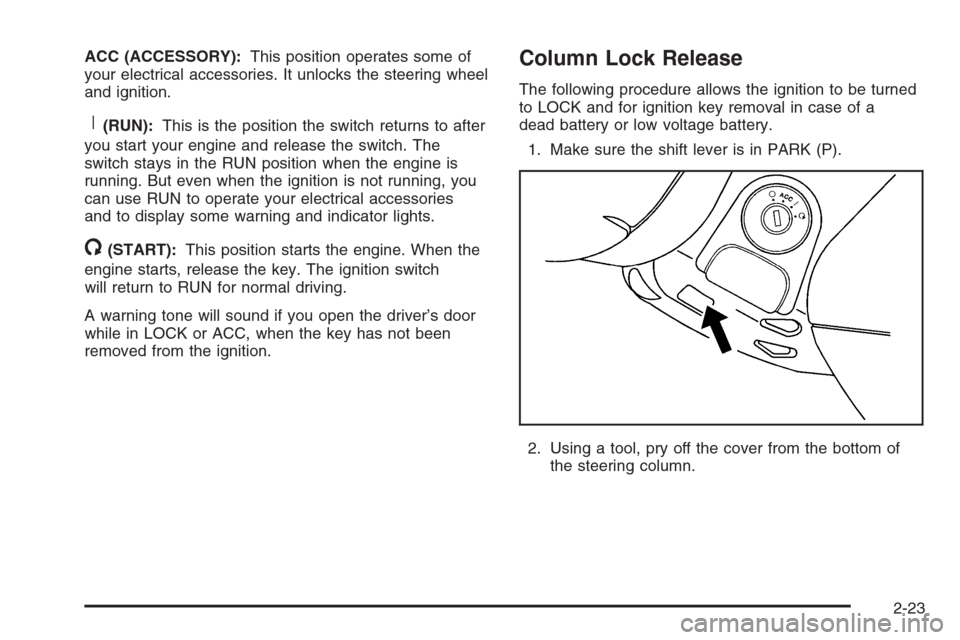
Column Lock Release
The following procedure allows the ignition to be turned
to LOCK and for ignition key removal in case of a
dead battery or low voltage battery.
1. Make sure the shift lever is in PARK (P).
2. Using a tool, pry off the cover from the bottom of
the steering column.
2-23
Page 107 of 394
Starting Procedure
1. With your foot off the accelerator pedal, turn the
ignition to START. When the engine starts, let go
of the key. The idle speed will go down as your
engine gets warm.
Your vehicle has a Computer-Controlled Cranking
System. This feature assists in starting the
engine and protects the electrical system. If the
ignition key is turned to the START position,
and then released when the engine begins cranking,
the engine will continue cranking until the vehicle
starts or until it exceeds the maximum cranking time
allowed, approximately 15 seconds to prevent
cranking motor damage. To prevent gear damage,
this system also prevents cranking if the engine
is already running. The engine cranking can
be stopped by turning the ignition switch to the
ACCESSORY or LOCK position.
Notice:Holding your key in START for longer
than 15 seconds at a time will cause your battery
to be drained much sooner. And the excessive
heat can damage your starter motor. Wait about
15 seconds between each try to help avoid draining
your battery or damaging your starter.
2. If it does not start, wait about 15 seconds and try
again to start the engine by turning the ignition to
START. Wait about 15 seconds between each try.When the engine has run about 10 seconds to
warm up, your vehicle is ready to be driven.
Do not run your engine at high speed when it
is cold.
If the weather is below freezing (32°F or 0°C),
let the engine run for a few minutes to warm up.
3. If the engine still will not start, or starts but then
stops, it could be �ooded with too much gasoline.
Try pushing your accelerator pedal all the way to
the �oor and holding it there as you hold the key
in START for about three seconds. If the vehicle
starts brie�y but then stops again, do the same
thing, but this time keep the pedal down for
�ve or six seconds. This clears the extra gasoline
from the engine.
Notice:Your engine is designed to work with the
electronics in your vehicle. If you add electrical
parts or accessories, you could change the way the
engine operates. Before adding electrical equipment,
check with your dealer. If you do not, your engine
might not perform properly. Any resulting damage
would not be covered by your vehicle’s warranty.
2-25
Page 117 of 394

Shifting Out of Park (P)
(Automatic Transaxle)
This vehicle is equipped with an electronic shift lock
release system. The shift lock release is designed to:
Prevent ignition key removal unless the shift
lever is in PARK (P) with the shift lever button
fully released, and
Prevent movement of the shift lever out of PARK (P)
unless the ignition is in a position other than LOCK.
The shift lock release is always functional except in
the case of a an uncharged or low voltage (less than
9 volt) battery.
If your vehicle has an uncharged battery or a battery
with low voltage, try charging or jump starting the
battery. SeeJump Starting on page 5-33for more
information.
To shift out of PARK (P) use the following sequence:
1. Apply the brake pedal.
2. Then press the shift lever button.
3. Move the shift lever to the desired position.If you still are unable to shift out of PARK (P):
1. Fully release the shift lever button.
2. While holding down the brake pedal, press the
shift lever button again.
3. Move the shift lever to the desired position.
If you still cannot move the shift lever from PARK (P),
consult your dealer or a professional towing service.Parking Your Vehicle
Before leaving your vehicle, fully press the clutch pedal
in, move the shift lever into REVERSE (R), and �rmly
apply the parking brake. Once the shift lever has
been placed in REVERSE (R) with the clutch pedal
pressed in, you can turn the ignition key to LOCK,
remove the key and release the clutch. SeeManual
Transaxle Operation on page 2-30.
2-35
Page 133 of 394
Instrument Panel Overview...............................3-4
Hazard Warning Flashers................................3-6
Other Warning Devices...................................3-6
Horn .............................................................3-6
Tilt Wheel.....................................................3-6
Turn Signal/Multifunction Lever.........................3-7
Turn and Lane-Change Signals........................3-7
Headlamp High/Low-Beam Changer..................3-8
Flash-to-Pass.................................................3-8
Windshield Wipers..........................................3-8
Windshield Washer.........................................3-9
Rear Window Wiper/Washer...........................3-10
Cruise Control..............................................3-11
Headlamps..................................................3-14
Wiper Activated Headlamps............................3-14
Headlamps on Reminder................................3-15
Daytime Running Lamps (DRL).......................3-15
Automatic Headlamp System..........................3-15
Fog Lamps ..................................................3-16
Instrument Panel Brightness...........................3-16
Dome Lamp .................................................3-17
Entry/Exit Lighting.........................................3-17
Mirror Reading Lamps...................................3-17
Rear Reading Lamps....................................3-17
Battery Run-Down Protection..........................3-17
Accessory Power Outlet(s).............................3-18
Ashtray(s) and Cigarette Lighter......................3-18Climate Controls............................................3-19
Climate Control System.................................3-19
Outlet Adjustment.........................................3-22
Passenger Compartment Air Filter...................3-22
Warning Lights, Gages, and Indicators............3-24
Instrument Panel Cluster................................3-25
Speedometer and Odometer...........................3-26
Tachometer.................................................3-26
Safety Belt Reminder Light.............................3-27
Passenger Safety Belt Reminder Light.............3-27
Airbag Readiness Light..................................3-28
Passenger Airbag Status Indicator...................3-29
Charging System Light..................................3-31
Up-Shift Light...............................................3-32
Brake System Warning Light..........................3-32
Anti-Lock Brake System Warning Light.............3-33
Enhanced Traction System Warning Light.........3-34
Engine Coolant Temperature Warning Light......3-34
Engine Coolant Temperature Gage..................3-35
Malfunction Indicator Lamp.............................3-35
Oil Pressure Light.........................................3-38
Security Light...............................................3-39
Fog Lamp Light............................................3-39
Highbeam On Light.......................................3-39
Fuel Gage...................................................3-40
Section 3 Instrument Panel
3-1