Page 78 of 426
Emergency Trunk Release Handle
(Convertible Only)
Notice:Do not use the emergency trunk release
handle as a tie-down or anchor point when securing
items in the trunk as it could damage the handle.
The emergency trunk release handle is only
intended to aid a person trapped in a latched trunk,
enabling them to open the trunk from the inside.
There is a glow-in-the-dark emergency trunk release
handle located on the rear wall of the trunk below
the latch. This handle will glow following exposure to
light. Pull the release handle down to open the
trunk from the inside.
Windows
{CAUTION:
Leaving children, helpless adults, or pets in a
vehicle with the windows closed is dangerous.
They can be overcome by the extreme heat
and suffer permanent injuries or even death
from heat stroke. Never leave a child, a
helpless adult, or a pet alone in a vehicle,
especially with the windows closed in warm or
hot weather.
2-16
Page 81 of 426
Sun Visors
To block out glare, you can swing down the visors. You
can also swing them to the side.
Lighted Visor Vanity Mirrors
Pull down the sun visor and lift the cover to expose the
lighted vanity mirror. When the cover is lifted, the
lamps will come on automatically, even if the ignition
is off.
Theft-Deterrent Systems
Vehicle theft is big business, especially in some cities.
Although your vehicle has a number of theft-deterrent
features, we know that nothing we put on it can make it
impossible to steal.
Theft-Deterrent System
Your vehicle is equipped with a theft-deterrent alarm
system.
With this system, the
security light will �ash when
the door is open and locked
with the power door lock
switch.
If this light is on continuously while the engine is
running, your vehicle needs service.
2-19
Page 82 of 426

Arming the System
Use one of the three following items listed here to arm
the system:
Press the lock button on the keyless access
transmitter.
Open the door. Lock the door with the power door
lock switch. The security light should �ash.
Remove the keyless access transmitter from inside
the vehicle and close the door. The security light
will stop �ashing and stay on. After 30 seconds, the
light should turn off.
The vehicle can be programmed to automatically
lock the doors and arm the theft-deterrent system
when you exit the vehicle. SeeDIC Vehicle
Personalization on page 3-68.
Now, if a door or the hatch/trunk is opened without
the keyless access transmitter, the alarm will go
off. Your horn will sound for two minutes, then it will go
off to save battery power. Your vehicle will not start
without a keyless access transmitter present.
The theft-deterrent system will not arm if you lock the
driver’s door with the power door lock switch after
the doors are closed.
If your passenger stays in the vehicle when you leave
with the keyless access transmitter, have the passenger
lock the vehicle after the doors are closed. This way the
alarm will not arm, and your passenger will not set it off.
Testing the Alarm
Do the following to test the system:
1. Make sure the trunk lid/hatch is latched.
2. Lower the window on the driver’s door.
3. Manually arm the system.
4. Close the doors and wait 30 seconds.
5. Reach through the open window and manually pull
the release lever on the �oor.
6. Turn off the alarm by pressing the unlock button on
the transmitter.
If the alarm is inoperative, check to see if the horn
works. If not, check the horn fuse. SeeFuses and Circuit
Breakers on page 5-93. If the horn works, but the
alarm doesn’t go off, see your dealer.
Disarming the System
Always use your keyless access transmitter to unlock
a door either by pressing the unlock button on the
transmitter or by squeezing the door handle sensor while
you have the transmitter with you. Unlocking a door
any other way will set off the alarm. If your alarm
sounds, press the unlock button on the keyless access
transmitter to disarm it.
2-20
Page 94 of 426

One to Four Shift Light
(Manual Transmission)
When this light comes on,
you can only shift from
FIRST (1) to FOURTH (4)
instead of FIRST (1) to
SECOND (2).
You must complete the shift into FOURTH (4) to turn off
this feature. This helps you get the best possible fuel
economy.
After shifting to FOURTH (4), you may downshift to a
lower gear.
Notice:Forcing the shift lever into any gear except
FOURTH (4) when the 1 TO 4 SHIFT light comes
on may damage the transmission. Shift only from
FIRST (1) to FOURTH (4) when the light comes on.
This light will come on when:
The engine coolant temperature is higher than
169°F (76°C),
you are going 15 to 19 mph (24 to 31 km/h) and
you are 21 percent throttle or less.
Downshifting (Manual Transmission)
Do not downshift into the gear shown below at a speed
greater than shown in the table:
FIRST (1) 50 mph (80 km/h)
SECOND (2) 74 mph (119 km/h)
THIRD (3) 101 mph (163 km/h)
FOURTH (4) 130 mph (209 km/h)
Notice:If you skip more than one gear when you
downshift, or if you race the engine when you
release the clutch pedal while downshifting, you
could damage the engine, clutch, driveshaft or the
transmission. Do not skip gears or race the
engine when downshifting.
The six-speed transmission has a spring that centers
the shift lever near THIRD (3) and FOURTH (4).
This spring helps you know which gear you are in when
you are shifting. Be careful when shifting from
FIRST (1) to SECOND (2) or downshifting from
SIXTH (6) to FIFTH (5). The spring will try to pull the
shift lever toward FOURTH (4) and THIRD (3).
Make sure you move the lever into SECOND (2) or
FIFTH (5). If you let the shift lever move in the direction
of the pulling, you may end up shifting from FIRST (1)
to FOURTH (4) or from SIXTH (6) to THIRD (3).
2-32
Page 95 of 426

Parking Brake
The parking brake lever is located to the right of the
center console.
To set the parking brake, hold the brake pedal down.
Pull the parking brake lever up. If the ignition is on,
the brake system warning light will come on.
To release the parking brake, hold the brake pedal
down. Then push the release button in as you move
the parking brake lever all the way down.
Notice:Driving with the parking brake on can
overheat the brake system and cause premature
wear or damage to brake system parts. Verify that
the parking brake is fully released and the brake
warning light is off before driving.
Shifting Into Park (P)
(Automatic Transmission)
{CAUTION:
It can be dangerous to get out of your vehicle
if the shift lever is not fully in PARK (P) with
the parking brake �rmly set. Your vehicle can
roll. If you have left the engine running, the
vehicle can move suddenly. You or others
could be injured. To be sure your vehicle will
not move, even when you are on fairly level
ground, use the steps that follow.
1. Hold the brake pedal down with your right foot and
set the parking brake.
2. Move the shift lever into PARK (P) by holding in the
button on the lever and pushing the lever all the
way toward the front of the vehicle.
3. Press the ACC button (ignition switch) to turn the
engine off.
2-33
Page 100 of 426

Mirrors
Manual Rearview Mirror
When you are sitting in a comfortable driving position,
adjust the mirror so you can see clearly behind your
vehicle. Grip the mirror in the center to move it up or
down and side to side. The day/night control, located at
the bottom of the mirror, lessens glare from the
headlamps behind your vehicle when in the night
position. Turn the control to the right for the night
position and to the left for the day position.
Two buttons under the rearview mirror control map
lamps. Push each button to turn each map lamp on
or off.
Automatic Dimming Rearview Mirror
with OnStar
®and Compass
The vehicle may have an automatic dimming rearview
mirror with OnStar®, a compass and map lamps.
Three OnStar®buttons are at the bottom of the mirror.
SeeOnStar®System on page 2-45for more
information the services OnStar®provides.
Mirror Operation
The mirror automatically changes to reduce glare from
headlamps behind you. A time delay feature prevents
rapid changing from the day to night positions while
driving under lights and through traffic.
P(On/Off):The automatic dimming feature is
automatically activated when the vehicle is started.
The automatic dimming feature is turned on or off by
pressing this button located on the lower part of
the mirror. Press and hold the button for up to
three seconds to turn this feature on or off.
T(Indicator Light):This light will turn on when the
automatic dimming feature is active.
2-38
Page 101 of 426

Map Lamps
The mirror has map lamps located at the bottom of the
mirror. To manually turn the lamps on or off, press the
button next to each lamp.
Compass Operation
The mirror has an eight-point compass display in the
bottom of the mirror face.
When the ignition and the compass feature are on, the
compass will show two character boxes for approximately
two seconds. After two seconds, the mirror will display
the current compass heading. For example, NE is
displayed for north-east.
Compass Calibration
If after two seconds the display does not show a
compass heading, there may be a strong magnetic �eld
interfering with the compass. Such interference may
be caused by a magnetic antenna mount, note
pad holder or similar object. If the letter C appears in
the compass window, the compass needs calibration.
The mirror compass can be calibrated by driving
the vehicle in circles at 5 mph (8 km/h) or less until
the display reads a direction.
The compass can be placed in calibration mode by
pressing and holding the left map light button until
a C appears on the compass display.
2-39
Page 102 of 426

Compass Variance
Compass variance is the difference between earth’s
magnetic north and true geographic north. If the mirror
is not adjusted for compass variance, your compass
could give false readings.
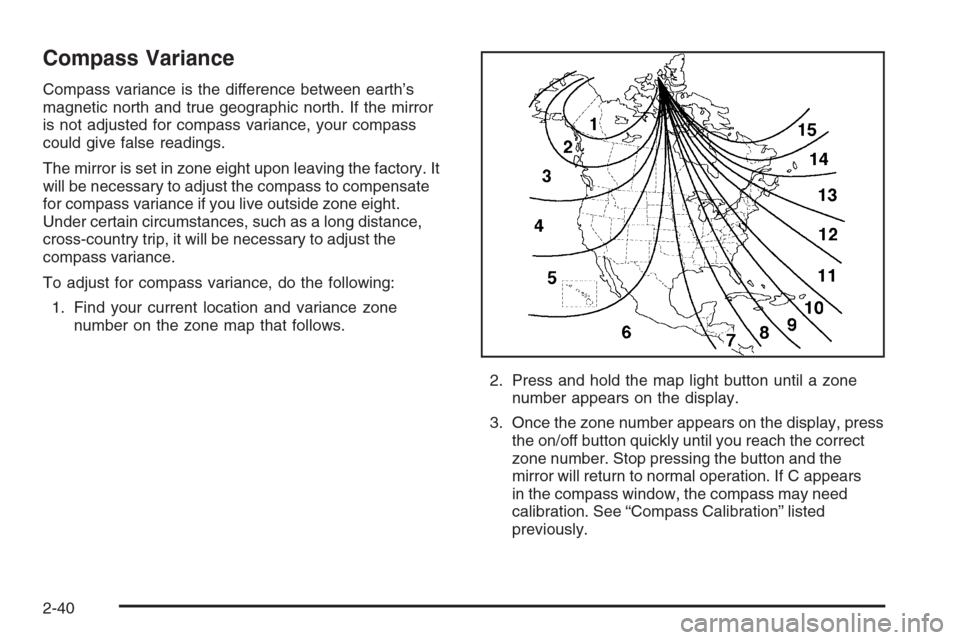
The mirror is set in zone eight upon leaving the factory. It
will be necessary to adjust the compass to compensate
for compass variance if you live outside zone eight.
Under certain circumstances, such as a long distance,
cross-country trip, it will be necessary to adjust the
compass variance.
To adjust for compass variance, do the following:
1. Find your current location and variance zone
number on the zone map that follows.
2. Press and hold the map light button until a zone
number appears on the display.
3. Once the zone number appears on the display, press
the on/off button quickly until you reach the correct
zone number. Stop pressing the button and the
mirror will return to normal operation. If C appears
in the compass window, the compass may need
calibration. See “Compass Calibration” listed
previously.
2-40