Page 9 of 35
. The system will
calculate and highlight t")
6. Touch the GO screen button. The map screen will display with the destination
marked.
7. Select the route preference (F
ASTEST, SHORTEST, or OTHER). The system will
calculate and highlight the route.
8. Select the S
TART GUIDANCE screen button. You are now ready to start your route.
Refer to the following for further info:
Deleting a Destination
Creating an Address Book Entry
There are two ways to add an address book entry:
1. Method I: To add the current final destination to the address book, press the M
ARK
screen button from the map screen. The system will automatically save the final
destination information in the address book.
2. Method II: Touch the A
DDRESS BOOK screen button when available on POI
information screens, destination entry screens, or POI screens. The system will
automatically save this information in the address book.
Refer to the following for further info:
Setting a Destination to an Address Book Entry
Setting a Destination to an Address Book Entry
This method allows you to select a destination by selecting an address that has been
stored in your address book.
Page 10 of 35

1. Press the DEST hard key. The DESTINATION ENTRY screen will appear.
2. Touch the A
DDRESS BOOK screen button. The ADDRESS BOOK screen will
appear listing your address book entries.
3. Touch the G
O screen button next to the address you wish to select. The map
screen, with the destination marked will display.
4. Select the route preference (F
ASTEST, SHORTEST, or OTHER). The system will
calculate and highlight the route.
5. Select the S
TART GUIDANCE screen button. You are now ready to start your route.
Refer to the following for further info:
Creating an Address Book Entry
Deleting a Destination
Adding or Changing Preset Destinations
There are two ways to add a preset destination:
1. Method I: To store the current final destination as a preset destination:
a. Touch the M
ARK screen button from the map screen to add the current final
destination. The ADDRESS BOOK screen will appear.
b. Touch the N
AME screen button. An alpha keyboard will display. Enter
the name.
c. Press and hold one of the buttons at the bottom of the screen until the name
appears in that preset destination screen button. It is now available to select from
the DESTINATION ENTRY screen.
2. Method II: To store an address book entry as a preset destination:
Page 11 of 35

a. Press the MENU hard key.
b. Touch the NAV screen button or press the MENU hard key until NAV is
selected.
d. Select the address book entry that you would like to store as the preset
destination. Touch the N
AME screen button to add a name, if needed.
e. Press and hold one of the buttons at the bottom of the screen until the name
appears in that preset destination screen button. It is now available to select from
the DESTINATION ENTRY screen.
Refer to the following for further info:
Setting a Destination by Preset Destinations
Setting a Destination by Preset Destinations
This method allows you to set a destination by selecting from one of five previously stored
destinations. You can use this method while the vehicle is moving.
1. Press the DEST hard key. The DESTINATION ENTRY screen will appear. The
preset destinations are shown across the bottom of the screen and are labeled with
the name that was selected when the destination was stored. If a screen button is
dimmed, no destination has been assigned to that button.
Page 12 of 35
2. Touch the desired preset destination screen. The map screen with the
destination marked will display.
3. Select the route preference (F
ASTEST, SHORTEST, or OTHER). The system will
calculate and highlight the route.
4. Select the S
TART GUIDANCE screen button. You are now ready to start your route.
Refer to the following for further info:
Deleting a Destination
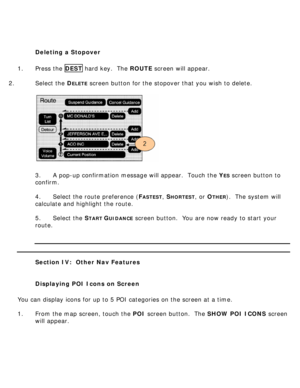
Setting a Destination by Previous Destination
This method allows you to select a destination from a list of previous destination
points. Up to 100 previous destinations will be stored. As new destinations are
entered, the system will automatically delete the oldest destinations.
1. Press the DEST hard key. The DESTINATION ENTRY screen will appear.
2. Touch the P
REVIOUS DESTINATION screen button. The PREVIOUS DESTINATION
screen will appear listing your previous destinations.
Page 13 of 35

3. Select a destination from the list. If the name is too long to view, touch the arrow to
the right of the destination to see the entire name. Use the up and down scroll
arrows on the left side of the screen to scroll through the list.
4. Touch the G
O screen button next to the destination you wish to select. The map
screen, with the destination marked, will display.
5. Select the route preference (F
ASTEST, SHORTEST, or OTHER). The system will
calculate and highlight the route.
6. Select the S
TART GUIDANCE screen button. You are now ready to start your route.
To delete all of the previous destinations, touch the C
LEAR ALL screen button.
Refer to the following for further info:
Deleting a Destination
Setting a Destination by Picking from the Map
This method allows you to select a destination by scrolling on the map.
1. Press the DEST hard key. The DESTINATION ENTRY screen will appear.
2. Touch the F
ROM MAP screen button. The map screen will display with a scrolling
symbol.
3. Use the zoom screen buttons and touch the map to find the area that you
would like to select as your destination. Pressing/holding and dragging your finder
on the map will activate fast scrolling.
Page 14 of 35

4. Touch once the area that you would like to select as your destination. The map
screen will display the address information.
5. Select the G
O screen button. The map screen, with the destination marked, will
display.
6. Select the route preference (F
ASTEST, SHORTEST, or OTHER). The system will
calculate and highlight the route.
7. Select the S
TART GUIDANCE screen button. You are now ready to start your route.
Refer to the following for further info:
Deleting a Destination
Setting a Destination by Map Coordinates
This method allows you to select a destination by entering latitude and longitude
coordinates.
1. Press the DEST hard key. The DESTINATION ENTRY screen will appear.
2. Touch the F
ROM MAP screen button. The map screen will display with a
scrolling symbol.
3. Touch the MAP COORDINATES screen button. The COORDINATES ENTRY
screen will display.
4. Touch the L
ATITUDE screen button. Enter the numeric portion of the latitude
coordinate. Touch either N (north) or S (south) to enter the direction of the latitude
coordinate.
Page 15 of 35
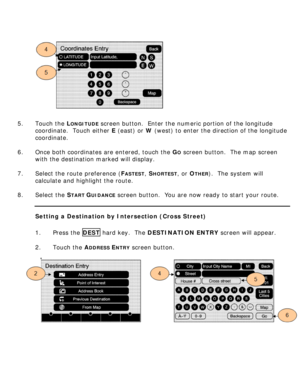
5. Touch the L
ONGITUDE screen button. Enter the numeric portion of the longitude
coordinate. Touch either E (east) or W (west) to enter the direction of the longitude
coordinate.
6. Once both coordinates are entered, touch the G
O screen button. The map screen
with the destination marked will display.
7. Select the route preference (F
ASTEST, SHORTEST, or OTHER). The system will
calculate and highlight the route.
8. Select the S
TART GUIDANCE screen button. You are now ready to start your route.
Setting a Destination by Intersection (Cross Street)
1. Press the DEST hard key. The DESTINATION ENTRY screen will appear.
2. Touch the A
DDRESS ENTRY screen button.
Page 16 of 35
 screen
button. Does this button just show the current state? A list of all of the available
states and provinces will ap")
3. If you need to change the state or province, touch the (State/Province) screen
button. Does this button just show the current state? A list of all of the available
states and provinces will appear. Select the correct state or province.
4. Touch the S
TREET screen button and start entering the street name. Enter the street
name without directionals or suffixes. The number of streets matching your entry
will display in the L
IST screen button. You can touch the LIST screen button to select
a street from the list. When five or fewer names are available, a list will display
automatically. You can also touch the L
AST 5 STREETS screen button to display a list
of the last five street names entered. Select a street from the list.
5. Touch the C
ROSS STREET screen button. Enter the name of the cross street without
directionals or suffixes. The number of streets matching your entry will display in
the L
IST screen button. You can touch the LIST screen button to select a street from
the list. When five or fewer names are available, a list will display automatically.
Select the cross street from the list.
6. Touch the G
O screen button. The map screen will display with the destination
marked.
7. Select the route preference (F
ASTEST, SHORTEST, or OTHER). The system will
calculate and highlight the route.
8. Select the S
TART GUIDANCE screen button. You are now ready to start your route.
Refer to the following for further info:
Deleting a Destination
Storing Voice Tags
You can use voice recognition to set a destination. To do this, you must store voice
tags in the system. This system allows you to store up to 40 voice tags.
You must create an address book entry for the destination before storing a voice tag.
1. Press the
MENU hard key.
2. Touch the N
AV screen button, or press the MENU hard key until the NAV screen
button is selected.


. The system will
cal")
 or W (west) to enter the direction of the longitude
coordinate.
6. Onc")