Page 17 of 35
3. Touch the E
DIT/VIEW Address Book screen button.
4. Touch the A
DD VOICE TAG screen button.
5. The system will ask you to state the name. You will have 5 seconds to state the
name. The system will respond back with the name.
Refer to the following for further info:
Creating an Address Book Entry
Editing an Address Book Entry
Setting a Destination through Voice Recognition
Using Voice Commands
Troubleshooting Voice Recognition
Setting a Destination through Voice Recognition
The vehicle does NOT need to be in park to use voice recognition. You must store
voice tags prior to using this method of setting a destination.
1. Press the talk symbol steering wheel control and release it when you hear a beep.
2. Clearly state one of the following commands (words in brackets are optional):
“Navigation go to [destination] (voice tag)”
OR
“Navigation select [destination] (voice tag)”
Page 18 of 35
3. If you are not currently driving on a route, the system will automatically create a
route with the voice tag destination as the final destination. If you are currently
driving on a route, the system will automatically add the voice tag destination as a
waypoint. Up to three waypoints can be created.
Refer to the following for further info:
Deleting a Destination
Storing Voice Tags
Using Voice Commands
Troubleshooting Voice Recognition
Deleting a Destination
1. Press the DEST hard key. The ROUTE screen will appear.
2. Touch the C
ANCEL GUIDANCE screen button to cancel the current route.
Adding a Stopover
This feature allows you to add up to 3 stopovers between your start point and final
destination.
1. Press the DEST hard key. The ROUTE screen will appear.
2. Touch the A
DD STOPOVER screen button. This button will only appear if a route
has been calculated.
Page 19 of 35
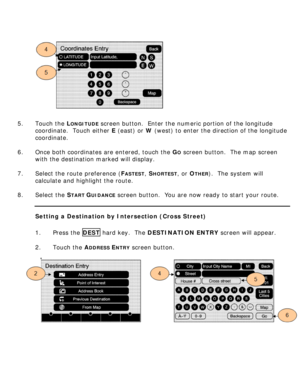
3. Enter a destination using any available method.
4. Select the route preference (F
ASTEST, SHORTEST, or OTHER). The system will
calculate and highlight the route.
5. Select the S
TART GUIDANCE screen button. You are now ready to start your
route.
To add the second and third stopovers, do the following:
a. Press the DEST hard key. The ROUTE screen will appear.
b. Press the ADD screen button where you would like the next stopover to fall on
your route.
c. Enter a destination using any available method.
d. Select the route preference (F
ASTEST, SHORTEST, or OTHER). The system will
calculate and highlight the route.
e. Select the S
TART GUIDANCE screen button. You are now ready to start your
route.
Refer to the following for further info:
Deleting a Stopover
Page 20 of 35
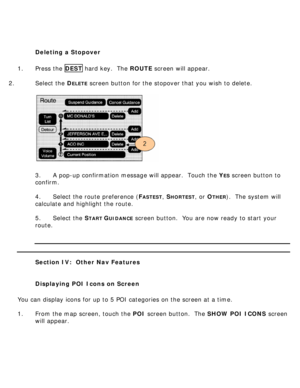
Deleting a Stopover
1. Press the DEST hard key. The ROUTE screen will appear.
2. Select the D
ELETE screen button for the stopover that you wish to delete.
3. A pop-up confirmation message will appear. Touch the Y
ES screen button to
confirm.
4. Select the route preference (F
ASTEST, SHORTEST, or OTHER). The system will
calculate and highlight the route.
5. Select the S
TART GUIDANCE screen button. You are now ready to start your
route.
Section IV: Other Nav Features
Displaying POI Icons on Screen
You can display icons for up to 5 POI categories on the screen at a time.
1. From the map screen, touch the POI screen button. The SHOW POI ICONS screen
will appear.
Page 21 of 35

2. Select the POI icons that you would like to display on the map. Once selected, the
POI icon will appear at the top of the screen. Touch the M
ORE screen button to see a
complete list.
3. Touch the S
HOW POI screen button. Icons for the selected categories will now be
displayed on the map. To stop displaying the icons on the map, click the S
HOW POI
screen button again. The categories will remain selected but will not be displayed on
the map.
4. To remove a POI category from the five selected categories, select the category. To
remove all selected POI categories from the five selected categories, touch the C
LEAR
ALL screen button.
POI Close To
Once categories have been selected, you can view POIs from those categories that
are close to your vehicle’s current location through the POI
CLOSE TO screen button.
1. Touch the POI
CLOSE TO screen button. A list of POIs in the selected categories will
appear. The list provides the POI icon, name, direction, and the distance from your
vehicle’s current position.
2. Select a POI to see information about that POI. From this screen, you can touch the
A
DDRESS BOOK screen button to add the POI to your address book. Touch the MAP
screen button to see a map showing the location of the POI.
3. Touch the G
O button to make this POI a destination or a stopover.
Page 22 of 35
Adjusting Route Preferences
This feature allows you to select the types of roads that will be used when calculating
routes.
1. Press the MENU hard key.
2. Touch the N
AV screen button or press the MENU hard key until NAV is selected.
3. Touch the R
OUTE PREFERENCE screen button.
4. You can select the following options:
a. Allow Major Roads: Allows the system to use major roads when calculating a
planned route.
b. Allow Toll Road: Allows the system to use toll roads when calculating a
planned route.
c. Allow Ferry: Allows the system to use ferries when calculating a planned
route.
d. Allow Time and Seasonal Restricted Roads: Allows the system to use time-
restricted and seasonal roads when calculating a planned route.
Choosing from Multiple Route Options
No information available.
Setting Detours
Page 23 of 35
Once a route is planned, you can tell the system to detour 1, 3, or 5 miles (or 1, 3,
or 5 km) around the current route.
1. Press the DEST hard key. The ROUTE screen will appear.
2. Touch the D
ETOUR screen button.
3. Touch the 1
MILE, 3 MILE, or 5 MILE screen button. You may also select to detour
the whole route, if necessary. This option is only available while you are driving on
your current planned route.
Avoiding Turns
Once a route is planned, you can tell the system to avoid specific turns.
1. Press the DEST hard key. The ROUTE screen will appear.
2. Touch the T
URN LIST screen button. A list of maneuvers for the entire route will
appear. Use the up and down scroll arrows to view the entire list.
Page 24 of 35
3. Touch the AVOID screen button next to the maneuver you wish to avoid. The map
screen will display. The route will recalculate without the selected street.
Previewing the Route
Once a route is planned, you can preview the entire route in either direction.
1. Press the DEST hard key. The ROUTE screen will appear.
2. Touch the T
URN LIST screen button. A list of maneuvers for the entire route
will appear.
3. Touch the R
OUTE PREVIEW screen button. A map screen will appear with your
route highlighted.


. The system will
calculate and highlight the route.
5. Select the S
TART")


 around the current route.
1. Press the DEST hard key. The ROUTE screen will appear.
2. Touch the")
