2006 BMW M3 COUPE light
[x] Cancel search: lightPage 135 of 170
135
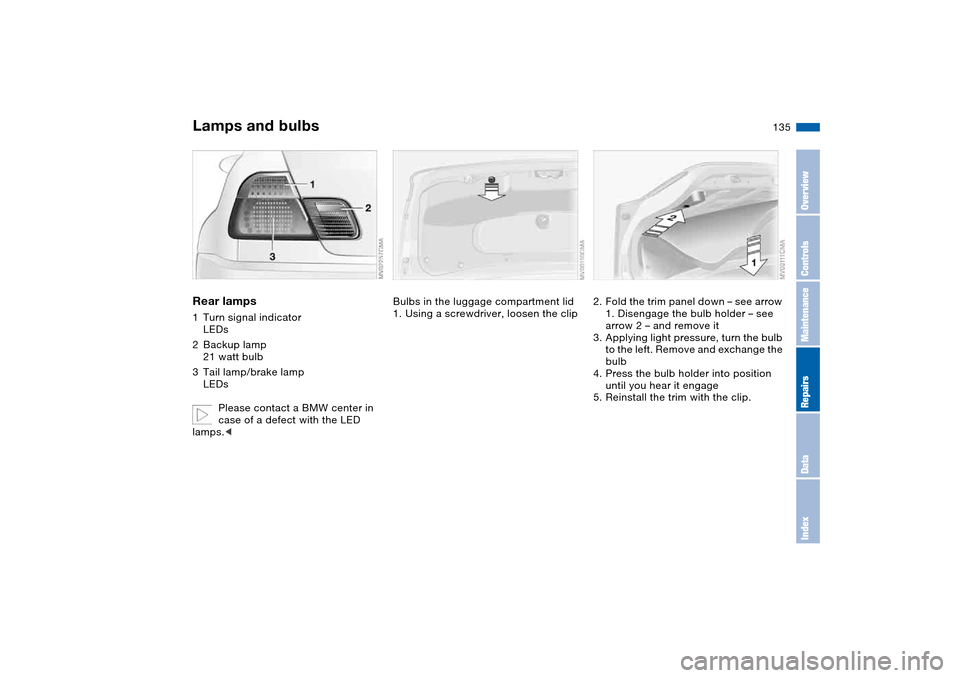
Rear lamps1Turn signal indicator
LEDs
2Backup lamp
21 watt bulb
3Tail lamp/brake lamp
LEDs
Please contact a BMW center in
case of a defect with the LED
lamps.<
Bulbs in the luggage compartment lid
1. Using a screwdriver, loosen the clip
2. Fold the trim panel down – see arrow
1. Disengage the bulb holder – see
arrow 2 – and remove it
3. Applying light pressure, turn the bulb
to the left. Remove and exchange the
bulb
4. Press the bulb holder into position
until you hear it engage
5. Reinstall the trim with the clip.
Lamps and bulbs
OverviewControlsMaintenanceRepairsDataIndex
Page 136 of 170
136
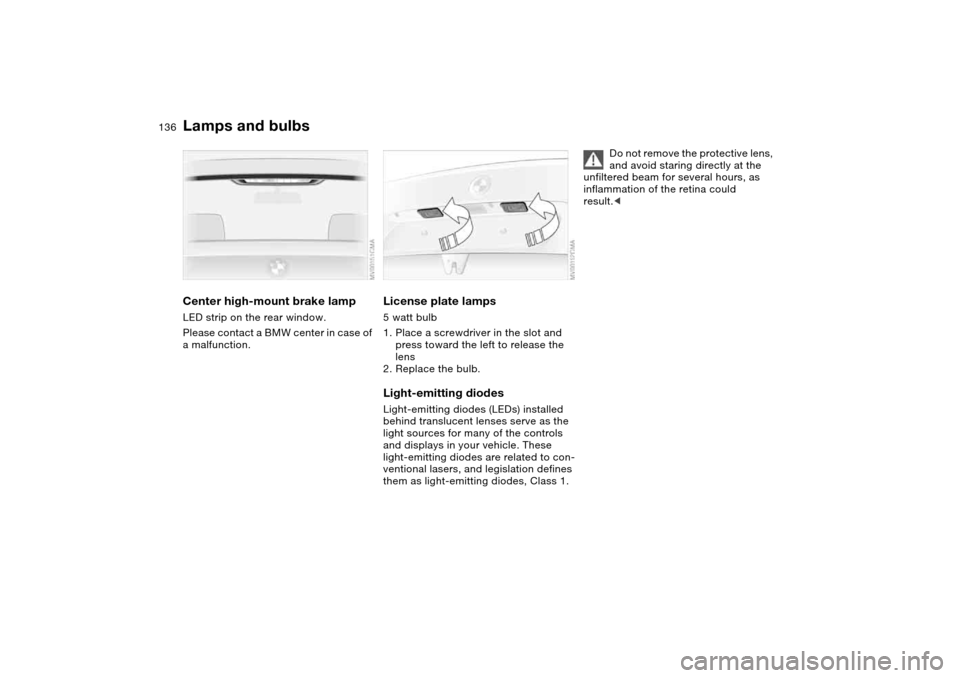
Center high-mount brake lampLED strip on the rear window.
Please contact a BMW center in case of
a malfunction.
License plate lamps5 watt bulb
1. Place a screwdriver in the slot and
press toward the left to release the
lens
2. Replace the bulb.Light-emitting diodesLight-emitting diodes (LEDs) installed
behind translucent lenses serve as the
light sources for many of the controls
and displays in your vehicle. These
light-emitting diodes are related to con-
ventional lasers, and legislation defines
them as light-emitting diodes, Class 1.
Do not remove the protective lens,
and avoid staring directly at the
unfiltered beam for several hours, as
inflammation of the retina could
result.<
Lamps and bulbs
Page 138 of 170
138
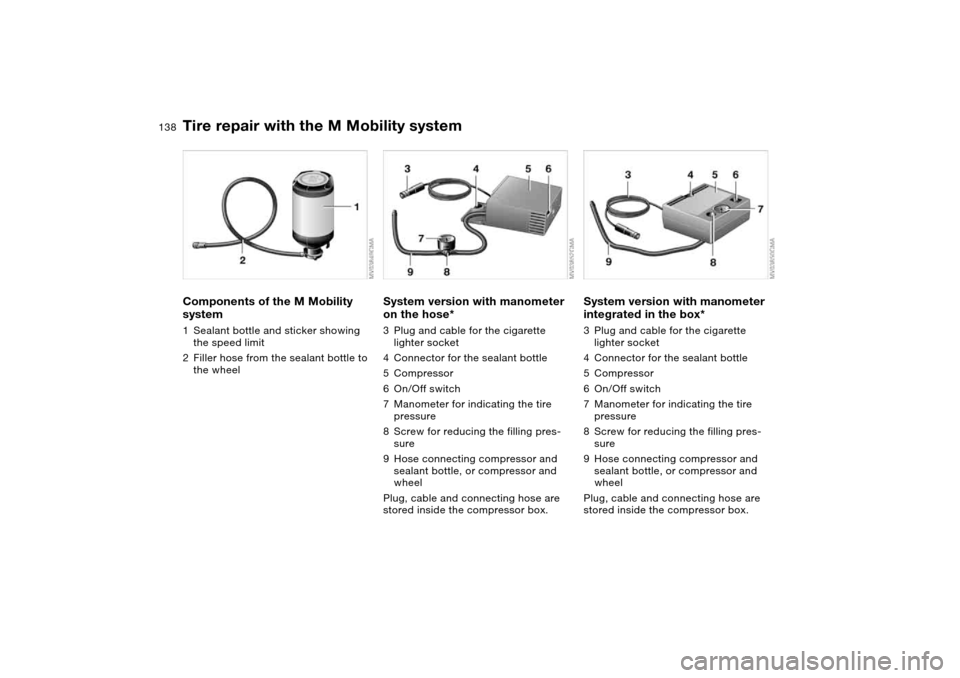
Components of the M Mobility
system1Sealant bottle and sticker showing
the speed limit
2Filler hose from the sealant bottle to
the wheel
System version with manometer
on the hose*3Plug and cable for the cigarette
lighter socket
4Connector for the sealant bottle
5Compressor
6On/Off switch
7Manometer for indicating the tire
pressure
8Screw for reducing the filling pres-
sure
9Hose connecting compressor and
sealant bottle, or compressor and
wheel
Plug, cable and connecting hose are
stored inside the compressor box.
System version with manometer
integrated in the box*3Plug and cable for the cigarette
lighter socket
4Connector for the sealant bottle
5Compressor
6On/Off switch
7Manometer for indicating the tire
pressure
8Screw for reducing the filling pres-
sure
9Hose connecting compressor and
sealant bottle, or compressor and
wheel
Plug, cable and connecting hose are
stored inside the compressor box.
Tire repair with the M Mobility system
Page 139 of 170
139
Using the M Mobility systemTo repair a flat tire using the M Mobility
system, proceed as follows:
>Fill with sealant, refer to page 139
>Distribute the sealant, refer to
page 139
>Restore tire inflation pressure, refer
to page 139.
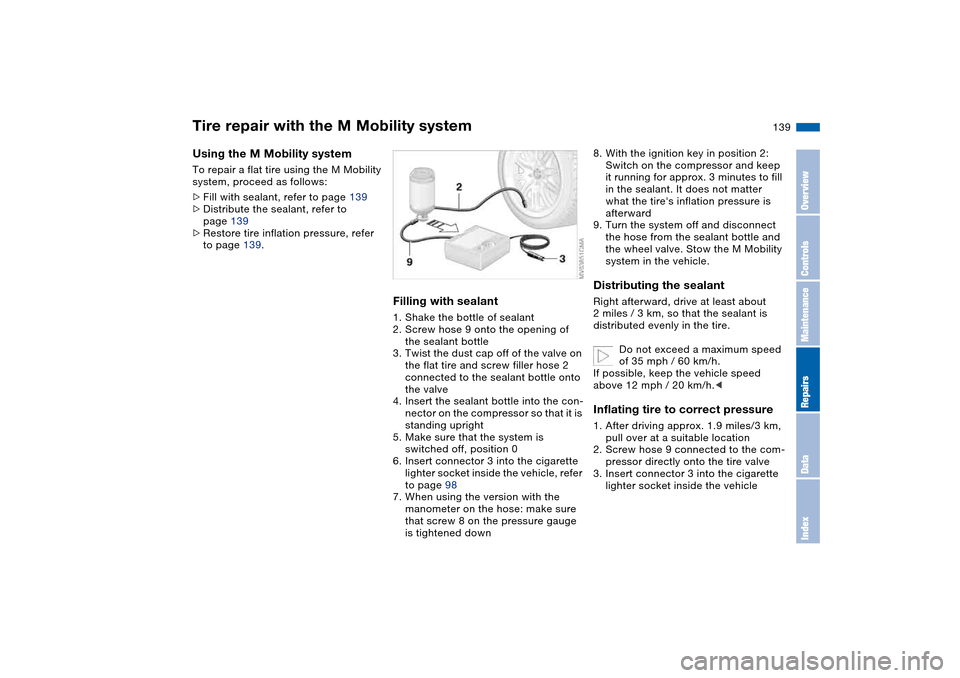
Filling with sealant1. Shake the bottle of sealant
2. Screw hose 9 onto the opening of
the sealant bottle
3. Twist the dust cap off of the valve on
the flat tire and screw filler hose 2
connected to the sealant bottle onto
the valve
4. Insert the sealant bottle into the con-
nector on the compressor so that it is
standing upright
5. Make sure that the system is
switched off, position 0
6. Insert connector 3 into the cigarette
lighter socket inside the vehicle, refer
to page 98
7. When using the version with the
manometer on the hose: make sure
that screw 8 on the pressure gauge
is tightened down
8. With the ignition key in position 2:
Switch on the compressor and keep
it running for approx. 3 minutes to fill
in the sealant. It does not matter
what the tire's inflation pressure is
afterward
9. Turn the system off and disconnect
the hose from the sealant bottle and
the wheel valve. Stow the M Mobility
system in the vehicle.Distributing the sealantRight afterward, drive at least about
2 miles / 3 km, so that the sealant is
distributed evenly in the tire.
Do not exceed a maximum speed
of 35 mph / 60 km/h.
If possible, keep the vehicle speed
above 12 mph / 20 km/h.
2. Screw hose 9 connected to the com-
pressor directly onto the tire valve
3. Insert connector 3 into the cigarette
lighter socket inside the vehicle
Tire repair with the M Mobility system
OverviewControlsMaintenanceRepairsDataIndex
Page 142 of 170

142Giving and receiving assistance
Receiving assistanceThe BMW Group's Mobile Service
offers you 24-hour assistance in the
event of a breakdown, even on week-
ends and holidays.
The telephone numbers of the Mobile
Service control center in your country
are listed in the Contact brochure.
If your vehicle has the necessary equip-
ment, you can contact the Mobile Ser-
vice or issue an emergency call using
buttons in the interior rearview mirror.
When an emergency call is initiated, a
telephone connection is established
with the BMW Assist response center.Fold down the cover.
1Emergency call
2Mobile Service
Requirements for initiating an emer-
gency call or contacting Mobile Service:
>Ignition key in position 1 or higher
>The car phone must be registered
with a mobile network
>The emergency call system must be
operational.
Initiating an emergency call*Press button 1 for at least 2 seconds.
The indicator lamp above the buttons
lights up. As soon as a telephone con-
nection has been set up to the BMW
Assist response center, the indicator
lamp flashes.
If the situation permits you to do so,
wait in the vehicle until the voice con-
nection is established. You can then
provide detailed information to the
response center.
If your vehicle is equipped with an acti-
vated BMW Assist and the current loca-
tion of the vehicle can be determined,
this location is transmitted to the BMW
Assist response center.
If the navigation system has failed,
the current location of the vehicle
is not transmitted.<
If the indicator lamp is flashing but you
cannot hear the BMW Assist response
center over the hands-free system, it is
possible that e.g. the hands-free sys-
tem is malfunctioning. The BMW Assist
response center can still hear you,
however.
If certain requirements are met, an
emergency call is automatically initiated
after a serious accident. The automatic
emergency call will not be hindered by
pressing the button.
For technical reasons, the emer-
gency call function cannot be
guaranteed in certain unfavorable con-
ditions.<
Page 143 of 170

143
Mobile Service*To establish contact with the BMW
Group's Mobile Service:
Press button 2 for at least 2 seconds.
The indicator lamp above the buttons
lights up. As soon as a telephone con-
nection has been set up with the Mobile
Service, the indicator lamp flashes.
Depending on the country you are in,
your vehicle's current location will also
be transmitted if your vehicle is
equipped with an activated BMW Assist
function.
Jump-startingWhen your battery is discharged, you
can use two jumper cables to start your
vehicle with power from the battery in a
second vehicle. You can also use the
same method to help start another
vehicle. Use only jumper cables with
fully insulated handles on the terminal
clamps.
Do not touch high-voltage wiring
and cables on a running engine.
Contact with components carrying high
voltage can be harmful or fatal.
Carefully observe the following instruc-
tions to avoid personal injury and/or
damage to one or both vehicles.
approximately the same capacity –
measured in Ah. This information is
provided on the battery
2. Stop the engine of the support vehi-
cle
3. Switch off all consumers in both
vehicles.
Make absolutely certain that there
is no contact between the body-
work of the two vehicles, otherwise
there is a short circuit hazard.<
Connecting the jumper cables
Be sure to connect the jumper
cables in the right order; other-
wise there is a risk of injury due to
sparks being created near the battery.<
The jump-starting terminal located in
your BMW's engine compartment
serves as the positive battery terminal;
refer also to the engine compartment
overview on page 120. The cover of this
auxiliary terminal is marked with a +.
1. Open the cover of the BMW jump-
starting terminal. Do so by pulling the
tab – see arrow 1
2. Connect one terminal clamp of the
plus/+ jumper cable to the positive
terminal of the battery or to a jump-
starting terminal in the donor vehicle
Receiving assistance
OverviewControlsMaintenanceRepairsDataIndex
Page 144 of 170
144
3. Connect the second terminal clamp
of the plus/+ jumper cable to the
positive terminal of the battery or to a
jump-starting terminal in the vehicle
to be started
4. Your BMW is equipped with a special
nut – see arrow 2 – to serve as the
ground or negative terminal.
Attach a terminal clamp of the
minus/– jumper cable to the negative
terminal of the support vehicle's bat-
tery or to a suitable ground on its
engine or bodywork
5. Attach the second terminal clamp of
the minus/– jumper cable to the neg-
ative terminal of the battery or to a
suitable ground on the engine or
bodywork of the vehicle to be
started.Starting the engine1. Start the engine of the support vehi-
cle and let it run for several minutes
at a slightly elevated engine idle
speed
2. Start the engine of the other vehicle
as usual.
If the first start attempt is not suc-
cessful, wait a few minutes before
another attempt in order to allow the
discharged battery to recharge3. Allow the engines to run for several
minutes
4. Disconnect the jumper cables in
reverse sequence.
Have the battery recharged at your
BMW center as required.
Do not use spray starter fluids to
start the engine.
Page 145 of 170
145
Towing and tow-starting the vehicle
Always observe all applicable
towing laws and regulations.<
Using the towing eyeletThe screw-in towing eyelet is stored in
the luggage compartment under the
floor panel and must remain with the
vehicle at all times. It can be attached
at the front or rear of your BMW.
Observe the following instruc-
tions in order to avoid damaging
the towing eyelet or the vehicle: use
only the towing eyelet supplied with the
vehicle, and screw it in firmly until it
stops. Use the towing eyelet for towing
on paved roads only. Avoid subjecting
the towing eyelet to lateral loads, e.g.
do not lift the vehicle using the towing
eyelet.<
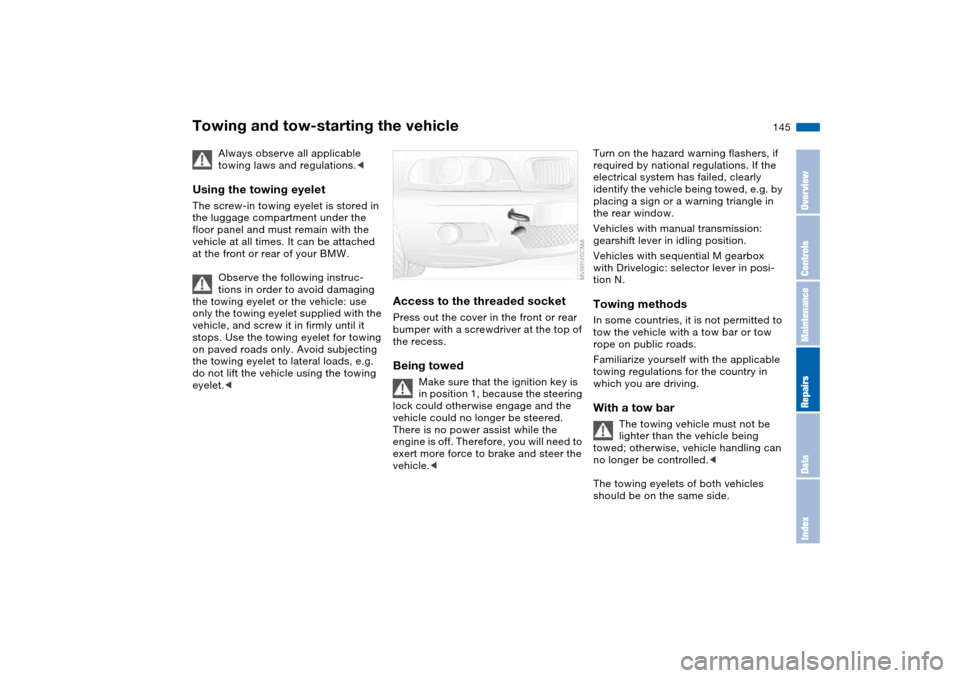
Access to the threaded socketPress out the cover in the front or rear
bumper with a screwdriver at the top of
the recess.Being towed
Make sure that the ignition key is
in position 1, because the steering
lock could otherwise engage and the
vehicle could no longer be steered.
There is no power assist while the
engine is off. Therefore, you will need to
exert more force to brake and steer the
vehicle.<
Turn on the hazard warning flashers, if
required by national regulations. If the
electrical system has failed, clearly
identify the vehicle being towed, e.g. by
placing a sign or a warning triangle in
the rear window.
Vehicles with manual transmission:
gearshift lever in idling position.
Vehicles with sequential M gearbox
with Drivelogic: selector lever in posi-
tion N.Towing methodsIn some countries, it is not permitted to
tow the vehicle with a tow bar or tow
rope on public roads.
Familiarize yourself with the applicable
towing regulations for the country in
which you are driving.With a tow bar
The towing vehicle must not be
lighter than the vehicle being
towed; otherwise, vehicle handling can
no longer be controlled.<
The towing eyelets of both vehicles
should be on the same side.
OverviewControlsMaintenanceRepairsDataIndex