2006 BMW M3 COUPE light
[x] Cancel search: lightPage 108 of 170
108Special operating instructions
Break-in proceduresTo ensure that your vehicle provides
maximum economy throughout a long
service life, we request that you
observe the following suggestions.
Because of its engineering design,
the BMW M3 is an especially high-
quality vehicle. It is in your best interest
to follow the break-in tips very closely.
Doing this, you will create the basis for
a long, optimum service life.
speeds, but do not exceed an engine
speed of 5,500 rpm or a road speed of
105 mph / 170 km/h.
Obey your local and state maximum
speed limits.
Do not depress the accelerator pedal to
the full-throttle position.
Vehicles with SMG Drivelogic, refer to
page 69: do not use Drivelogic pro-
grams 5 or 6 or launch control during
the break-in period.
>Following the break-in inspection at
1,250 miles/2,000 km, you can grad-
ually increase engine or road speeds.
TransmissionThe transmission will begin to function
optimally after approx.
300 miles/500 km. Shift gears cau-
tiously during this period and do not
exceed an engine speed of 5,500 rpm.
Vehicles with SMG Drivelogic, refer to
page 69: do not use Drivelogic pro-
grams 5 or 6 or launch control during
the break-in period.TiresDue to technical factors associated
with their manufacture, tires do not
achieve their full traction potential until
an initial break-in period has elapsed.
Thus drive with extra care during the
initial 200 miles/300 km.
Obey your local and state maximum
speed limits.Brake systemApprox. 300 miles/500 km must elapse
before the brake pads and rotors
achieve the optimal pad-surface and
wear patterns required for trouble-free
operation and long service life later on.To break in the separate parking brake
drums, apply the parking brake lightly
when coasting to a standstill, e.g. at a
traffic signal, provided that traffic condi-
tions permit to do so.
To avoid corrosion, repeat this proce-
dure from time to time.
The brake lamps do not come on
when the parking brake is set.
Vacuum for the brake system servo unit
on your BMW is available only when the
engine is running. When you move the
vehicle with the engine off – when tow-
ing, for example – substantially higher
levels of pedal force will be required to
brake the vehicle.<
ClutchThe clutch will also begin to function
optimally after about 300 miles/500 km.
Drive cautiously during this break-in
period and do not press the clutch or
shift at high engine speeds.After replacing partsFollow the same break-in procedures if
any of the components mentioned
above have to be replaced in the future.
Page 109 of 170
109
General driving notesHot exhaust system
High temperatures occur with
every vehicle equipped with a cat-
alytic converter. Heat shields are
installed adjacent to some sections of
the exhaust system. Never remove
these shields; do not apply undercoat-
ing to their surfaces. When driving,
standing at idle and parking the vehicle,
take care to avoid contact between the
hot exhaust system and flammable
materials, e.g. hay, leaves, grass, etc.
Such contact could lead to a fire,
resulting in serious personal injury and
property damage.<
When the vehicle is parkedCondensation forms in the automatic
climate control system during opera-
tion, which then exits under the vehicle.
Traces of condensed water of this kind
are thus normal.Before driving through a car washFold in the exterior mirrors manually
because they could otherwise be dam-
aged due to the width of the vehicle.
Hydroplaning
When driving on wet or slushy
roads, reduce road speed. If you
do not, a wedge of water can form
between tire and road surface. This
phenomenon is referred to as hydro-
planing, and can lead to partial or com-
plete loss of traction, vehicle control
and braking effectiveness.<
The risk of hydroplaning increases as
the tread depth of the tires decreases,
refer also to Tire tread on page 116.
Driving through water
Do not drive through water on the
road if it is deeper than 1 ft/30 cm,
and then only at walking speed. Other-
wise, the vehicle's engine, the electrical
systems and the transmission may be
damaged.<
Braking safelyYour BMW is equipped with ABS as a
standard feature. If you are in a situa-
tion which requires full braking, it is
best to brake using maximum brake
pressure: panic stop. Since the vehicle
maintains steering responsiveness, you
can avoid possible obstacles with a
minimum of steering effort.
Pulsation at the brake pedal combines
with sounds from the hydraulic circuits
to indicate to the driver that ABS is in
its active mode.
Do not rest your foot on the brake
pedal while driving. Otherwise,
even light but consistent pedal pres-
sure can lead to high temperatures,
brake wear and possibly even brake
failure.<
Wet roads:
If the roads are wet or if there is heavy
rain, it is advisable to gently press the
brakes for a brief moment every few
miles/kilometers. Watch traffic condi-
tions to ensure that this maneuver does
not endanger other road users. The
heat generated in this process helps
dry the pads and rotors. Immediate
braking force is then available if neces-
sary.
OverviewControlsMaintenanceRepairsDataIndex
Page 110 of 170
110
Inclines:
To prevent overheating and, as a
result, diminished braking effec-
tiveness, drive down long or steep
downhill grades in a gear which
requires the least braking. Otherwise,
even light but consistent pedal pres-
sure can lead to high temperatures,
brake wear and possibly even brake
failure.<
The braking power of the engine can be
further enhanced by downshifting the
automatic transmission in manual
mode, if necessary, into first gear. This
helps avoid placing excessive loads on
the brake system.
Do not coast with the clutch
depressed or with the transmis-
sion or selector lever in Neutral. Do not
coast with the engine switched off. Oth-
erwise, the engine provides no braking
effect while the transmission is in idling
position, and there is no power-assist
for braking or steering when the engine
is off.
Floor mats, floor carpets or other
objects must not be in the area near the
brake or accelerator pedal, as this
could impair the movement of the ped-
als.<
Corrosion on the brake rotorsLimited vehicle use, extended periods
with the vehicle parked or in storage,
and operating conditions in which brak-
ing is restricted to gentle, low-pressure
applications will all increase the ten-
dency for corrosion to form on the
rotors and contamination to accumulate
on the brake pads. This occurs because
the minimal pressure which must be
exerted by the pads to clean the rotors
by brake applications is not reached.
Corrosion on brake rotors is signaled by
a pulsation during initial braking that
usually does not disappear even after
extended subsequent braking.
Brake pads
For your own safety: use only
brake pads which BMW has
approved for your specific vehicle
model. BMW cannot evaluate non-
approved brake pads to determine if
they are suitable for use, and therefore
cannot ensure the operating safety of
the vehicle if they are installed.<
Portable phone in the vehicle
BMW advises against using
mobile equipment, e.g. cellular
phones, inside the vehicle without con-
necting them directly to an outside
antenna. Otherwise, it cannot be ruled
out that vehicle electronics and the
mobile equipment interfere with one
another. In addition, it is not ensured
that the radio waves emitted during
transmission are directed outside of the
vehicle interior.<
General driving notes
Page 117 of 170
117
The correct wheels and tires
BMW recommends using only
wheels and tires that have been
tested and approved by BMW for the
particular vehicle model, as otherwise
body contact and serious accidents can
result despite the use of the same nom-
inal size, e.g. due to manufacturing tol-
erances. If non-approved wheels and
tires are used, BMW cannot evaluate
their suitability, and therefore cannot be
held liable for driving safety.<
To maintain good handling and vehicle
response, use only tires of a single
brand and tread configuration. After a
flat tire, have the previous wheel and
tire combination restored as soon as
possible.
Recommended tire sizes and
brandsFor each tire size, certain tire brands
have been tested, classified as road-
safe and approved by BMW. You can
find out about these from a professional
tire center, preferably your BMW cen-
ter. Observe any country-specific regu-
lations, e.g. on making a corresponding
entry in the vehicle documents.
The factory-approved radial belt tires
are matched to your vehicle and pro-
vide optimum safety and driving com-
fort when used properly.Special characteristics of winter
tiresBMW recommends the use of winter
tires for operation under winter road
conditions. While all-season tires with
M+S designation provide better winter
traction than summer tires, they gener-
ally do not achieve the full performance
of winter tires.Observing speed ratings
Never exceed the maximum
speed for which the winter tires
are rated. Unprofessional attempts by
laymen to service tires can lead to dam-
age and accidents. Have this work per-
formed by skilled professionals only.
The technicians at your BMW center
will be glad to assist you with the
required professional knowledge and
specialized equipment.<
StorageAlways store tires in a cool, dry place.
Store them away from light whenever
possible. Protect the tires against con-
tact with oil, grease and fuel. Do not
exceed the maximum tire inflation pres-
sures specified on the tire sidewall.
New wheels and tires
OverviewControlsMaintenanceRepairsDataIndex
Page 124 of 170

124
Low ambient temperaturesThe oils used by BMW at the factory for
your vehicle model can be used at virtu-
ally any ambient temperature.
However, if the vehicle is exposed to
temperatures below –47/–206 for
extended periods, please have your
BMW center recommend a suitable oil.
Coolant
Do not open the cooling system
when the engine is hot. If you do,
escaping coolant can cause burns.<
Coolant consists of water and coolant
additives. Not all commercially available
additives are suitable for your BMW.
Your BMW center knows which addi-
tives are appropriate.
Only use approved additives, as
the engine could otherwise be
damaged. The additives are hazardous
to health.<
Comply with the applicable envi-
ronmental laws regulating
the disposal of coolant additives.<
Checking the coolant level1. The engine must be at ambient tem-
perature
2. Open the cap for the expansion tank
by turning it slightly counterclock-
wise to allow accumulated pressure
to escape. Then open
3. The coolant level is correct when the
upper end of the red float is even
with the upper edge of the filler neck,
refer to the arrow in the illustration or
to the schematic diagram next to the
filler neck
4. If necessary, slowly add coolant until
the correct level is reached; do not
overfill
5. Close the cap by turning until it is
well tight
6. Have the cause for the coolant loss
removed as soon as possible.
Engine oil
Page 128 of 170

128Laws and regulations
OBD interface socketThe Onboard Diagnostic (OBD) inter-
face socket is located on the left of the
driver's side under the instrument panel
and under a cover.
The cover has the letters OBD on it.
The purpose of the OBD system is to
ensure proper operation of the emis-
sion control system for the vehicle's
lifetime. The system monitors emission-
related components and systems for
deterioriation and malfunction.
An illuminated lamp informs you
of the need for service, not of
the need to stop the vehicle.
However, the systems should be
checked by your BMW center at the
earliest possible opportunity.
Display in Canadian models for
the malfunction described
above.
Under certain conditions, the indicator
will blink or flash. This indicates a rather
severe level of engine misfire. When
this occurs, you should reduce speed
and consult the nearest BMW center as
soon as possible. Severe engine misfire
over only a short period of time can
seriously damage emission control
components, especially the catalytic
converter.
When the fuel filler cap is not
properly tightened, the OBD sys-
tem can detect the vapor leak and the
indicator will light up. If the filler cap is
subsequently tightened, the indicator
should go out within a few days.<
Event data recordersYour vehicle may be equipped with one
or more sensing and diagnostic mod-
ules or a recording device capable of
recording or transmitting certain vehicle
data or information. In addition, if you
have a Subscription Service Agreement
for the BMW Assist system, certain
vehicle information may be transmitted
or recorded in order to provide such
services.
Page 133 of 170

133
Lamps and bulbsThe lamps and bulbs make essential
contributions to the safety of your vehi-
cle. Therefore, proceed carefully when
handling bulbs. BMW recommends that
you have such work performed by your
BMW center if you are not familiar with
the procedures.
Do not touch the glass portion of
a new bulb with your bare hands
since even small amounts of impurities
burn in to the surface and reduce the
service life of the bulb. Use a clean
cloth, paper napkin, or a similar mate-
rial, or hold the bulb by its metallic
base.<
A replacement bulb set is available from
your BMW center.
Before working on the electrical
system, switch off the electrical
accessory you are working on or dis-
connect the cable from the negative
terminal of the battery. Failure to
observe this precaution could result in
short circuits.
To prevent injuries and damage when
changing a bulb, be sure to comply with
any instructions provided by the bulb
manufacturer.<
Low beams and high beams>Low beams: H7 bulb, 55 watts.
>High beams: H7 bulb, 55 watts.
The H7 bulb is pressurized. There-
fore, wear safety glasses and pro-
tective gloves. Failure to comply with
this precaution could lead to injury if the
bulb is damaged.<
Please contact a BMW center in case of
a malfunction.
When cleaning the headlamps, please
follow the instructions in the Caring for
your vehicle brochure.Parking lamps5 watt bulb
Please contact a BMW center in case of
a malfunction.Xenon lamps*The service life of these bulbs is very
long and the probability of a failure is
very low, provided that they are not
switched on and off an unusual number
of times. If one of these bulbs should
nevertheless fail, it is possible to con-
tinue driving with great caution using
the fog lamps, provided traffic laws in
your area do not prohibit this.
Because of the extremely high
voltages involved, any work on the
xenon lighting system, including bulb-
changing, should be carried out by
technically-qualified personnel only.
Otherwise, there is a risk of fatal
injury.<
OverviewControlsMaintenanceRepairsDataIndex
Page 134 of 170
134
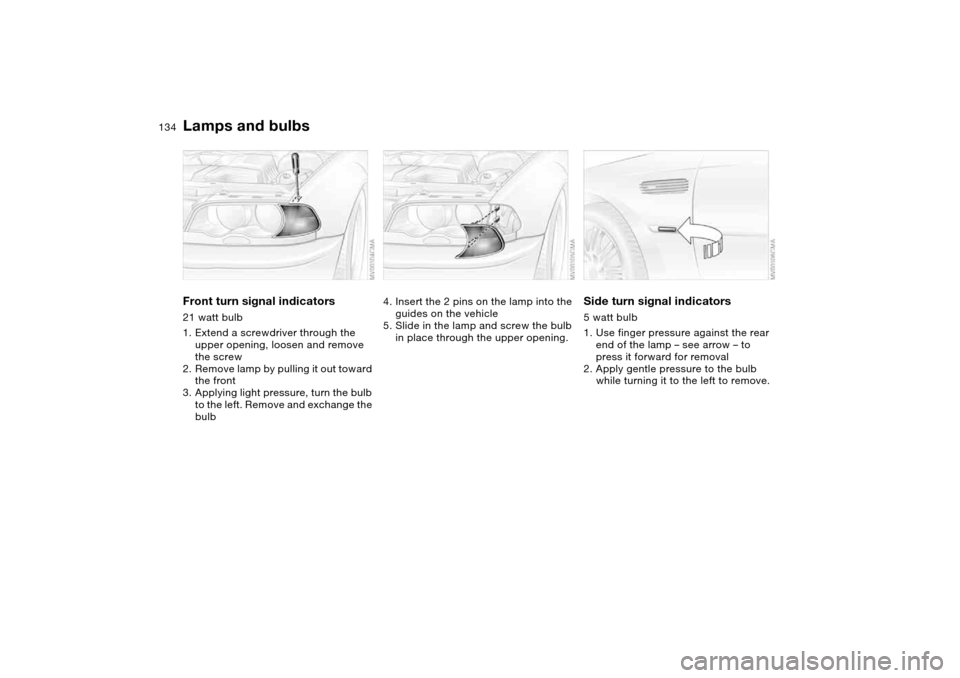
Front turn signal indicators21 watt bulb
1. Extend a screwdriver through the
upper opening, loosen and remove
the screw
2. Remove lamp by pulling it out toward
the front
3. Applying light pressure, turn the bulb
to the left. Remove and exchange the
bulb
4. Insert the 2 pins on the lamp into the
guides on the vehicle
5. Slide in the lamp and screw the bulb
in place through the upper opening.
Side turn signal indicators5 watt bulb
1. Use finger pressure against the rear
end of the lamp – see arrow – to
press it forward for removal
2. Apply gentle pressure to the bulb
while turning it to the left to remove.
Lamps and bulbs