2006 BMW M3 COUPE traction control
[x] Cancel search: traction controlPage 57 of 170

57
Child seat securityAll of the rear belt retractors and the
front passenger's safety belt can be
locked for mounting and securing child-
restraint systems.
A label with the appropriate instructions
for this is located in the immediate
vicinity of the buckle latch of each
safety belt.To lock the safety beltExtract the entire length of the belt from
the inertia reel mechanism. Allow the
reel to retract the belt somewhat and
engage the buckle, then tighten the belt
against the child-restraint system. The
retraction mechanism is now locked.
The belt cannot be extracted further.
Always observe the installation instruc-
tions provided by the manufacturer of
the child-restraint system.To unlock the safety belt Release the safety belt, remove the
child seat and retract the safety belt to
its end position on the belt retractor.
LATCH child-restraint mounting
systemLATCH: Lower Anchors and Tether for
CHildren
The left and right rear seats are both
equipped with a LATCH child-restraint
mounting system.
Transporting children safely
OverviewControlsMaintenanceRepairsDataIndex
Page 65 of 170

65
If exceptional circumstances
make it necessary to engage the
parking brake while the vehicle is in
motion, do not pull it with excessive
pressure. Keep your thumb pressed
against the release button while care-
fully pulling the lever up.
Excessive pressure can lead to over-
braking and loss of traction – fishtailing
– at the rear axle.
The brake lamps do not come on when
the parking brake is engaged.
Always engage the parking brake when
parking on downhill roads. Engaging a
gear may not sufficiently secure the
vehicle against rolling.<
To avoid corrosion and one-sided
braking, apply the parking brake
from time to time when coasting to a
standstill – at a traffic light, for example
– provided that it is safe to do so.<
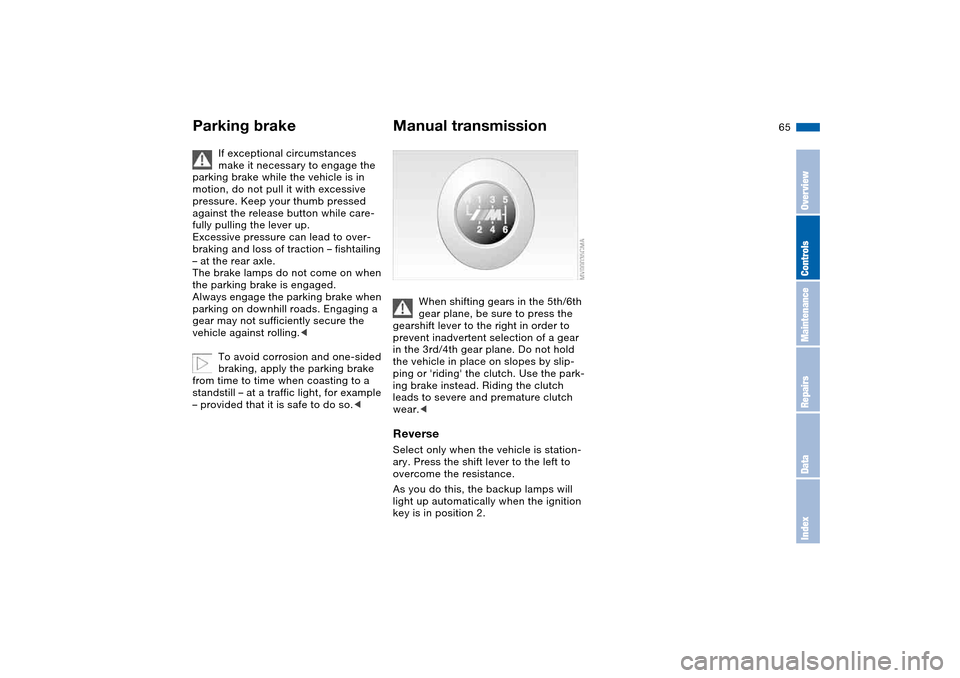
Manual transmission
When shifting gears in the 5th/6th
gear plane, be sure to press the
gearshift lever to the right in order to
prevent inadvertent selection of a gear
in the 3rd/4th gear plane. Do not hold
the vehicle in place on slopes by slip-
ping or 'riding' the clutch. Use the park-
ing brake instead. Riding the clutch
leads to severe and premature clutch
wear.<
ReverseSelect only when the vehicle is station-
ary. Press the shift lever to the left to
overcome the resistance.
As you do this, the backup lamps will
light up automatically when the ignition
key is in position 2.
Parking brake
OverviewControlsMaintenanceRepairsDataIndex
Page 82 of 170

82
Dynamic Stability Control (DSC)The conceptDSC supports vehicle stability, even in
critical driving situations.
DSC optimizes driving stability and
traction during acceleration and when
you are starting from a standstill. In
addition, it also recognizes unstable
vehicle conditions, such as understeer-
ing and oversteering. By reducing
engine power and applying brakes at
the wheels, DSC helps to keep the
vehicle on a steady course within phys-
ically feasible limits.
DSC starts up automatically each time
you start the engine.
The laws of physics cannot be
repealed, even with DSC. The
driver remains responsible for the con-
sequences of any inadequate driving
style. Therefore, do not take any risks
because of the additional safety pro-
vided. Do not make any modifications
to the DSC system. Allow only autho-
rized technicians to perform service
procedures on the DSC.<
Indicator lamp for DSC
The indicator lamp in the instru-
ment cluster will go out shortly
after the ignition has been
switched on, refer to page 20.
>The indicator lamp flashes: DSC is
active and is controlling the drive
torque based on driving conditions
>The indicator lamp does not go out
after the engine is started or lights up
continuously while you are driving:
DSC has been deactivated via the
button or is defective.
You can continue to drive the vehicle
normally without DSC. In the event of a
malfunction, contact a BMW center or a
workshop that works according to
BMW requirements with appropriately
trained personnel.
M Track mode*M track mode is a feature of the
Dynamic Stability Control DSC,
designed for driving on dry roads. It
allows you to drive with higher longitu-
dinal and lateral acceleration, whereas
driving stability is somewhat reduced.
Only in its absolute limit range will the
system try to stabilize the vehicle by
reducing engine power and applying
brakes to the wheels. Under these driv-
ing conditions the driver must be pre-
pared to perform corrective steering
movements if necessary.
By default, M Track mode is off after
each engine start.
While M Track mode is active, sta-
bilising interventions are per-
formed to a reduced extent only.<
To maintain vehicle stability,
always drive with DSC switched
on and M Track mode switched off
whenever possible.
shortly after the ignition is
switched on.
>Indicator lamp stays on: M Track
mode ist on
>Indicator lamp stays on and DSC
indicator lamp flashes:
M Track mode is actively regulating
drive torque and braking forces.
Page 83 of 170

83
Activating M Track modeTap the button; the indicator lamp
comes on and stays on.Deactivating M Track modePress the button again; the indicator
lamp goes out.
To deactivate DSCPress the DSC button; the DSC indica-
tor lamp lights up continuously. DSC
and M Track mode are off.
When better traction is required, it is
beneficial to deactivate the system in
the following situations:
>When rocking the vehicle or starting
off in deep snow or on loose surfaces
>When driving with snow chains.
To maintain vehicle stability,
always drive with the system
switched on whenever possible.
Flat Tire MonitorThe conceptAs you drive, the Flat Tire Monitor
keeps track of pressure levels in all four
tires. The system alerts you whenever
the inflation pressure of a tire falls sig-
nificantly below the pressure of another
tire.
In the event of tire pressure loss, the
rolling radius of the tire changes, and
thereby the rotational speed of the
wheel. This change is detected, and a
flat tire warning is issued to the driver.Functional requirementsTo ensure a reliable flat tire warning,
the system must be initialized with the
correct tire inflation pressures.
Initialize the system immediately
after you have corrected a tire
inflation pressure, or changed the tire
or wheel.
vide you with advance warning of
sudden and severe tire damage caused
by external factors and does not detect
the balanced and very gradual pressure
loss that takes place in all four tires
over an extended period of time.<
Dynamic Stability Control (DSC)
OverviewControlsMaintenanceRepairsDataIndex
Page 108 of 170

108Special operating instructions
Break-in proceduresTo ensure that your vehicle provides
maximum economy throughout a long
service life, we request that you
observe the following suggestions.
Because of its engineering design,
the BMW M3 is an especially high-
quality vehicle. It is in your best interest
to follow the break-in tips very closely.
Doing this, you will create the basis for
a long, optimum service life.
speeds, but do not exceed an engine
speed of 5,500 rpm or a road speed of
105 mph / 170 km/h.
Obey your local and state maximum
speed limits.
Do not depress the accelerator pedal to
the full-throttle position.
Vehicles with SMG Drivelogic, refer to
page 69: do not use Drivelogic pro-
grams 5 or 6 or launch control during
the break-in period.
>Following the break-in inspection at
1,250 miles/2,000 km, you can grad-
ually increase engine or road speeds.
TransmissionThe transmission will begin to function
optimally after approx.
300 miles/500 km. Shift gears cau-
tiously during this period and do not
exceed an engine speed of 5,500 rpm.
Vehicles with SMG Drivelogic, refer to
page 69: do not use Drivelogic pro-
grams 5 or 6 or launch control during
the break-in period.TiresDue to technical factors associated
with their manufacture, tires do not
achieve their full traction potential until
an initial break-in period has elapsed.
Thus drive with extra care during the
initial 200 miles/300 km.
Obey your local and state maximum
speed limits.Brake systemApprox. 300 miles/500 km must elapse
before the brake pads and rotors
achieve the optimal pad-surface and
wear patterns required for trouble-free
operation and long service life later on.To break in the separate parking brake
drums, apply the parking brake lightly
when coasting to a standstill, e.g. at a
traffic signal, provided that traffic condi-
tions permit to do so.
To avoid corrosion, repeat this proce-
dure from time to time.
The brake lamps do not come on
when the parking brake is set.
Vacuum for the brake system servo unit
on your BMW is available only when the
engine is running. When you move the
vehicle with the engine off – when tow-
ing, for example – substantially higher
levels of pedal force will be required to
brake the vehicle.<
ClutchThe clutch will also begin to function
optimally after about 300 miles/500 km.
Drive cautiously during this break-in
period and do not press the clutch or
shift at high engine speeds.After replacing partsFollow the same break-in procedures if
any of the components mentioned
above have to be replaced in the future.
Page 109 of 170

109
General driving notesHot exhaust system
High temperatures occur with
every vehicle equipped with a cat-
alytic converter. Heat shields are
installed adjacent to some sections of
the exhaust system. Never remove
these shields; do not apply undercoat-
ing to their surfaces. When driving,
standing at idle and parking the vehicle,
take care to avoid contact between the
hot exhaust system and flammable
materials, e.g. hay, leaves, grass, etc.
Such contact could lead to a fire,
resulting in serious personal injury and
property damage.<
When the vehicle is parkedCondensation forms in the automatic
climate control system during opera-
tion, which then exits under the vehicle.
Traces of condensed water of this kind
are thus normal.Before driving through a car washFold in the exterior mirrors manually
because they could otherwise be dam-
aged due to the width of the vehicle.
Hydroplaning
When driving on wet or slushy
roads, reduce road speed. If you
do not, a wedge of water can form
between tire and road surface. This
phenomenon is referred to as hydro-
planing, and can lead to partial or com-
plete loss of traction, vehicle control
and braking effectiveness.<
The risk of hydroplaning increases as
the tread depth of the tires decreases,
refer also to Tire tread on page 116.
Driving through water
Do not drive through water on the
road if it is deeper than 1 ft/30 cm,
and then only at walking speed. Other-
wise, the vehicle's engine, the electrical
systems and the transmission may be
damaged.<
Braking safelyYour BMW is equipped with ABS as a
standard feature. If you are in a situa-
tion which requires full braking, it is
best to brake using maximum brake
pressure: panic stop. Since the vehicle
maintains steering responsiveness, you
can avoid possible obstacles with a
minimum of steering effort.
Pulsation at the brake pedal combines
with sounds from the hydraulic circuits
to indicate to the driver that ABS is in
its active mode.
Do not rest your foot on the brake
pedal while driving. Otherwise,
even light but consistent pedal pres-
sure can lead to high temperatures,
brake wear and possibly even brake
failure.<
Wet roads:
If the roads are wet or if there is heavy
rain, it is advisable to gently press the
brakes for a brief moment every few
miles/kilometers. Watch traffic condi-
tions to ensure that this maneuver does
not endanger other road users. The
heat generated in this process helps
dry the pads and rotors. Immediate
braking force is then available if neces-
sary.
OverviewControlsMaintenanceRepairsDataIndex
Page 114 of 170

114
Tire codeKnowing the tire code on the tire side-
wall makes it easier to correctly choose
and identify your tires.Tire sizeE.g. 205/60 R 15 91 W
205 = Nominal width in mm
60 = Cross-sectional ratio in %
R = Radial belt construction
15 = Rim diameter in inches
91 = Load index, not on ZR tires
W = Speed rating, in front of the R on
ZR tiresSpeed ratingQ = up to 100 mph (160 km/h)
T = up to 118 mph (190 km/h)
H = up to 130 mph (210 km/h)
V = up to 150 mph (240 km/h)
W = up to 167 mph (270 km/h)
Y = up to 186 mph (300 km/h)Tire Identification NumberTires with DOT codes comply with the
guidelines of the U.S. Department of
Transportation.DOT code:
E.g. DOT xxxx xxx 3204
xxxx = Manufacturer's code for tire
brand
xxx = Tire size and tire version
3204 = Tire age
Tire ageThe date on which the tire was manu-
factured is indicated by the code on the
sidewall:
DOT … 3204 indicates that the tire was
manufactured in week 32 of the year
2004.
BMW recommends the replacement of
all tires when they are no more than
6 years old, even if a tire life of 10 years
is possible.Uniform Tire Quality GradingQuality grades can be found where
applicable on the tire sidewall between
tread shoulder and maximum section
width. For example:
Tread wear 200 Traction AA
Temperature ADOT quality gradesTread wearTraction AA A B C
Temperature A B C
All passenger car tires must con-
form to Federal Safety Require-
ments in addition to these grades.<
Tread wearThe tread wear grade is a comparative
rating based on the wear rate of the tire
when tested under controlled condi-
tions on a specified government test
course.
For example, a tire graded 150 would
wear one and one-half – 1
1/2 – times as
well on the government course as a tire
graded 100. The relative performance
of tires depends upon the actual condi-
tions of their use, however, and may
depart significantly from the norm due
to variations in driving habits, service
practices and differences in road char-
acteristics and climate.
TractionThe traction grades, from highest to
lowest, are AA, A, B, and C.
Page 115 of 170

115
Those grades represent the tire's ability
to stop on wet pavement as measured
under controlled conditions on speci-
fied government test surfaces of
asphalt and concrete. A tire marked C
may have poor traction performance.
The traction grade assigned to
this tire is based on straight-
ahead braking traction tests, and does
not include acceleration, cornering,
hydroplaning, or peak traction charac-
teristics.
tire's resistance to the generation of
heat and its ability to dissipate heat
when tested under controlled condi-
tions on a specified indoor laboratory
test wheel.
Sustained high temperature can cause
the material of the tire to degenerate
and reduce tire life, and excessive tem-
perature can lead to sudden tire failure.
The grade C corresponds to a level of
performance which all passenger car
tires must meet under the Federal
Motor Vehicle Safety Standard No. 109.
Grades B and A represent higher levels
of performance on the laboratory test
wheel than the minimum required by
law.
The temperature grade for this tire
is established for a tire that is
properly inflated and not overloaded.
Excessive speed, under-inflation, or
excessive loading, either separately or
in combination, can cause heat buildup
and possible tire failure.
summer tires.
Tire conditionWheel/tire damageInspect your tires frequently for signs of
damage, foreign objects and tread
wear, and check tread depth.
Due to low-profile tires, please
note that wheels, tires and sus-
pension parts are more susceptible to
road hazard and consequential dam-
ages.
Unusual vibrations encountered during
normal vehicle operation can indicate
tire failure or some other vehicle defect.
This type of problem can be caused by
contact with curbs, etc. This is also true
for irregularities in the vehicle's han-
dling characteristics, such as a pro-
nounced tendency to pull to the left or
right.
Should this occur, respond by immedi-
ately reducing your speed. Proceed
carefully to the nearest BMW center or
professional tire center, or have the
vehicle towed there. Tire damage, up to
and including blowouts, can endanger
the lives of both the vehicle occupants
and other road users.<
Tire code
OverviewControlsMaintenanceRepairsDataIndex