Page 65 of 247

Controls
63Reference
At a glance
Driving tips
Communications
Navigation
Entertainment
Mobility
R Reverse
Select only when the vehicle is stationary.
N Neutral
You can select this position, for example, in car
washes. The vehicle can roll.
Transmission remains in N even after the
ignition is switched off whenever you
leave the remote control in the ignition lock.
This function is useful in automatic car washes,
etc.
After approx. 30 minutes the system automati-
cally shifts into position P. Observe the mes-
sages on the Info Display.
Switching off engine, refer to page58.<
D Drive, automatic position
This is the mode recommended for normal
vehicle operation. All forward gears are avail-
able.
Under normal operating conditions, the fuel
consumption is lowest when driving in posi-
tion D.
Kick-down
The kick-down mode provides maximum accel-
eration.
Press the accelerator pedal beyond the full-
throttle resistance point.
Sport program and manual operation
Press button1 on the steering wheel.
The sport program is activated and S appears
on the Info Display. This program is recom-
mended for a performance-oriented driving
style.
Press button1 again to switch into the manual
mode and then into the Automatic program
again.
In the manual mode, the Steptronic changes
gears when one of the buttons2 on the front or
back of the steering wheel is briefly pressed.
The Info Display shows the manual ranges M1
through M6.
Upshifts and downshifts are executed only
when they will result in a plausible combination
of engine and vehicle speed; thus, for example,
the system will not execute a downshift that
would cause the engine to overrev. The
requested gear appears briefly on the Info Dis-
play, followed by the current gear.
Press button1 again to switch into the Auto-
matic program again.
Page 66 of 247

Driving
64
Manually releasing transmission lock
In case of a power failure, e.g. when the
battery is drained or disconnected, or in
the event of an electrical malfunction, the trans-
mission lock must be manually released; other-
wise, the drive wheels are locked and the vehi-
cle cannot be towed.<
When manually releasing the transmis-
sion lock, depress the brake pedal; other-
wise, there is a danger of the vehicle rolling
when the transmission lock is manually
released.<
The transmission lock should only be released
for towing. Reengage the transmission lock
after parking the vehicle at its destination.
If it also becomes necessary to manually
release the parking brake, follow this sequence:
1.Start by manually releasing the parking
brake, refer to page60
2.Then proceed to manually release the
transmission lock.
Jump starting and tow starting, refer to
pages213 and214.
Releasing
1.Use the vehicle key to release the cover
panel beneath the instrument panel by turn-
ing the lock counterclockwise, then fold
down the cover.2.Pull out the release lever with the loop1
until it locks into place: the transmission
lock is unlocked.
Reengage the transmission lock after
parking the vehicle at its destination. Oth-
erwise, there is a danger of the vehicle rolling.<
Engaging locks
1.Disengage the release lever by pressing it
together with the red detent lever, refer to
arrow.
2.Guide the release lever all the way back into
its original position – the transmission lock
is engaged once more.
3.Fold up and lock the cover panel again. Now
– and not before – the key may be removed.
Once the transmission lock has been
engaged, the message in the Info Display
should disappear, and the symbol on the Info
Display should change from N to P. Otherwise,
there is a danger of the vehicle rolling.<
Jump starting and tow starting, refer to
pages213 and214.
Page 67 of 247

Controls
65Reference
At a glance
Driving tips
Communications
Navigation
Entertainment
Mobility
Turn signals/
headlamp flasher
1High beams
2Headlamp flasher
3Turn signals
Using turn signals
Move the lever beyond the resistance point.
If you wish to manually control the shut-off of
the turn signal, then only push the lever to the
resistance point.
Atypically rapid flashing of the indicator
lamps signals the failure of a turn signal
lamp, possibly in the trailer when towing.<
Temporarily signaling
Push the lever to the resistance point and hold it
there for as long as you wish to signal.
Triple turn signal activation
Press the lever to the resistance point; the turn
signal flashes three times.
Wiper system
1Switching on wipers
2Switching off wipers or for brief wipe
3Activating/deactivating rain sensor
4Cleaning windshield, headlamps and
BMW Night Vision camera
*
5Adjusting rain sensor sensitivity level
Switching on wipers
The lever automatically returns to its initial posi-
tion when released.
Normal wiper speed
Press once.
The system reverts to operation in the intermit-
tent mode when the vehicle is stationary.
Fast wiper speed
Press twice or press beyond the resistance
point.
The system reverts to normal speed when the
vehicle is stationary.
Rain sensor
The rain sensor controls the wiper operation as
a function of the rain intensity. It is located on
the windshield, directly in front of the inside
rearview mirror.
Page 68 of 247

Driving
66
Activating rain sensor
Briefly press the button, arrow, the wipers move
once across the windshield. The LED lights up.
Adjusting rain sensor sensitivity level
Turn the knurled wheel 5.
Deactivating rain sensor
Briefly press the button again, arrow. The LED
goes out.
Deactivate the rain sensor when passing
through an automatic car wash. Failure to
do so could result in damage caused by undes-
ired wiper activation.<
Cleaning windshield, headlamps and
BMW Night Vision camera*
The system sprays washer fluid against the
windshield and activates the wipers for a brief
period.
With the vehicle lighting switched on, the head-
lamps and the BMW Night Vision camera are
also cleaned simultaneously at suitable inter-
vals.
Do not use the washers if there is any
danger that the fluid will freeze on the
windshield. If you do so, your vision could be
obscured. To avoid freezing, use a washer fluid
antifreeze, refer to Washer fluid.
Avoid using the washer when the reservoir is
empty. Otherwise, you could damage the
pump.<
Windshield washer nozzles
The windshield washer nozzles and the wind-
shield itself in the area around the wipers are
heated automatically when the ignition is
switched on.
Pivoting wipers into folded-out
position
This position is important for changing wiper
blades or when folding wiper arms away from
windshield to prevent blades from sticking in
the event of frost.
1.Switch off the engine and remove the
remote control from the ignition lock.
2.Press the wiper lever upward past the resis-
tance point and maintain pressure for about
3 seconds until the wipers stop in a roughly
vertical position: pivot into the folded-out
position.
After folding the wipers back against the wind-
shield you will need to reactivate the wiper sys-
tem:
1.Switch on radio ready state.
2.Briefly press wiper lever downward. The
wipers return to their retracted position and
are ready for normal operation.
To prevent damage to the wipers, always
fold them back against the windshield
before switching on either the radio ready state
or the ignition.<
Washer fluid
Washer fluid antifreeze is flammable.
Always keep it well away from sparks and
open flames, and store it in tightly closed con-
tainers well out of the reach of children. Always
follow the instructions for use provided on the
containers.<
In order to maintain the mixture ratio, mix
the washer fluid before filling.<
Page 69 of 247

Controls
67Reference
At a glance
Driving tips
Communications
Navigation
Entertainment
Mobility
Windshield and headlamp washer
system
Capacity: 6.3 US quarts/6 liters.
Fill with water and – if required – with a washer
antifreeze, according to manufacturer's recom-
mendations.
Programmable cruise control
The concept
The programmable cruise control is available
for use at speeds of approx. 20 mph/30 km/h
and higher. The vehicle maintains and stores
the speed that you set using the lever mounted
on the steering column.
You can also use the multilevel preset mode to
store six desired speeds for later selection with
the lever, refer to page67.
This feature assists you in quickly adapting the
vehicle speed to specific road conditions, e.g.
changes in speeds limits.
Do not use the programmable cruise con-
trol when unfavorable conditions do not
permit you to drive at a constant speed, e.g.
when driving on winding roads, in heavy traffic
or under poor road conditions such as snow,
rain, ice, or a loose road surface. If you do, you
could lose control of the vehicle and cause an
accident.<
One lever for all functions
1Maintaining speed, storing, and accelerat-
ing
2Maintaining speed, storing, and decelerat-
ing
3Interrupt or deactivate cruise control
4Resuming stored speed
Maintaining speed, storing, and
accelerating
Press lever to resistance point, arrow 1:
The system maintains and stores the current
vehicle speed. The pointer5 in the speedome-
ter indicates this speed, refer to Displays in
speedometer on page68. Each time the lever is
pressed again briefly, the speed is increased by
approx. 1 mph or 1 km/h.
Push the lever to the resistance point for a
longer time:
The vehicle accelerates without pressure on
the accelerator pedal. The system maintains
and stores your current speed as soon as you
release the lever.
Press the lever past the resistance point if no
desired speeds6 are stored:
The pointer5 jumps to the next multiple of
5 mph or 10 km/h and then further, as long as
the lever is held. The speed then indicated is
reached and stored.
The vehicle may accelerate beyond the preset
speed on steep downhill stretches where the
engine's braking action alone may not be suffi-
cient to slow the vehicle. Speed can drop on
uphill grades if the engine output is insufficient.
Page 70 of 247

Driving
68
Maintaining speed, storing, and
decelerating
Pull the lever, arrow2:
Functions in the same way as1, except that the
vehicle speed is decreased.
Interrupting the cruise control
Briefly press the lever up or down, arrow3.
In addition, cruise control is interrupted auto-
matically:
>when you apply pressure to the brake pedal
>when you shift the automatic transmission
into position N
>when the DSC control is operative
Resuming stored speed
Briefly press the button4:
The vehicle accelerates back to and maintains
the stored speed.
Displays in speedometer
5Pointer for stored speed
> Cruise control activated
> Cruise control deactivated
6Mark for stored desired speed in the multi-
level function
Storing desired speeds
With vehicle stationary
1.Switch on the ignition.
2.Press, arrow1, or pull, arrow2, the lever
past the resistance point:
Now you can move the pointer5 with the lever until you have reached your desired
speed:
>Press or pull the lever up to the resis-
tance point again: the pointer slowly
moves.
>Press or pull the lever past the resis-
tance point again: the pointer jumps to
the next multiple of 5 mph or 10 km/h
and then further, as long as the lever is
held.
3.Press the button4 for approx. 3 seconds.
The stored desired speed is indicated by a
mark 6.
If six desired speeds have already been stored,
please delete at least one of them before adding
another.
While driving
1.Press, arrow1, or pull, arrow2, the lever
past the resistance point.
2.Press the button4 for approx. 3 seconds.
The current speed is applied as the desired
speed and displayed with6.
If all of the marks 6 flash twice, this indicates
that six desired speeds have already been
stored. You must then delete at least one of
them before adding another.
Deleting desired speeds
1.Select corresponding desired speed6,
refer to section below.
2.Press button4 for approx. 3 seconds.
Activating multilevel preset mode
Press, arrow1, or pull, arrow2, the lever past
the resistance point.
The current driving speed is maintained, stored
and displayed by the pointer5.
Selecting desired speed
Press, arrow1, or pull, arrow2, the lever past
the resistance point:
The next desired speed is selected.
Page 71 of 247

Controls
69Reference
At a glance
Driving tips
Communications
Navigation
Entertainment
Mobility
Deactivating system
>Press the lever up or down, arrow3 for
approx. 3 seconds
>or switch off the ignition.
The stored speed5 is deleted, however the
stored marks6 are retained.
Active cruise control*
The concept
With active cruise control you can select a
desired speed which is not only automatically
maintained when driving on open roadways, but
also varied to maintain a selected distance set-
ting as slower traffic is encountered.
Active cruise control represents a technological
advance over the familiar cruise control and is a
welcome relief from the constant adjustment of
speed that can accompany driving in traffic on
highways or other high-speed thoroughfares.
Especially on longer trips, the system can
reduce fatigue and tension, while increasing
your enjoyment of driving. Please use it safely
and responsibly.
In addition to holding a steady cruising speed,
if you encounter slower vehicles ahead, active
cruise control will, within the scope of given
possibilities, adjust your vehicle's speed auto-
matically so that you can flow with the traffic
without having to make constant adjustments.
If, for example, while cruising at the selected
speed, you begin to approach a slower vehicle
ahead of you in the same lane, the system will
reduce your vehicle's speed to the same as that
of the vehicle ahead to maintain your selected
distance setting between your vehicle and the
vehicle ahead. You can vary the distance, which
is additionally speed-dependent. Based on
your selected distance setting, the system
automatically decreases the throttle setting and
lightly applies the brakes if necessary. The vehi-
cle brake lamps will automatically illuminate to
signal a following driver to take action. In addi-
tion, it may be necessary for the vehicle to
downshift to maintain the distance setting
selected. If the vehicle ahead speeds up or when the lane ahead becomes clear, your vehi-
cle will accelerate to the speed you have
selected by increasing the throttle setting and
shifting gears as needed. Your selected speed
will be maintained when driving downhill, too.
Active cruise control is not and must not
be used as a collision avoidance/warning
system.<
Since this active cruise control system is
a new technology and operates differ-
ently from conventional cruise control systems
to which you may be accustomed, you are
strongly urged to read all of the pages relating
to this system before use. Pay special attention
to the information contained in the Things to
know about active cruise control section begin-
ning on page73.<
Brake pedal feel
>When the system brakes and you also
depress the brake pedal, a somewhat differ-
ent braking feeling results.
>Any noises produced during automatic
braking are normal.
Applications
As with conventional cruise control systems,
active cruise control in no way diminishes or
substitutes for the driver's own personal
responsibility, alertness and awareness in
adjusting speed, braking or otherwise control-
ling the vehicle. The driver should decide when
to use the system on the basis of road, traffic,
visibility, and weather conditions. Active cruise
control is intended for use on highway-type
roadways where traffic is moving relatively
smoothly. Do not use this system in city driving;
heavy traffic such as during rush hour; on curvy,
winding roads, slippery roads or roads with
sharp curves such as highway off-ramps; during
inclement weather such as snow, strong rain or
fog; or when entering interchanges, service/
parking areas or toll booths. It is also important
to regulate your vehicle's speed and distance
setting within applicable legal limits. Always be
ready to take action or apply the brakes if nec-
essary, especially when the system is actively
Page 72 of 247

Driving
70 following a vehicle in front of you. Otherwise,
driving states can result which lead to a violation
of the law or danger of an accident.
One lever for all functions
1Store and increase desired speed
2Store and decrease desired speed
3Deactivate system, refer to page71
4Resume stored desired speed and dis-
tance, refer to page72
5Select distance to vehicle driving ahead,
refer to page71
Maintaining current speed
Briefly press, arrow1, or briefly pull, arrow2,
lever.
The current driving speed is stored and main-
tained, and briefly displayed on the speedome-
ter, refer to arrow.
Selecting desired speed
To avoid the risk of accidents, adjust your
desired speed to the traffic conditions
and remain ready to brake at all times. The sys-
tem cannot compensate for great differences in
speed in relation to the vehicles driving ahead, e.g. when quickly approaching a truck or when
another vehicle swerves into your lane.<
The desired speed can drop on uphill grades if
the engine output is insufficient.
Increasing in steps
Briefly press the lever repeatedly up to the
resistance point or past the resistance point,
arrow1, until the desired speed is displayed.
>Each time the lever is briefly pressed up to
the resistance point, the desired speed
increases by approx. 1 mph or 1 km/h.
>Each time the lever is briefly pressed
beyond the resistance point, the desired
speed is increased to the next multiple of 5
mph or 10 km/h until a maximum of
110 mph or 180 km/h is reached.
The speed then displayed is stored and
reached on clear roads.
Increasing smoothly
Press the lever up to the resistance point or
past the resistance point, arrow1, until the
desired speed is reached.
The speed then displayed is stored and
reached on clear roads.
Decreasing
Pull the lever up to the resistance point or past
the resistance point, arrow2, until the desired
speed is displayed.
>Each time the lever is pulled up to the resis-
tance point, the desired speed decreases
by approx. 1 mph or 1 km/h.
>Each time the lever is pulled back beyond
the resistance point, the desired speed is
rounded down to the next multiple of 5 mph
or 10 km/h until the minimum speed of
20 mph/30 km/h is reached.
The speed then displayed is stored and
reached on clear roads.
Executes other functions in the same way as
increasing in steps or smoothly, except that the
desired speed is decreased.
 1
1 2
2 3
3 4
4 5
5 6
6 7
7 8
8 9
9 10
10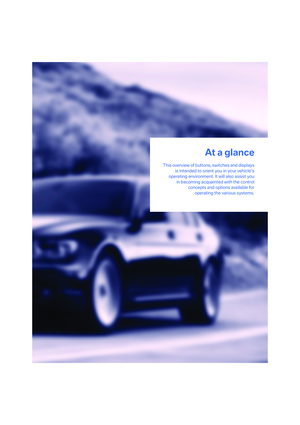 11
11 12
12 13
13 14
14 15
15 16
16 17
17 18
18 19
19 20
20 21
21 22
22 23
23 24
24 25
25 26
26 27
27 28
28 29
29 30
30 31
31 32
32 33
33 34
34 35
35 36
36 37
37 38
38 39
39 40
40 41
41 42
42 43
43 44
44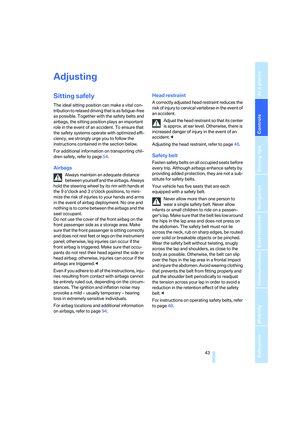 45
45 46
46 47
47 48
48 49
49 50
50 51
51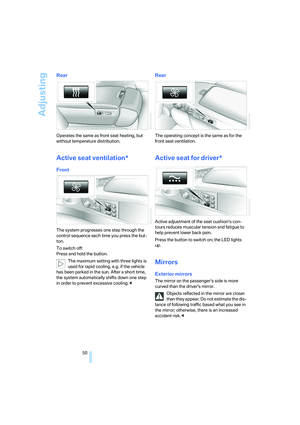 52
52 53
53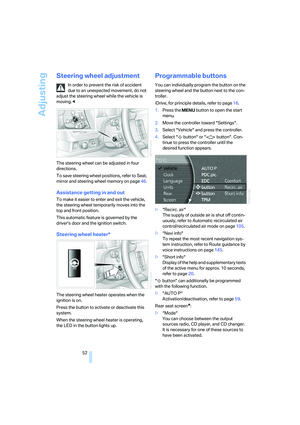 54
54 55
55 56
56 57
57 58
58 59
59 60
60 61
61 62
62 63
63 64
64 65
65 66
66 67
67 68
68 69
69 70
70 71
71 72
72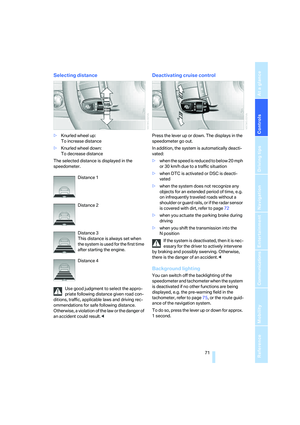 73
73 74
74 75
75 76
76 77
77 78
78 79
79 80
80 81
81 82
82 83
83 84
84 85
85 86
86 87
87 88
88 89
89 90
90 91
91 92
92 93
93 94
94 95
95 96
96 97
97 98
98 99
99 100
100 101
101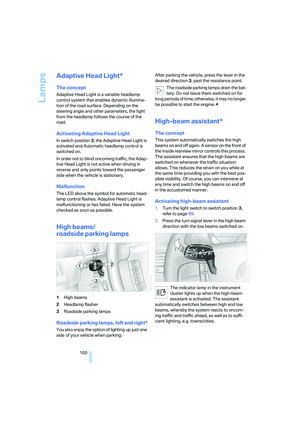 102
102 103
103 104
104 105
105 106
106 107
107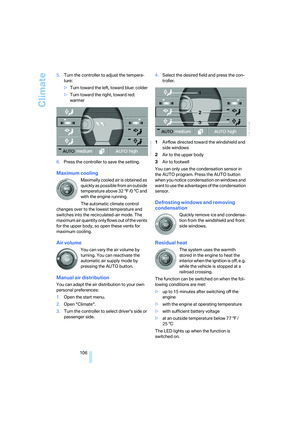 108
108 109
109 110
110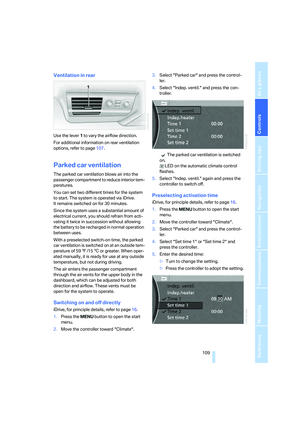 111
111 112
112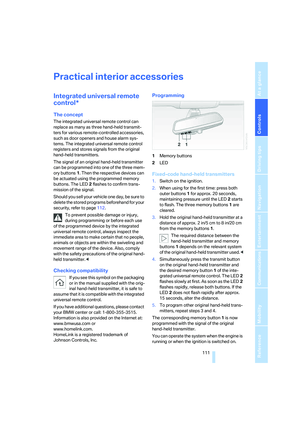 113
113 114
114 115
115 116
116 117
117 118
118 119
119 120
120 121
121 122
122 123
123 124
124 125
125 126
126 127
127 128
128 129
129 130
130 131
131 132
132 133
133 134
134 135
135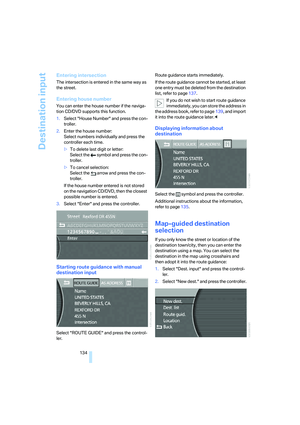 136
136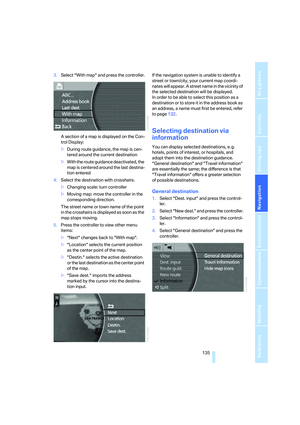 137
137 138
138 139
139 140
140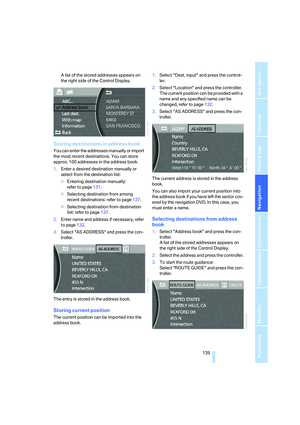 141
141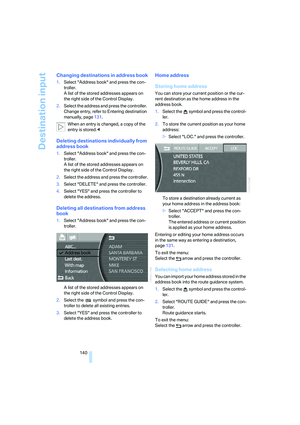 142
142 143
143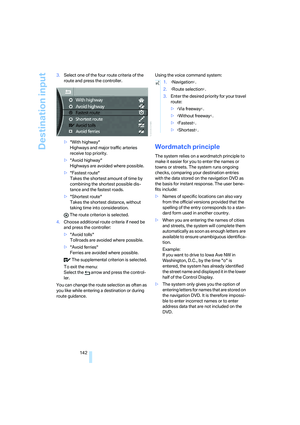 144
144 145
145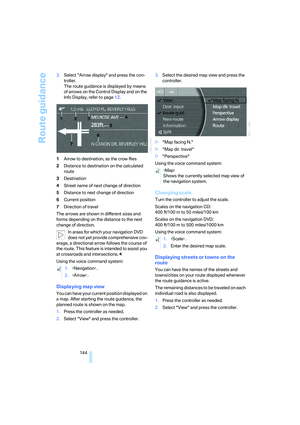 146
146 147
147 148
148 149
149 150
150 151
151 152
152 153
153 154
154 155
155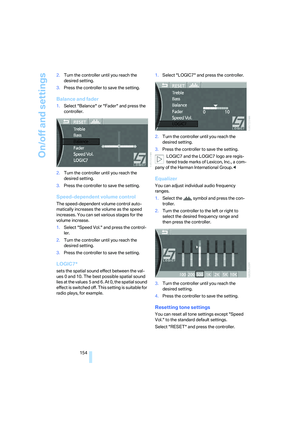 156
156 157
157 158
158 159
159 160
160 161
161 162
162 163
163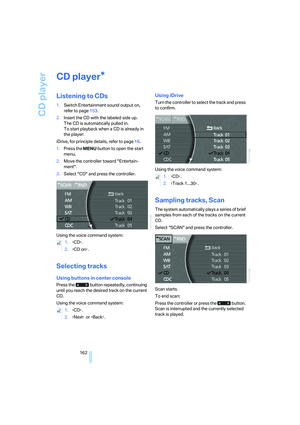 164
164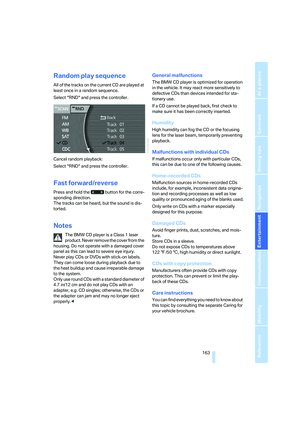 165
165 166
166 167
167 168
168 169
169 170
170 171
171 172
172 173
173 174
174 175
175 176
176 177
177 178
178 179
179 180
180 181
181 182
182 183
183 184
184 185
185 186
186 187
187 188
188 189
189 190
190 191
191 192
192 193
193 194
194 195
195 196
196 197
197 198
198 199
199 200
200 201
201 202
202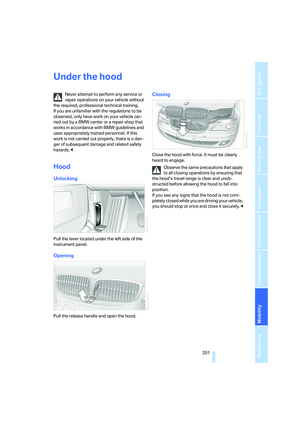 203
203 204
204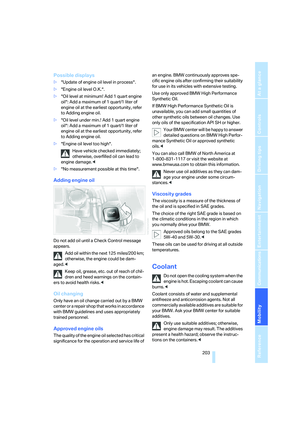 205
205 206
206 207
207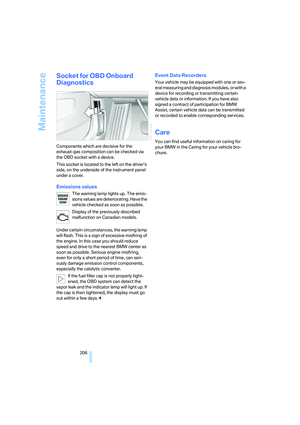 208
208 209
209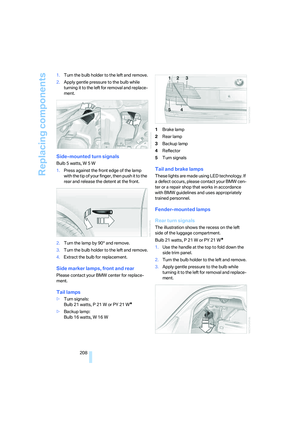 210
210 211
211 212
212 213
213 214
214 215
215 216
216 217
217 218
218 219
219 220
220 221
221 222
222 223
223 224
224 225
225 226
226 227
227 228
228 229
229 230
230 231
231 232
232 233
233 234
234 235
235 236
236 237
237 238
238 239
239 240
240 241
241 242
242 243
243 244
244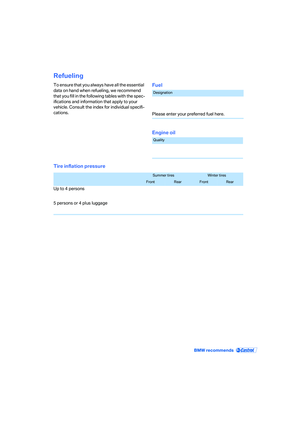 245
245 246
246