Page 89 of 247

Controls
87Reference
At a glance
Driving tips
Communications
Navigation
Entertainment
Mobility
iDrive, for principle details, refer to page16.
1.Press the button to open the start
menu.
2.Move the controller toward "Settings".
3.Select "Vehicle" and press the controller.
4.Select "PDC pic." and press the controller.
This activates the PDC display.
The display appears as soon as PDC is acti-
vated.
The setting is stored for the remote control cur-
rently in use.
To exit the menu:
Select the arrow and press the controller.
System limits
Even with PDC, final responsibility for
estimating the distance between the
vehicle and any objects always remains with the
driver. Even when sensors are involved, there is
a blind spot in which objects cannot be
detected. The system's detection of objects is
also subject to the physical limits that apply to
all forms of ultrasonic measurement, such as
those encountered with tow bars and trailer
couplings, as well as thin and wedge-shaped
objects, etc. It is also possible that low objects
already displayed, such as curb edges, may come into the blind spot of the sensors before a
continuous signal sounds or that the system will
fail to detect higher, projecting obstacles such
as ledges. Loud noises from outside and inside
the vehicle may also prevent you from hearing
the PDC's signal tone.<
Driving stability control
systems
Your BMW is equipped with an extended array
of systems designed to enhance and maintain
vehicle stability under extreme conditions.
ABS Antilock Brake System
ABS prevents the wheels from locking during
braking. Safe steering response is maintained
even during hard braking. This increases active
driving safety.
ABS is operational every time you start the
engine. For information on safe braking, refer to
page123.
CBC Cornering Brake Control
This system provides further enhancements to
vehicle stability and steering response when
braking while cornering or when braking during
a lane change.
Electronic brake-force distribution
The system controls the brake pressure in the
rear wheels to ensure a stable braking behavior.
DBC Dynamic Brake Control
When you apply the brakes rapidly, this system
automatically produces the maximum braking
force boost and thus helps to achieve the short-
est possible braking distance during full brak-
ing. This system exploits all of the benefits pro-
vided by ABS.
Do not reduce the pressure on the brake pedal
for the duration of the full braking.
DSC Dynamic Stability Control
DSC prevents traction loss in the driving wheels
when starting off and accelerating. DSC also
Page 90 of 247

Technology for comfort, convenience and safety
88 detects unstable driving conditions such as
fishtailing or sliding of the vehicle's front
wheels. In these cases, DSC helps the vehicle
safely stay on course within the physical limits
by reducing the engine output and by applying
the brakes in the individual wheels.
The laws of physics cannot be repealed,
even with DSC. An appropriate driving
style always remains the responsibility of the
driver. Do not reduce the additional safety mar-
gin by taking unnecessary risks.<
Deactivating DSC
1.Press the button to open the start
menu.
2.Move the controller toward "Settings".
3.Select "DTC" again and press the controller
for at least 3 seconds.
The LED for "DTC" and the DSC indicator lamp
on the Info Display light up. DTC Dynamic Trac-
tion Control and DSC Dynamic Stability Control
are deactivated together. Interventions promot-
ing stability and forward momentum will no
longer be carried out.
To promote enhanced operating stability, reac-
tivate DSC again as soon as possible.
Activating DSC
Select "DTC" again and press the controller.
The LED on the Control Display and the DSC
indicator lamp on the Info Display go out.
For control purposes
If the indicator lamp flashes:
DSC controls the drive forces and
brake forces. The indicator lamp comes on:
DSC is deactivated.
DTC Dynamic Traction Control
DTC is a version of DSC that is optimized for
forward momentum in special road conditions.
The system ensures maximum forward
momentum, but with limited driving stability.
Therefore, drive with appropriate caution.
You may find it useful to briefly activate DTC
under the following special circumstances:
>When driving on snow-covered uphill
grades, in slushy snow or on uncleared,
snow-covered roads
>When rocking a stuck vehicle free or when
starting off in deep snow or on loose ground
>When driving with snow chains
Activating DTC
iDrive, for principle details, refer to page16.
1.Press the button to open the start
menu.
2.Move the controller toward "Settings".
3.Select "DTC" and press the controller.
The LED for "DTC" and the DTC indicator lamp
on the Info Display light up.
For control purposes
If the indicator lamp flashes:
DTC controls the drive forces and
brake forces.
The indicator lamp comes on:
DTC is activated.
Page 91 of 247

Controls
89Reference
At a glance
Driving tips
Communications
Navigation
Entertainment
Mobility
Deactivating DTC
Select "DTC" again and press the controller.
The LED on the Control Display and the DTC
indicator lamp on the Info Display go out.
Dynamic Drive
The concept
Dynamic Drive minimizes body roll and opti-
mizes vehicle stability during cornering and
evasive maneuvers.
Active stabilizers at the front and rear axles form
the basis for Dynamic Drive. Suspension com-
pliance adapts to suit driving conditions, vary-
ing from performance-oriented during corner-
ing to smooth and comfort-oriented when the
vehicle is traveling in a straight line. During vehi-
cle operation, the system continuously runs
through closed-loop control cycles lasting only
fractions of a second.
The system assumes operational status each
time you start the engine.
Malfunction
The warning lamp lights up yellow and
a message is shown on the Info Display.
A malfunction has occurred in the
Dynamic Drive system. Have the system
checked as soon as possible.
If a malfunction occurs, please remember
to adapt your speed accordingly, espe-
cially in curves.
The suspension will be noticeably softer and
the vehicle will display a greater tendency to tilt
during cornering and in crosswinds.
If a Check Control message stating that you
should stop is displayed, stop at a suitable loca-
tion and switch off the engine as soon as possi-
ble. In this case, the oil level in the reservoir may
have dropped below the minimum, possibly
owing to a leak in the hydraulic system.
Do not continue driving, but instead contact
your BMW center.<
Self-leveling suspension*
Malfunction
The warning lamp for self-leveling sus-
pension lights up yellow and a message
is shown on the Info Display.
A malfunction has occurred in the level control
system.
Stop driving and check the vehicle:
>The vehicle is considerably lower at the rear
than at the front, possibly also on one side,
at the rear left compared to the rear right.
>The ground clearance is reduced or the
driving comfort is noticeably reduced.
>The position of the vehicle is normal, but a
malfunction is indicated.
Drive to the nearest BMW center or a workshop
that works in accordance with BMW guidelines
and uses appropriately trained personnel. Drive
with appropriate caution in the meantime.
EDC Electronic Damping
Control*
If the influencing variables such as road surface
quality or operating conditions such as steer-
ing, braking etc. change, the damping automat-
ically adjusts to the new conditions.
iDrive, for principle details, refer to page16.
1.Press the button to open the start
menu.
2.Move the controller toward "Settings".
3.Select "Vehicle" and press the controller.
4.Select "EDC" and press the controller.
Page 92 of 247

Technology for comfort, convenience and safety
90 There are two programs.
With each press of the controller, you can
switch back and forth between "Comfort" and
"Sport".
Comfort program
The Comfort program is suitable for use
throughout the vehicle's entire speed range and
regardless of load.
Sport program
You should select the Sport program for consis-
tently performance-oriented response from
shock absorbers and steering.
FTM Flat Tire Monitor*
The concept
The Flat Tire Monitor keeps track of the infla-
tion pressures in the four mounted tires as you
drive. The system triggers an alert whenever
the inflation pressure drops significantly in rela-
tion to the pressure in another tire.
When a loss of pressure occurs, the rolling
radius changes and with it, the rotational speed
of the wheels. This change is detected and sig-
naled as a flat tire.
Functional requirements
To ensure the reliable signaling of a flat tire, the
system must be initialized at the correct tire
inflation pressure.
The initialization must be repeated after
every correction of the tire inflation pres-
sure and after every tire or wheel change.<
System limits
The Flat Tire Monitor cannot indicate
sudden severe tire damage caused by
outside factors and does not detect a natural,
even pressure drop in all four tires.<
In the following situations, the system could be
delayed or malfunction:
>When the system has not been initialized.>When driving on snow-covered or slippery
road surfaces.
>Sporty driving style: slip in the drive wheels,
high lateral acceleration.
>When driving with snow chains
*.
Initializing system
The initialization is completed during driv-
ing, which can be interrupted at any time.
The initialization automatically continues when
driving resumes. Do not initialize the system
when driving with snow chains
*.<
iDrive, for principle details, refer to page16.
1.Select "Settings".
2.Select "Vehicle" and press the controller.
3.Select "FTM" and press the controller.
The initialization menu appears.
4.Start the engine, but do not begin to drive.
5.Select "SET" and press the controller.
During the initialization, "Initialization is run-
ning and will be completed after driving for a
while! Status: FTM is being initialized"
appears on the Control Display.
6.Start driving.
It takes at least 10 minutes before the Flat
Tire Monitor can detect and report a flat tire.
The initialization is completed during driving.
Then the message "Only set after tire pressure
is correctly adjusted (vehicle must be stopped
and ignition on) Status: active" appears on the
Control Display again.
To exit the menu:
Select the arrow and press the controller.
Page 93 of 247

Controls
91Reference
At a glance
Driving tips
Communications
Navigation
Entertainment
Mobility
Indication of a flat tire
The warning lamp lights up red and a
message is shown on the Info Display.
In addition, a signal sounds. A flat tire or
a major air loss has occurred.
1.Reduce speed and stop the vehicle care-
fully. Avoid sudden braking and steering
maneuvers.
2.Identify the damaged tire.
If identification is not possible, con-
tact your BMW center.<
3.Replace the damaged tire, refer to Chang-
ing wheels on page209.
Run-flat tires*
1.Cautiously reduce the vehicle speed to
below 50 mph/80 km/h. Avoid sudden brak-
ing and steering maneuvers. Do not exceed
a vehicle speed of 50 mph/80 km/h.
If the vehicle is not equipped with run-
flat tires, refer to page199, do not
continue to drive. Continued driving after a
flat tire can result in serious accidents.<
2.Check the air pressure in all four tires at the
next opportunity.
If the tire inflation pressure in all four
tires is correct, the Flat Tire Monitor
may not have been initialized. The system
must then be initialized.<
3.In the event of a total loss of inflation pres-
sure, 0 psi/kPa, or obvious tire damage, you
can estimate the possible distance for con-
tinued driving on the basis of the following
guide values:
>With low load:
1 to 2 persons without luggage:
approx. 155 miles/250 km.
>With medium load:
2 persons, luggage compartment full, or
4 persons without luggage:
approx. 95 miles/150 km.
>With full load:
More than 4 persons, luggage compart-
ment full:
approx. 30 miles/50 km.Drive reservedly and do not exceed a
speed of 50 mph/80 km/h. In the event of
pressure loss, vehicle handling changes. This
includes reduced tracking stability in braking,
extended braking distances, and altered natural
steering characteristics.
If unusual vibrations or loud noises occur while
the vehicle is being driven, this can indicate final
failure of the damaged tire. Reduce speed and
stop at a suitable location as soon as possible;
otherwise, pieces of the tire could come off and
cause an accident. Do not continue driving,
contact your BMW center.<
Malfunction
The warning lamp lights up yellow and
a message is shown on the Info Display.
The Flat Tire Monitor has failed. Have
the system checked as soon as possible.
TPM Tire Pressure Monitor*
The concept
TPM checks the tire inflation pressure in the
four mounted tires. The system indicates if the
tire inflation pressure has dropped considerably
in one or several tires.
Functional requirement
In order to assure the reliable reporting of a flat
tire, the system must have been reset with the
correct tire inflation pressure.
Always use wheels with TPM electronics; oth-
erwise, fault-free operation of the system is not
ensured.
Reset the system again after each correc-
tion of the tire inflation pressure and after
every tire or wheel change.<
System limits
TPM cannot warn you of sudden serious
tire damage caused by external influ-
ences.<
The system does not function properly if it has
not been reset, e.g. a flat tire is reported despite
correct tire inflation pressures.
Page 94 of 247

Technology for comfort, convenience and safety
92 The system is inactive and cannot display a flat
tire if a wheel has been mounted without TPM
electronics or if TPM experiences temporary
interference from other systems or devices that
use the same radio frequency.
Status display on Control Display
The tire and system status is indicated by the
color of the tires.
TPM takes the fact that the tire pressure
changes during driving into account. A correc-
tion is only required if the color of the TPM dis-
play indicates that it is necessary.
Green
The tire pressure matches the learned set state.
"Status: TPM active" is displayed on the Con-
trol Display.
A wheel is yellow
There is a flat tire or a major drop in inflation
pressure in the indicated tire. A message
appears on the Control Display.
All wheels are yellow
There is a flat tire or a major drop in inflation
pressure in several tires. A message appears on
the Control Display.
Gray
The system cannot detect a flat tire.
Reasons for this can include:
>TPM is being reset
>Temporary interference due to systems or
devices that use the same radio frequency
>Malfunction
Resetting system
Reset the system again after each correc-
tion of the tire inflation pressure and after
every tire or wheel change.<
Resetting finishes during driving and which can
be interrupted at any time. When driving
resumes, resetting is continued automatically.iDrive, for principle details, refer to page16.
1.Press the button to open the start
menu.
2.Move the controller toward "Settings".
3.Select "Vehicle" and press the controller.
4.Select "TPM" and press the controller.
5.Start the engine, but do not begin to drive.
6.Select "RESET" and press the controller.
7.Select "YES" and press the controller.
8.Start to drive.
The tires are shown in gray and "Status:
Resetting TPM..." is displayed.
After a few minutes of driving, the set tire infla-
tion pressures in the tires are applied as the set
values to be monitored. Resetting finishes dur-
ing driving. The tires are shown in gray on the
Control Display and "Status: TPM active" is dis-
played again.
If a flat tire is detected during resetting
and applying the tire inflation pressures,
all tires are shown in yellow on the Control Dis-
play. The message "Status: Tire low!" is dis-
played.<
Page 95 of 247

Controls
93Reference
At a glance
Driving tips
Communications
Navigation
Entertainment
Mobility
Low tire pressure message
The warning lamp lights up yellow. A
message appears on the Control Dis-
play. In addition, a signal sounds. A flat
tire or a major air loss has occurred.
1.Reduce speed and stop the vehicle care-
fully. Avoid sudden braking and steering
maneuvers.
2.Check whether your vehicle is equipped
with standard tires or run-flat tires.
You will recognize run-flat tires by a
circular symbol containing the letters
RSC on the side of the tire, refer to
page199.<
Standard tires
1.If all four wheels are shown in yellow, iden-
tify the damaged tire on the vehicle.
2.Replace the damaged wheel or wheels,
refer to Changing wheels on page209.
The spare wheel is equipped with the neces-
sary TPM electronics and when mounted, will
also be monitored once the system has been
reset.
Have the tire replaced by a BMW center or a
workshop that is familiar with handling TPM and
works according to BMW repair procedures
with correspondingly trained personnel.
Run-flat tires*
1.Cautiously reduce speed to below 50 mph/
80 km/h. Avoid sudden braking and steer-
ing maneuvers. Do not exceed a speed of
50 mph/80 km/h.
If the vehicle is not equipped with run-
flat tires, refer to page199, do not
continue to drive. Continued driving after a
flat tire can result in serious accidents.<
2.In the event of complete tire pressure loss,
0 psi/0 kPa, you can estimate the possible
distance for continued driving on the basis
of the following guide values:
>With a light load:
1 to 2 persons without luggage:
approx. 155 miles/250 km>With a medium load:
2 persons, luggage compartment full, or
4 persons without luggage:
approx. 95 miles/150 km
>With a full load:
More than 4 persons, luggage compart-
ment full:
approx. 30 miles/50 km
Drive reservedly and do not exceed a
speed of 50 mph/80 km/h. In the event of
pressure loss, vehicle handling changes. This
includes reduced tracking stability in braking,
extended braking distance and altered natural
steering characteristics.
If unusual vibrations occur while the vehicle is
being driven, this can indicate final failure of the
damaged tire. Reduce speed and stop as soon
as possible; otherwise, pieces of the tire could
come loose and cause an accident. Do not con-
tinue driving, but instead contact your BMW
center.<
Malfunction
The yellow warning light flashes and
then lights up continuously. The tires
are shown in gray on the Control Dis-
play and a message is displayed. No flat tire can
be detected. Have system checked.
A message like this is displayed in the following
situations:
>When a malfunction is occurring.
Have the system checked.
>If a wheel without TPM electronics is
mounted.
>If TPM is temporarily interfered with by
other systems or devices which use the
same radio frequency.
Page 96 of 247

Technology for comfort, convenience and safety
94
Brake force display
Left-hand picture: normal braking.
Right-hand picture: heavy braking.
Airbags
The following airbags are located under the
marked covers:
1Front airbags
2Head airbags
3Side airbags in front and rear
*
4Knee airbags
Protective action
To ensure that the safety systems con-
tinue to provide optimized protection,
please follow the adjustment instructions on
page43.<
The front airbags help protect the driver and
front passenger by responding to frontal
impacts in which safety belts alone cannot pro-
vide adequate restraint. When needed, the
head and side airbags help provide protection in
the event of side impact. The relevant side air-
bag supports the side upper body area. The
head air bag supports the head. The knee air-bags help protect the legs against impact
against the cockpit.
The airbags are deliberately not triggered in
every impact situation, e.g. less severe acci-
dents or rear-end collisions.
Do not apply adhesive materials to the
cover panels of the airbags, cover them or
modify them in any other way.
Do not attempt to remove the airbag retention
system from the vehicle. Never modify or
tamper with either the wiring or the individual
components in the airbag system. This cate-
gory includes the upholstery in the center of the
steering wheel, on the instrument panel, the
doors and the roof pillars along with the sides of
the headliner. Do not attempt to remove or dis-
mantle the steering wheel.
Do not touch the individual components
directly after the system has been triggered,
because there is a danger of burns. In the event
of malfunctions, deactivation, or triggering of
 1
1 2
2 3
3 4
4 5
5 6
6 7
7 8
8 9
9 10
10 11
11 12
12 13
13 14
14 15
15 16
16 17
17 18
18 19
19 20
20 21
21 22
22 23
23 24
24 25
25 26
26 27
27 28
28 29
29 30
30 31
31 32
32 33
33 34
34 35
35 36
36 37
37 38
38 39
39 40
40 41
41 42
42 43
43 44
44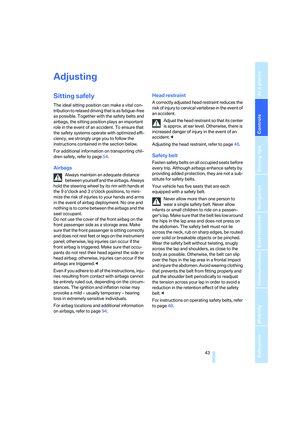 45
45 46
46 47
47 48
48 49
49 50
50 51
51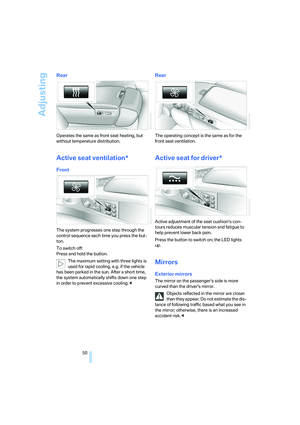 52
52 53
53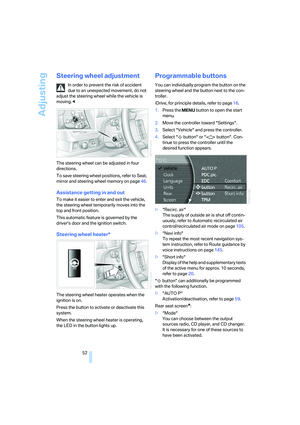 54
54 55
55 56
56 57
57 58
58 59
59 60
60 61
61 62
62 63
63 64
64 65
65 66
66 67
67 68
68 69
69 70
70 71
71 72
72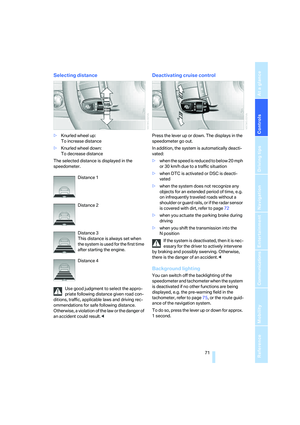 73
73 74
74 75
75 76
76 77
77 78
78 79
79 80
80 81
81 82
82 83
83 84
84 85
85 86
86 87
87 88
88 89
89 90
90 91
91 92
92 93
93 94
94 95
95 96
96 97
97 98
98 99
99 100
100 101
101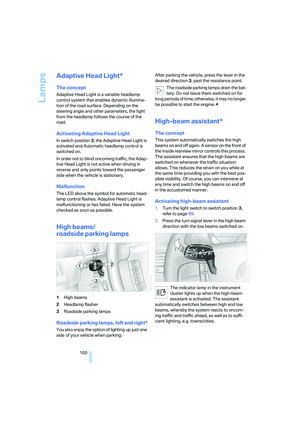 102
102 103
103 104
104 105
105 106
106 107
107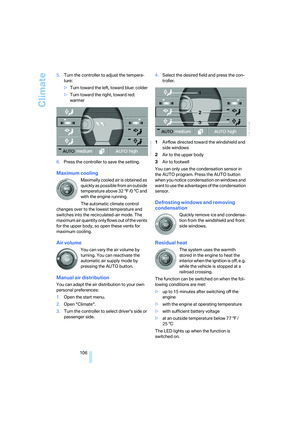 108
108 109
109 110
110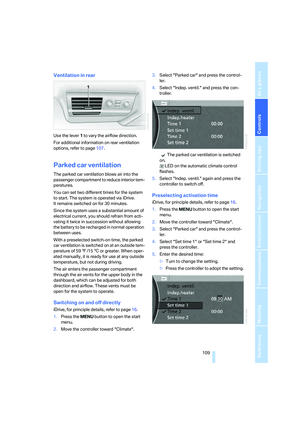 111
111 112
112 113
113 114
114 115
115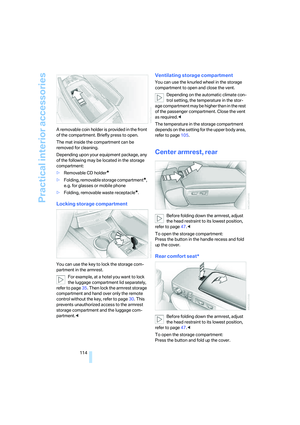 116
116 117
117 118
118 119
119 120
120 121
121 122
122 123
123 124
124 125
125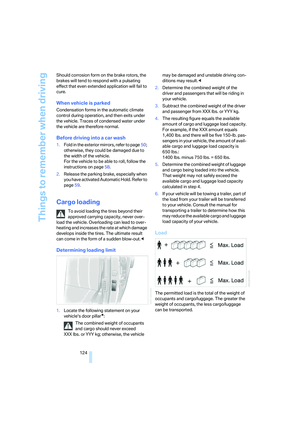 126
126 127
127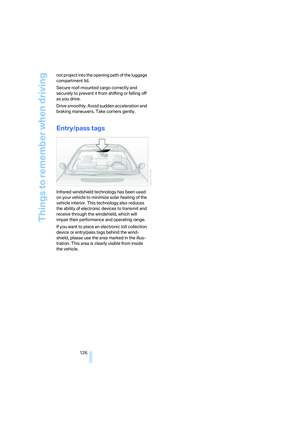 128
128 129
129 130
130 131
131 132
132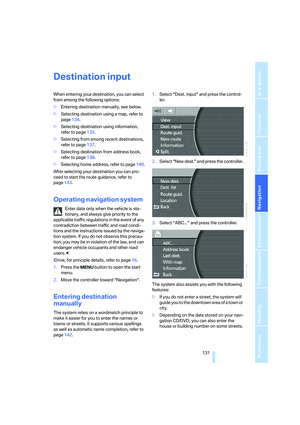 133
133 134
134 135
135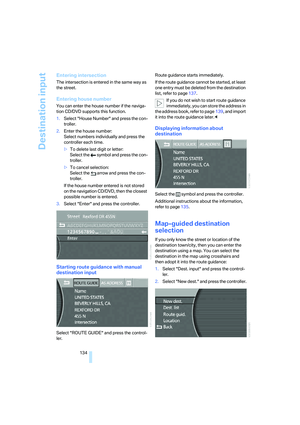 136
136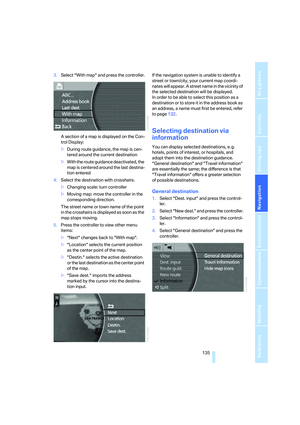 137
137 138
138 139
139 140
140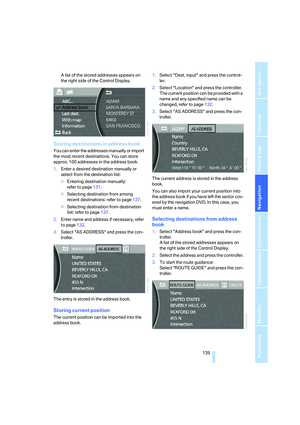 141
141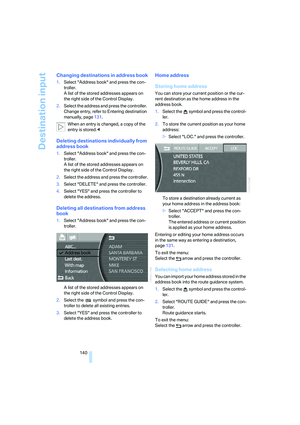 142
142 143
143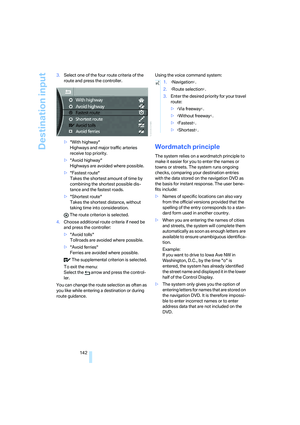 144
144 145
145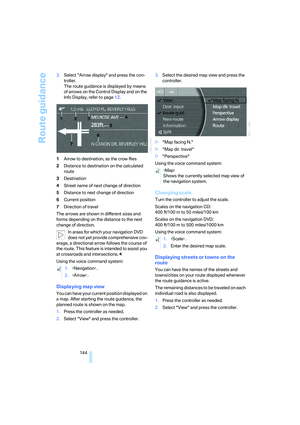 146
146 147
147 148
148 149
149 150
150 151
151 152
152 153
153 154
154 155
155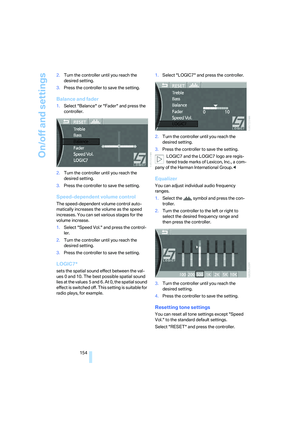 156
156 157
157 158
158 159
159 160
160 161
161 162
162 163
163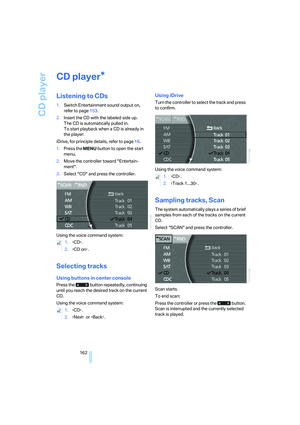 164
164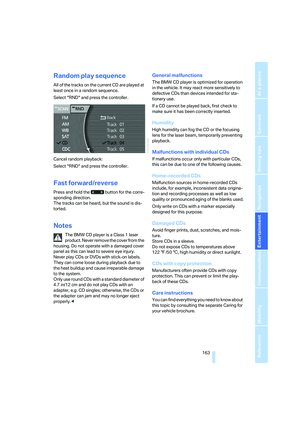 165
165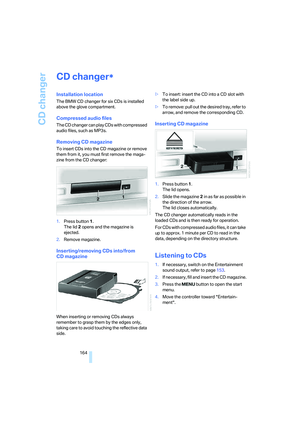 166
166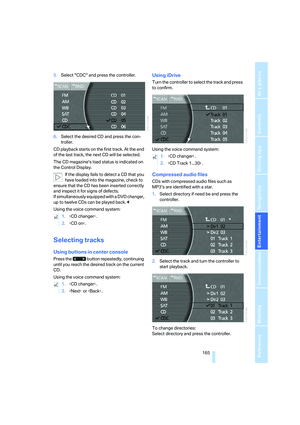 167
167 168
168 169
169 170
170 171
171 172
172 173
173 174
174 175
175 176
176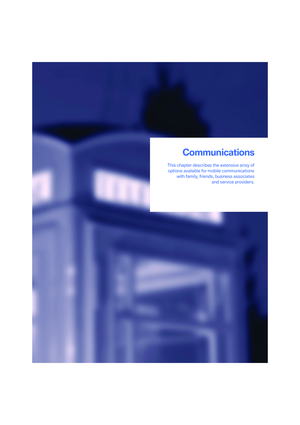 177
177 178
178 179
179 180
180 181
181 182
182 183
183 184
184 185
185 186
186 187
187 188
188 189
189 190
190 191
191 192
192 193
193 194
194 195
195 196
196 197
197 198
198 199
199 200
200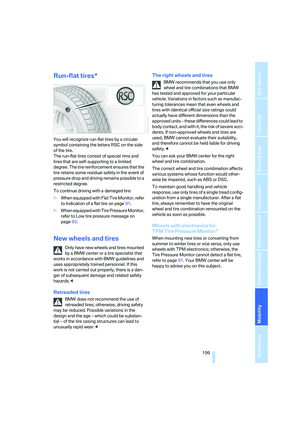 201
201 202
202 203
203 204
204 205
205 206
206 207
207 208
208 209
209 210
210 211
211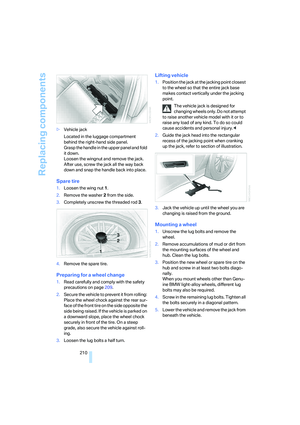 212
212 213
213 214
214 215
215 216
216 217
217 218
218 219
219 220
220 221
221 222
222 223
223 224
224 225
225 226
226 227
227 228
228 229
229 230
230 231
231 232
232 233
233 234
234 235
235 236
236 237
237 238
238 239
239 240
240 241
241 242
242 243
243 244
244 245
245 246
246