2006 BMW 750LI light
[x] Cancel search: lightPage 12 of 247
Cockpit
10
Cockpit
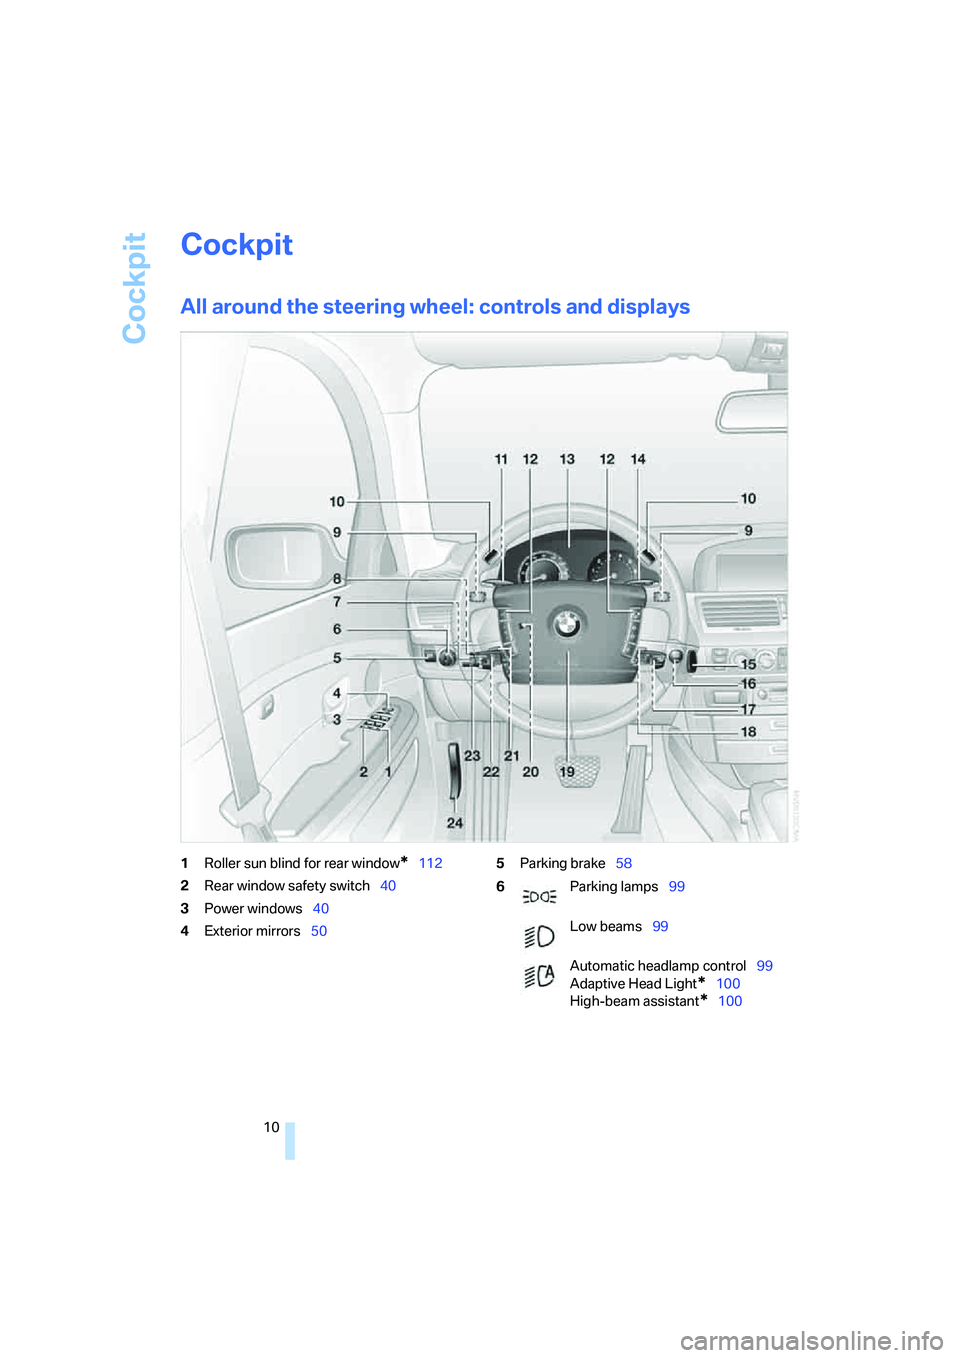
All around the steering wheel: controls and displays
1Roller sun blind for rear window*112
2Rear window safety switch40
3Power windows40
4Exterior mirrors505Parking brake58
6Parking lamps99
Low beams99
Automatic headlamp control99
Adaptive Head Light
*100
High-beam assistant
*100
Page 13 of 247
At a glance
11Reference
Controls
Driving tips
Communications
Navigation
Entertainment
Mobility
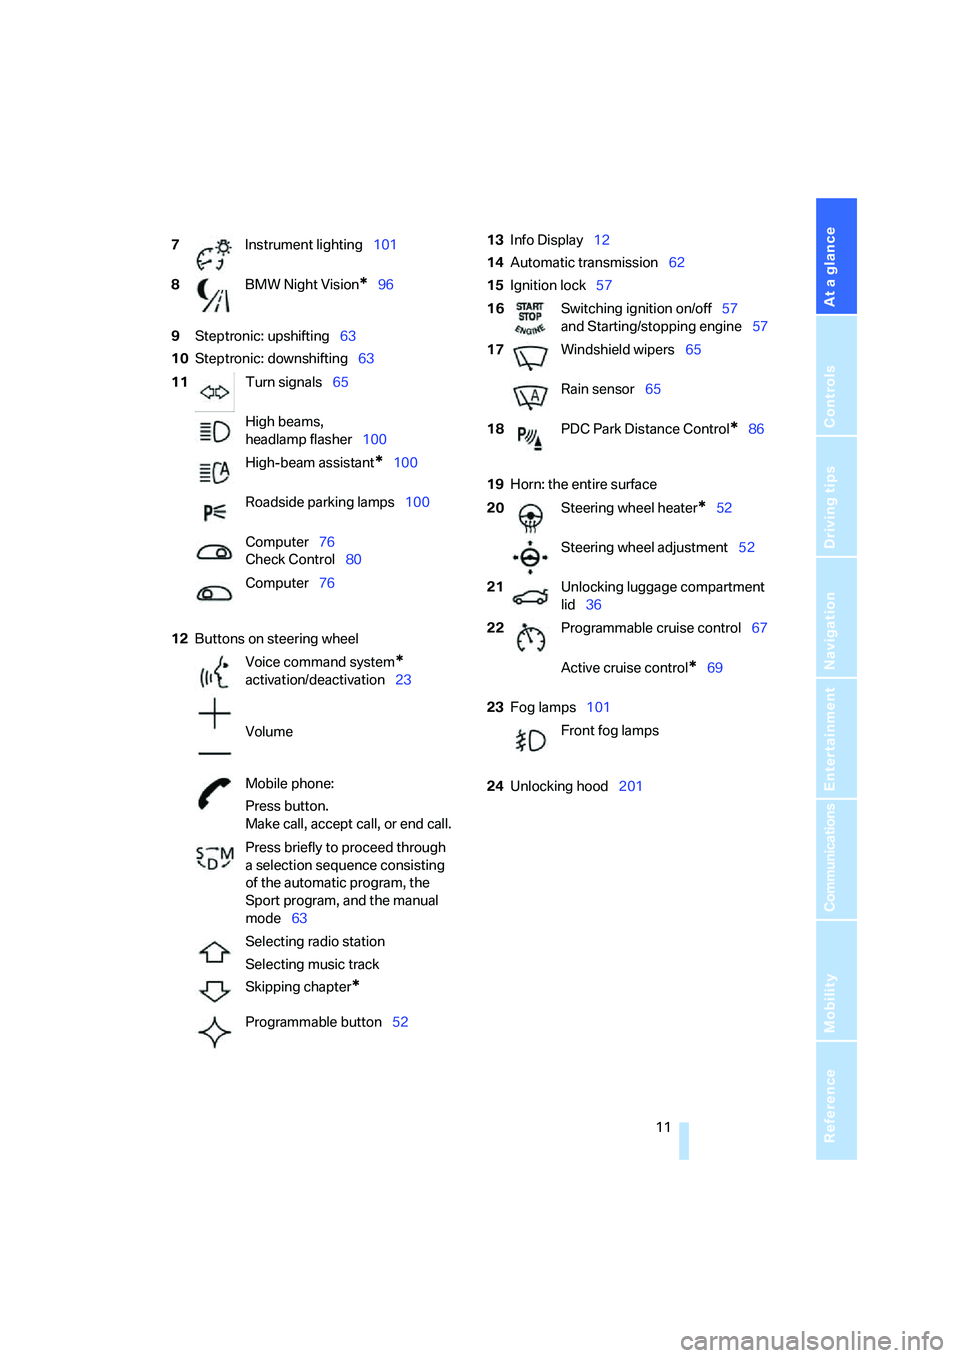
9Steptronic: upshifting63
10Steptronic: downshifting63
12Buttons on steering wheel13Info Display12
14Automatic transmission62
15Ignition lock57
19Horn: the entire surface
23Fog lamps101
24Unlocking hood201 7Instrument lighting101
8BMW Night Vision
*96
11Turn signals65
High beams,
headlamp flasher100
High-beam assistant
*100
Roadside parking lamps100
Computer76
Check Control80
Computer76
Voice command system
*
activation/deactivation23
Volume
Mobile phone:
Press button.
Make call, accept call, or end call.
Press briefly to proceed through
a selection sequence consisting
of the automatic program, the
Sport program, and the manual
mode63
Selecting radio station
Selecting music track
Skipping chapter
*
Programmable button52
16Switching ignition on/off57
and Starting/stopping engine57
17Windshield wipers65
Rain sensor65
18PDC Park Distance Control
*86
20Steering wheel heater
*52
Steering wheel adjustment52
21Unlocking luggage compartment
lid36
22Programmable cruise control67
Active cruise control
*69
Front fog lamps
Page 14 of 247
Cockpit
12
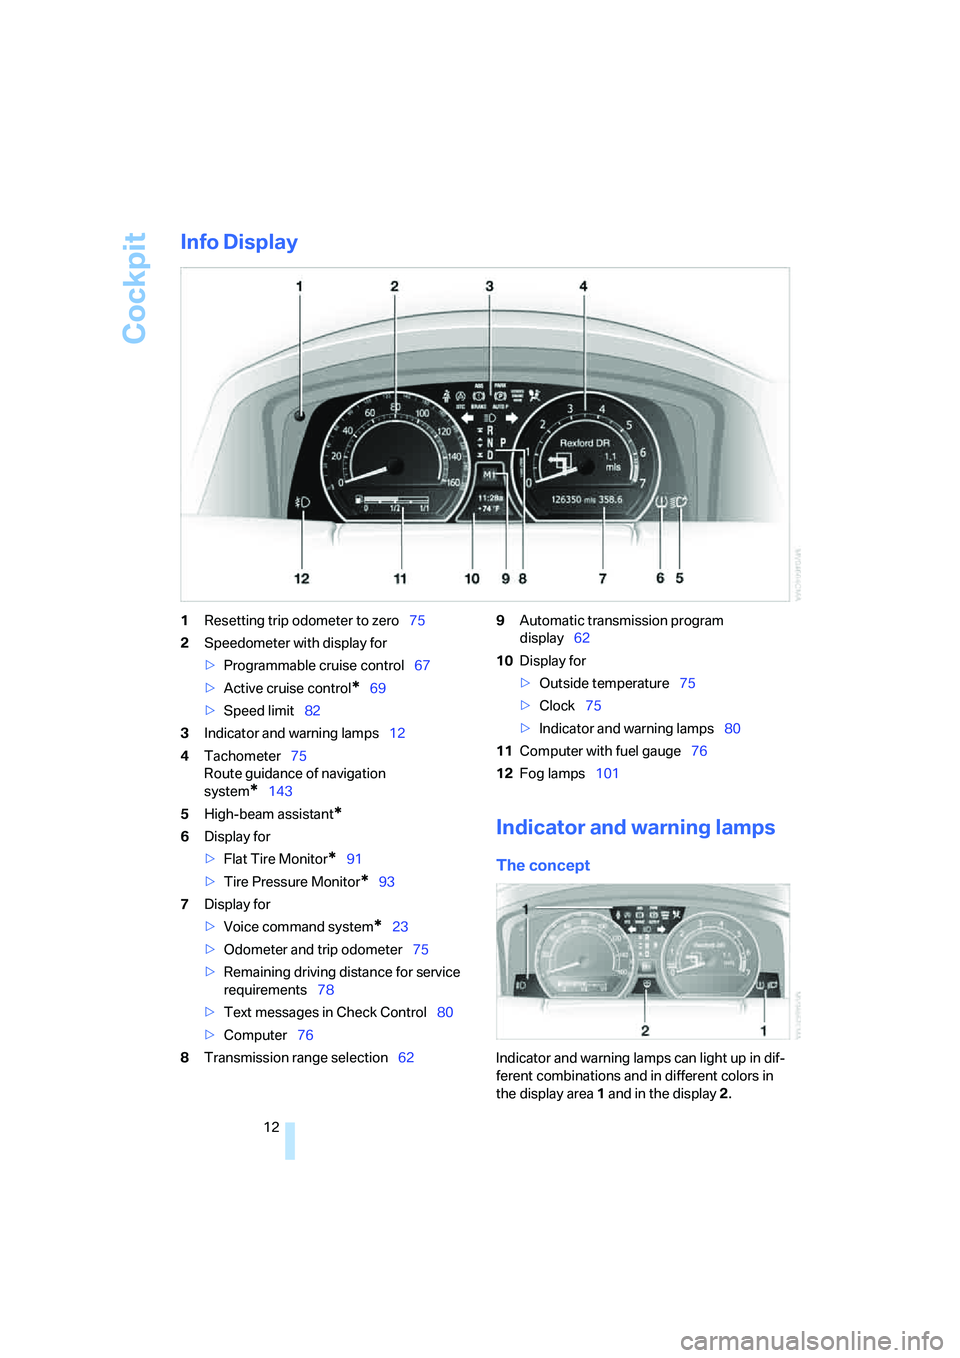
Info Display
1Resetting trip odometer to zero75
2Speedometer with display for
>Programmable cruise control67
>Active cruise control
*69
>Speed limit82
3Indicator and warning lamps12
4Tachometer75
Route guidance of navigation
system
*143
5High-beam assistant
*
6Display for
>Flat Tire Monitor
*91
>Tire Pressure Monitor
*93
7Display for
>Voice command system
*23
>Odometer and trip odometer75
>Remaining driving distance for service
requirements78
>Text messages in Check Control80
>Computer76
8Transmission range selection629Automatic transmission program
display62
10Display for
>Outside temperature75
>Clock75
>Indicator and warning lamps80
11Computer with fuel gauge76
12Fog lamps101
Indicator and warning lamps
The concept
Indicator and warning lamps can light up in dif-
ferent combinations and in different colors in
the display area1 and in the display2.
Page 15 of 247
At a glance
13Reference
Controls
Driving tips
Communications
Navigation
Entertainment
Mobility
When the engine is started or the ignition is
switched on, some lamps are checked for
proper operation and light up briefly in the pro-
cess.
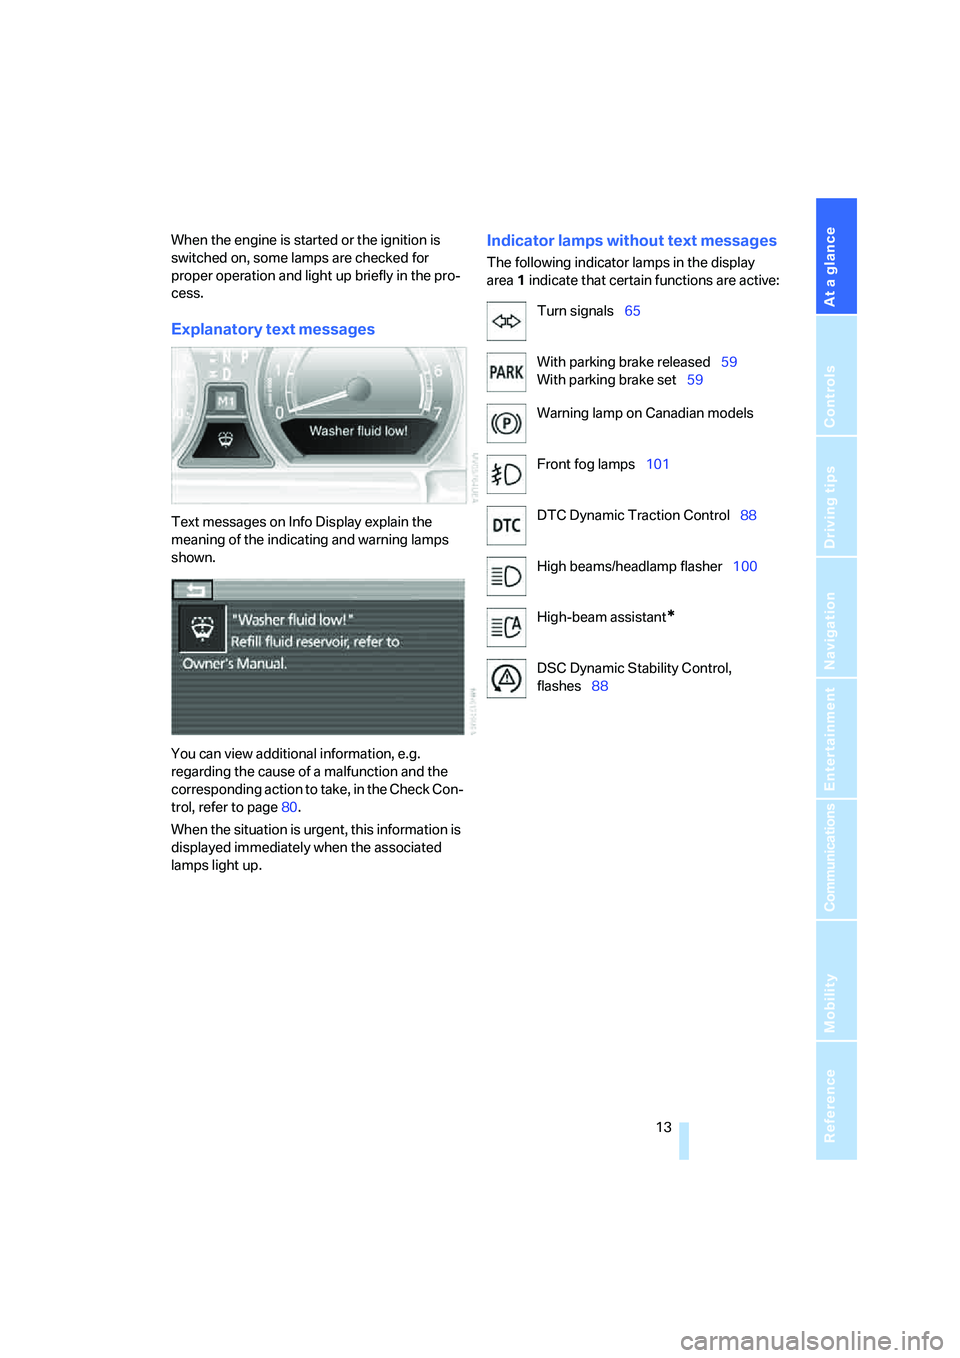
Explanatory text messages
Text messages on Info Display explain the
meaning of the indicating and warning lamps
shown.
You can view additional information, e.g.
regarding the cause of a malfunction and the
corresponding action to take, in the Check Con-
trol, refer to page80.
When the situation is urgent, this information is
displayed immediately when the associated
lamps light up.
Indicator lamps without text messages
The following indicator lamps in the display
area1 indicate that certain functions are active:
Turn signals65
With parking brake released59
With parking brake set59
Warning lamp on Canadian models
Front fog lamps101
DTC Dynamic Traction Control88
High beams/headlamp flasher100
High-beam assistant
*
DSC Dynamic Stability Control,
flashes88
Page 21 of 247
At a glance
19Reference
Controls
Driving tips
Communications
Navigation
Entertainment
Mobility
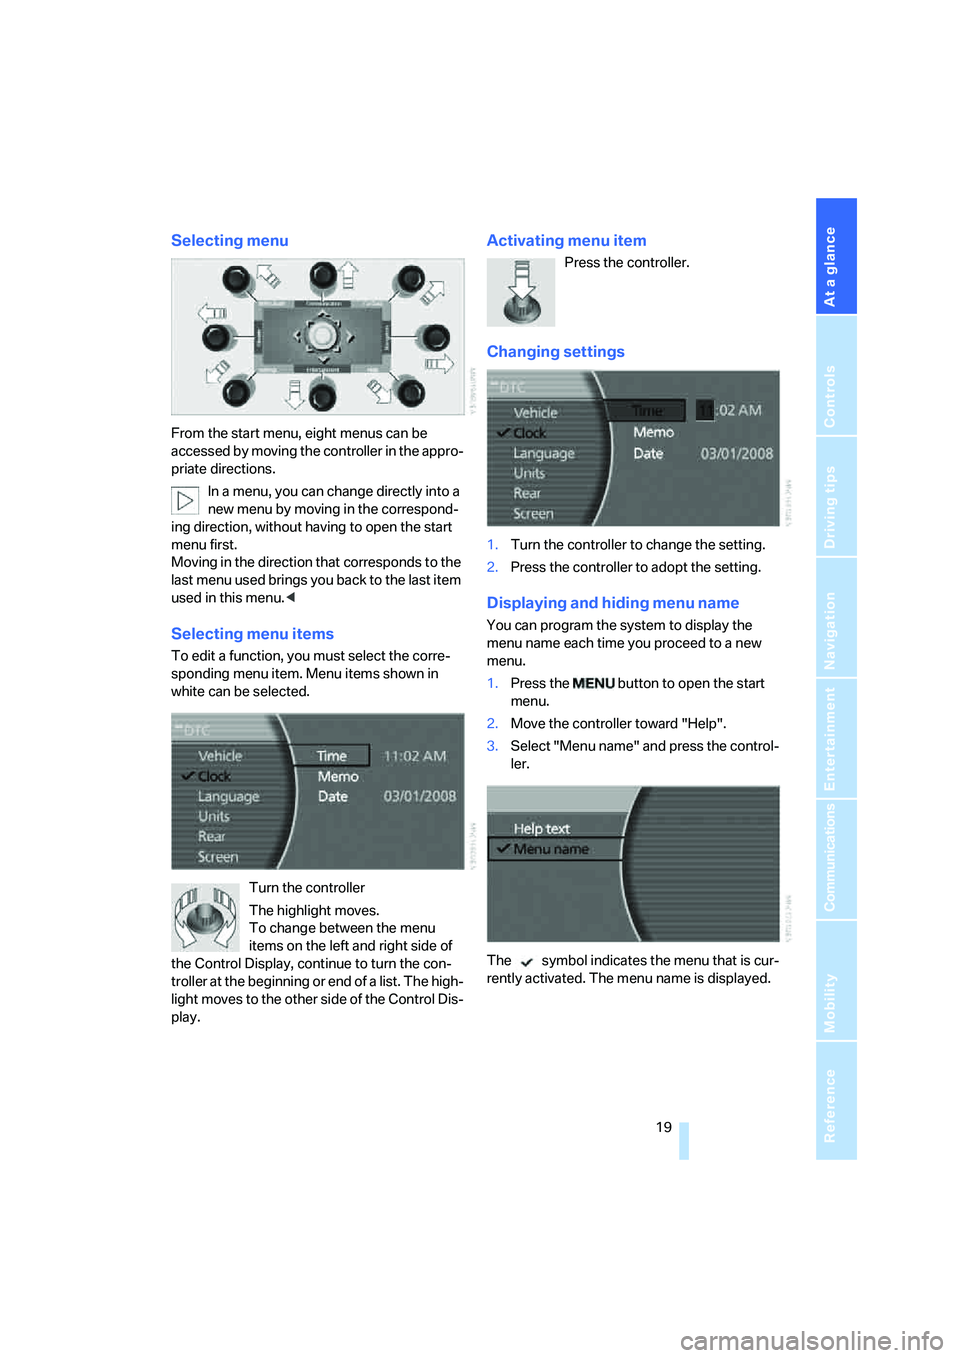
Selecting menu
From the start menu, eight menus can be
accessed by moving the controller in the appro-
priate directions.
In a menu, you can change directly into a
new menu by moving in the correspond-
ing direction, without having to open the start
menu first.
Moving in the direction that corresponds to the
last menu used brings you back to the last item
used in this menu.<
Selecting menu items
To edit a function, you must select the corre-
sponding menu item. Menu items shown in
white can be selected.
Turn the controller
The highlight moves.
To change between the menu
items on the left and right side of
the Control Display, continue to turn the con-
troller at the beginning or end of a list. The high-
light moves to the other side of the Control Dis-
play.
Activating menu item
Press the controller.
Changing settings
1.Turn the controller to change the setting.
2.Press the controller to adopt the setting.
Displaying and hiding menu name
You can program the system to display the
menu name each time you proceed to a new
menu.
1.Press the button to open the start
menu.
2.Move the controller toward "Help".
3.Select "Menu name" and press the control-
ler.
The symbol indicates the menu that is cur-
rently activated. The menu name is displayed.
Page 34 of 247

Opening and closing
32
Central locking system
The concept
The central locking system is ready for opera-
tion whenever the driver's door is closed. This
simultaneously engages and releases the locks
on the following:
>Doors
>Luggage compartment lid
>Fuel filler door
The central locking system can be operated
from the outside:
>via the remote control
>via the driver's door lock
>with Comfort Access
* via the door handles
and from inside via the button for the central
locking system.
When the system is locked from inside, the fuel
filler door remains unlocked. Refer to page34.
Each time the central locking system is locked
or unlocked from outside the vehicle, this simul-
taneously engages or disengages the anti-theft
system. The alarm system is also armed or dis-
armed. The remote control also switches the
interior lamps on and off.
For additional details on alarm system
refer to
page37.
In an accident of corresponding severity, the
central locking system automatically unlocks
the vehicle. In addition, the hazard warning
flashers and interior lamps switch on.
Opening and closing: from
outside
Using remote control
Because any persons or animals left unat-
tended in a parked vehicle could lock the
doors from the inside, you should always keep
the remote control with you; this precaution
ensures that you will remain able to unlock the
vehicle from the outside at all times.<1Unlocking, comfort opening, and deactivat-
ing alarm system
2Locking and securing, arming alarm sys-
tem, switching off tilt alarm sensor and inte-
rior motion sensor, switching on interior
lamps and perimeter lighting
3Opening luggage compartment lid
4Switching on interior lamps and pathway
lighting, activating panic mode
*. You can
find details about home lighting on page99.
If it is no longer possible to lock the vehi-
cle with a remote control, its battery is
discharged. Use this remote control during an
extended drive; this will recharge the battery,
refer to page30.
In the event of malfunctions, please contact
your BMW center. which is also your source for
replacement keys.<
Unlocking
1. Press the button. The hazard warning
flashers blink twice.
Driver's door and fuel filler door are
unlocked.
2.Press the button again.
All other doors and the luggage compart-
ment lid are unlocked.
The interior lamps and the door-mounted
perimeter lamps come on.
Comfort opening
Press the button longer. The windows and
the glass sunroof open. The glass sunroof will
not move if it is already in its raised position.
Page 35 of 247

Controls
33Reference
At a glance
Driving tips
Communications
Navigation
Entertainment
Mobility
Engaging locks
Press the button. The hazard warning
flashers blink once.
Switching on interior lamps and
perimeter lighting
Press the button if the vehicle is
locked.
Switching on interior lamps
Press the button.
You can also use this function to locate your
vehicle in parking garages etc.
Panic mode*
You can also trigger the alarm system in case of
danger:
Press the button for at least 3 seconds.
To deactivate the alarm: press any button
Opening luggage compartment lid
Press the button for approx. one second.
The luggage compartment lid opens, regard-
less of whether it was previously locked or
unlocked.
During opening, the luggage compart-
ment lid pivots back and up. Ensure that
adequate clearance is available before opening.
To avoid being inadvertently locked out, never
set the remote control down in the luggage
compartment. A previously locked luggage
compartment lid is also locked again after clos-
ing.<
Automatic luggage compartment lid
operation*
Opening luggage compartment lid
Press the button for approx. one second.
The luggage compartment lid opens all the way,
regardless of whether it was previously locked
or unlocked.
To interrupt the opening process:
Press the button again while opening is in
progress.During opening, the luggage compart-
ment lid pivots back and up. Ensure that
adequate clearance is available before opening.
To avoid being inadvertently locked out, never
set the remote control down in the luggage
compartment. A previously locked luggage
compartment lid is also locked again after clos-
ing.<
Malfunction
Local radio waves can cause the remote control
to malfunction.
Should the remote control fail to operate owing
to interference of this kind, the vehicle can be
opened and closed via the door lock with a key.
If it is no longer possible to lock the vehicle with
a remote control, then its battery is discharged.
Use this remote control during an extended
drive; this will recharge the battery, refer to
page30.
For US owners only
The transmitter and receiver units comply with
part 15 of the FCC/Federal Communication
Commission regulations. Operation is gov-
erned by the following:
FCC ID:
>LX8766S
>LX8766E
>LX8CAS
>LX8CAS2
Compliance statement:
This device complies with part 15 of the FCC
Rules. Operation is subject to the following two
conditions:
>This device may not cause harmful interfer-
ence, and
>this device must accept any interference
received, including interference that may
cause undesired operation.
Any unauthorized modifications or
changes to these devices could void the
user's authority to operate this equipment.<
Page 36 of 247

Opening and closing
34
Using key
1.Turn key.
Driver's door and fuel filler door are
unlocked.
2.Turn key again.
All other doors and the luggage compart-
ment lid are unlocked.
Convenience operation
You also have the option of operating the win-
dows and the glass sunroof from the driver's
door lock.
>To open:
With the door closed, turn the key to the
Unlock position and hold it there.
>To close:
With the door closed, turn the key to the
Lock position and hold it there.
Watch during the closing process to
be sure that no one is injured. Releas-
ing the key stops the operation.<
Manual operation
If an electrical malfunction occurs, you can
unlock or lock the driver's door with the key in
the end positions of the door lock.
Opening and closing: from
inside
When the front doors are closed, use this but-
ton to unlock the doors and luggage compart-
ment lid or to lock them without arming their
anti-theft sensors. The fuel filler door remains
unlocked.
If the remote control, refer to page32, or
Comfort Access, refer to page38, have
been used to unlock only the driver's door and
you press the button, then all of the other
doors, the luggage compartment lid, and the
fuel filler door are unlocked.
A closed driver's door is locked when is
pressed.<
Unlocking and opening doors
>Either unlock the doors together with the
button for the central locking system and
then pull the release handle above the arm-
rest
>or pull the release handle for each door
twice: the first pull unlocks the door, and the
second one opens it.
When the low beams are switched on, the
interior door handles are also lighted. The
intensity of the lighting is adjusted using the
instrument lighting control, refer to page101.<
Engaging locks
>Use the central locking button to lock all of
the doors simultaneously
>or press down the individual lock buttons of
the doors