2006 BMW 335I COUPE navigation
[x] Cancel search: navigationPage 65 of 239

Controls
63Reference
At a glance
Driving tips
Communications
Navigation
Entertainment
Mobility
>When the speed is reduced to below
20 mph or 30 km/h due to a traffic situation
>When you switch gears very slowly or shift
to idle in cars with manual transmission
>When you select the automatic transmis-
sion's neutral position N
>When you activate the Dynamic Traction
Control DTC
>When you deactivate the Dynamic Stability
Control DSC
>When DSC or ABS is intervening
>When the system does not recognize any
objects for a longer period of time, e.g. on
infrequently traveled roads without a shoul-
der or guard rails, or if the radar sensor is
covered with dirt, refer to page64
>When you apply the handbrake
When the system is deactivated, you
must brake the vehicle yourself and/or
maneuver as necessary, otherwise there is a
risk of accident.<
Warning lamp
The warning lamp comes on when
active cruise control has been auto-
matically deactivated due to a driving
speed below 20 mph or 30 km/h, an application
of the handbrake or a DSC intervention. A mes-
sage appears on the Control Display.
Resuming stored desired speed and
distance
Briefly press the button, arrow 4.
The stored speed and distance are regained
and maintained.
In the following instances, the stored speed is
deleted and can no longer be resumed:
>When driving stability control systems are
intervening
>In ca rs with manua l transmiss ion: when you
shift gears very slowly or shift to idle posi-
tion
>In cars with automatic transmission: when
you engage selector lever position N
>When the ignition is switched off
Displays in the instrument cluster
1Stored desired speed
2Shows yellow: vehicle detected ahead
Flashes in red: system cannot maintain dis-
tance; driver must brake the vehicle
Flashes in yellow: driving stability control
systems are intervening; cruise control is
deactivated
3Selected distance to vehicle ahead
The indicator lights up as soon as the sys-
tem is activated.
4Selected desired speed is temporarily dis-
played
If --- mph or --- km/h temporarily appears
in the instrument cluster display, it is pos-
sible that the system prerequisites for operation
are currently not met. Calling up Check Control
messages, refer to page77.<
Warning lamps
The indicator2 flashes in red; a
signal sounds.
The system indicates that you
must brake and/or maneuver the
vehicle yourself. Active cruise con-
trol cannot automatically restore the distance to
the vehicle ahead.
This indicator does not release you from your
responsibility to adapt your desired speed and
driving style to prevailing driving conditions.
The indicator 2 flashes in yellow.
The prerequisites for operating
active cruise control are not met,
e.g. as a result of ABS or DSC
interventions. Active cruise control
is deactivated. You can reactivate the system, if
ba8_E9293_US.book Seite 63 Freitag, 5. Mai 2006 1:02 13
Page 67 of 239
Controls
65Reference
At a glance
Driving tips
Communications
Navigation
Entertainment
Mobility
While active cruise control is capable of
braking your vehicle automatically when
you approach a slower vehicle ahead, it is
important to be aware that the ability of the sys-
tem to apply the brakes is also limited, e.g.
when you reduce your desired speed sharply.
The system cannot stop your vehicle. It uses
only a portion of braking system capacity and
does not utilize the full capacity of the vehicle
braking system. Therefore, the system cannot
decrease your speed for large differences in
speed between your vehicle and the vehicle
ahead. Examples: when you approach a vehicle
traveling at a much lower speed than your own
speed such as approaching a toll booth or when
a much slower vehicle cuts in front of you at
close range.<
Active cruise control can only decelerate the
vehicle to approx. 20 mph or 30 km/h.
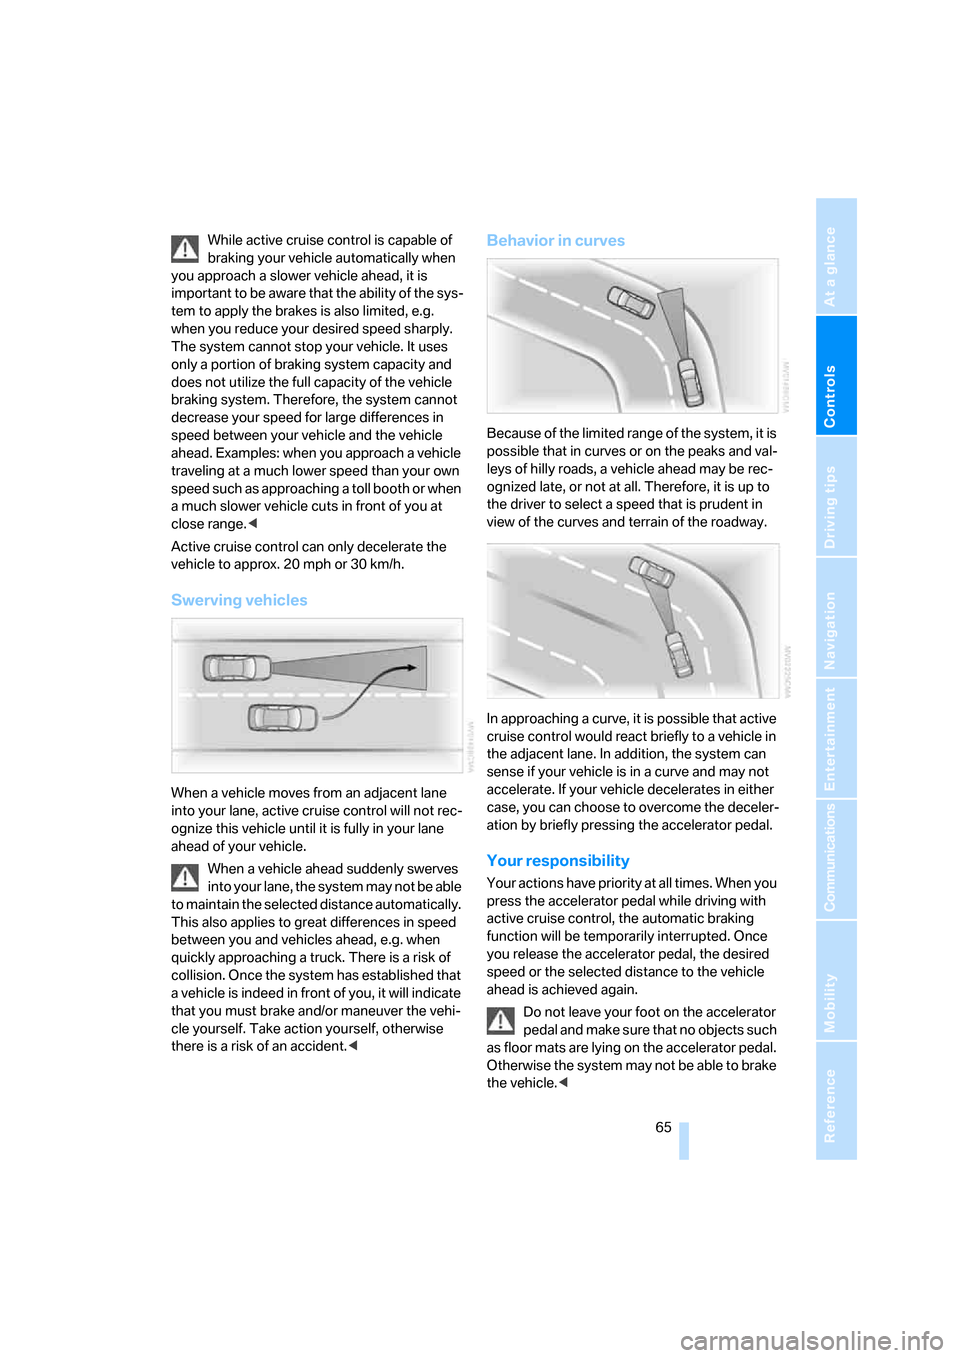
Swerving vehicles
When a vehicle moves from an adjacent lane
into your lane, active cruise control will not rec-
ognize this vehicle until it is fully in your lane
ahead of your vehicle.
When a vehicle ahead suddenly swerves
into your lane, the system may not be able
to maintain the selected distance automatically.
This also applies to great differences in speed
between you and vehicles ahead, e.g. when
quickly approaching a truck. There is a risk of
collision. Once the system has established that
a vehicle is indeed in front of you, it will indicate
that you must brake and/or maneuver the vehi-
cle yourself. Take action yourself, otherwise
there is a risk of an accident.<
Behavior in curves
Because of the limited range of the system, it is
possible that in curves or on the peaks and val-
leys of hilly roads, a vehicle ahead may be rec-
ognized late, or not at all. Therefore, it is up to
the driver to select a speed that is prudent in
view of the curves and terrain of the roadway.
In approaching a curve, it is possible that active
cruise control would react briefly to a vehicle in
the adjacent lane. In addition, the system can
sense if your vehicle is in a curve and may not
accelerate. If your vehicle decelerates in either
case, you can choose to overcome the deceler-
ation by briefly pressing the accelerator pedal.
Your responsibility
Your actions have priority at all times. When you
press the accelerator pedal while driving with
active cruise control, the automatic braking
function will be temporarily interrupted. Once
you release the accelerator pedal, the desired
speed or the selected distance to the vehicle
ahead is achieved again.
Do not leave your foot on the accelerator
pedal and make sure that no objects such
as floor mats are lying on the accelerator pedal.
Otherwise the system may not be able to brake
the vehicle.<
ba8_E9293_US.book Seite 65 Freitag, 5. Mai 2006 1:02 13
Page 69 of 239

Controls
67Reference
At a glance
Driving tips
Communications
Navigation
Entertainment
Mobility
Coolant temperature
A warning lamp will come on if the coolant, and
therefore the engine, becomes too hot. In addi-
tion, a message will appear on the Control Dis-
play.
Check coolant level, refer to page194.
Engine oil temperature
During standard operation, the engine oil tem-
perature is between approx. 1607/706 and
approx. 3407/1706. If the engine oil temper-
ature is too high, a message will appear on the
Control Display.
Fuel gauge
Fuel tank capacity: approx. 15.9 US gallons/
60 liters.
You can find information on refueling on
page182.
If the tilt of the vehicle varies for a longer period,
when you are driving in mountainous areas, for
example, the indicator may fluctuate slightly.
Reserve
Once the fuel level has fallen to the reserve
zone, a message briefly appears on the Control
Display and the cruising range for the remaining
amount of fuel is displayed on the computer.
Under a cruising range of approx. 30 miles/
50 km, the message remains in the Control Dis-
play.
Refuel as soon as possible once your
cruising range falls below 30 miles/
50 km, otherwise engine functions are not
ensured and damage can occur.<
Computer
Displays in the instrument cluster
Calling up information
Press the button in the turn indicator stalk.
The following items of information are dis-
played in the order listed:
>Cruising range
>Average speed
>Average fuel consumption
>Current fuel consumption
To set the corresponding units of measure,
refer to Units of measure on page70.
Cruising range
Displays the estimated cruising range available
with the remaining fuel. The range is calculated
on the basis of the way the car has been driven
over the last 18 miles/30 km and the amount of
fuel currently in the tank.
ba8_E9293_US.book Seite 67 Freitag, 5. Mai 2006 1:02 13
Page 70 of 239
Everything under control
68 Refuel as soon as possible once your
cruising range falls below 30 miles/
50 km, otherwise engine functions are not
ensured and damage can occur.<
Average speed
Periods with the vehicle parked and the engine
switched off are not included in the calculations
of average speed.
With the trip computer, refer to page69, you
can have the average speed for another trip dis-
played.
To reset average speed: press the button in the
turn indicator stalk for approx. 2 seconds.
Average fuel consumption
The average fuel consumption is calculated for
the time during which the engine is running.
With the trip computer, refer to page69, you
can have the average consumption for another
trip displayed.
To reset average fuel consumption: press the
button in the turn indicator stalk for approx.
2seconds.
Current fuel consumption
Displays the current fuel consumption. This
allows you to see whether your current driving
style is conducive to fuel economy with mini-
mum exhaust emissions.
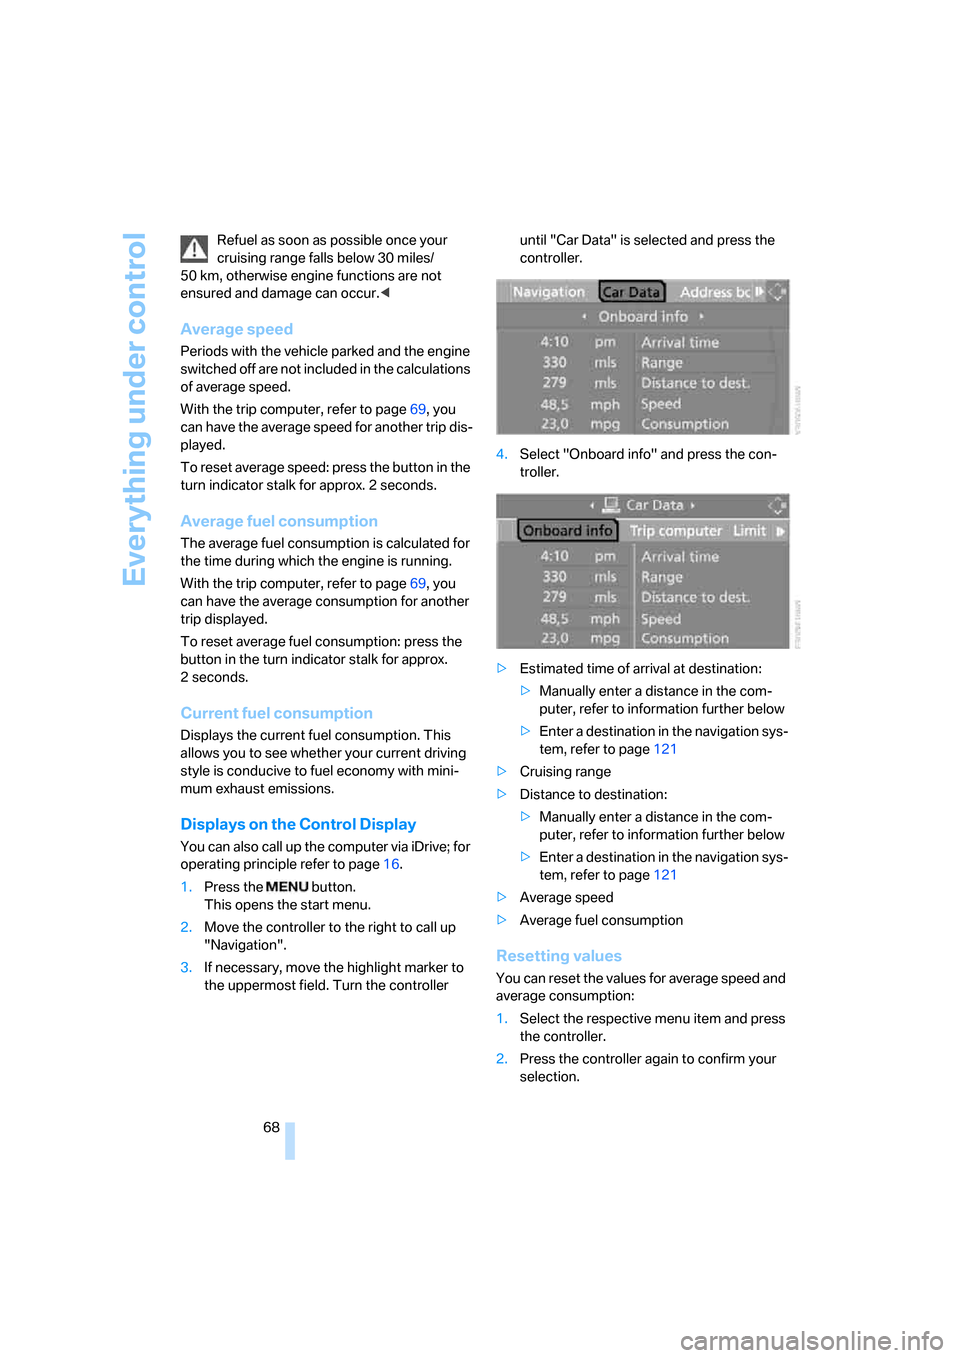
Displays on the Control Display
You can also call up the computer via iDrive; for
operating principle refer to page16.
1.Press the button.
This opens the start menu.
2.Move the controller to the right to call up
"Navigation".
3.If necessary, move the highlight marker to
the uppermost field. Turn the controller until "Car Data" is selected and press the
controller.
4.Select "Onboard info" and press the con-
troller.
>Estimated time of arrival at destination:
>Manually enter a distance in the com-
puter, refer to information further below
>Enter a destination in the navigation sys-
tem, refer to page121
>Cruising range
>Distance to destination:
>Manually enter a distance in the com-
puter, refer to information further below
>Enter a destination in the navigation sys-
tem, refer to page121
>Average speed
>Average fuel consumption
Resetting values
You can reset the values for average speed and
average consumption:
1.Select the respective menu item and press
the controller.
2.Press the controller again to confirm your
selection.
ba8_E9293_US.book Seite 68 Freitag, 5. Mai 2006 1:02 13
Page 71 of 239
Controls
69Reference
At a glance
Driving tips
Communications
Navigation
Entertainment
Mobility
Entering a distance manually
1.Select "Distance to dest." and press the
controller.
2.Turn the controller to select the distance to
your destination.
3.Press the controller to apply the setting.
The distance is automatically entered during
destination guidance.
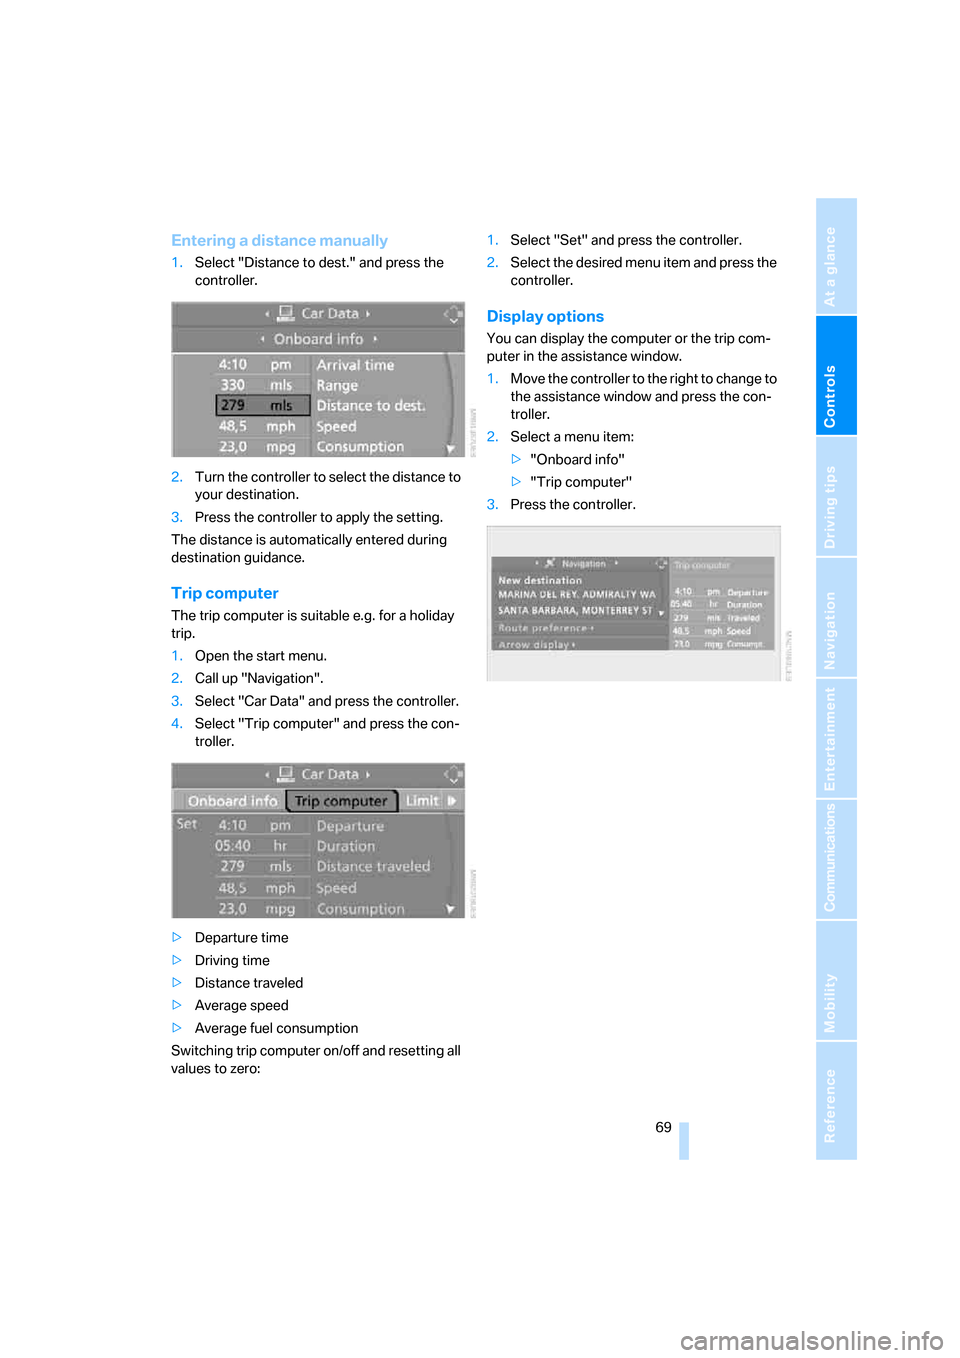
Trip computer
The trip computer is suitable e.g. for a holiday
trip.
1.Open the start menu.
2.Call up "Navigation".
3.Select "Car Data" and press the controller.
4.Select "Trip computer" and press the con-
troller.
>Departure time
>Driving time
>Distance traveled
>Average speed
>Average fuel consumption
Switching trip computer on/off and resetting all
values to zero:1.Select "Set" and press the controller.
2.Select the desired menu item and press the
controller.
Display options
You can display the computer or the trip com-
puter in the assistance window.
1.Move the controller to the right to change to
the assistance window and press the con-
troller.
2.Select a menu item:
>"Onboard info"
>"Trip computer"
3.Press the controller.
ba8_E9293_US.book Seite 69 Freitag, 5. Mai 2006 1:02 13
Page 73 of 239
Controls
71Reference
At a glance
Driving tips
Communications
Navigation
Entertainment
Mobility
6.Select the desired measurement unit and
press the controller.
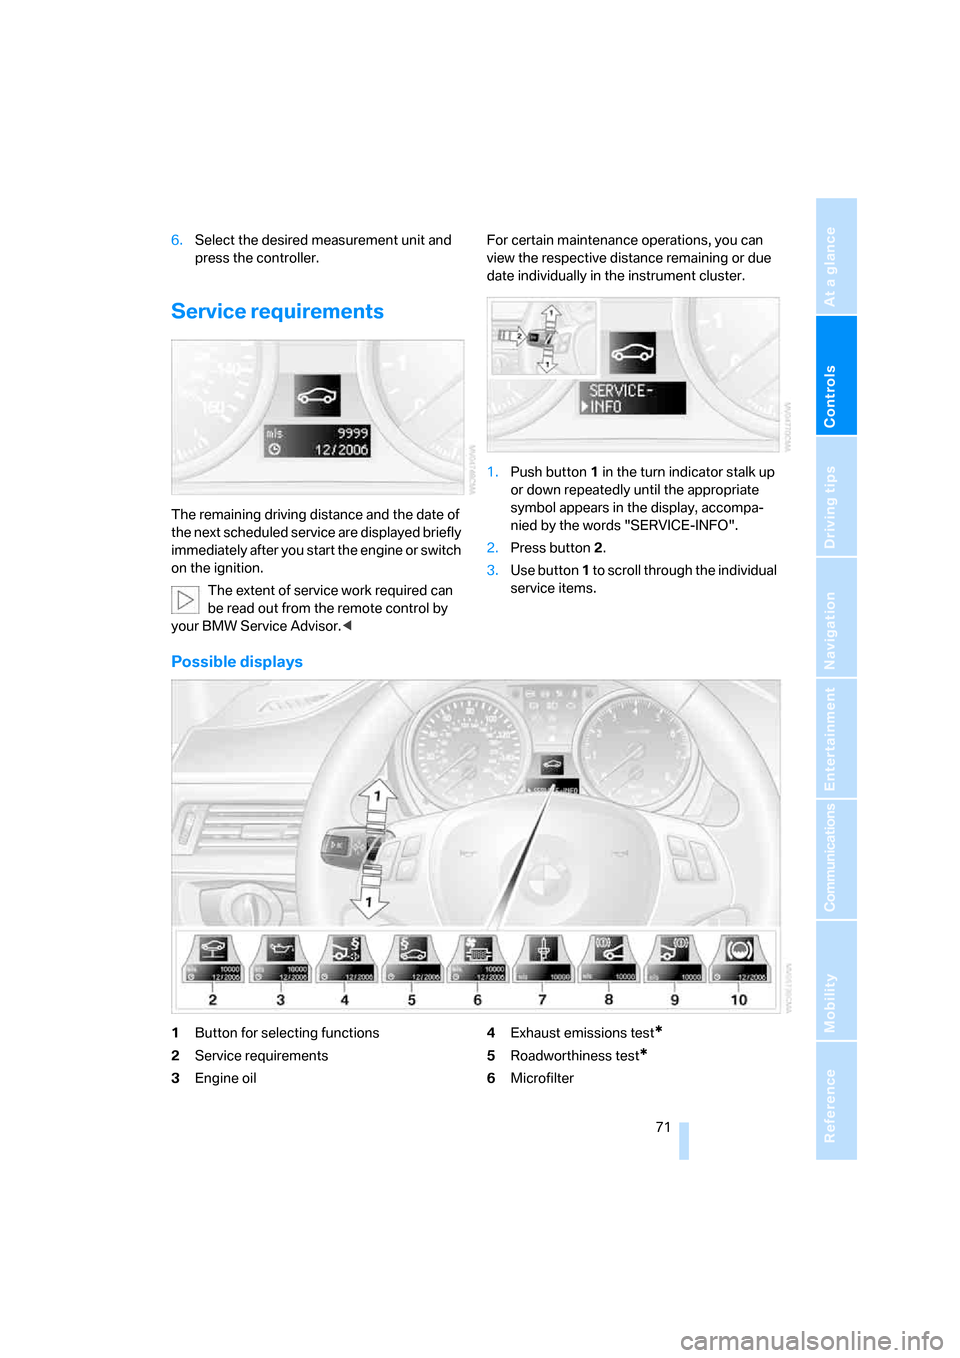
Service requirements
The remaining driving distance and the date of
the next scheduled service are displayed briefly
immediately after you start the engine or switch
on the ignition.
The extent of service work required can
be read out from the remote control by
your BMW Service Advisor.
date individually in the instrument cluster.
1.Push button 1 in the turn indicator stalk up
or down repeatedly until the appropriate
symbol appears in the display, accompa-
nied by the words "SERVICE-INFO".
2.Press button 2.
3.Use button 1 to scroll through the individual
service items.
Possible displays
1Button for selecting functions
2Service requirements
3Engine oil4Exhaust emissions test*
5Roadworthiness test*
6Microfilter
ba8_E9293_US.book Seite 71 Freitag, 5. Mai 2006 1:02 13
Page 75 of 239
Controls
73Reference
At a glance
Driving tips
Communications
Navigation
Entertainment
Mobility
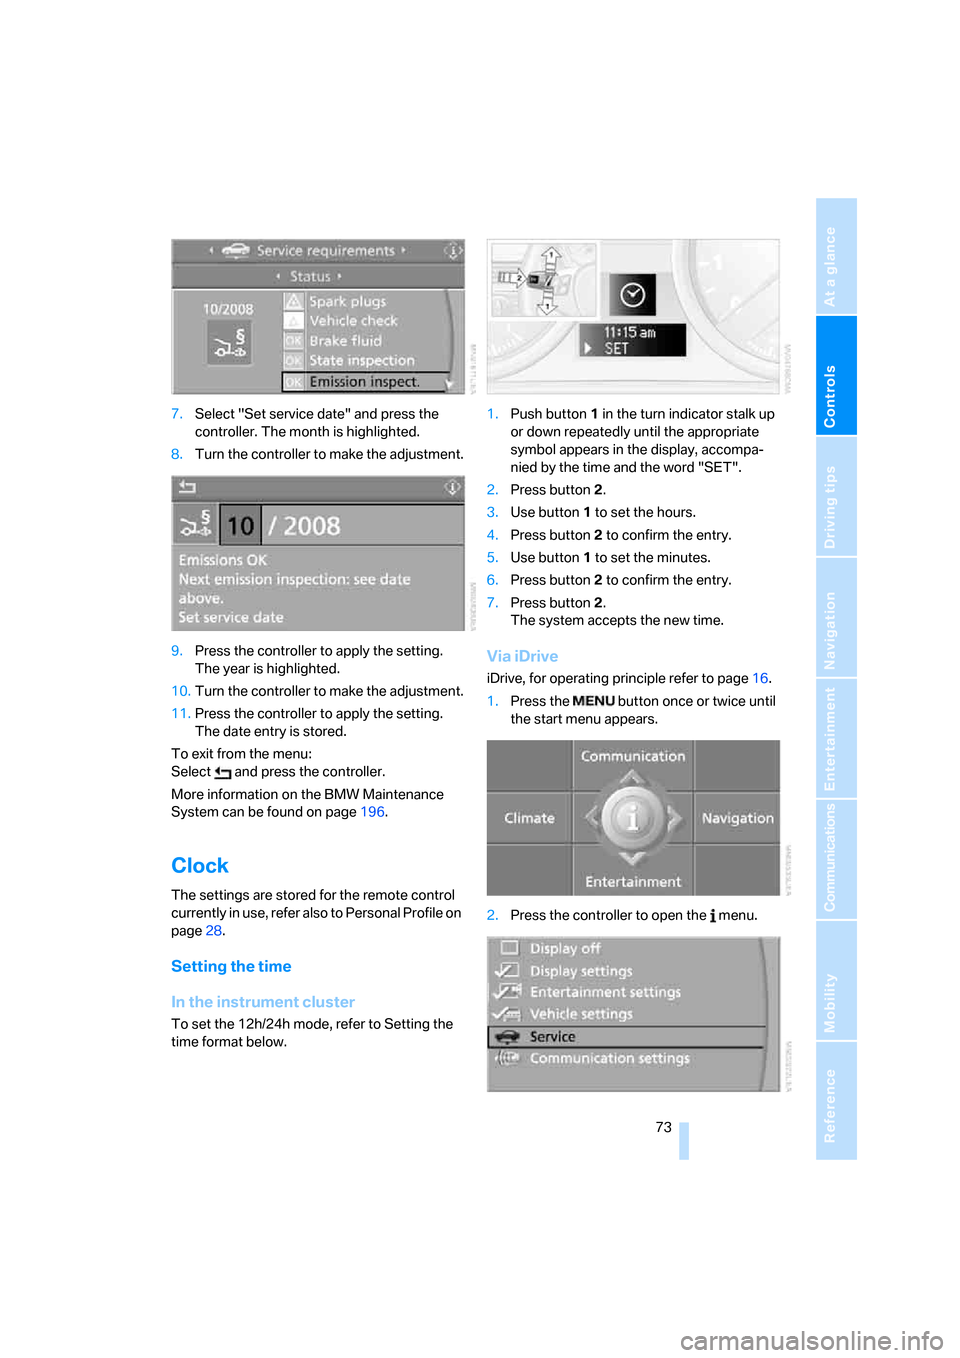
7.Select "Set service date" and press the
controller. The month is highlighted.
8.Turn the controller to make the adjustment.
9.Press the controller to apply the setting.
The year is highlighted.
10.Turn the controller to make the adjustment.
11.Press the controller to apply the setting.
The date entry is stored.
To exit from the menu:
Select and press the controller.
More information on the BMW Maintenance
System can be found on page196.
Clock
The settings are stored for the remote control
currently in use, refer also to Personal Profile on
page28.
Setting the time
In the instrument cluster
To set the 12h/24h mode, refer to Setting the
time format below.1.Push button 1 in the turn indicator stalk up
or down repeatedly until the appropriate
symbol appears in the display, accompa-
nied by the time and the word "SET".
2.Press button 2.
3.Use button 1 to set the hours.
4.Press button 2 to confirm the entry.
5.Use button 1 to set the minutes.
6.Press button 2 to confirm the entry.
7.Press button 2.
The system accepts the new time.
Via iDrive
iDrive, for operating principle refer to page16.
1.Press the button once or twice until
the start menu appears.
2.Press the controller to open the menu.
ba8_E9293_US.book Seite 73 Freitag, 5. Mai 2006 1:02 13
Page 77 of 239
Controls
75Reference
At a glance
Driving tips
Communications
Navigation
Entertainment
Mobility
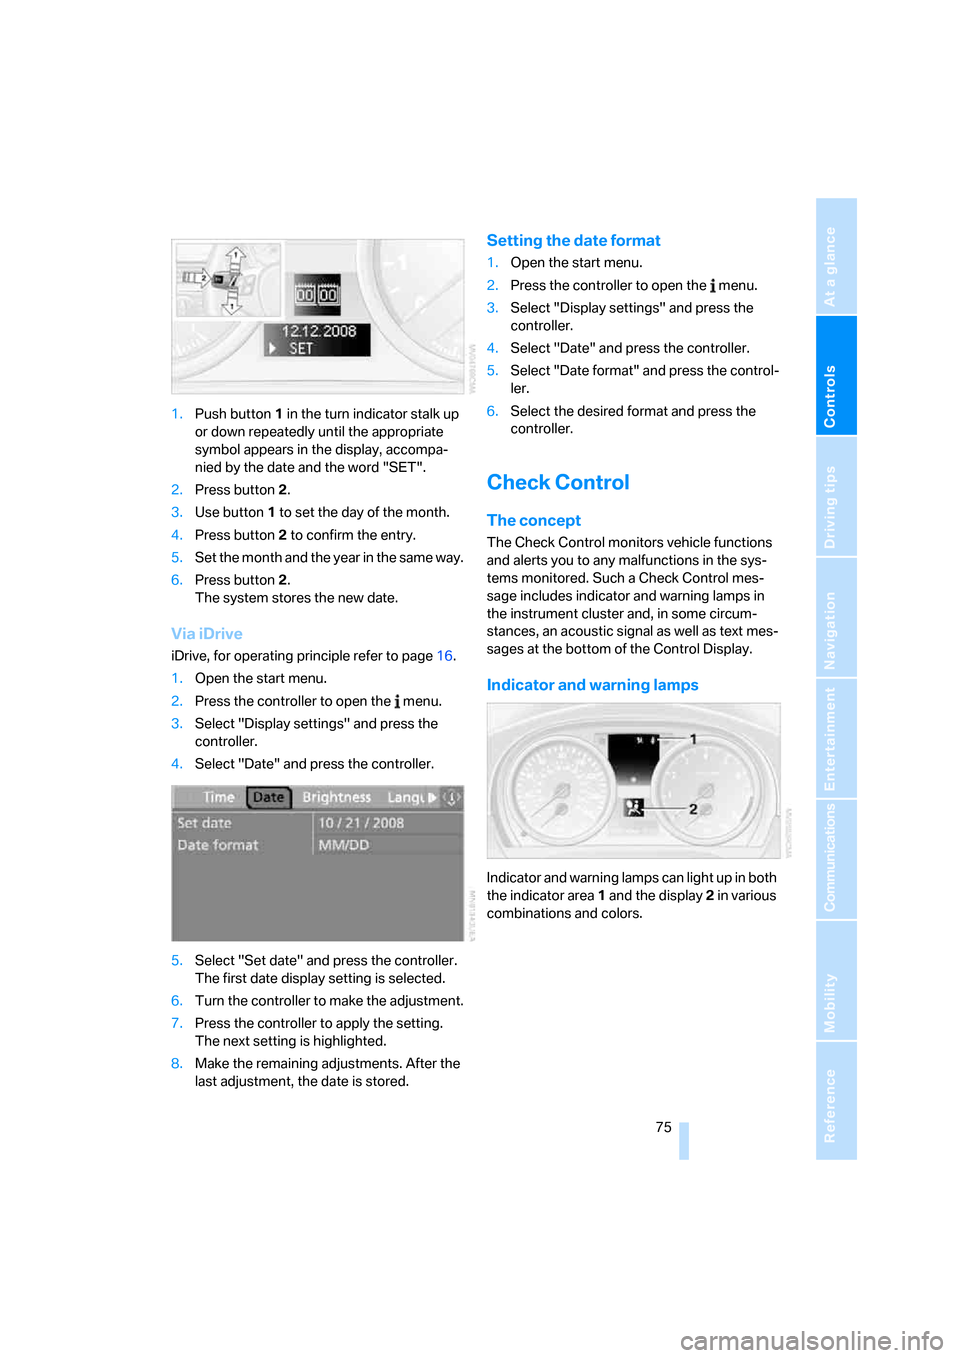
1.Push button 1 in the turn indicator stalk up
or down repeatedly until the appropriate
symbol appears in the display, accompa-
nied by the date and the word "SET".
2.Press button 2.
3.Use button 1 to set the day of the month.
4.Press button 2 to confirm the entry.
5.Set the month and the year in the same way.
6.Press button 2.
The system stores the new date.
Via iDrive
iDrive, for operating principle refer to page16.
1.Open the start menu.
2.Press the controller to open the menu.
3.Select "Display settings" and press the
controller.
4.Select "Date" and press the controller.
5.Select "Set date" and press the controller.
The first date display setting is selected.
6.Turn the controller to make the adjustment.
7.Press the controller to apply the setting.
The next setting is highlighted.
8.Make the remaining adjustments. After the
last adjustment, the date is stored.
Setting the date format
1.Open the start menu.
2.Press the controller to open the menu.
3.Select "Display settings" and press the
controller.
4.Select "Date" and press the controller.
5.Select "Date format" and press the control-
ler.
6.Select the desired format and press the
controller.
Check Control
The concept
The Check Control monitors vehicle functions
and alerts you to any malfunctions in the sys-
tems monitored. Such a Check Control mes-
sage includes indicator and warning lamps in
the instrument cluster and, in some circum-
stances, an acoustic signal as well as text mes-
sages at the bottom of the Control Display.
Indicator and warning lamps
Indicator and warning lamps can light up in both
the indicator area 1 and the display 2 in various
combinations and colors.
ba8_E9293_US.book Seite 75 Freitag, 5. Mai 2006 1:02 13