2006 BMW 325XI SPORTS WAGON remote control
[x] Cancel search: remote controlPage 39 of 236
Opening and closing
38 or32. For information on closing with conve-
nient access, refer to Locking on page30.
Take the remote control with you when
you leave the car, otherwise children
could operate the electric windows and possi-
bly injure themselves.<
Anti-trapping mechanism
If the closing force exceeds a specific value as
an electric window closes, the closing action is
interrupted immediately and the window
reopens slightly.
Despite the anti-trapping mechanism
check and clear the window's travel path
prior to closing it, otherwise the safety system
might fail to detect certain kinds of obstruc-
tions, such as thin objects, and the window
would continue closing.
Pulling the switch beyond the resistance point
and holding it limits the response of the anti-
trapping mechanism. In this case, if the closing
force exceeds a defined threshold, the window
will only open a few fractions of an inch/a few
millimeters.
If the switch is pulled past the resistance point
again within approx. 4 seconds, the anti-trap-
ping mechanism will be deactivated.<
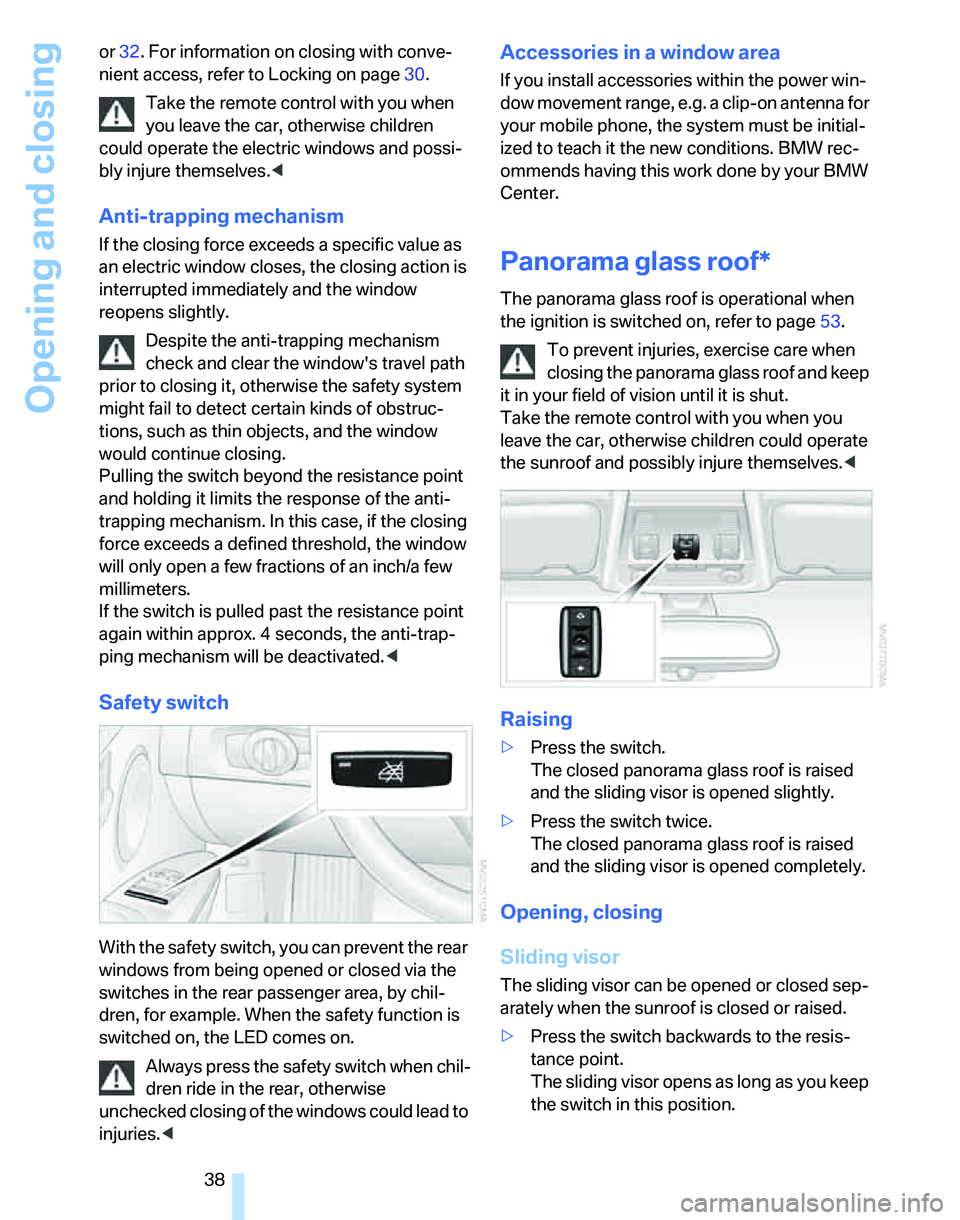
Safety switch
With the safety switch, you can prevent the rear
windows from being opened or closed via the
switches in the rear passenger area, by chil-
dren, for example. When the safety function is
switched on, the LED comes on.
Always press the safety switch when chil-
dren ride in the rear, otherwise
unchecked closing of the windows could lead to
injuries.<
Accessories in a window area
If you install accessories within the power win-
dow movement range, e.g. a clip-on antenna for
your mobile phone, the system must be initial-
ized to teach it the new conditions. BMW rec-
ommends having this work done by your BMW
Center.
Panorama glass roof*
The panorama glass roof is operational when
the ignition is switched on, refer to page53.
To prevent injuries, exercise care when
closing the panorama glass roof and keep
it in your field of vision until it is shut.
Take the remote control with you when you
leave the car, otherwise children could operate
the sunroof and possibly injure themselves.<
Raising
>Press the switch.
The closed panorama glass roof is raised
and the sliding visor is opened slightly.
>Press the switch twice.
The closed panorama glass roof is raised
and the sliding visor is opened completely.
Opening, closing
Sliding visor
The sliding visor can be opened or closed sep-
arately when the sunroof is closed or raised.
>Press the switch backwards to the resis-
tance point.
The sliding visor opens as long as you keep
the switch in this position.
Page 40 of 236
Controls
39Reference
At a glance
Driving tips
Communications
Navigation
Entertainment
Mobility
>Press the switch backwards past the resis-
tance point.
The sliding visor will open automatically.
Briefly press the switch again to stop the
movement.
You can close the sliding visor in a similar man-
ner by pressing the switch forwards.
Comfort position
In the comfort position, the sunroof is not com-
pletely open, thus reducing wind noise in the
passenger compartment.
Each time the panorama glass roof is opened or
closed, it stops in the comfort position. If
desired, continue the movement by pressing
the switch.
Panorama glass roof
>With the sliding visor open, press the switch
backwards again to the resistance point.
The panorama glass roof opens as long as
you keep the switch in this position.
>With the sliding visor open, press the switch
backwards again beyond the resistance
point.
The panorama glass roof opens automati-
cally. Briefly press the switch again to stop
the movement.
You can close the panorama glass roof in a sim-
ilar manner by pressing the switch forwards.
For information on convenient operation via the
remote control or door lock, refer to page30
or32.
Opening and closing the sunroof and
sliding visor at the same time
Press the switch twice in quick succession
beyond the resistance point.
Pressing the switch again stops the operation.
Anti-trapping mechanism
If the panorama glass roof or the sliding visor
encounters an obstruction while closing from a
position about two-thirds closed, or during
closing from the raised position, the closing
movement is interrupted and the panorama glass roof and the sliding visor are opened again
slightly.
Despite the anti-trapping mechanism
check and clear the sunroof's travel path
prior to closing it, otherwise the safety system
might fail to detect certain kinds of obstruc-
tions, such as very thin objects, and the sunroof
would continue closing.
Pressing the switch beyond the resistance
point and holding it there deactivates the anti-
trapping mechanism.<
Following interruptions in electrical
power supply
After a power failure, there is a possibility that
the sunroof can only be raised. The system
must be initialized. BMW recommends having
this work done by your BMW Center.
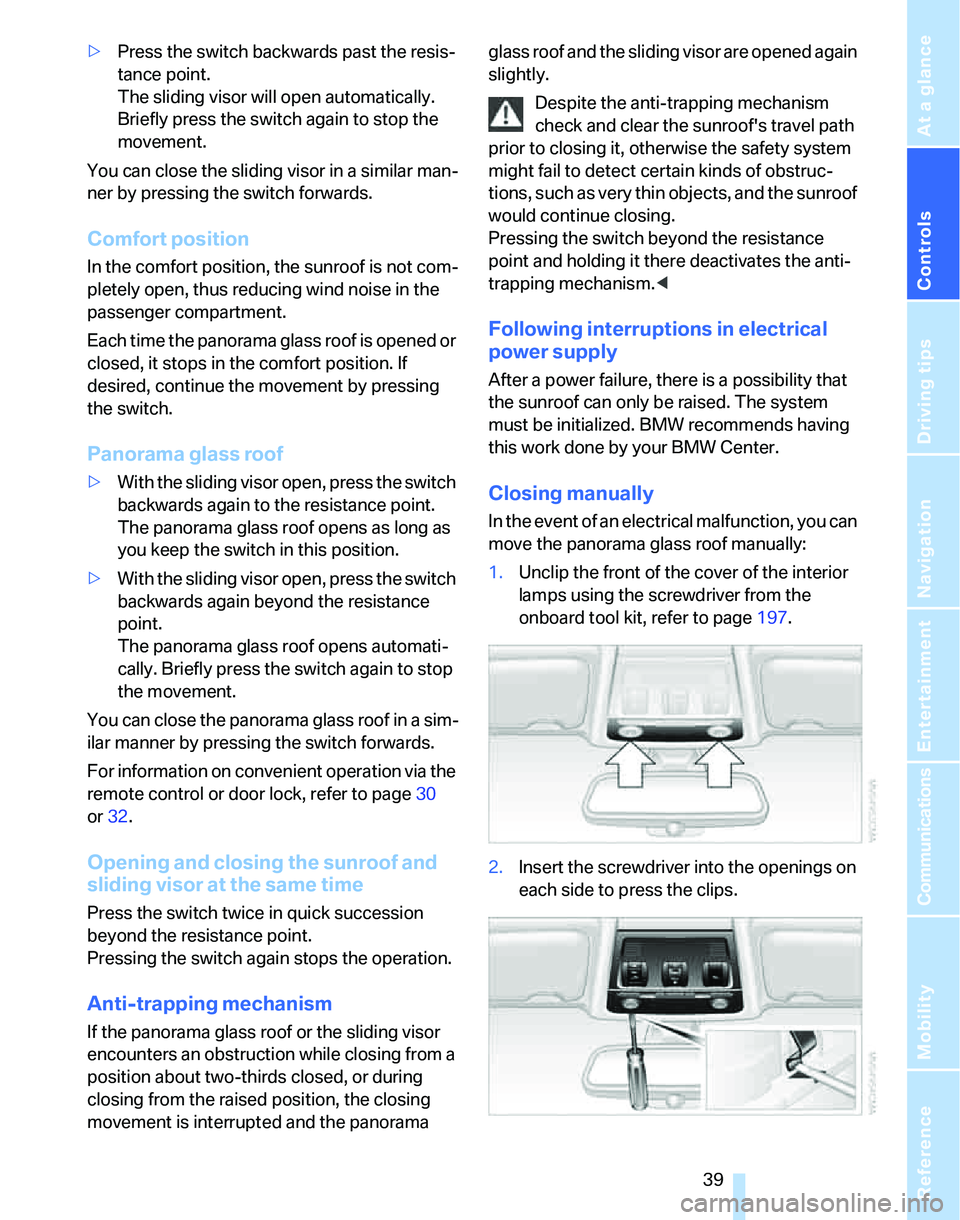
Closing manually
In the event of an electrical malfunction, you can
move the panorama glass roof manually:
1.Unclip the front of the cover of the interior
lamps using the screwdriver from the
onboard tool kit, refer to page197.
2.Insert the screwdriver into the openings on
each side to press the clips.
Page 46 of 236

Controls
45Reference
At a glance
Driving tips
Communications
Navigation
Entertainment
Mobility
Settings for the seat back width and lumbar
support are not stored in memory.
Storing
1.Switch on radio readiness or the ignition,
refer to page53.
2.Adjust the seat and exterior mirrors to the
desired positions.
3.Press the button.
The LED in the button lights up.
4.Press the desired memory key 1 or 2.
The LED goes out.
The driver's seat and exterior mirror posi-
tions are stored for the remote control cur-
rently in use.
Automatic call-up
You can select at what occasion the stored
positions of the driver's seat and exterior mir-
rors are to be called up.
>Call-up when the vehicle is unlocked
>Call-up when the driver's door is opened.
When this Personal Profile function is
used, first ensure that the footwell behind
the driver's seat is free of obstacles. Failure to
do so could cause injury to persons or damage
to objects as a result of a rearward movement of
the seat.<
The adjusting procedure is immediately halted
when you press a seat adjustment switch or one
of the MEMORY buttons.
Selecting automatic call-up
iDrive concept, refer to page16.
1.Open the start menu.
2.Press the controller to open the menu.3.Select "Vehicle settings" and press the
controller.
4.Select "Door locks" and press the control-
ler.
5.Select "Central locking" and press the con-
troller.
6.Select "Last seat pos." and press the con-
troller.
7.Select "After unlocking" or "After door
opened".
8.Press the controller.
Switching off automatic call-up
Select "Deactivated" and press the controller.
Manual call-up
Do not call up memory while you are driv-
ing, otherwise unexpected seat move-
ment could result in an accident.<
Convenience mode
1.Unlock and open the driver's door or switch
on radio readiness, refer to page53.
2.Briefly press the desired memory button1
or 2.
Page 48 of 236

Controls
47Reference
At a glance
Driving tips
Communications
Navigation
Entertainment
Mobility
1Adjustments
2Switching to the other mirror or automatic
curb monitor
*
3Folding mirrors in and out*
The positions of the exterior mirrors are stored
for the remote control currently used
*, refer to
Personal Profile, page29.
Manual adjustment
The mirrors can also be adjusted manually:
press the edge of the glass.
To prevent the exterior mirrors on this
vehicle from being damaged, always fold
them in by hand before entering an automatic
car wash.<
Automatic heating*
At outside temperatures below a certain limit,
both exterior mirrors are automatically heated
while the engine is running or the ignition
switched on.
Passenger-side mirror tilt function –
automatic curb monitor*
Activating
1.Push the switch to the position for the
driver's-side mirror, arrow 1.
2.Engage reverse gear or move the selector
lever to position R.
The glass of the mirror on the passenger
side tilts slightly down. This allows the
driver to see the area immediately adjacent
to the vehicle, such as a curb, when parking,
etc.
Deactivating
Push the switch to the position for the passen-
ger-side mirror, arrow 2.
Interior rearview mirror
Turn the knob to reduce glare from the head-
lamps of cars behind you when driving at night.
Automatically dimming mirrors, refer to
page113.
Page 49 of 236
Adjustments
48
Steering wheel
Adjustments
Do not adjust the steering wheel position
while the car is in motion, or an accident
may result from any unexpected movement.<
1.Fold the lever down.
2.Move the steering wheel to the preferred
height and angle to suit your seated posi-
tion.
3.Swing the lever back up.
Do not use force to swing the lever
back up, otherwise the mechanism
will be damaged.<
Electric steering wheel lock
The steering wheel locks or unlocks automati-
cally when the remote control is removed or
inserted, refer to page53.
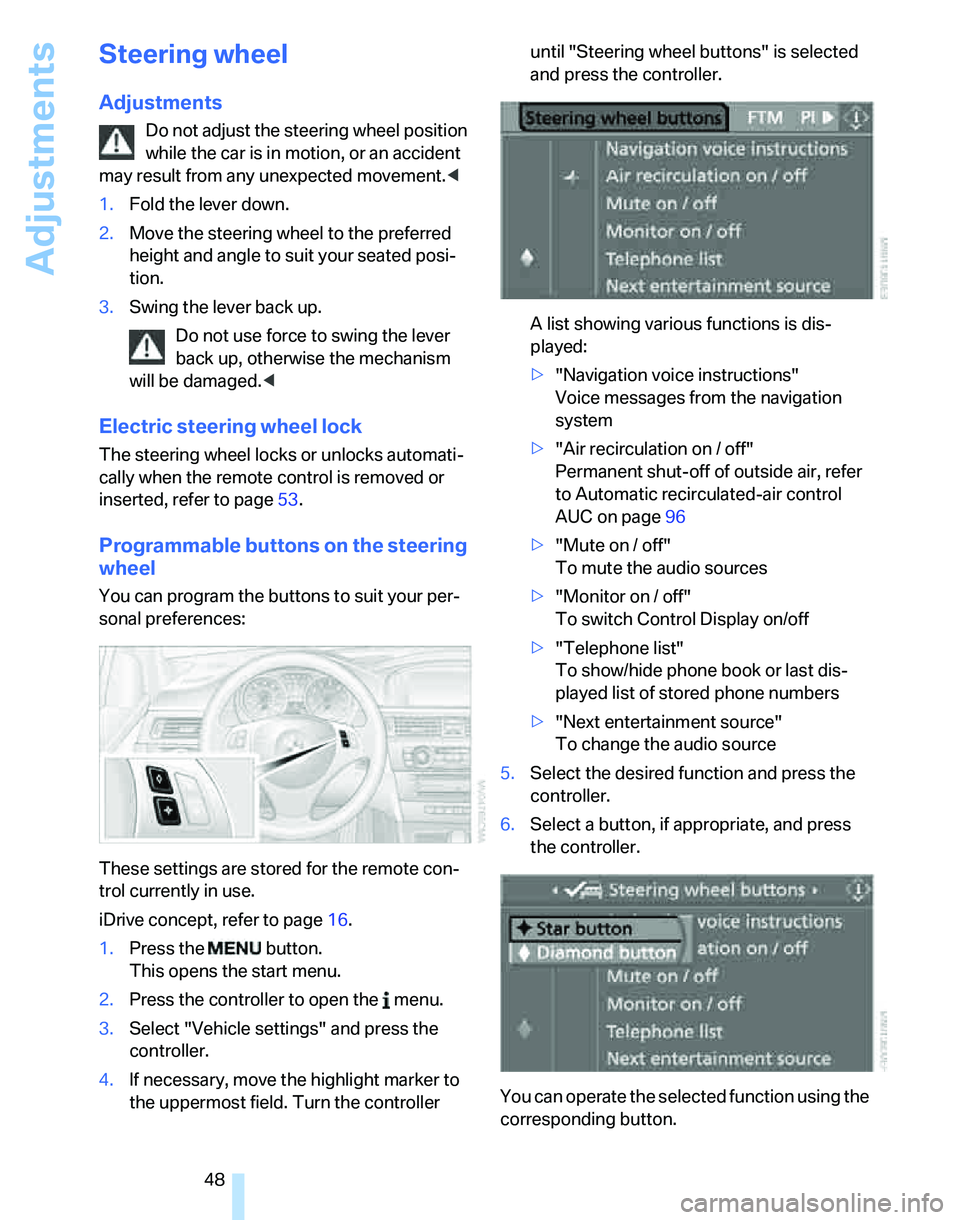
Programmable buttons on the steering
wheel
You can program the buttons to suit your per-
sonal preferences:
These settings are stored for the remote con-
trol currently in use.
iDrive concept, refer to page16.
1.Press the button.
This opens the start menu.
2.Press the controller to open the menu.
3.Select "Vehicle settings" and press the
controller.
4.If necessary, move the highlight marker to
the uppermost field. Turn the controller until "Steering wheel buttons" is selected
and press the controller.
A list showing various functions is dis-
played:
>"Navigation voice instructions"
Voice messages from the navigation
system
>"Air recirculation on / off"
Permanent shut-off of outside air, refer
to Automatic recirculated-air control
AUC on page96
>"Mute on / off"
To mute the audio sources
>"Monitor on / off"
To switch Control Display on/off
>"Telephone list"
To show/hide phone book or last dis-
played list of stored phone numbers
>"Next entertainment source"
To change the audio source
5.Select the desired function and press the
controller.
6.Select a button, if appropriate, and press
the controller.
You can operate the selected function using the
corresponding button.
Page 54 of 236

Controls
53Reference
At a glance
Driving tips
Communications
Navigation
Entertainment
Mobility
Driving
Ignition lock
Insert the remote control all the way into the
ignition lock.
>Radio readiness switches on.
Individual electrical consumers can operate.
>The electric steering wheel lock disen-
gages audibly.
Insert the remote control into the ignition
lock before you move the vehicle, other-
wise the electric steering wheel lock will not dis-
engage and you will not be able to steer the
car.<
Removing the remote control from the
ignition lock
Press the remote control in briefly; it is ejected
part of the way.
At the same time:
>The ignition switches off if it was on before-
hand.
>The electric steering wheel lock engages
audibly.
Automatic transmission
You cannot take out the remote control unless
the selector lever is in the P position: interlock.
Start/stop button
Each time the start/stop button is pressed,
radio readiness or the ignition is switched on or
off.
Briefly pressing the start/stop button
while the brake or clutch is depressed
starts the engine.<
Radio readiness
Individual electrical consumers can operate.
The time and the outside temperature are dis-
played in the instrument cluster.
Radio readiness is switched off automatically:
>Immediately when the remote control is
removed from the ignition lock
>In cars with convenient access
*, by touch-
ing the surface above the door lock, refer to
Locking on page36
Ignition on
Most of the indicator and warning lamps in the
indicator area1 of the instrument cluster, refer
to page13, light up and remain on for different
lengths of time.
Radio readiness and ignition off
All indicator and warning lamps in the instru-
ment cluster go out.
Page 55 of 236

Driving
54
Starting the engine
Do not run the engine in closed rooms,
otherwise the inhaling of toxic exhaust
gases can cause unconsciousness and death.
The exhaust gases contain carbon monoxide,
an odorless and colorless, but highly toxic gas.
Never leave an unattended vehicle with the
engine running, otherwise such a vehicle repre-
sents a potential safety hazard.
Before leaving the car with the engine running,
place the transmission in idle or move the
selector lever to position P and apply the hand-
brake to prevent the car from moving.<
When starting the engine, do not press the
accelerator pedal.
Do not allow the engine to warm up by leaving it
running while the vehicle remains stationary.
Instead, begin to drive immediately at a moder-
ate engine speed.
Do not depress either the brake or the
clutch until you are ready to start the
engine. The engine is started immediately
when you briefly touch the start/stop button
and depress the brake if the car has automatic
transmission, or the clutch if the car has manual
transmission.<
Manual transmission
1.Apply the handbrake.
2.Depress the clutch and shift to idle position.
3.Briefly press the start/stop button.
The starter operates automatically for a certain
time, and stops automatically as soon as the
engine has started.
Automatic transmission
1.Depress the brake.
2.Move the selector lever to position P.
3.Briefly press the start/stop button.
The starter operates automatically for a certain
time, and stops automatically as soon as the
engine has started.
Special starting conditions
In the following situations, press the accelerator
pedal halfway down when starting the engine:
>If the engine does not start on the first
attempt, for instance when it is extremely
hot or cold.
>If the engine is started at very low tempera-
tures, below approx. + 57/–156, at high
altitudes above approx. 3,300 ft/1,000 m.
Avoid frequent starting in quick succes-
sion or repeated start attempts in which
the engine does not start. Otherwise, the fuel is
not burned or inadequately burned and there is
a danger of overheating and damaging the cat-
alytic converter.<
Switching off the engine
Always take the remote control with you
when you leave the vehicle.
When parking on a downhill incline, apply the
handbrake, otherwise the vehicle could roll
away.<
Manual transmission
1.Apply the handbrake.
2.With the car at a standstill, briefly press the
start/stop button.
3.Shift into first gear or reverse.
Automatic transmission
1.With the car at a standstill, move the selec-
tor lever to position P.
2.Briefly press the start/stop button.
3.Apply the handbrake.
Page 56 of 236

Controls
55Reference
At a glance
Driving tips
Communications
Navigation
Entertainment
Mobility
Handbrake
The handbrake is primarily intended to prevent
the vehicle from rolling while parked; it brakes
the rear wheels.
Indicator lamp
The indicator lamp is lit, and when you
drive off an acoustic signal sounds in
addition. The handbrake is still applied.
Indicator lamp for Canadian models.
Applying
The lever locks in position automatically.
Releasing
Pull slightly upwards, press the button and
lower the lever.
In exceptional cases, if the handbrake has
to be used to slow or stop the car, do not
pull the lever up too hard. In doing so, continu-
ously press the button of the handbrake lever.
Otherwise, too violent an application of the
handbrake can overbrake the rear axle and
cause the rear of the car to swerve.<
To prevent corrosion and one-sided brak-
ing action, occasionally apply the hand-
brake lightly when the vehicle is slowly coming
to a stop if the traffic conditions are suitable.
The brake lamps do not light up when the hand-
brake is applied.<
Manual transmission
When shifting into 5th or 6th gear, press
the gearshift lever to the right. Otherwise
the engine could be damaged if you inadvert-
ently shift into 3rd or 4th gear.<
Reverse gear
Select only when the vehicle is stationary.
When the gearshift lever is pressed to the left, a
slight resistance has to be overcome.
Automatic transmission with
Steptronic*
In addition to fully automatic operation, you can
also manually shift with the Steptronic, refer to
page56.
Vehicle parking
To prevent the vehicle from rolling,
always select position P and apply the
handbrake before leaving the vehicle with the
engine running.<
Disengaging the remote control
In order to remove the remote control from the
ignition lock, you must first move the selector
lever to position P and switch off the engine:
interlock.
Selector lever positions
P R N D M/S + –