2006 BMW 325XI SPORTS WAGON CD player
[x] Cancel search: CD playerPage 4 of 236

Reference
At a glance
Controls
Driving tips
Communications
Navigation
Entertainment
Mobility
Contents
The fastest way to find information on a partic-
ular topic or item is by using the index, refer to
page218.
Using this Owner's Manual
4Notes
6Reporting safety defects
At a glance
10Cockpit
16iDrive
22Voice command system
Controls
28Opening and closing
41Adjustments
50Transporting children safely
53Driving
67Everything under control
81Technology for driving comfort and
safety
90Lamps
94Climate
100Practical interior accessories
Driving tips
112Things to remember when driving
Navigation
120Starting the navigation system
121Destination entry
132Destination guidance
137What to do if …
Entertainment
140On/off and settings
144Radio
152CD player and CD changer
158External audio device
Communications
162Telephoning
174TeleService, BMW Assist
Mobility
182Refueling
184Wheels and tires
190Under the hood
195Maintenance
197Replacing components
203Giving and receiving assistance
Reference
210Technical data
214Short commands for the voice command
system
218Everything from A - Z
Page 18 of 236
At a glance
17Reference
Controls
Driving tips
Communications
Navigation
Entertainment
Mobility
Menu overview
Communication
>Telephone*
>BMW Assist* or TeleService*
Navigation
>Navigation system
>Onboard information, e.g. for displaying the
average fuel consumption.
Entertainment
>Radio
>CD player and CD changer
*
>External audio device
Climate
>Air distribution
>Automatic program
>Parked car ventilation
menu
>Switching off Control Display
>Tone and display settings
>Settings for your vehicle, e.g. for the central
locking system
>Display of service requirements and dates
for statutory emissions and vehicle inspec-
tions
>Settings for telephone
Operating principle
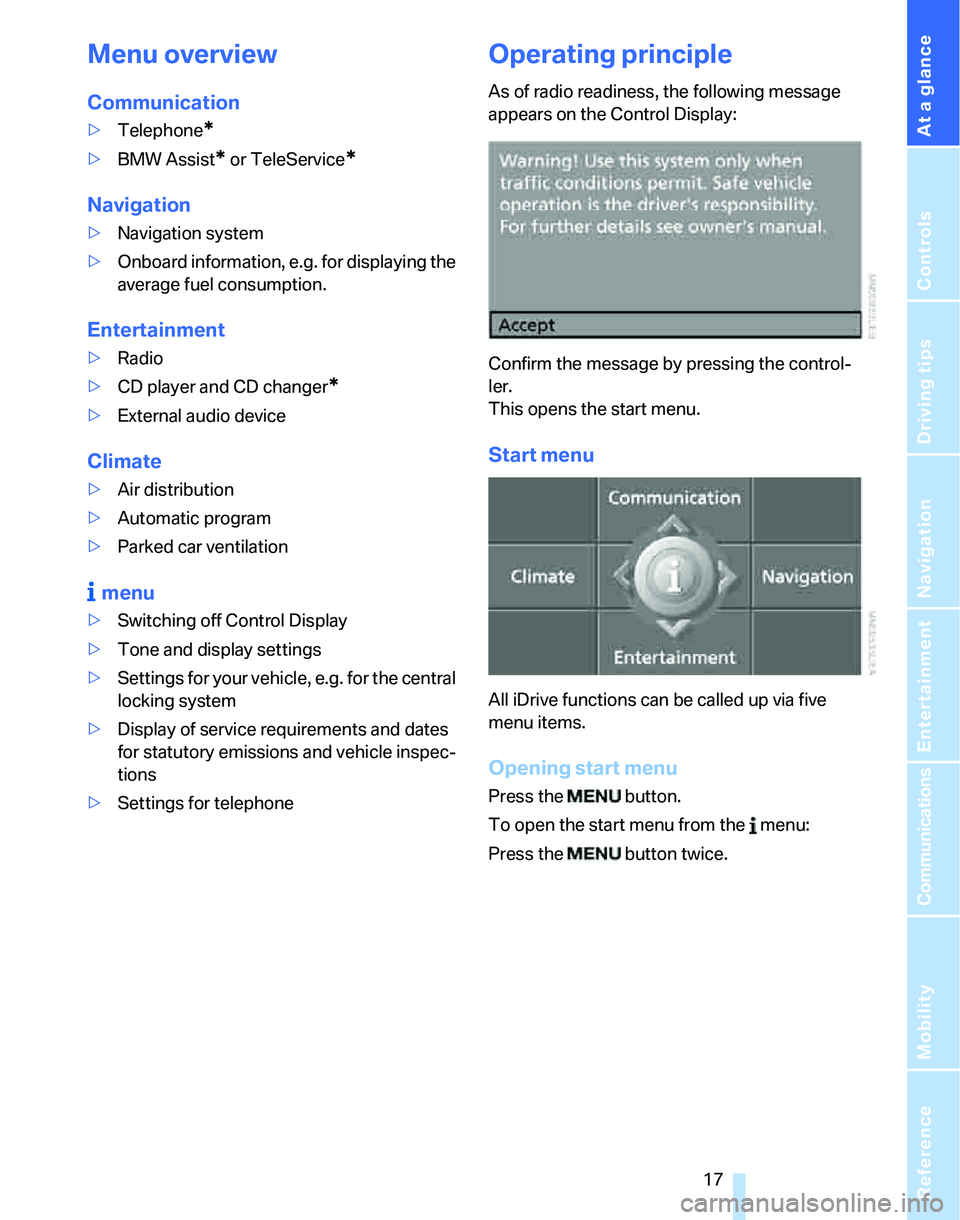
As of radio readiness, the following message
appears on the Control Display:
Confirm the message by pressing the control-
ler.
This opens the start menu.
Start menu
All iDrive functions can be called up via five
menu items.
Opening start menu
Press the button.
To open the start menu from the menu:
Press the button twice.
Page 24 of 236
At a glance
23Reference
Controls
Driving tips
Communications
Navigation
Entertainment
Mobility
If no further commands are possible, continue
by operating the item of equipment via iDrive.
Terminating or canceling voice
command system
Press the button on the steering wheel or in
the center console
or
Commands
Having the possible commands read
aloud
You can have the system read aloud the possi-
ble commands related to the selected menu
item on the Control Display.
To have the possible commands read out to
you:
For instance, if you have selected "CD", the
commands available for operating the CD
player and CD changer are read out.
Opening help
Using alternative commands
There are often a number of commands to run a
function, e.g.:
Calling up functions immediately via
short commands
Short commands enable you to perform certain
functions immediately, irrespective of which
menu item is selected, refer to page214.
Opening the start menu
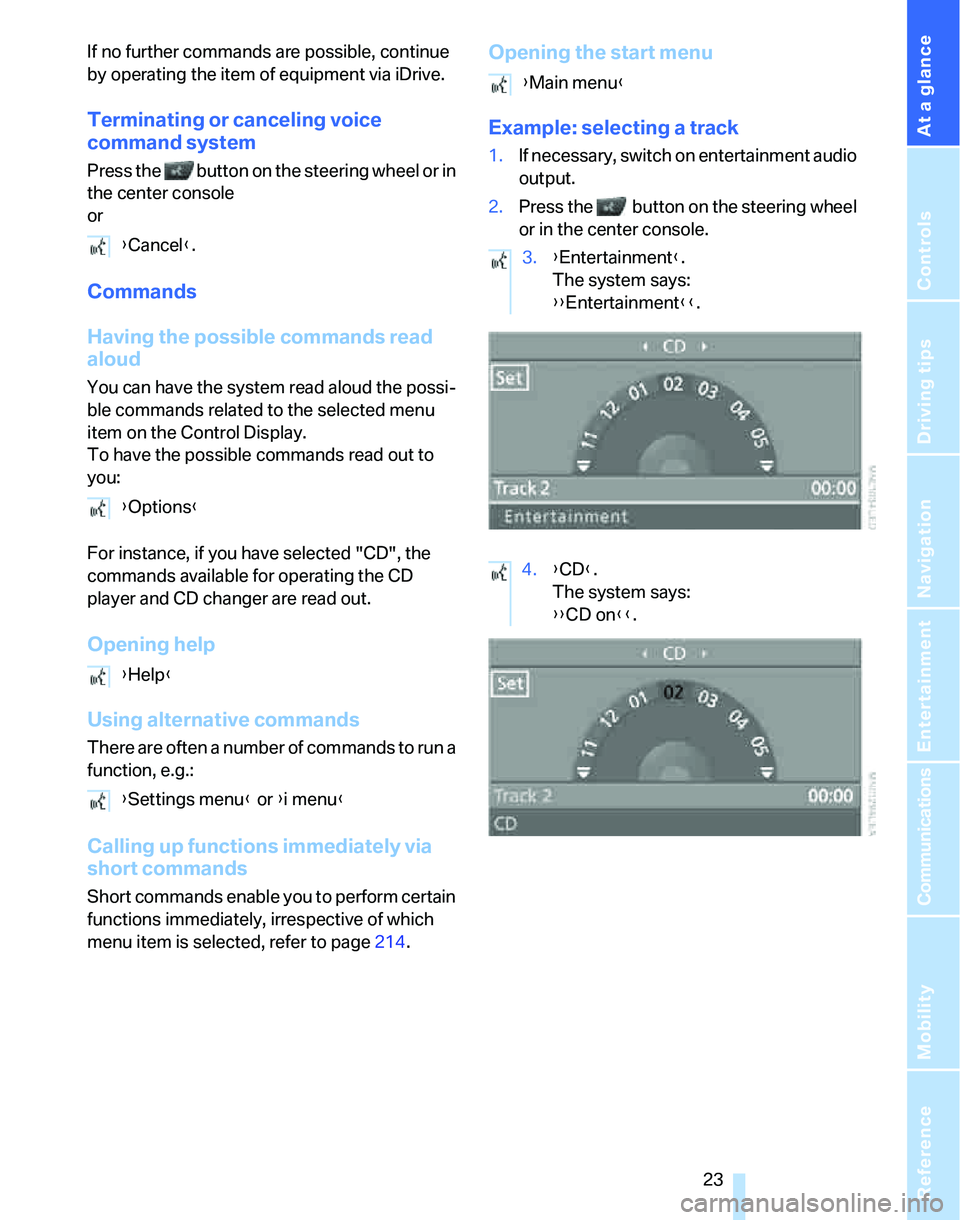
Example: selecting a track
1.If necessary, switch on entertainment audio
output.
2.Press the button on the steering wheel
or in the center console.
{Cancel}.
{Options}
{Help}
{Settings menu} or {i menu}
{Main menu}
3.{Entertainment}.
The system says:
{{Entertainment}}.
4.{CD}.
The system says:
{{CD on}}.
Page 104 of 236
Controls
103Reference
At a glance
Driving tips
Communications
Navigation
Entertainment
Mobility
Glove compartment
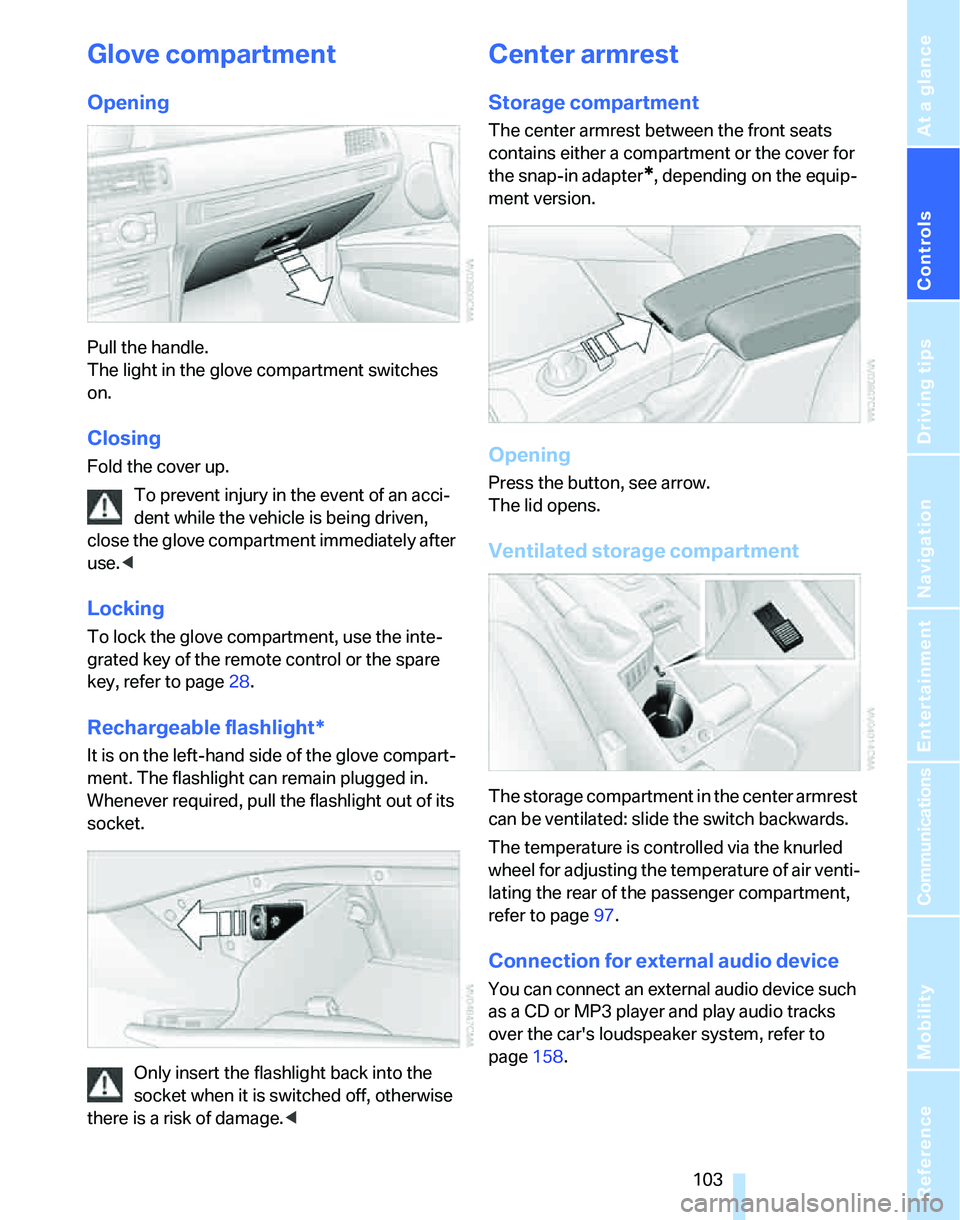
Opening
Pull the handle.
The light in the glove compartment switches
on.
Closing
Fold the cover up.
To prevent injury in the event of an acci-
dent while the vehicle is being driven,
close the glove compartment immediately after
use.<
Locking
To lock the glove compartment, use the inte-
grated key of the remote control or the spare
key, refer to page28.
Rechargeable flashlight*
It is on the left-hand side of the glove compart-
ment. The flashlight can remain plugged in.
Whenever required, pull the flashlight out of its
socket.
Only insert the flashlight back into the
socket when it is switched off, otherwise
there is a risk of damage.<
Center armrest
Storage compartment
The center armrest between the front seats
contains either a compartment or the cover for
the snap-in adapter
*, depending on the equip-
ment version.
Opening
Press the button, see arrow.
The lid opens.
Ventilated storage compartment
The storage compartment in the center armrest
can be ventilated: slide the switch backwards.
The temperature is controlled via the knurled
wheel for adjusting the temperature of air venti-
lating the rear of the passenger compartment,
refer to page97.
Connection for external audio device
You can connect an external audio device such
as a CD or MP3 player and play audio tracks
over the car's loudspeaker system, refer to
page158.
Page 141 of 236
On/off and settings
140
On/off and settings
The following audio sources have shared con-
trols and setting options:
>Radio
>CD player
>CD changer
*
Controls
The audio sources can be operated using:
>Buttons near the CD player
>iDrive
>Buttons
on the steering wheel, refer to
page11
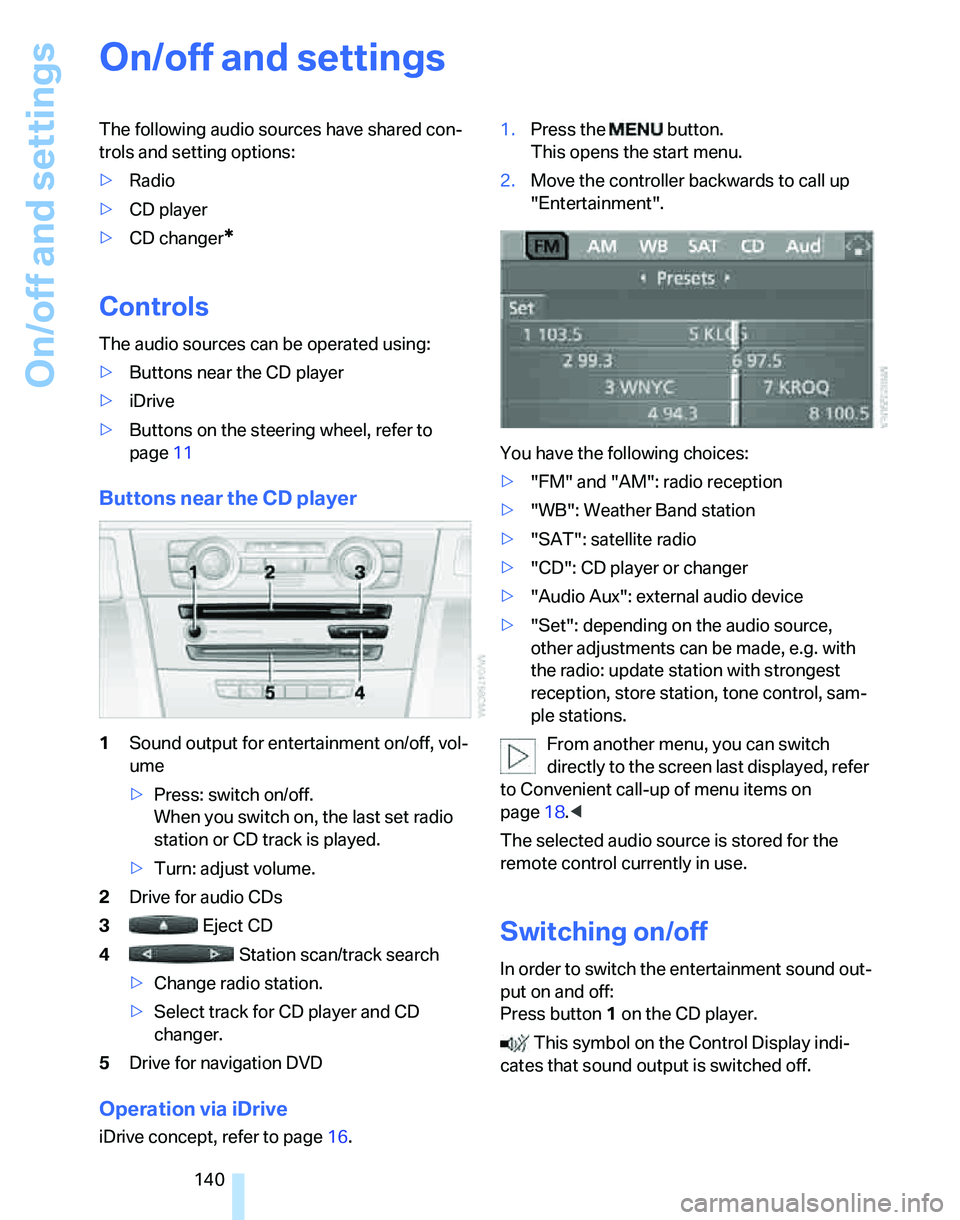
Buttons near the CD player
1Sound output for entertainment on/off, vol-
ume
>Press: switch on/off.
When you switch on, the last set radio
station or CD track is played.
>Turn: adjust volume.
2Drive for audio CDs
3 Eject CD
4 Station scan/track search
>Change radio station.
>Select track for CD player and CD
changer.
5Drive for navigation DVD
Operation via iDrive
iDrive concept, refer to page16.1.Press the button.
This opens the start menu.
2.Move the controller backwards to call up
"Entertainment".
You have the following choices:
>"FM" and "AM": radio reception
>"WB": Weather Band station
>"SAT": satellite radio
>"CD": CD player or changer
>"Audio Aux": external audio device
>"Set": depending on the audio source,
other adjustments can be made, e.g. with
the radio: update station with strongest
reception, store station, tone control, sam-
ple stations.
From another menu, you can switch
directly to the screen last displayed, refer
to Convenient call-up of menu items on
page18.<
The selected audio source is stored for the
remote control currently in use.
Switching on/off
In order to switch the entertainment sound out-
put on and off:
Press button1 on the CD player.
This symbol on the Control Display indi-
cates that sound output is switched off.
Page 142 of 236
Navigation
Entertainment
Driving tips
141Reference
At a glance
Controls
Communications
Mobility
Adjusting volume
Turn knob1 on the CD player until the desired
volume is obtained.
You can also adjust the volume with buttons on
the steering wheel, refer to page11.
The setting is stored for the remote control cur-
rently in use.
Tone control
You can alter various tone settings, e.g. treble
and bass or the speed-dependent volume
increase.
The tone settings are applied to all audio
sources.
The settings are stored for the remote control
currently in use.
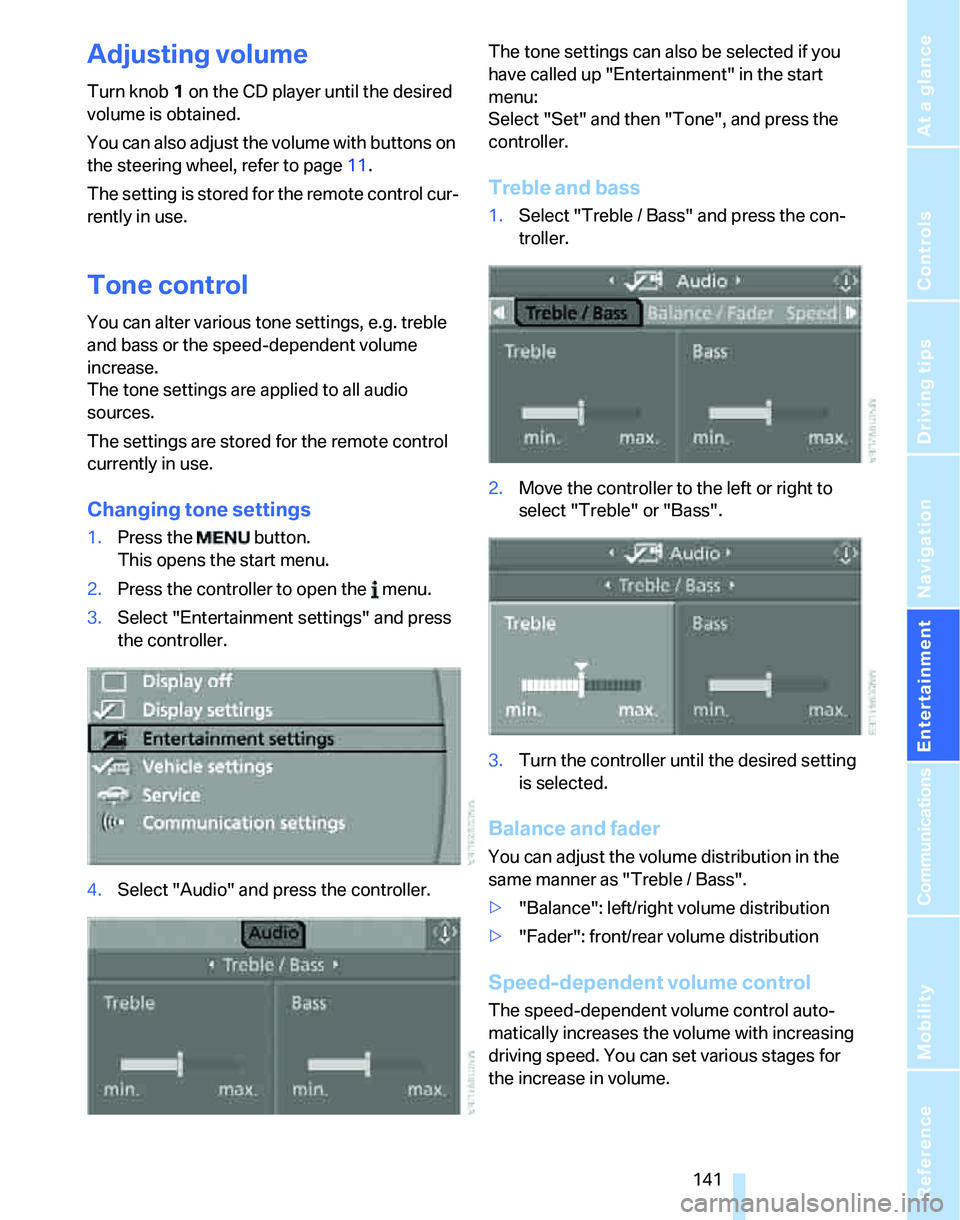
Changing tone settings
1.Press the button.
This opens the start menu.
2.Press the controller to open the menu.
3.Select "Entertainment settings" and press
the controller.
4.Select "Audio" and press the controller.The tone settings can also be selected if you
have called up "Entertainment" in the start
menu:
Select "Set" and then "Tone", and press the
controller.
Treble and bass
1.Select "Treble / Bass" and press the con-
troller.
2.Move the controller to the left or right to
select "Treble" or "Bass".
3.Turn the controller until the desired setting
is selected.
Balance and fader
You can adjust the volume distribution in the
same manner as "Treble / Bass".
>"Balance": left/right volume distribution
>"Fader": front/rear volume distribution
Speed-dependent volume control
The speed-dependent volume control auto-
matically increases the volume with increasing
driving speed. You can set various stages for
the increase in volume.
Page 145 of 236
Radio
144
Radio
Your radio provides reception of the FM and AM
wavebands:
Listening to the radio
Press the button if the sound output is switched
off.
iDrive concept, refer to page16.
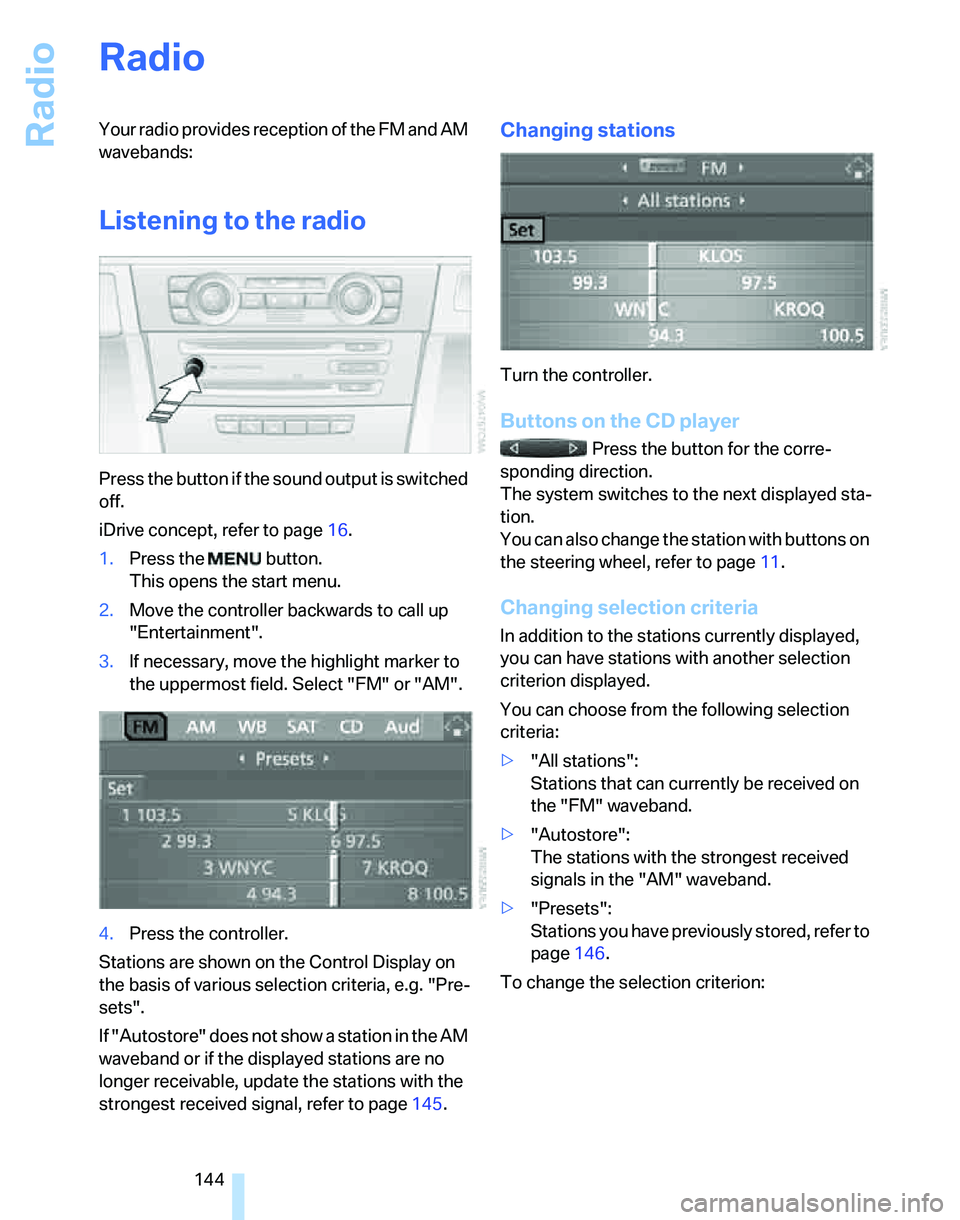
1.Press the button.
This opens the start menu.
2.Move the controller backwards to call up
"Entertainment".
3.If necessary, move the highlight marker to
the uppermost field. Select "FM" or "AM".
4.Press the controller.
Stations are shown on the Control Display on
the basis of various selection criteria, e.g. "Pre-
sets".
If "Autostore" does not show a station in the AM
waveband or if the displayed stations are no
longer receivable, update the stations with the
strongest received signal, refer to page145.
Changing stations
Turn the controller.
Buttons on the CD player
Press the button for the corre-
sponding direction.
The system switches to the next displayed sta-
tion.
You can also change the station with buttons on
the steering wheel, refer to page11.
Changing selection criteria
In addition to the stations currently displayed,
you can have stations with another selection
criterion displayed.
You can choose from the following selection
criteria:
>"All stations":
Stations that can currently be received on
the "FM" waveband.
>"Autostore":
The stations with the strongest received
signals in the "AM" waveband.
>"Presets":
Stations you have previously stored, refer to
page146.
To change the selection criterion:
Page 146 of 236
Navigation
Entertainment
Driving tips
145Reference
At a glance
Controls
Communications
Mobility
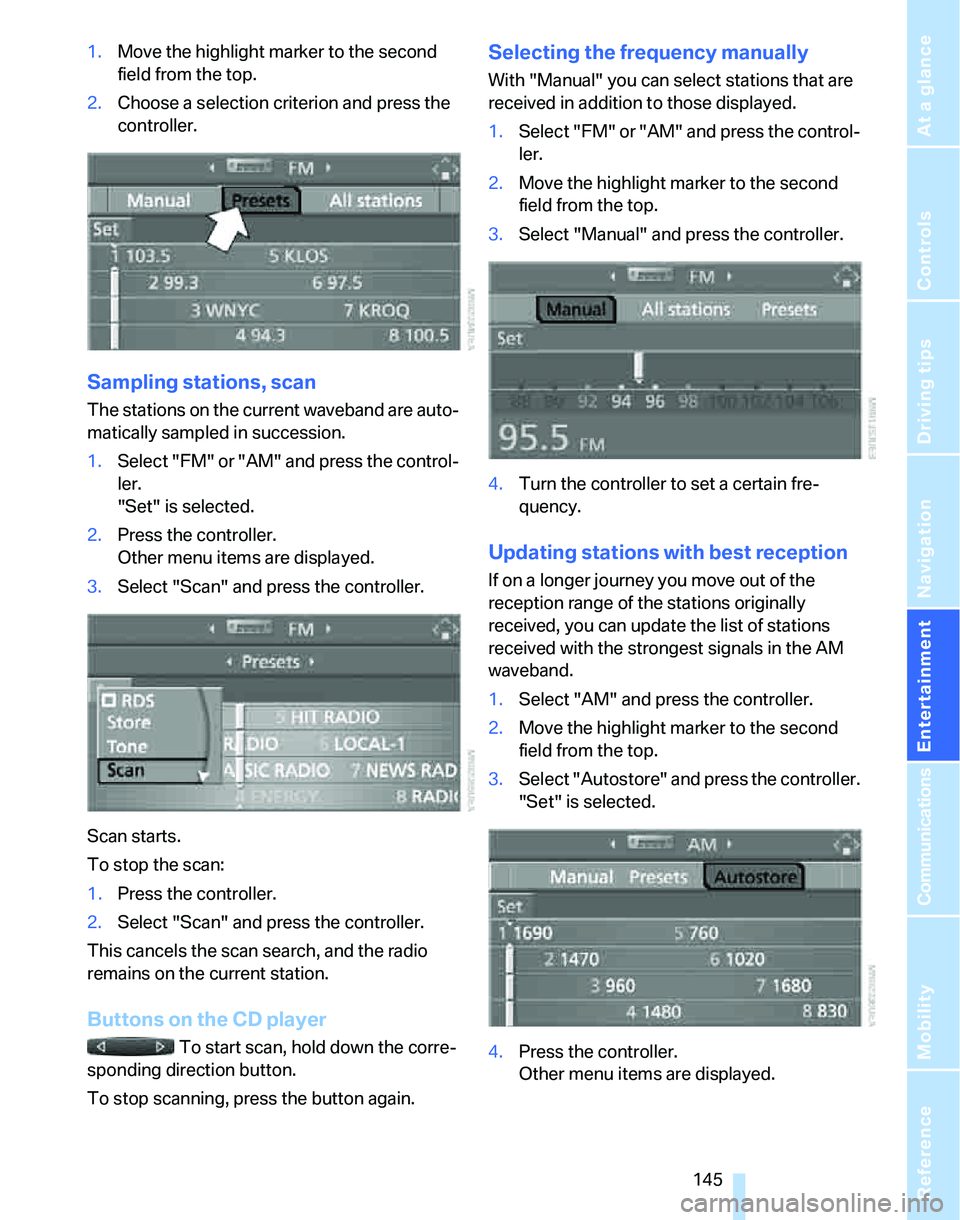
1.Move the highlight marker to the second
field from the top.
2.Choose a selection criterion and press the
controller.
Sampling stations, scan
The stations on the current waveband are auto-
matically sampled in succession.
1.Select "FM" or "AM" and press the control-
ler.
"Set" is selected.
2.Press the controller.
Other menu items are displayed.
3.Select "Scan" and press the controller.
Scan starts.
To stop the scan:
1.Press the controller.
2.Select "Scan" and press the controller.
This cancels the scan search, and the radio
remains on the current station.
Buttons on the CD player
To start scan, hold down the corre-
sponding direction button.
To stop scanning, press the button again.
Selecting the frequency manually
With "Manual" you can select stations that are
received in addition to those displayed.
1.Select "FM" or "AM" and press the control-
ler.
2.Move the highlight marker to the second
field from the top.
3.Select "Manual" and press the controller.
4.Turn the controller to set a certain fre-
quency.
Updating stations with best reception
If on a longer journey you move out of the
reception range of the stations originally
received, you can update the list of stations
received with the strongest signals in the AM
waveband.
1.Select "AM" and press the controller.
2.Move the highlight marker to the second
field from the top.
3.Select "Autostore" and press the controller.
"Set" is selected.
4.Press the controller.
Other menu items are displayed.