2006 Alfa Romeo GT low beam
[x] Cancel search: low beamPage 150 of 307

GETTING TO KNOW YOUR CAR
148
Scarves, ties and other
loose clothing might be
pulled by moving parts.
For safety reasons the
bonnet shall always be
perfectly closed when trav-
elling. Always check for proper
bonnet locking. If the bonnet is left
inadvertently open, stop the car
immediately and close the bonnet.
To close:
– lower the bonnet until approx. 20 cm
from the engine compartment and then let
it drop, ensuring it is fully closed and not just
held in position by the safety catch.
If the bonnet does not close properly do
not push it down but open it again and re-
peat the above procedure.
HEADLIGHTS
The adjustment of the headlights is vital to
your safety and comfort and to that of oth-
er road users.
The adjustment of the headlights is also
governed by precise regulations.
Contact Alfa Romeo Authorised Services to
have the headlights correctly adjusted.
IMPORTANTThe headlight inner sur-
face may get slightly misted: this does not
mean it is faulty; it is a natural phenome-
non due to low temperature and the air hu-
midity level. Misting will disappear as soon
as the headlights are turned on. The pres-
ence of water drops inside the headlight in-
dicates water infiltration: contact Alfa Romeo
Authorised Services.
COMPENSATION FOR TILT
(fig. 150)
When the vehicle is loaded, the beam from
the headlights is raised due to the back-
wards tilt of the vehicle.
In this case the headlights must be ad-
justed correctly.
To do this, use the rocker button (A), on
the plate at the side of the steering column:
– press the arrow on the button (
A), to
increase by one position (e.g.:0
➟1➟2➟
3);
– press the arrow on the button (
S), this will low-
er by one position (e.g.:3
➟2➟1➟0);
The display (B) in the tachometer shows
the positions while adjustment is being ma
fig. 150
A0A0093b
Page 151 of 307

GETTING TO KNOW YOUR CAR
149
Check beam aiming every
time the load carried
changes.
fig. 152
A0A0199b
For correct adjustment, bear in mind the
following conditions:
– position 0: one or two people occupy-
ing the front seats
– position 1: five people;
– position 2: five people + load in the
boot;
– position 3: driver + maximum permis-
sible load all stowed in lug-
gage compartmentHEADLIGHT ADJUSTMENT
ABROAD
(fig. 152)
The dipped-beam headlights are adjusted
for circulation in the country in which the ve-
hicle is marketed. In countries with opposite
circulation, to avoid glaring oncoming vehi-
cles it is necessary to cover the area of the
headlights as shown below; this is done us-
ing non-transparent sticker tape.
The illustration refers to passing from right-
hand drive to left-hand drive.
fig. 151
A0A00677b
IMPORTANTThe compensation for tilt of
Xenon headlights (if fitted) is carried out au-
tomatically and therefore in the versions fitted
with this type of headlights the aiming de-
vice is not present (fig. 151).
Page 227 of 307

IN AN EMERGENCY
225
BULBS
High beam
Low beam
Xenon lights
Front sidelights
Foglights
Front direction indicators
Side direction indicators
Rear direction indicators
Rear sidelights - braking lights
Third stop (additional braking lights)
Reversing light
Rear foglights
Number plate light
Puddle lights
Front roof light
Rear roof light
Courtesy mirror light
Glovebox light
Boot lightFIGURE 21
D
D
F
B
E
B
A
B
B
–
B
B
A
C
C
C
A
A
CPOWER
55W
55W
35W
6W
55W
21W
5W
21W
5W/21W
–
21W
21W
5W
5W
10W
10W
1.2W
5W
5W TYPE
H7
H7
DS2
H6W
H1
PY21W
W5W
P21W
P21/5W
Led
P21W
P21W
W5W
C5W
C10W
C10W
W1.2W
W5W
C5W
Page 228 of 307

IN AN EMERGENCY
226
IF AN EXTERIOR
LIGHT GOES OUT
XENON LIGHTS
Due to high voltage, the
bulb of (Xenon) gas-dis-
charge headlights must on-
ly be replaced by experts: danger
of death! Contact Alfa Romeo Au-
thorized Services.
HALOGEN HEADLIGHTSThe bulbs are arranged inside the light
unit as follows (fig. 22):
(A) Fog lights.
(B) Dipped beam headlights.
(C) Sidelights.
(D) Main beam headlights.
To change the bulbs of the sidelights, low
beams and main beams it is necessary to
remove the cover (A-fig. 23) releasing
the catches (B).
To change the fog lights, remove the
cover (C) turning counter-clockwise. IMPORTANTSee the previous chapter
“When needing to change a bulb” for the
type of bulb and power rating.
The front light units contain the sidelight,
the dipped beam, main beam and fog
light bulbs.
fig. 22
A0A0159b
fig. 23
A0A0160b
Page 229 of 307
IN AN EMERGENCY
227
– Fit a new bulb, making the tab of the
metal part coincide with the one on the
lamp unit, then hook the bulb holder catch
(B).
– Re-connect the electric connector (A).
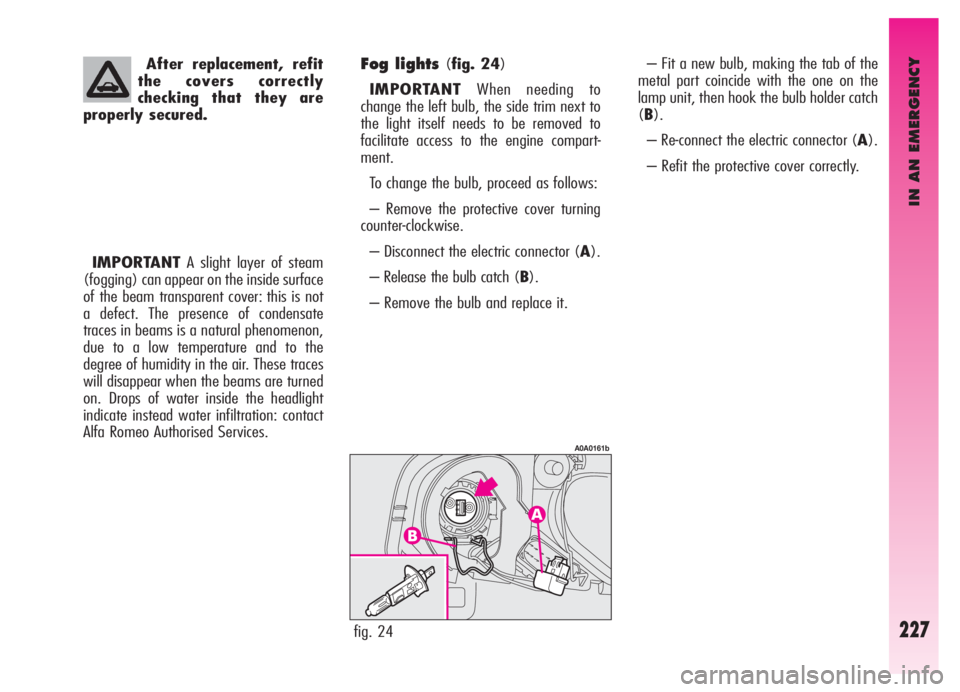
– Refit the protective cover correctly.Fog lights (fig. 24)
IMPORTANTWhen needing to
change the left bulb, the side trim next to
the light itself needs to be removed to
facilitate access to the engine compart-
ment.
To change the bulb, proceed as follows:
– Remove the protective cover turning
counter-clockwise.
– Disconnect the electric connector (A).
– Release the bulb catch (B).
– Remove the bulb and replace it.
fig. 24
A0A0161b
After replacement, refit
the covers correctly
checking that they are
properly secured.
IMPORTANTA slight layer of steam
(fogging) can appear on the inside surface
of the beam transparent cover: this is not
a defect. The presence of condensate
traces in beams is a natural phenomenon,
due to a low temperature and to the
degree of humidity in the air. These traces
will disappear when the beams are turned
on. Drops of water inside the headlight
indicate instead water infiltration: contact
Alfa Romeo Authorised Services.
Page 230 of 307

IN AN EMERGENCY
228
Dipped beam headlights
(fig. 25)
To change the bulb, proceed as follows:
– Remove the protective cover releasing
the catches.
– Disconnect the electric connector (A).
– Release the bulb catch (B).
– Remove the bulb and replace it.
– Fit a new bulb, making the tabs of the
metallic part coincide with the grooves on
the reflector, then hook the bulb holder
catch (B).
– Re-connect the electric connector (A).
– Refit the protective cover correctly.
fig. 25
A0A0162b
Main beam headlights
(fig. 27)
To change the bulb, proceed as follows:
– Remove the protective cover releasing
the catches.
– Disconnect the electric connector (A).
– Release the bulb catch (B).
– Remove the bulb and replace it.
– Fit a new bulb, making the tabs of the
metallic part coincide with the grooves on
the reflector, then hook the bulb holder
catch (B).
– Re-connect the electric connector (A).
– Refit the protective cover correctly.
fig. 27
A0A0164b
Front side lights(fig. 26)
To change the bulb, proceed as follows:
– Remove the protective cover releasing
the catches.
– Using the extension (A), integral with
the bulb holder (B), withdraw the bulb
holder itself which is snap-fitted.
– Remove the bulb (C), pushing gently
and turning counter-clockwise.
– Change the bulb and re-insert the bulb
holder making sure that it clicks into
place; also check that the bulb is in the
correct position looking at the lamp from
outside.
– Refit the protective cover correctly.
fig. 26
A0A0342b
Page 294 of 307

INDEX
292
- windows ............................... 269
Climate control, automatic
two-zone ................................. 109
Climate control system .......... 103-111
Controls ..................................... 124
CO
2emissions ............................ 287
CODE card .................................. 7
Compact spare wheel .................. 214
- characteristics ........................... 277
Correct use of the car........... 200
Courtesy light
- changing bulbs ....................... 234
Cruise control ............................. 49
Dashboard................................. 52
Demisting-defrosting
- door mirrors ................ 24-107-123
- rearscreen ....................... 105-123
- windscreen and front
side windows ................... 107-122
Diesel fuel filter ........................... 260
Digital multifunction display .......... 57
Direction indicators
- changing front bulbs ................ 229
- changing rear bulbs ................. 230- changing side bulbs ................. 229
- switching on .................... 44-45-46
Door locking system .................... 125
Door mirrors ............................... 23
Doors
- central locking ........................ 16
- opening/closing from inside ..... 15
- opening/closing from outside ... 15
- remote control ........................ 7
- remote locking/unlocking ........ 6-7
Electronic alarm system ............... 11
Emergency starting ...................... 210
- coasting ................................ 212
- starting with an auxiliary
battery .................................. 211
Engine
- identification codes/marking .... 272
- specifications ......................... 273
Engine compartment
- bonnet .................................. 147
Engine starting ........................... 200
- emergency starting ................. 202- ignition switch ........................ 14
- procedure for JTD versions ........ 201
- procedure for petrol versions ..... 200
- switching off .......................... 202
- warming the engine ................ 201
Engine oil consumption ................ 256
EOBD (system) ........................... 155
External lights (switching on) ....... 44
First-aid kit................................. 246
Flashing high beams .................... 45
Fluids (specifications) .................. 284
Follow me home device ............... 46
Foglights
- changing bulbs ................. 225-227
- switching on .......................... 124
Front ceiling light ........................ 138
- changing bulbs ....................... 232
Fuel
- at the filling station ................. 273
- automatic shut off switch ......... 125
- consumption .......................... 286
- fuel cap ................................. 198
- level gauge and reserve ........... 56
Page 295 of 307

INDEX
293
- refuelling ............................... 198
Fuel consumption ........................ 286
Fuel flap .................................... 198
Fuses ........................................ 236
Gearbox lever ............................ 127
Getting to know your car.... 6
Glass holder ......................... 141-142
Glove compartment ..................... 138
Glove compartment light
- changing bulbs ....................... 234
Handbrake ................................ 126
Hazard warning lights .................. 124
Headlamp beam adjustment ......... 148
Headlight washers ................ 49-267
Headlights
- adjustment abroad .................. 148
- beam adjustment .................... 148
- changing bulbs ................. 221-224
- compensation for tilt ......... 148-149
Headrests (front/rear) .......... 18-21Horn ......................................... 52
Hoses ........................................ 265
Ignition device ............................ 14
Ignition switch and steering lock 14-15
In an emergency..................... 210
In the event of an accident ........... 246
Inertial fuel cut off switch ............. 125
Instrument cluster ................. 53-54
Instrument lighting adjustment ...... 59
Intelligent washing (windscreen) ... 47
Interior fittings ............................ 269
Interior lighting
- boot lighting .......................... 146
- dashboard lighting (rheostat) ... 59
- front lighting .................... 138-139
- rear lighting ........................... 140
Jack ......................................... 215
Levers (steering wheel) ............... 44
Lights ........................................ 44Load limiters (seat belts) ............. 29
Low beam headlights
- changing bulbs ................. 225-228
- switching on .................... 44-45
Luggage restrainer net ................. 22
Main beam headlights
- changing bulbs ................. 226-228
- switching on .......................... 45
Maintenance
- additional operations ............... 250
- annual inspection programme ... 250
- checking levels ....................... 253
- precautions and warnings ......... 251
- scheduled maintenance ........... 247
- scheduled maintenance
programme ............................ 248
Manual heater ............................ 102
Mechanical gearbox ..................... 127
Number plate lights
- changing bulbs ........................ 231