Page 6 of 295
�Î
�ÎTo use the horn, press the center pad of the steering wheel.
:
Your Vehicle at a Glance
Your Vehicle at a Glance
5
INSTRUMENT PANEL
BRIGHTNESS WINDSHIELD WIPERS/WASHERS
HAZARD WARNING
BUTTON
HEADLIGHTS/TURN SIGNALS/
FOG LIGHTS
REAR WINDOW
DEFOGGER
BUTTONCRUISE
CONTROL
BUTTONS
SEAT HEATER
SWITCHES
MIRROR CONTROLS STEERING WHEEL
ADJUSTMENTREMOTE AUDIO CONTROL
BUTTONS HORN
HANDSFREELINK
BUTTONS
VEHICLE STABILITY
ASSIST (VSA) OFF
SWITCH (P.84,85)
(P.85) (P.203)
(P.101) (P.88)(P.150) (P.160)(P.106)(P.153)
(P.87)
(P.86)
(P.83)
TM
Page 68 of 295

position. Some of the messages help
you operate your vehicl")
The multi-inf ormation display in the
instrument panel displays various
inf ormation and messages when the
ignition switch is in the ON (II)
position. Some of the messages help
you operate your vehicle more
comf ortably.
Others help to keep you aware of the
periodic maintenance your vehicle
needs f or continued trouble-f ree
driving.Driver 1 or 2 Detected
Door and Trunk Open
Fasten Seat Belt
Release Parking Brake
Odometer
Trip Meter
Outside Temperature
Engine Oil Lif e Maintenance Messages
Auto door lock conditions
Auto door unlock conditions
Whenever unlocking (driver’s
door, or all doors)
Keyless lock acknowledgment
conditions
Security relock timer
Headlight auto of f timer
Interior light dimming time
To customize these control settings,
see page .
Low Windshield Washer Fluid
Level (Canada only)
Here is a list of the messages you
can see. The f ollowing pages give
you more inf ormation on these
messages.
Tighten Fuel Cap With the multi-information display
and the two buttons next to it, you
can also customize these vehicle
control settings to your liking.Language Selection (Canada only) HandsFree Link
Keyless Memory Settings
Trip Computer
Tire Pressure
76
Multi-Inf ormation Display
67
SELECT/
RESET
BUTTON
INFO
BUTTON
TMTM
Page 83 of 295
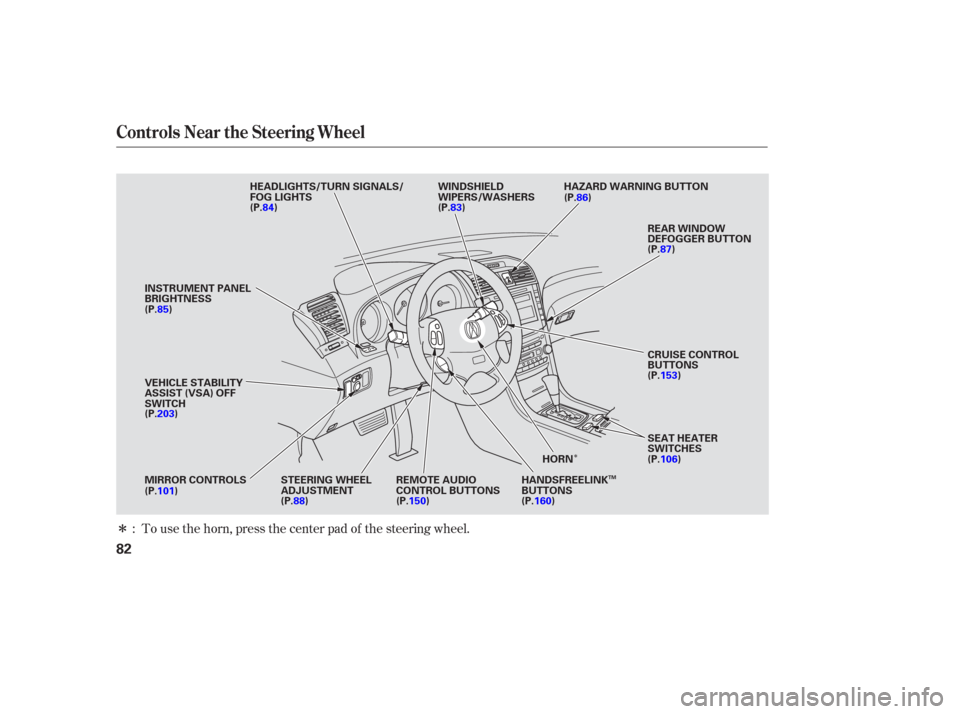
�Î
�ÎTo use the horn, press the center pad of the steering wheel.
:
Controls Near the Steering Wheel
82
WINDSHIELD
WIPERS/WASHERS
INSTRUMENT PANEL
BRIGHTNESS HAZARD WARNING BUTTON
HEADLIGHTS/TURN SIGNALS/
FOG LIGHTS
REAR WINDOW
DEFOGGER BUTTON
SEAT HEATER
SWITCHES
HORN
MIRROR CONTROLS STEERING WHEEL ADJUSTMENTREMOTE AUDIO
CONTROL BUTTONS HANDSFREELINK
BUTTONS CRUISE CONTROL
BUTTONS
VEHICLE STABILITY
ASSIST (VSA) OFF
SWITCH (P.84)
(P.85)
(P.203)
(P.101) (P.88)(P.150) (P.160)
(P.83)
(P.86)
(P.106) (P.153) (P.87)
TM
Page 97 of 295
 is
shownonthebackof each
transmitter. Make sure you store
your desired driving position in the
memory that is activated by the
transmitter yo")
The driving position memory
activated (Driver 1, Driver 2) is
shownonthebackof each
transmitter. Make sure you store
your desired driving position in the
memory that is activated by the
transmitter you normally carry.
You can turn of f this driving position
memory activation. Press and hold
the LOCK and UNLOCK buttons at
thesametime.TheLEDinthe
remote transmitter will blink twice.
Then release the buttons. Doing this
also cancels the keyless memory
settings f or that remote and restores
the default settings.
To turn it back on, repeat this
procedure. The LED will come on
for 1 second to indicate the feature
has been turned on.Avoid dropping or throwing the
transmitter.
Protect the transmitter from
extreme temperature.
Do not immerse the transmitter in
any liquid.
Each remote transmitter also
activates the driving position
memory system and changes the
keyless memory settings related to
that remote (see page ). When
you open the driver’s door af ter
unlocking it with the remote
transmitter, you will hear a beep.
The driver’s seat and outside mirrors
move to the positions stored in that
memory location. You will hear two beeps when the movement is
completed.
If you lose a transmitter, the
replacement needs to be
reprogrammed by your dealer.
103
Remote Transmitter
Recalling a Memorized Driving
PositionRemote Transmitter Care
96
With Driver 1 With Driver2
Page 104 of 295

Two seat and outside mirror
positionscanbestoredinseparate
memories. You select a memorized
position by pushing the appropriate
button or using the appropriate
remote transmitter (Driver 1 or
Driver 2).Adjust the outside mirrors f or best
visibility (see page ). Adjust the seat to a comfortable
position (see page ). Turn the ignition switch to the ON
(II) position. You cannot add a
new driving position in the
memory unless the ignition switch
is in the ON (II) position. You can
recall a memorized position with
the ignition switch in any position.
Store a driving position only when
the vehicle is parked.
Your vehicle has a memory feature
f or the driver’s seat and outside
mirror positions.
Press and release the MEMO
button on the driver’s door. You
will hear a beep. Immediately
press and hold one of the memory
buttons (1 or 2) until you hear two
beeps. The indicator in the
memory button will come on. The
current positions of the driver’s
seat and outside mirrors are now
stored.
3.
1.
2.
98
101
CONT INUED
Driving Position Memory System
Storing a Driving Position in
Memory
Inst rument s and Cont rols
103
MEMO BUTTON
MEMORY BUTTONS
Page 105 of 295

Doing any of the f ollowing af ter
pressing the MEMO button will
cancel the storing procedure.Not pressing a memory button
within 5 seconds.
Readjusting the seat position.
Readjusting the outside mirror
position.
Each memory button stores only one
driving position. Storing a new
position erases the previous setting
stored in that button’s memory. If
you want to add a new position while
retaining the current one, use the
other memory button. To select a memorized position, do
this:
Make sure the parking brake is set
(M/T) or the shif t lever is in Park
(A/T).
Press the desired memory button
(1 or 2) until you hear a beep, then
release the button. The system will move the seat and
outside mirrors to the memorized
positions. The indicator in the
selected memory button will f lash
during movement. When the
adjustments are complete, you will
hear two beeps, and the indicator will
remain on.
If the parking brake is not set, you
must press and hold the memory
button until the adjustment is
complete. You cannot select a memorized
position if the transmission is in
reverse. Shif t to another gear,
then select.
1.
2.
Notes f or vehicles with M/T
Driving Position Memory System
Selecting a Memorized Position
104
MEMORY BUTTONS
Page 120 of 295

The climate control systems in your
vehicle provide a comfortable driving
environment in all weather
conditions.
The standard audio system has
many f eatures. This section de-
scribes those f eatures and how to
use them.
Your vehicle has an anti-theft audio
system that requires a code number
to enable it.
The security system helps to dis-
courage vandalism and thef t of your
vehicle..............
Vents, Heating, and A/C .120
.............................
Airflow Buttons .122
.............................
Climate Control .125
..........
Playing the AM/FM Radio .127
............
AM/FM Radio Reception .132
Playing the XM Satellite Radio
............................
(U.S. models) .134
.................................
Playing Discs .140
..................
Protecting Your Discs .145
...
Disc Changer Error Messages .146
...............................
Playing a Tape .147
................
Remote Audio Controls .150
.................
Radio Thef t Protection .151
............................
Security System .152
...............................
Cruise Control .153
HomeLink Universal ................................
Transceiver .156
.............................
HandsFreeLink .160
Features
Features
119
Page 121 of 295
Vents, Heating, and A/C
120
TEMPERATURE DISPLAY
DRIVER’S SIDE MODE
CONTROL BUTTON
OFF BUTTON REAR WINDOW
DEFOGGER BUTTON
FAN CONTROL
BUTTONS
Vehicles without Navigation System
DUAL BUTTON DRIVER’S AUTO BUTTON
PASSENGER’S AUTO BUTTON
AIR CONDITIONING BUTTON
RECIRCULATION BUTTON
WINDSHIELD
DEFROST
BUTTON PASSENGER’S SIDE MODE
CONTROL BUTTON
DRIVER’S SIDE
TEMPERATURE
CONTROL BUTTONS
PASSENGER’S SIDE
TEMPERATURE
CONTROL BUTTONS