Page 299 of 2893
.")
10-9
8. Loosely install the radiator cap.
9. Set the heater temperature control dial tomaximum heat.
10. Start the engine, and let it run until it warms up (the radiator fan comes on at least twice).
11. Turn off the engine. Check the level in the radiator, and add Honda Long Life Coolant/Antifreeze
Type 2, if needed.
12. Install the radiator cap securely, then start the engine again, and check for leaks.
13. Clean up any spilled engine coolant.
14. If the maintenance minder required engine coolant replacement, reset the maintenance minder
(see page 3-6), and this procedure is complete. If
the maintenance minder did not require engine
coolant replacement, go to step 15.
15. Turn the ignition switch to LOCK (0).
16. Connect the Honda Diagnostic System (HDS) to the data link connector (DLC) (see step 2 on page 11-3).
17. Turn the ignition switch to ON (II).
18. Make sure the HDS communicates with the vehicle and the engine control module (ECM)/powertrain
control module (PCM). If it does not communicate,
troubleshoot the DLC circuit (see page 11- 204).
19. Select GAUGES in the BODY ELECTRICAL menu with the HDS.
20. Select ADJUSTMENT in the GAUGES with the HDS.
21. Select SERVICE REMINDER in the ADJUSTMENT menu with the HDS.
22. Select RESET in the SERVICE REMINDER menu with the HDS.
23. Select MAINTENACE SUB ITEM 5 RESET menu with the HDS.
08/08/21 14:39:59 61SNR030_100_0009
ProCarManuals.com
DYNOMITE -2009-
Page 300 of 2893
����
�(�#�'�����������
�������������������
� �����)����
10-10Cooling System
Thermostat Replacement
THERMOSTAT ASSEMBLY
HARNESS CLAMP LOWER RADIATOR HOSE 6x1.0mm
10 N·m (1.0 kgf·m, 7.2 lbf·ft)O-RING
1. Drain the engine coolant (see page 10-8).
2. Remove the splash shield (see step 25 on page 5-5).
3. Remove the lower radiator hose, then remove the thermostat.
4. Install the new thermostat assembly with a new O-ring, then install the lower radiator hose.
5. Install the splash shield (see step 40 on page 5-20).
6. Refill the radiator with engine coolant, and bleed the air from the cooling system with the heater valve open (see
step 6 on page 10-8).
7. Clean up any spilled engine coolant.
Replace.
08/08/21 14:39:59 61SNR030_100_0010
ProCarManuals.com
DYNOMITE -2009-
Page 303 of 2893
���
����
�(�#�'�����������
��������������������� �����)����
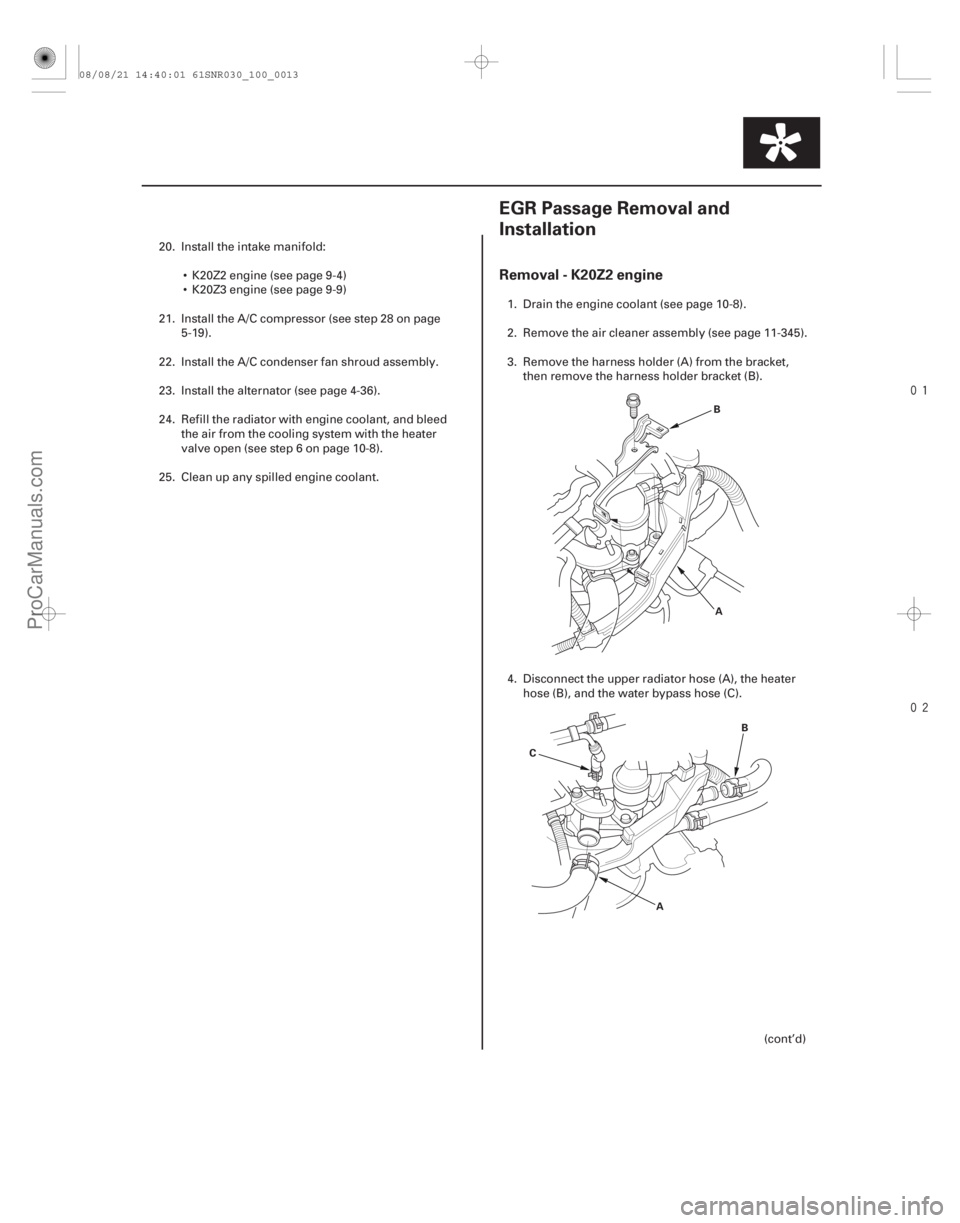
Removal - K20Z2 engine
10-1310-13
EGR Passage Removal and
Installation
A
B
A B
C
20. Install the intake manifold:
K20Z2 engine (see page 9-4)
K20Z3 engine (see page 9-9)
21. Install the A/C compressor (see step 28 on page 5-19).
22. Install the A/C condenser fan shroud assembly.
23. Install the alternator (see page 4-36).
24. Refill the radiator with engine coolant, and bleed the air from the cooling system with the heater
valve open (see step 6 on page 10-8).
25. Clean up any spilled engine coolant. 1. Drain the engine coolant (see page 10-8).
2. Remove the air cleaner assembly (see page 11-345).
3. Remove the harness holder (A) from the bracket,
then remove the harness holder bracket (B).
4. Disconnect the upper radiator hose (A), the heater hose (B), and the water bypass hose (C).
(cont’d)
08/08/21 14:40:01 61SNR030_100_0013
ProCarManuals.com
DYNOMITE -2009-
Page 304 of 2893
���
����
�(�#�'�����������
��������������������� �����)����
Removal - K20Z2 engine
10-1310-13
EGR Passage Removal and
Installation
A
B
A B
C
20. Install the intake manifold:
K20Z2 engine (see page 9-4)
K20Z3 engine (see page 9-9)
21. Install the A/C compressor (see step 28 on page 5-19).
22. Install the A/C condenser fan shroud assembly.
23. Install the alternator (see page 4-36).
24. Refill the radiator with engine coolant, and bleed the air from the cooling system with the heater
valve open (see step 6 on page 10-8).
25. Clean up any spilled engine coolant. 1. Drain the engine coolant (see page 10-8).
2. Remove the air cleaner assembly (see page 11-345).
3. Remove the harness holder (A) from the bracket,
then remove the harness holder bracket (B).
4. Disconnect the upper radiator hose (A), the heater hose (B), and the water bypass hose (C).
(cont’d)
08/08/21 14:40:01 61SNR030_100_0013
ProCarManuals.com
DYNOMITE -2009-
Page 306 of 2893
����
��������
����
Installation - K20Z2 engine
10-15
8x1.25mm
22 N·m
(2.2 kgf·m, 16 lbf·ft)
A
B
8x1.25mm
22 N·m
(2.2 kgf·m, 16 lbf·ft)
A B
8x1.25mm
22 N·m
(2.2 kgf·m, 16 lbf·ft)
8x1.25mm
22 N·m
(2.2 kgf·m, 16 lbf·ft)
A B
C
1. Install the EGR valve (A), with a new gasket (B).
2. Install the EGR passage (A) with a new gasket (B). 3. Install the air cleaner brackets.
4. Connect the upper radiator hose (A), the heater
hose (B), and the water bypass hose (C).
(cont’d)
08/08/21 14:40:02 61SNR030_100_0015
ProCarManuals.com
DYNOMITE -2009-
Page 307 of 2893
�
�����
����
�(�#�'�����������
�������������������
� �����)����
Removal - K20Z3 engine
10-1610-16 Cooling System
EGR Passage Removal and
Installation (cont’d)
Water Outlet Removal and
Installation
BA
6x1.0mm
12 N·m
(1.2 kgf·m, 8.7 lbf·ft)
A
B
A B
C
5. Install the harness holder bracket (A), then install the harness holder (B).
6. Install the air cleaner assembly (see page 11-345).
7. Refill the radiator with engine coolant, and bleed the air from the cooling system with the heater
valve open (see step 6 on page 10-8).
8. Clean up any spilled engine coolant. 1. Drain the engine coolant (see page 10-8).
2. Remove the air cleaner assembly (see page 11-345).
3. Remove the harness holder (A) from the bracket,
then remove the harness holder bracket (B).
4. Disconnect the upper radiator hose (A), the heater hose (B), and the water bypass hose (C).
08/08/21 14:40:03 61SNR030_100_0016
ProCarManuals.com
DYNOMITE -2009-
Page 308 of 2893
�
�����
����
�(�#�'�����������
�������������������
� �����)����
Removal - K20Z3 engine
10-1610-16 Cooling System
EGR Passage Removal and
Installation (cont’d)
Water Outlet Removal and
Installation
BA
6x1.0mm
12 N·m
(1.2 kgf·m, 8.7 lbf·ft)
A
B
A B
C
5. Install the harness holder bracket (A), then install the harness holder (B).
6. Install the air cleaner assembly (see page 11-345).
7. Refill the radiator with engine coolant, and bleed the air from the cooling system with the heater
valve open (see step 6 on page 10-8).
8. Clean up any spilled engine coolant. 1. Drain the engine coolant (see page 10-8).
2. Remove the air cleaner assembly (see page 11-345).
3. Remove the harness holder (A) from the bracket,
then remove the harness holder bracket (B).
4. Disconnect the upper radiator hose (A), the heater hose (B), and the water bypass hose (C).
08/08/21 14:40:03 61SNR030_100_0016
ProCarManuals.com
DYNOMITE -2009-
Page 310 of 2893
����
��������
����
Installation - K20Z3 engine
10-18Cooling System
Water Outlet Removal and Installation (cont’d)
8x1.25mm
22 N·m
(2.2 kgf·m, 16 lbf·ft)
A
B
8x1.25mm
22 N·m
(2.2 kgf·m, 16 lbf·ft)
A B
8x1.25mm
22 N·m
(2.2 kgf·m,
16 lbf·ft)
8x1.25mm
22 N·m
(2.2 kgf·m, 16 lbf·ft)
A B
C
1. Install the EGR plate (A) with a new gasket (B).
2. Install the water outlet (A) with a new gasket (B). 3. Install the air cleaner brackets.
4. Connect the upper radiator hose (A), the heater
hose (B), and the water bypass hose (C).
08/08/21 14:40:05 61SNR030_100_0018
ProCarManuals.com
DYNOMITE -2009-