Page 1742 of 2893
�
�
S
pecial Tools Required
Driver’s side Passenger’s sideFront Door Sill Area
20-66Interior Trim
Trim Removal/Installation - Door Are")
��������
����
�(�#�'��������������������������������� �����)�
�
S
pecial Tools Required
Driver’s side Passenger’s sideFront Door Sill Area
20-66Interior Trim
Trim Removal/Installation - Door Areas
A
B C
D
E
F
G G
A B A
B
G
G
Fastener Locations
:Clip,1
F : Clip, 4
G
(White)
(Orange)
E Fa
stener Locations
: Clip, 1
F : Clip, 4
G
(White)
(Orange)
A
B
C D E
F
G B
A
A
BG
G
G
E
AB
A
A
KTC trim tool set SOJATP2014
NOTE:
Put on gloves to protect your hands.
Take care not to bend or scratch the trim and panels.
Use the appropriate tool from the KTC trim tool set to avoid damage when removing components.
1. Driver’s side: Remove the footrest (see step 3 on page 20-89).
2. Driver’s side: Remove the front side cap from the front door sill trim, and remove the trunk lid/fuel fill
door opener lock cylinder and the screw (see page
20-184).
3. Detach the hooks (A) and the tabs (B) from the kick panel (C) and the B-pillar lower trim (D), and pull
the front door sill trim (E) up by hand to detach the
clips (F, G), then remove it.
4
. Pull out the front door opening seal (A) from thetrim hooks (B) and around the front door opening
flange, then remove the seal.
08/08/21 15:01:29 61SNR030_200_0068
ProCarManuals.com
DYNOMITE -2009-
Page 1843 of 2893
���
����
�(�#�'�����������
���������������������"�����)����
20-158 Fuel Fill Door
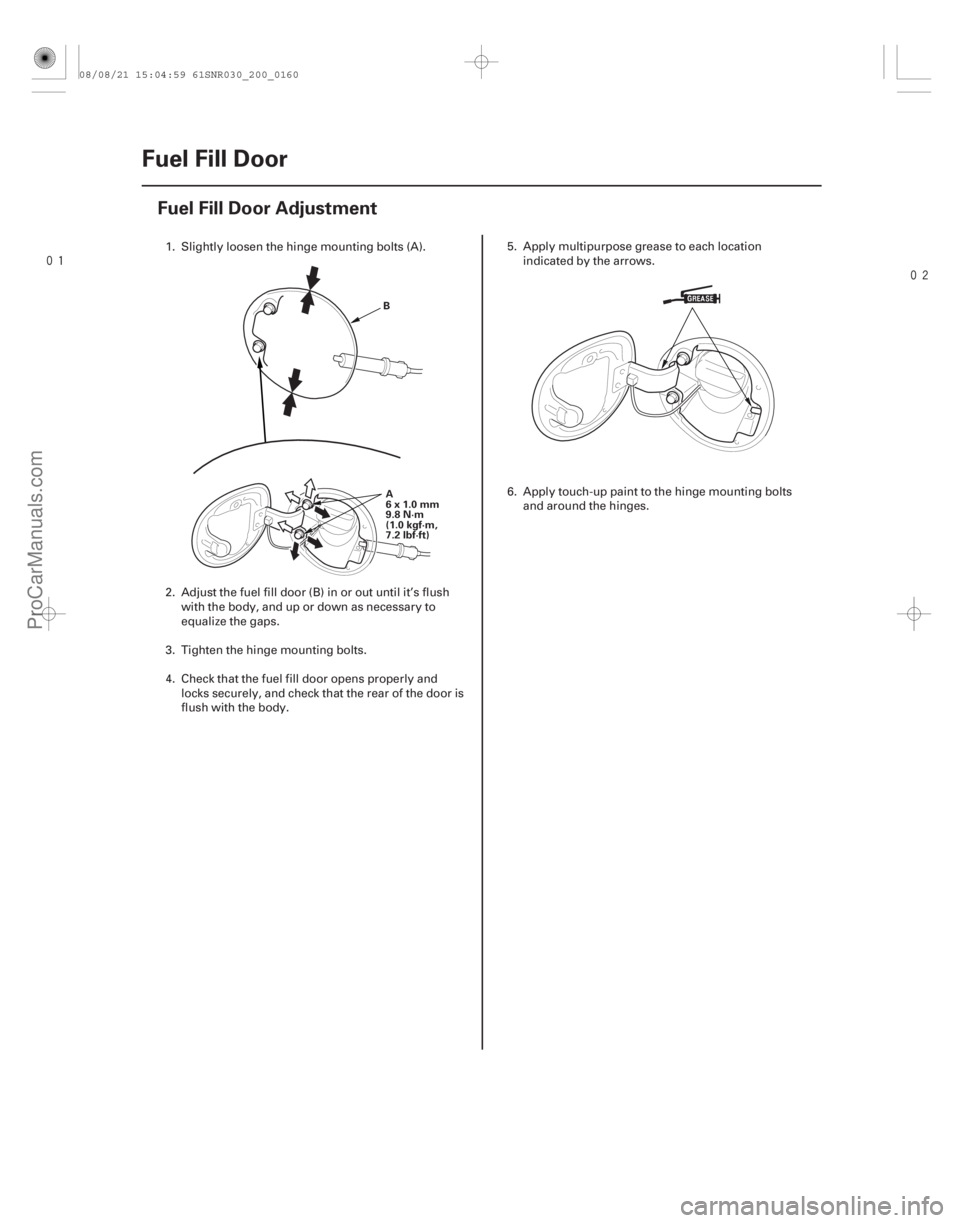
Fuel Fill Door Adjustment
B
A
6x1.0mm
9.8 N·m
(1.0 kgf·m,
7.2 lbf·ft)
1. Slightly loosen the hinge mounting bolts (A).
2. Adjust the fuel fill door (B) in or out until it’s flush with the body, and up or down as necessary to
equalize the gaps.
3. Tighten the hinge mounting bolts.
4. Check that the fuel fill door opens properly and locks securely, and check that the rear of the door is
flush with the body. 5. Apply multipurpose grease to each location
indicated by the arrows.
6. Apply touch-up paint to the hinge mounting bolts and around the hinges.
08/08/21 15:04:59 61SNR030_200_0160
ProCarManuals.com
DYNOMITE -2009-
Page 1844 of 2893
���
����
����
�(�#�'�����������
��������������������� �����)����
20-159
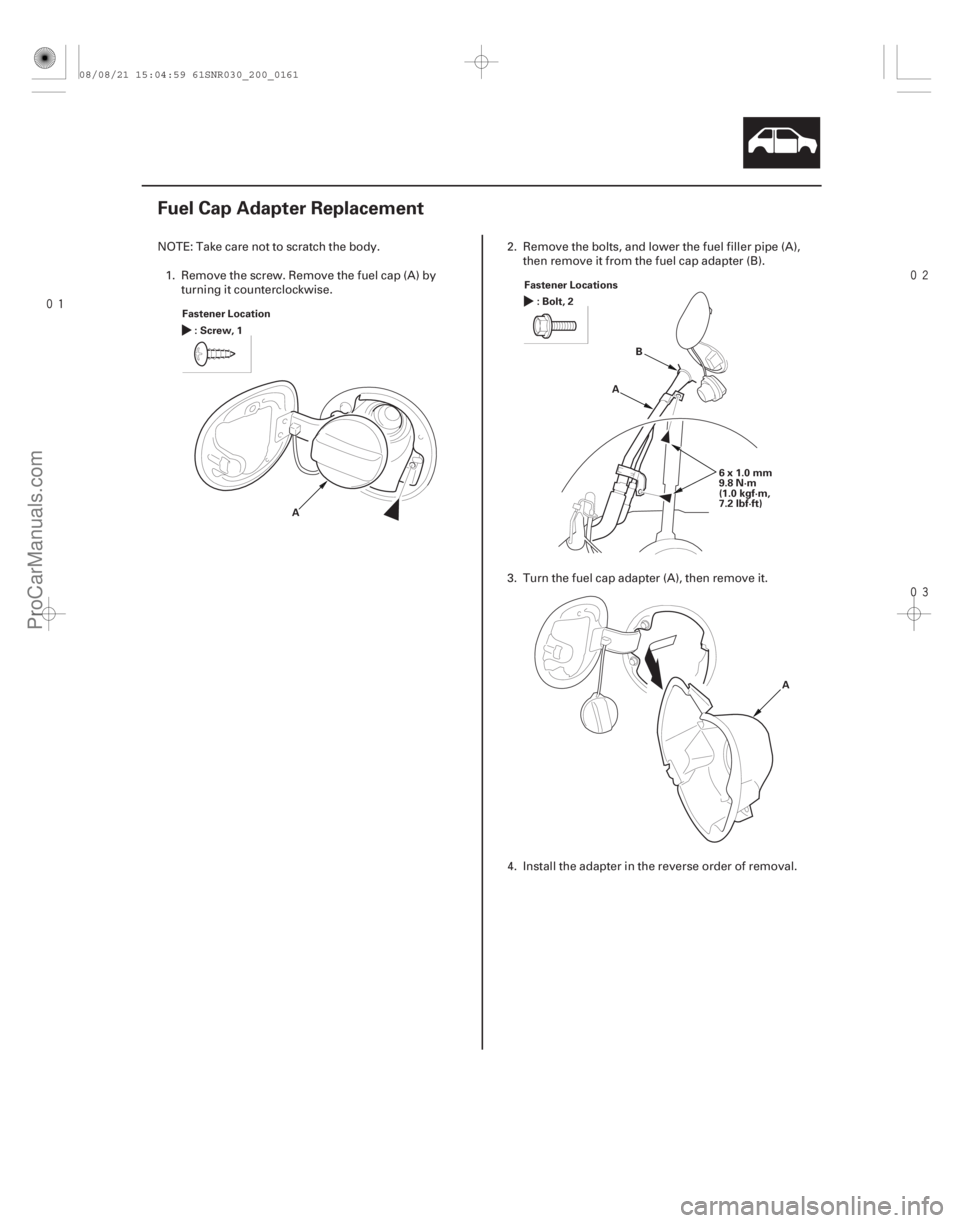
Fuel Cap Adapter Replacement
Fastener Location :Screw,1
A Fastener Locations
:Bolt,2
AB
6x1.0mm
9.8 N·m
(1.0 kgf·m,
7.2 lbf·ft)
A
NOTE: Take care not to scratch the body.1. Remove the screw. Remove the fuel cap (A) by turning it counterclockwise. 2. Remove the bolts, and lower the fuel filler pipe (A),
then remove it from the fuel cap adapter (B).
3. Turn the fuel cap adapter (A), then remove it.
4. Install the adapter in the reverse order of removal.
08/08/21 15:04:59 61SNR030_200_0161
ProCarManuals.com
DYNOMITE -2009-
Page 1862 of 2893
���� ���
�(�#������������
��������������������� �����)����
20-17520-175
Fuel Pipe Protector Replacement Rear Fender Cover Replacement
Fastener Lo")
����
�(�#�'�����������
���������������
���
� �����)���� ���
�(�#�'�����������
��������������������� �����)����
20-17520-175
Fuel Pipe Protector Replacement Rear Fender Cover Replacement
Fastener Locations :Clip,3
A Fastener Locations
:Screw,2 :Clip,1
B
A
NOTE: Take care not to scratch the body.
Put on gloves to protect your hands.
1. Remove the left rear wheel (see page 18-32).
2. Remove the clips, then remove the fuel pipe protector (A).
3. Install the protector in the reverse order of removal, and note these items:
If the clips are damaged or stress-whitened, replace them with new ones.
Push the clips into place securely. NOTE: Take care not to scratch the rear bumper and the
body.
1. Remove the screws and the clip, then remove the rear fender cover (A) from the rear bumper (B) and
the body.
2. Install the fender cover in the reverse order of removal, and if the clip is damaged or stress-
whitened, replace them with a new one.
08/08/21 15:05:08 61SNR030_200_0177
ProCarManuals.com
DYNOMITE -2009-
Page 1864 of 2893
����
�(�#�'�����������
�������������������
�������)����
20-177
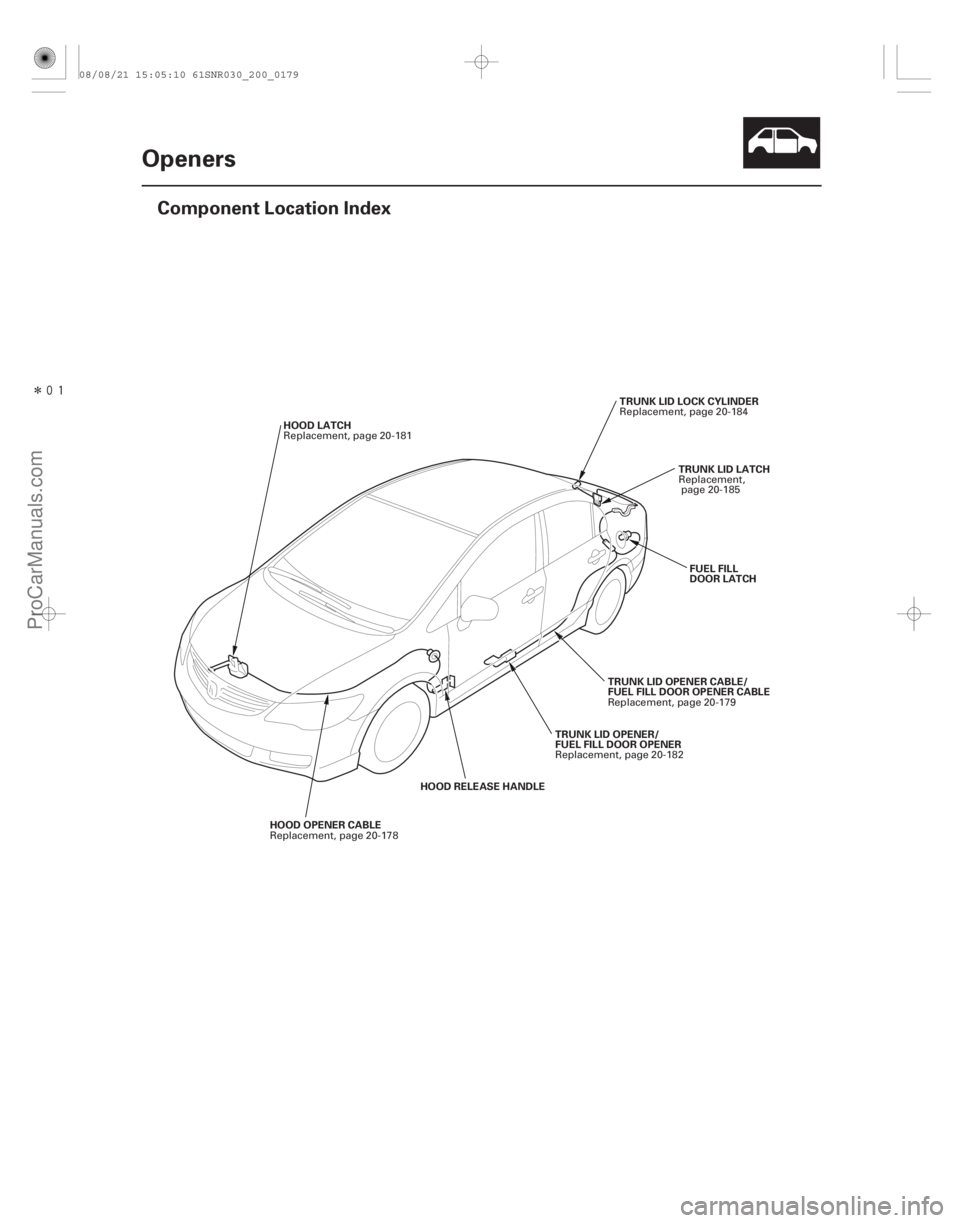
Openers
Component Location Index
TRUNK LID LOCK CYLINDER
TRUNK LID LATCH
FUEL FILL
DOOR LATCH
TRUNK LID OPENER CABLE/
FUEL FILL DOOR OPENER CABLE
HOOD OPENER CABLE HOOD LATCH
TRUNK LID OPENER/
FUEL FILL DOOR OPENER
HOOD RELEASE HANDLE Replacement, page 20-184
Replacement,page 20-185
Replacement, page 20-179
Replacement, page 20-178 Replacement, page 20-181
Replacement, page 20-182
08/08/21 15:05:10 61SNR030_200_0179
ProCarManuals.com
DYNOMITE -2009-
Page 1866 of 2893
����
20-179
Trunk Lid Opener Cable/Fuel Fill Door Opener Cable Replacement
A
B
C
Fastener Locations
:Clip,2
B : Cushion tape, 2
C
CB A
B A
A")
���
����
����
�(�#�'�����������
��������������������� �����)����
20-179
Trunk Lid Opener Cable/Fuel Fill Door Opener Cable Replacement
A
B
C
Fastener Locations
:Clip,2
B : Cushion tape, 2
C
CB A
B A
A B C
SRS components are located in this area. Review the
SRS component locations (see page 24-11) and the
precautions and procedures (see page 24-13) before
doing repairs or service.
NOTE:
Put on gloves to protect your hands.
Take care not to scratch the body and related parts.
1. Remove these items:
Rear seat cushion (see page 20-133)
Rear seat side bolster (see page 20-134)
Front door sill trim, driver’s side (see step 3 onpage 20-66)
Kick panel, driver’s side (see page 20-66)
Rear door sill trim, both sides (see page 20-67)
B-pillar lower trim, driver’s side (see page 20-72)
Trunk side trim panel, left side (see step 6 on page 20-81)
Trunk lid trim (see page 20-82)
Trunk lid opener/fuel fill door opener (see page 20-182)
Fuel cap adapter (see page 20-159)
2. Pull the carpet back as needed.
3. Release the opener cable (A) from the clips (B). Remove the cushion tape (C). 4. While pinching the hooks (A) from inside the
vehicle, remove the grommet (B) from the body.
5. Release the hook (A), then remove the grommet (B) from the fuel fill door latch (C).
(cont’d)
08/08/21 15:05:32 61SNR030_200_0181
ProCarManuals.com
DYNOMITE -2009-
Page 1867 of 2893
��������
����
20-180Openers
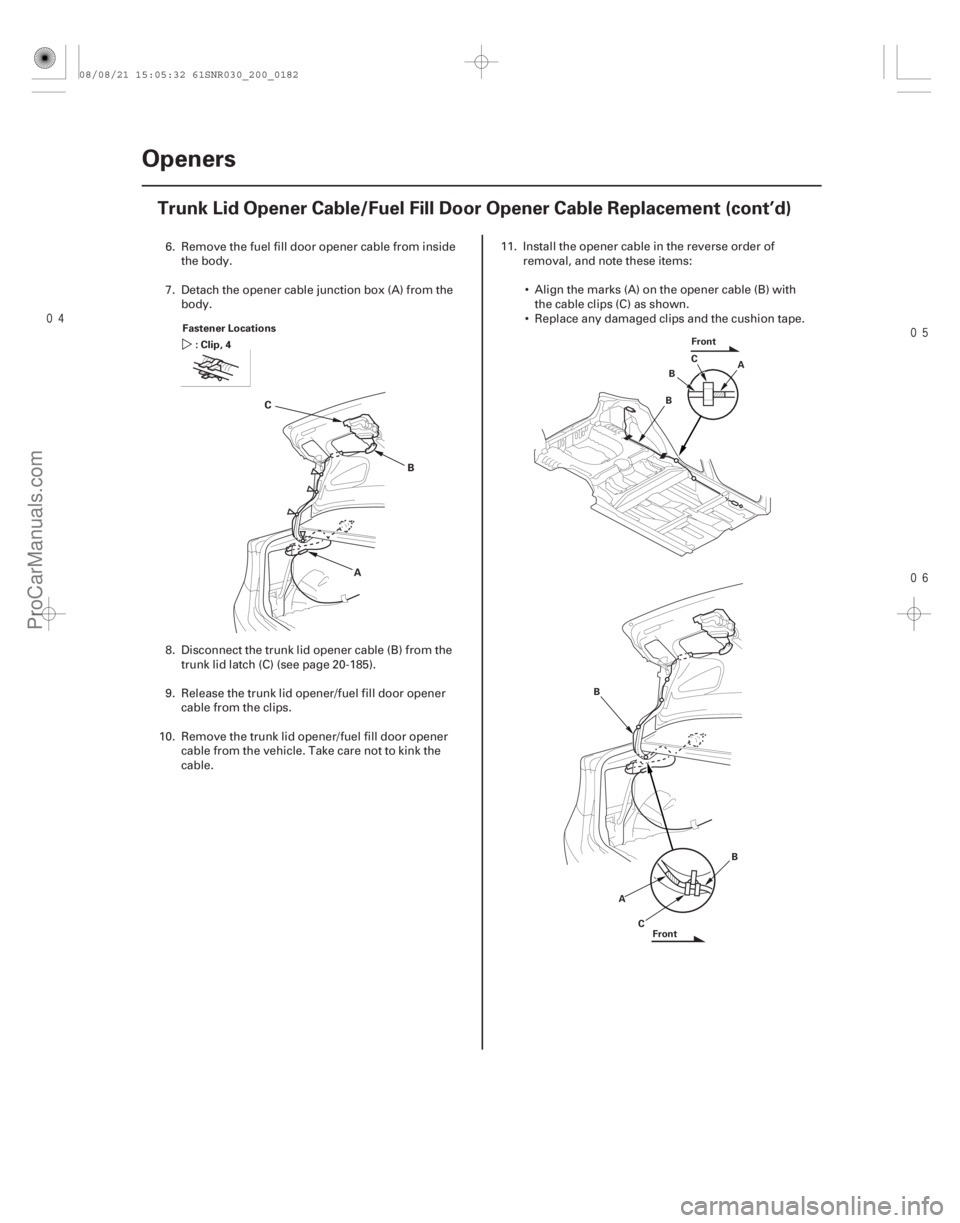
Trunk Lid Opener Cable/Fuel Fill Door Opener Cable Replacement (cont’d)
A
B
C
Fastener Locations
:Clip,4
A
B C
Front
B
A C
B
B
Front
6. Remove the fuel fill door opener cable from inside the body.
7. Detach the opener cable junction box (A) from the body.
8. Disconnect the trunk lid opener cable (B) from the trunk lid latch (C) (see page 20-185).
9. Release the trunk lid opener/fuel fill door opener cable from the clips.
10. Remove the trunk lid opener/fuel fill door opener cable from the vehicle. Take care not to kink the
cable. 11. Install the opener cable in the reverse order of
removal, and note these items:
Align the marks (A) on the opener cable (B) with the cable clips (C) as shown.
Replace any damaged clips and the cushion tape.
08/08/21 15:05:32 61SNR030_200_0182
ProCarManuals.com
DYNOMITE -2009-
Page 1869 of 2893
���
����
�(�#�'�����������
�������������������
� �����)����
S
pecial Tools Required
20-182 Openers
Trunk Lid Opener/Fuel Fill Door Opener Replacement
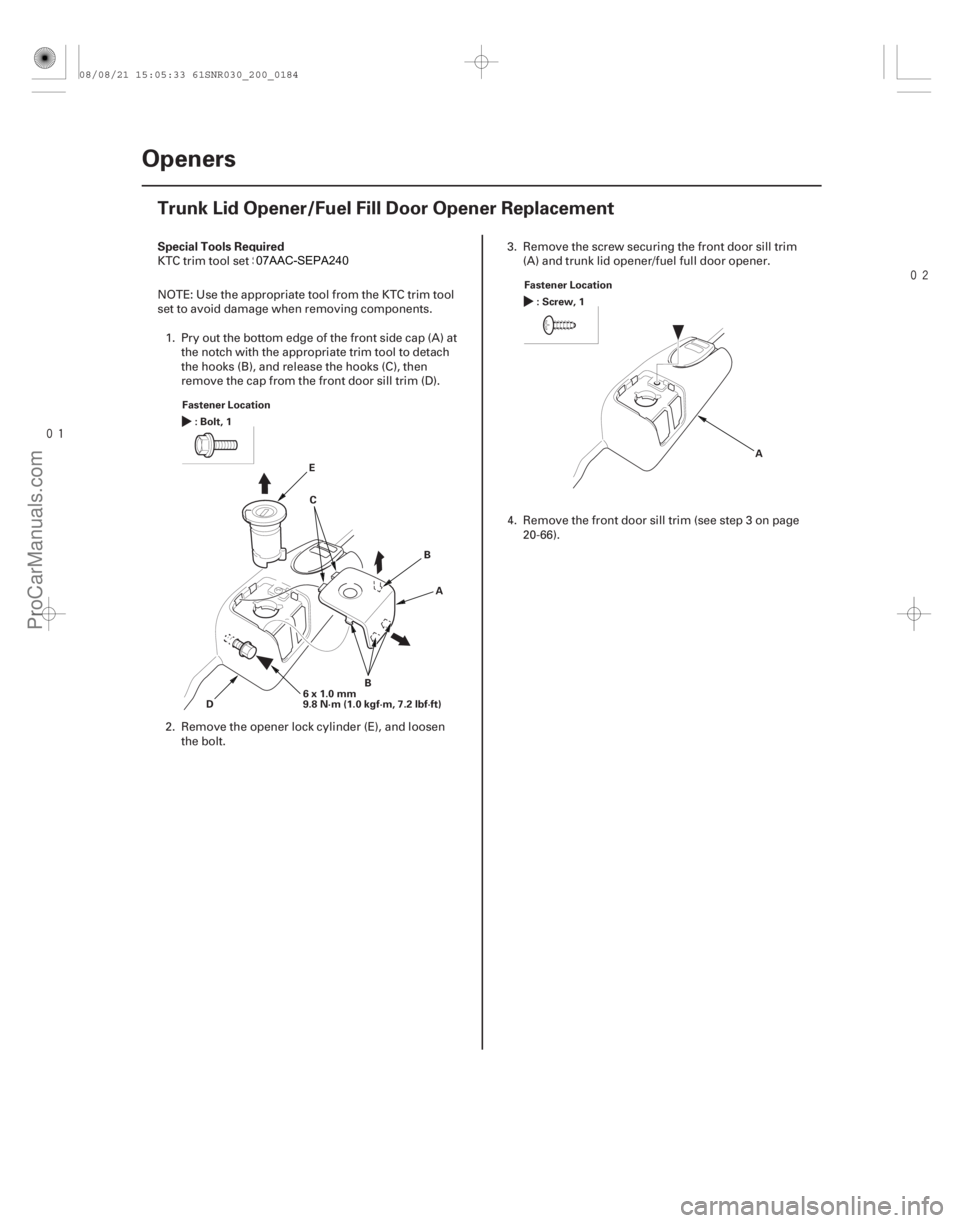
Fastener Location
:Bolt,1
6x1.0mm
9.8 N·m (1.0 kgf·m, 7.2 lbf·ft) A
D E
B
B
C F
astener Location
:Screw,1
A
KTC trim tool set SOJATP2014
NOTE: Use the appropriate tool from the KTC trim tool
s
et to avoid damage when removing components.
1. Pry out the bottom edge of the front side cap (A) at the notch with the appropriate trim tool to detach
the hooks (B), and release the hooks (C), then
remove the cap from the front door sill trim (D).
2. Remove the opener lock cylinder (E), and loosen the bolt. 3
. Remove the screw securing the front door sill trim
(A) and trunk lid opener/fuel full door opener.
4. Remove the front door sill trim (see step 3 on page 20-66).
08/08/21 15:05:33 61SNR030_200_0184
ProCarManuals.com
DYNOMITE -2009-