2005 VOLVO S80 ABS
[x] Cancel search: ABSPage 2 of 123

Volvo Cars of North America Volvo Cars of Canada Ltd.
Customer Care CenterNational Customer Service
P.O. Box 914 175 Gordon Baker Road
Rockleigh, New Jersey 07647-0914 North York, Ontario M2H 2N7
800-458-1552 800-663-8255
http://www.volvocars.us
http://www.volvocanada.com
Contents
Contents
Chapter 1 - Safety
Chapter 2 - Instruments, switches and controls
Chapter 3 - Climate control system
Chapter 4 - Interior
Chapter 5 - Keys, Locks, Alarm
Chapter 6 - Starting and driving
Chapter 7 - Wheels and tires
Chapter 8 - Maintenance/Servicing
Chapter 9 - Specifications
Chapter 10 - Audio systems
HomeLink® Universal Transceiver (option)
Index
Back Cover
© 2004 Volvo Cars of North America LLC.
General information
Shiftlock
When your car is parked, the gear selector is locked in the (P)ark position. To release the selector from this position,
turn the ignition key to position II (or start the engine), depress the brake pedal, press the button on the front side of the
gear selector and move the selector from (P)ark.
Keylock
This means that when you switch off the ignition, the gear selector must be in the (P)ark position before the key can be
removed from the ignition switch.
Anti-lock Brake System (ABS)
The ABS system in your car performs a self -diagnostic test when the vehicle first reaches the speed of approximately
12 mph (20 km/h). The brake pedal will pulsate several times and a sound may be audible from the ABS control
module. This is normal.
ProCarManuals.com
Page 5 of 123

2 0 0 5
VOLVO S80
Chapter 1 - Safety
pg. 1 Safety
Not wearing a seat belt is like believing "It'll never happen to me!" Volvo, the inventor of the three-point seat belt,
urges you and all adult occupants of your car to wear seat belts and ensure that children are properly restrained, using
an infant, car or booster seat determined by age, weight and height. Volvo also believes no child should sit in the front
seat of a car.
Fact: In every state and province, some type of child-restraint legislation has been passed. Additionally, most states
and provinces have already made it mandatory for occupants of a car to use seat belts.
So, urging you to "buckle up" is not just our recommendation - legislation in your state or province may mandate seat
belt usage. The few seconds it takes to buckle up may one day allow you to say, "It's a good thing I was wearing my
seat belt."
Seat belts
2
Center head restraint3
Front airbags (SRS)4
Side impact airbags (SIPS)10
Volvo Inflatable Curtain (VIC)11
Whiplash Protection System (WHIPS)12
Occupant safety13
Child safety14
Brake system18
Anti-lock Brake System (ABS)19
Stability Traction Control (STC)20
Dynamic Stability and Traction Control (DSTC)20
pg. 2 Seat belts
Seat belts
Always fasten the seat belts before you drive or ride. A chime will sound several times if the driver has not
fastened his seat belt.
ProCarManuals.com
Page 22 of 123

Canadian models are equipped with this warning light:
Oil pressure warning light
If the light comes on while driving, stop the car and then stop the engine immediately and check the engine oil
level . See page 137
. If the light stays on after restart, have the car towed to the nearest authorized Volvo retailer. After
hard driving, the light may come on occasionally when the engine is idling. This is normal, provided it goes off when
the engine speed is increased.
Generator warning light
If the light comes on while the engine is running, have the charging system checked.
* Rear fog light, if used, and trailer turn signal, if towing a trailer, will go on while driving.
pg. 29 Indicator and warning lights
Rear fog light
This light indicates that the rear fog light is on.
CHECK
ENGINE
Malfunction indicator lamp
On-Board Diagnostic II (OBDII): As you drive, a computer called "OBDII" monitors your car's engine, transmission,
electrical and emission systems. The CHECK ENGINE light will light up if the computer senses a condition that
potentially may need correcting. When this happens, please have your car checked by a Volvo retailer as soon as
possible.
A CHECK ENGINE light may have many causes. Sometimes, you may not notice a change in your car's behavior.
Even so, an uncorrected condition could hurt fuel economy, emission cleanliness, and driveability. Extended driving
without correcting the cause could even damage other components in your car.
Canadian models are equipped with this warning light:
NOTE : If the fuel filler cap is not closed tightly or if the engine is running when the car is refueled, the Malfunction
Indicator Lamp may indicate a fault. However, your vehicle's performance will not be affected. Use only Volvo
original or approved fuel filler caps.
Anti-lock Brake System ABS
If the warning light comes on, there is a malfunction of the ABS system (the standard braking system pwill however
function). The vehicle should be driven to a Volvo retailer for inspection. See page 19
for additional information.
Stability Traction Control (STC) system (option), or Dynamic Stability and Traction Control (DSTC) system
(option)
This indicator light will flash with STC or DSTC is actively working to stabilize the car. See pages 20-21
for more
detailed information.
ProCarManuals.com
Page 60 of 123

If you select the (MAN)ual position while driving, the gear that was being used in the (D)rive position will also
initially be selected in (MAN)ual position.
Move the gear selector forward (toward "+") to shift to a higher gear or rearward (toward "-") to shift to a lower
gear.
If you hold the gear selector toward "-", the transmission will downshift one gear , and will utilize the braking power
of the engine. If the current speed is too high for using a lower gear, the downshift will not occur until the speed has
decreased enough to allow the lower gear to be used.
If you slow down to a very low speed, the transmission will automatically shift down.
When starting in the (MAN)ual position, 3rd gear is the highest gear that may be selected.
NOTE: Kickdown (see previous page) does not function when the transmission is in the manual shift (geartronic)
mode. The gear selector must be in D (Drive) position.
* Models with a 5-cylinder turbo engine have a 5-speed transmission. Fifth gear also has the lock-up function.
W Winter/Wet driving mode - enhanced vehicle traction
Mode W will only function if the gear selector is in the (D)rive position.
Press the button at the base of the gear selector to engage/disengage this driving mode. The position of this button
may vary slightly on certain models.
An LED in the button will light up to indicate that W is engaged and this will also be displayed in the instrument
panel (see page 27
).
This mode may be selected for starting/moving off on slippery roads.
pg. 82 Four -C active chassis system
Four-C (option)
Your car can be optionally equipped with the Four-C (Continuously Controlled Chassis Concept) system.
This system is based on a number of sensors that continuously monitor factors such as the car's lateral and vertical
movements, speed, and movements of the wheels. The sensors receive data up to 500 times per second, which is used
to provide extremely fast and precise adjustment of each shock absorber. The system adjusts the stiffness of the shock
absorbers approximately 100 times per second.
The button in the center console (see the illustration on page 31
) can be used at any time to switch between the two
driving modes: Comfort or Sport.
The system then adjusts the stiffness of the shock absorbers accordingly, for example when the type of road changes,
or if the driver wishes to change driving style. This adjustment takes place instantaneously.
Comfort
ProCarManuals.com
Page 61 of 123

The Comfort mode chassis setting offers the greatest amount of shock absorption and the softest ride. This mode is
recommended for long-distance driving, or when driving in slippery conditions.
If Comfort mode was selected when the engine was switched off, this mode will be active when the engine is restarted.
Sport
An indicator lamp in the button will come on when this mode has been activated.
In Sport mode, shock absorption is stiffer to reduce the car's body sway during cornering and to provide more
immediate steering response.
If this setting was selected when the engine was switched off, Sport mode will be active when the engine is restarted.
pg. 83 Front/rear park assist (option/accessory)
A - front (accessory as available), B - rear (option)
Front/rear park assist
The park assist system(s) are designed to assist you when driving into parking spaces, garages, etc. They utilize
ultrasound sensors located in the bumpers to measure the distance to a vehicle or other object, or a person who may be
close to the front or rear of the vehicle.
When is park assist active?
Front: the system is active from the time the engine is started until the car exceeds a speed of approximately 10 mph
(15 km/h).
Rear: when the engine is running and reverse gear is selected.
NOTE:
· If the vehicle is equipped with front and rear park assist, both systems will either be activated or deactivated together.
They cannot be used separately.
· The indicator light in the button (see the illustration on page 31
) will light up to indicate that park assist system(s) are
activated.
When park assist is actively working:
1. The audio system's volume will be reduced.
2. An intermittent signal will be audible from the speakers to indicate that you are approaching a person, object,
parked vehicle, etc.
The signals begin when the distance between the bumper and the object is:
Rear: approximately 5 feet (1.5 meters)
Front: approximately 2.5 ft (0.8 meters)
3. At a distance of approximately 1 foot (30 cm), the signal will become constant.
Deactivating the system(s)
ProCarManuals.com
Page 81 of 123

Ordinary fuses
LocationAmperage
1 -
2 Auxiliary lamps (option) 20A
3 -
4 Oxygen sensors 20A
5 Crankcase ventilation heater, solenoid valves, fuel tank, leakage monitor 10A
6 Mass airflow sensor, engine control module, injectors 15A
7 -
8 AC compressor, accelerator pedal position sensor, E-box fan 10A
9 -
10 -
11 Ignition coils 20A
12 -
13 Windshield wipers 25A
14 ABS 30A
15 -
16 -
17 Driver's side low beam 20A
18 Front parking lights 15A
19 ABS 30A
20 Passenger's side low beam 20A
21 Fuel pump 15A
22 Starter motor 35A
23 Engine control module, engine relay 10A
24 -
pg. 116 Fuses in the passenger compartment
ProCarManuals.com
Page 83 of 123

38-
pg. 117 Fuses in the passenger compartment
Fuse box in the passenger compartment, behind the plastic cover
This fuse box is located behind the plastic cover below the steering wheel. When replacing a blown fuse, be sure to
replace it with a new one of the same color and amperage (written on the fuse).
Location Amperage
1 Heated passenger's seat (option) 15A
2 Heated driver's seat (option) 15A
3 Horn 15A
4 -
5 -
6 -
7 -
8 Alarm siren 5A
9 Brake light switch feed 5A
10 Instrument panel, climate system, power driver's seat (option) 10A
11 12-volt sockets - front and rear seats 15A
12 -
13 -
14 Headlight wipers (certain models) 15A
15 ABS, STC/DSTC 5A
16 Power steering, Bi -Xenon headlights (option) 10A
17 Driver's side front foglight (option) 7.5A
18 Passenger's side front foglight (option) 7.5A
19 -
20 -
21 Transmission control module, reverse gear block (M66 gearbox) 10A
22 Driver's side high beam 10A
23 Passenger's side high beam 10A
24 -
25 -
26 -
27 -
28 Power passenger's seat (option), audio system 5A
ProCarManuals.com
Page 90 of 123

Carefully insert a screwdriver and pry out the lens.
Pry out the defective bulb and replace it.
Carefully press the lower edge of lens onto the four tabs and press the upper edge of the lens into place.
pg. 123 Replacing bulbs
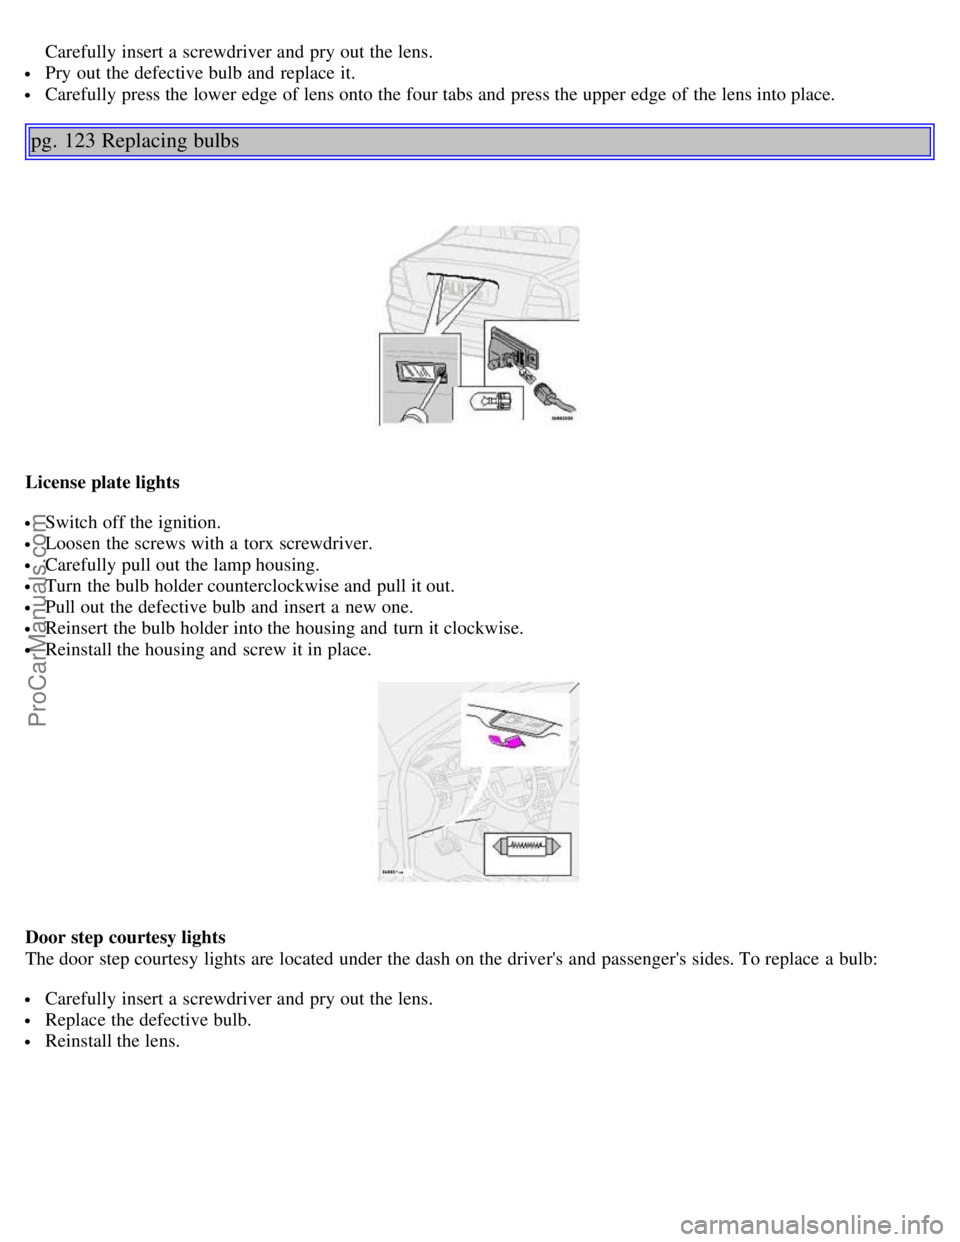
License plate lights
Switch off the ignition.
Loosen the screws with a torx screwdriver.
Carefully pull out the lamp housing.
Turn the bulb holder counterclockwise and pull it out.
Pull out the defective bulb and insert a new one.
Reinsert the bulb holder into the housing and turn it clockwise.
Reinstall the housing and screw it in place.
Door step courtesy lights
The door step courtesy lights are located under the dash on the driver's and passenger's sides. To replace a bulb:
Carefully insert a screwdriver and pry out the lens.
Replace the defective bulb.
Reinstall the lens.
ProCarManuals.com