2005 VOLVO S80 turn signal
[x] Cancel search: turn signalPage 48 of 123

"Panic" button
In an emergency situation, this feature can be used to attract attention.
Activate the "panic" button by pressing the red button on the remote control (see illustration on page 63
) for at least 3
seconds or by pressing this button twice within 3 seconds. The turn signals will flash, and the car's horn will sound.
The function can be turned off by pressing any of the buttons on the remote control or will stop automatically
after 25 seconds. When a button is pressed, there is a 5 second delay before the panic alarm is deactivated.
NOTE: This button will NOT unlock the car.
pg. 68 Alarm
The position of this button may vary, depending on the specifications of your car.
Temporarily turning off the inclination and movement alarm sensor(s) - accessory
This button will only be found in cars equipped with the accessory inclination and/or movement sensors.
FCC ID: MAYDA5823
This device complies with part 15 of the FCC rules. Operation is subject to the following conditions: (1) This device
may not cause harmful interference, and (2) this device must accept any interference received, including interference
that may cause undesired operation.
Canadian IC: 4405A-DA5823
Movement sensor DA5823 by Dynex
Operation is subject to the following conditions: (1) this device may not cause interference, and (2) this device must
accept any interference, including interference that may cause undesired operation of the device.
In certain situations it may be desirable to turn off the optional inclination and movement alarm sensors if, for
example, you drive your car onto a ferry where the rocking of the boat could trigger the alarm or if a pet is left in the
car with the doors locked.
To temporarily turn off the inclination and movement alarm sensor from the alarm system:
From the time the ignition key is turned from the Drive position (position II) until you lock the car, you can press the
button in the center console. The LED in the switch will light up and a message will be displayed in the text window
to indicate that the sensors are disconnected.
The car can then be locked in the usual way to set the alarm.
NOTE:
ProCarManuals.com
Page 49 of 123

This function will not turn off the vehicle's standard alarm.
The optional sensors are automatically reconnected to the alarm system the next time the car is unlocked and then
locked again.
LED alarm status signals
The status of the alarm system is indicated by the red LED at the top of the dash:
LED off - the alarm is not armed
LED flashes once per second - the alarm is armed
LED flashes rapidly before the ignition is switched on - the alarm has been triggered
Fault in the alarm system: If a fault has been detected in the alarm system, a message will be displayed in the text
window. Contact a Volvo retailer.
Automatic re-lock/re -arm function
If the car is unlocked with the remote, the car will re-lock and the alarm will re-arm after 2 minutes unless a door or
the trunk has been opened.
pg. 69 Child safety locks - rear doors
Child safety locks - rear doors
The controls are located on the rear door jambs. Use the ignition key or a screwdriver to adjust these controls.
A The door cannot be opened from the inside. Normal operation from the outside.
B The door lock functions normally.
WARNING!
Remember, in the event of an accident, the rear seat passengers cannot open the doors from the inside with the
buttons in position A.
pg. 70
This page intentionally left blank.
Contents | Top of Page
ProCarManuals.com
Page 85 of 123
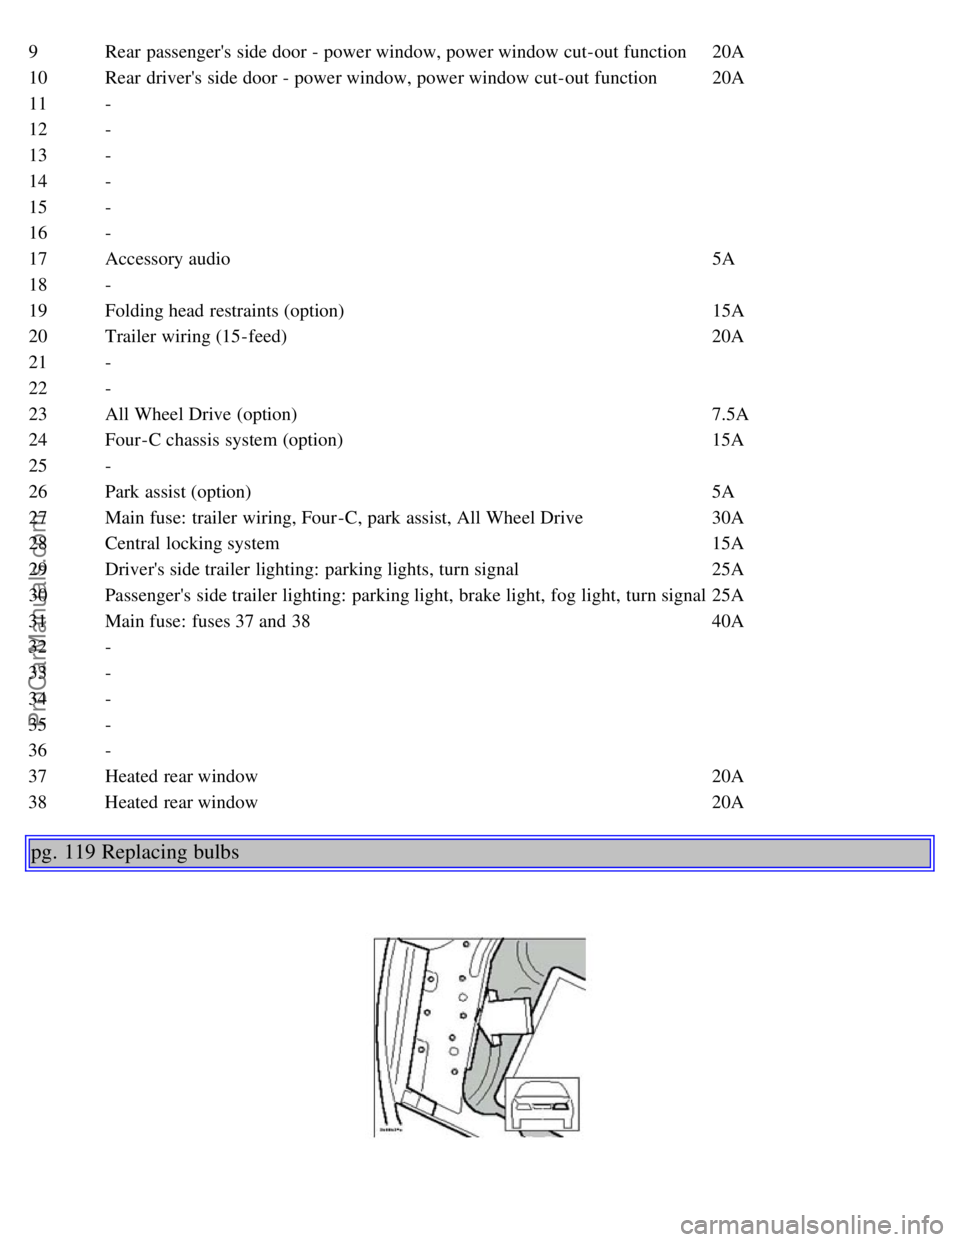
9Rear passenger's side door - power window, power window cut-out function 20A
10Rear driver's side door - power window, power window cut-out function 20A
11 -
12 -
13 -
14 -
15 -
16 -
17 Accessory audio 5A
18 -
19 Folding head restraints (option) 15A
20 Trailer wiring (15-feed) 20A
21 -
22 -
23 All Wheel Drive (option) 7.5A
24 Four-C chassis system (option) 15A
25 -
26 Park assist (option) 5A
27 Main fuse: trailer wiring, Four-C, park assist, All Wheel Drive 30A
28 Central locking system 15A
29 Driver's side trailer lighting: parking lights, turn signal 25A
30 Passenger's side trailer lighting: parking light, brake light, fog light, turn signal 25A
31 Main fuse: fuses 37 and 38 40A
32 -
33 -
34 -
35 -
36 -
37 Heated rear window 20A
38 Heated rear window 20A
pg. 119 Replacing bulbs
ProCarManuals.com
Page 87 of 123
pg. 120 Replacing bulbs
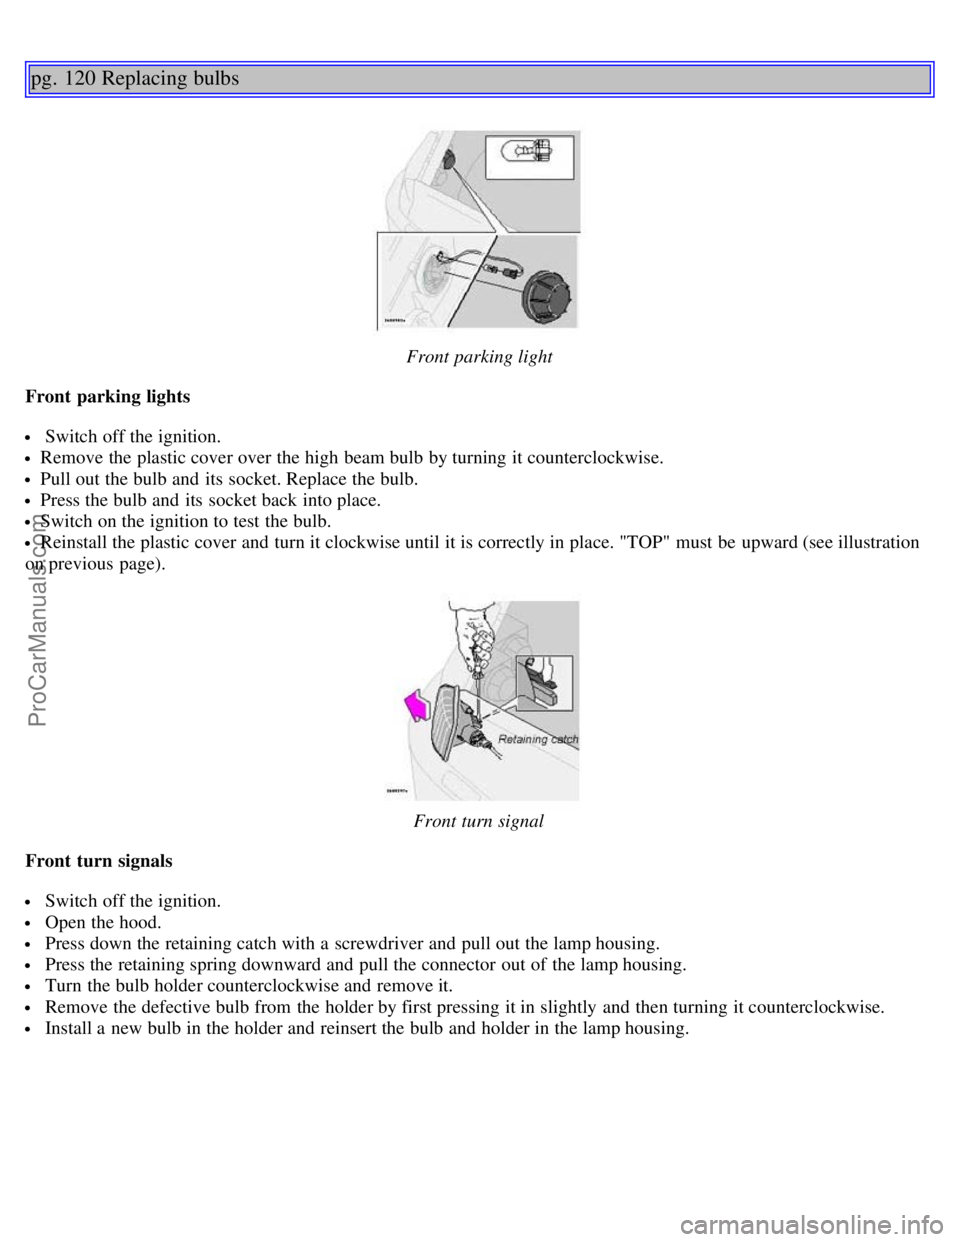
Front parking light
Front parking lights
Switch off the ignition.
Remove the plastic cover over the high beam bulb by turning it counterclockwise.
Pull out the bulb and its socket. Replace the bulb.
Press the bulb and its socket back into place.
Switch on the ignition to test the bulb.
Reinstall the plastic cover and turn it clockwise until it is correctly in place. "TOP" must be upward (see illustration
on previous page).
Front turn signal
Front turn signals
Switch off the ignition.
Open the hood.
Press down the retaining catch with a screwdriver and pull out the lamp housing.
Press the retaining spring downward and pull the connector out of the lamp housing.
Turn the bulb holder counterclockwise and remove it.
Remove the defective bulb from the holder by first pressing it in slightly and then turning it counterclockwise.
Install a new bulb in the holder and reinsert the bulb and holder in the lamp housing.
ProCarManuals.com
Page 88 of 123
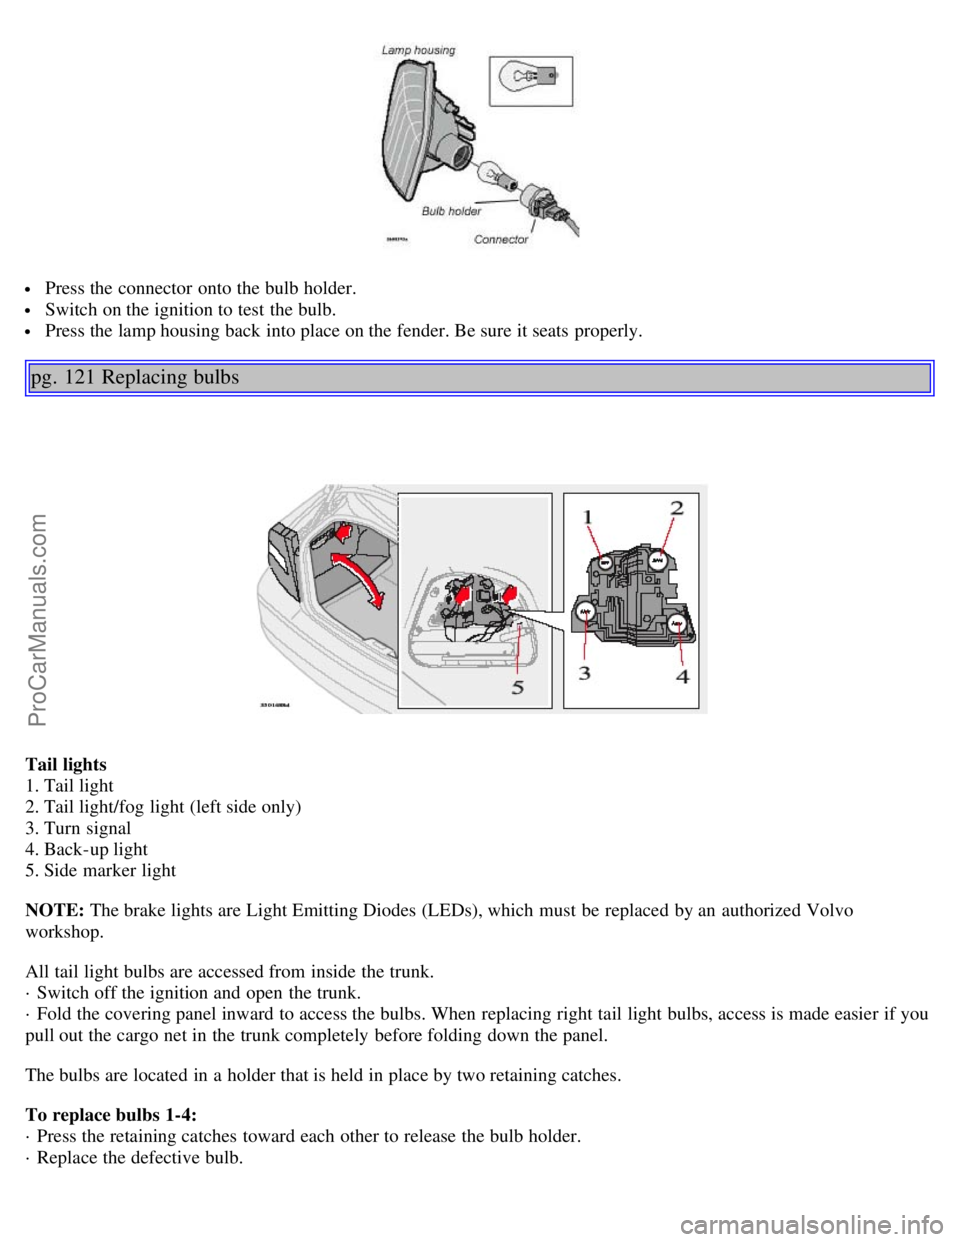
Press the connector onto the bulb holder.
Switch on the ignition to test the bulb.
Press the lamp housing back into place on the fender. Be sure it seats properly.
pg. 121 Replacing bulbs
Tail lights
1. Tail light
2. Tail light/fog light (left side only)
3. Turn signal
4. Back-up light
5. Side marker light
NOTE: The brake lights are Light Emitting Diodes (LEDs), which must be replaced by an authorized Volvo
workshop.
All tail light bulbs are accessed from inside the trunk.
· Switch off the ignition and open the trunk.
· Fold the covering panel inward to access the bulbs. When replacing right tail light bulbs, access is made easier if you
pull out the cargo net in the trunk completely before folding down the panel.
The bulbs are located in a holder that is held in place by two retaining catches.
To replace bulbs 1-4:
· Press the retaining catches toward each other to release the bulb holder.
· Replace the defective bulb.
ProCarManuals.com
Page 97 of 123
pg. 149 Electrical system
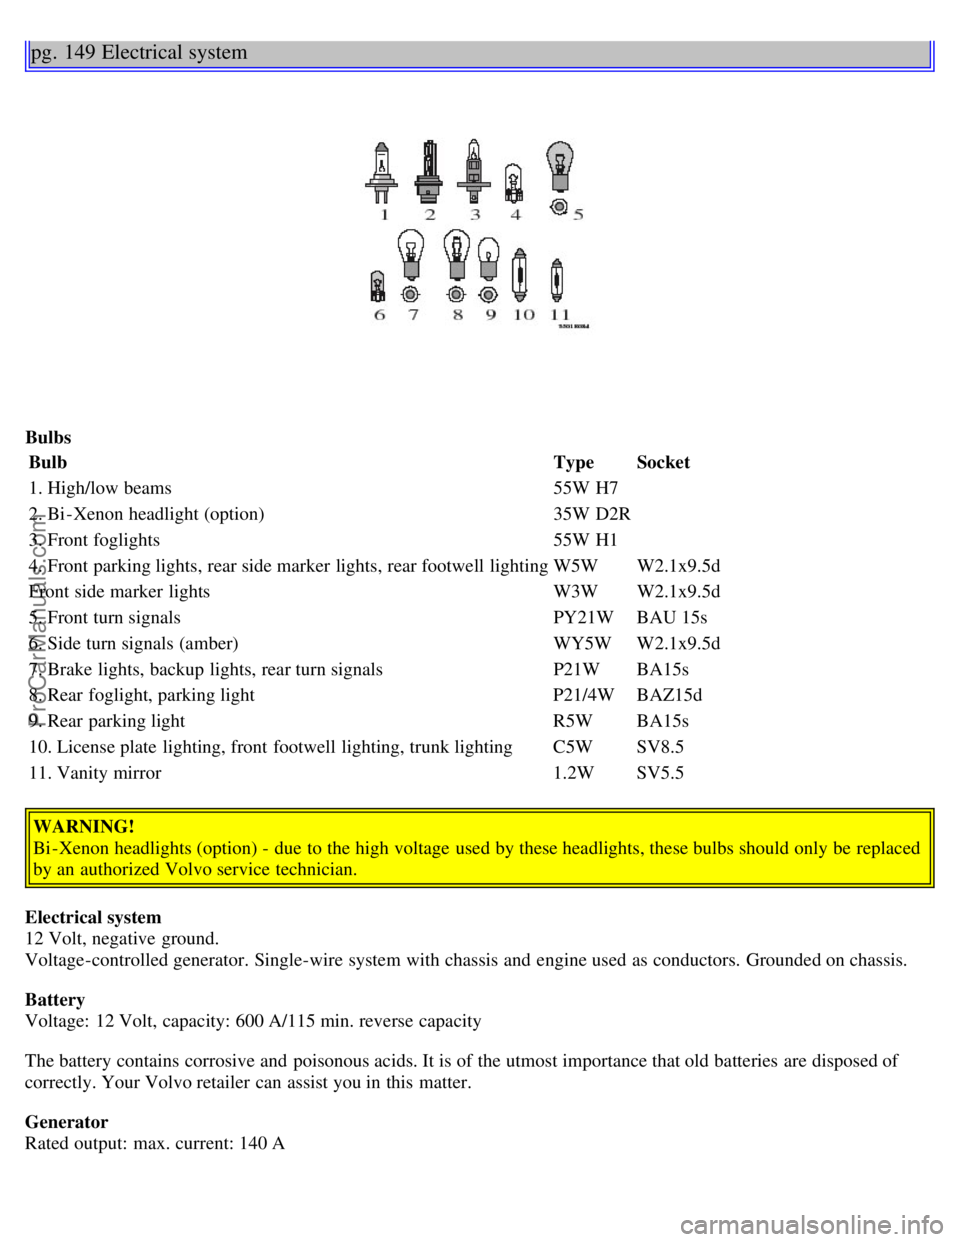
BulbsBulb TypeSocket
1. High/low beams 55W H7
2. Bi -Xenon headlight (option) 35W D2R
3. Front foglights 55W H1
4. Front parking lights, rear side marker lights, rear footwell lighting W5WW2.1x9.5d
Front side marker lights W3WW2.1x9.5d
5. Front turn signals PY21WBAU 15s
6. Side turn signals (amber) WY5WW2.1x9.5d
7. Brake lights, backup lights, rear turn signals P21WBA15s
8. Rear foglight, parking light P21/4WBAZ15d
9. Rear parking light R5WBA15s
10. License plate lighting, front footwell lighting, trunk lighting C5WSV8.5
11. Vanity mirror 1.2WSV5.5
WARNING!
Bi -Xenon headlights (option) - due to the high voltage used by these headlights, these bulbs should only be replaced
by an authorized Volvo service technician.
Electrical system
12 Volt, negative ground.
Voltage-controlled generator. Single-wire system with chassis and engine used as conductors. Grounded on chassis.
Battery
Voltage: 12 Volt, capacity: 600 A/115 min. reverse capacity
The battery contains corrosive and poisonous acids. It is of the utmost importance that old batteries are disposed of
correctly. Your Volvo retailer can assist you in this matter.
Generator
Rated output: max. current: 140 A
ProCarManuals.com
Page 106 of 123
1. Select radio mode using the AM or FM buttons.
2. Start the search by pressing AUTO for more than 2 seconds.
3. AUTO appears in the display and a number of stations with strong (max. 10) from the selected frequency band will
be stored in the auto-store memory. If there are no stations with sufficient signal strength, NO STATION is displayed.
4. Press the AUTO button or the arrow keys on the optional steering wheel controls briefly to select the stored stations.
When the radio is in auto-store mode, AUTO is shown in the display. AUTO disappears when you return to the
normal radio mode.
Return to the normal radio mode by pressing the AM, FM, or EXIT button or turn the PRESET/CD knob.
To return to the Auto-store mode, press the AUTO button briefly.
pg. 159 Radio functions HU-650/HU-850
Radio Broadcast Data System - RBDS
This feature, which may not be available in your area, functions only with FM broadcasts. The radio in your car is
equipped with an advanced system allowing information from broadcasters to be transmitted visually, as text, together
with the audio signal. This information is then decoded by the radio and made available for several new and unique
features.
The RBDS or Radio Broadcast Data System operates in the FM band only, and the information transmitted is supplied
exclusively by participating broadcasters. Volvo has no control over the accuracy of the data or information.
Coverage by local broadcasters may be limited at this time, but as the technology and benefits grow, you will find the
radio in your car is equipped to take advantage of this system.
PI (Program Information) Seek:
When an FM station has been stored as a preset, the radio also stores RBDS program information if it is available.
When the preset is selected at a later time, the radio tries to access updated program information. In weak signal areas,
there may be a delay before the station becomes audible. During this delay, "PI seek" will be displayed and there will
be no sound.
PI seek can be interrupted by pressing EXIT.
Radio text
Certain RBDS stations broadcast program information, which can be shown in the display. The text will be shown
twice in the display.
To start this function:
Press the FM button for several seconds.
To deactivate this function:
Press FM briefly.
Station information will be shown twice in the display.
Alarm
Alarms bulletins are transmitted automatically by certain RBDS stations. The function cannot be deactivated.
"Alarm!" is shown in the radio display when an alarm message is sent. The function is used to warn motorists of
ProCarManuals.com
Page 118 of 123
Seat belts - cleaning..........129
Seats - front..........54
Self supporting run flat tires..........103
Servicing..........133, 134
Shiftlock..........75, 76, 78, 80
Side impact airbag system (SIPS)..........10
Side marker lights - replacing..........124
Side turn signals - replacing..........124
Sideview mirrors..........42
Sideview mirrors - heated..........39
Sideview mirrors - memory function..........42
Spare tire.......... 59
Spark plugs..........133, 148
Specifications..........146
Speed -sensitive power steering..........85
SRS..........6
SRS diagnostic system..........28
Stability Traction Control (STC)..........19
Start inhibitor (immobilizer)..........62, 75
Starting the engine..........75
Steering wheel adjustment ........ 38
Steering wheel lock..........38
Storage compartment in center console..........58
Storage compartments..........57
Sun blinds..........44
Supplemental Restraint System..........4, 28
Suspension..........148
Switches in center console ........ 31
T
Tachometer..........27
Tail light bulbs - replacing ........ 121
Temperature gauge..........27
Text window..........30
Three-way catalytic converters..........95, 96
Timing belt..........133
Tire inflation..........99
Tire inflation pressures tables..........101
Tire Pressure Monitoring System (TPMS)..........102
Tires..........85, 98 - 109
Tires - changing..........110, 111
Tool bag..........59
Towing a trailer..........89
Towing eyelet..........87
Towing the car..........87, 88
ProCarManuals.com