2005 VOLVO S80 hood open
[x] Cancel search: hood openPage 21 of 123

13 Fuel gauge
The fuel tank holds approximately 21.1 US gal. (80 liters) on T6 models, or 18 US gal. (68 liters) on the S80 All
Wheel Drive and the S80 2.5T Front Wheel Drive.
A warning light in the gauge comes on there are approximately 1.8 US gal. (8 liters) of fuel remaining in the tank.
14 Indicator and warning lights
pg. 28 Indicator and warning lights
The indicator and warning lights described on pages 28 and 29 should never stay on when driving*
When the ignition key is turned, all of the warning lights in the lower right-hand side of the instrument panel should
go on to test the function of the bulbs. If a light does not go off after the engine has started, the system indicated
should be inspected.
NOTE: The parking brake reminder light will not go off until the parking brake has been fully released.
Warning lamp in the center of the instrument panel
This lamp lights up red or yellow depending on the severity of the fault that has been detected.
Yellow light: Follow the instructions shown in the text window.
Red light: Stop the car as soon as possible in a suitable location and read the message shown in the text window.
Supplemental Restraint System (SRS)
If the light comes on (or stays on after the vehicle has started), the SRS diagnostic system has detected a fault. Drive to
an authorized Volvo retailer for an inspection of the system. See the SRS section for more information.
BRAKE
Brake failure warning light
If the light comes on while driving or braking, stop immediately, open the hood and check the brake fluid level
in the reservoir. See page 138
for reservoir position and instructions.
Canadian models are equipped with this warning light:
Park
Brake
Parking brake reminder light
This light will be on when the parking brake (hand brake) is applied. The parking brake lever is situated between the
front seats.
ProCarManuals.com
Page 47 of 123

Valet security locking
The security locking feature of your car allow you to prevent unwanted access to your trunk and glove compartment,
while still allowing a parking attendant to unlock, start, and relock the rest of your car. To prevent unwanted access to
the trunk and glove compartment do the following:
Give your service key to the parking attendant.
Insert your master key into the glove compartment. Turn it 90 degrees clockwise and remove the key. The glove
compartment cannot be unlocked with the service key.
Insert your master key into the ignition and turn it to position II.
Press the trunk lock button in the center console. An LED and a message in the text window will show that the trunk
lock has be activated.
Turn off the ignition and remove the master key.
With the trunk lock activated, neither the service key nor the remote control will open the trunk.
The function can be turned off (deactivated) by turning the ignition key to position II and pressing the trunk lock
button again (the LED in the button will go out and VALET LOCK OFF" will be displayed in the text window).
* The position of this button may vary, depending on the specifications of your car.
pg. 67 Alarm
Alarm
The alarm is automatically armed whenever you lock your car.
When armed, the alarm continuously monitors a number of points on the car. The following conditions will set off the
alarm:
The hood is forced opened.
The trunk is forced opened.
A door is forced opened.
The ignition switch is tampered with.
If there is movement in the passenger compartment (if the car is equipped with the optional movement sensor).
The car is lifted or towed (if the car is equipped with the optional inclination sensor).
The battery is disconnected (while the alarm is set).
Arming the alarm
Press the LOCK button on the remote control, lock the car using the key in the driver's door or press the central lock
button on one of the front doors with the door open. One long flash of the turn signals will confirm that the alarm is
armed.
Disarming the alarm
Press the UNLOCK button on the remote control or unlock the doors with the key.
Turning off (stopping) the alarm
If the alarm is sounding, it can be stopped by pressing the UNLOCK button on the remote control or by unlocking the
driver's door with the key.
Visual alarm signal
The visual alarm signal is given by flashing all turn signals and turning on the interior lighting for approximately 5
minutes.
Audible alarm signal
An audible alarm signal is given by a battery powered siren. One alarm cycle lasts for 25 seconds.
ProCarManuals.com
Page 79 of 123

2 0 0 5
VOLVO S80
Chapter 8 - Maintenance/Servicing
pg. 113 Maintenance/Servicing
Fuses114
Replacing bulbs119
Paint touch up126
Washing the car127
Cleaning the upholstery129
Maintenance service, Warranty130
Fuel/emissions systems131
Drive belt, Coolant132
Emissions maintenance133
Washer fluid, Hoisting the car134
Opening the hood, Engine compartment135
Engine oil136
Power steering/Brake fluid reservoirs138
Replacing the battery139
Battery maintenance140
Replacing wiper blades141
pg. 114 Fuses
ProCarManuals.com
Page 86 of 123

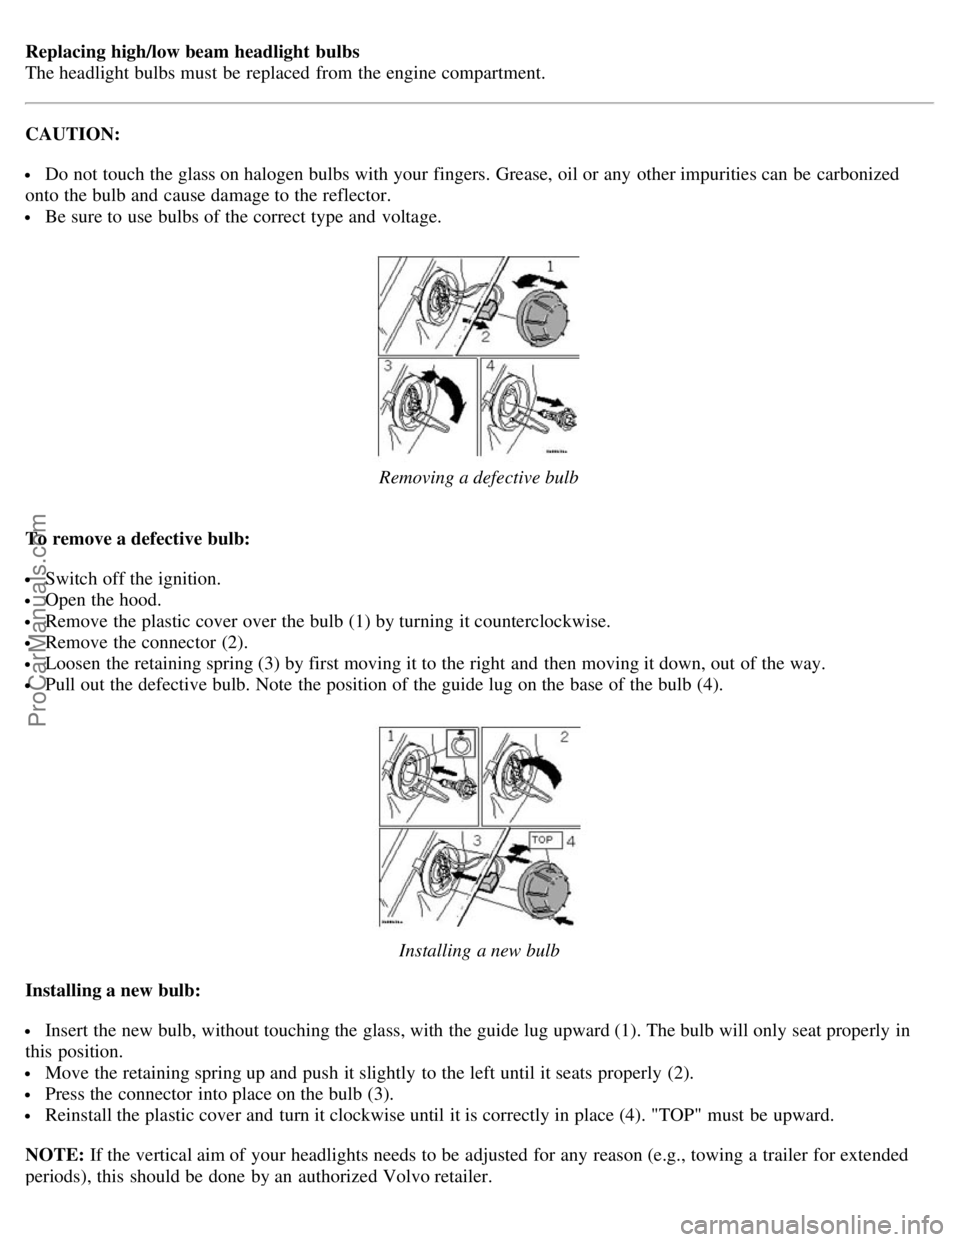
Replacing high/low beam headlight bulbs
The headlight bulbs must be replaced from the engine compartment.
CAUTION:
Do not touch the glass on halogen bulbs with your fingers. Grease, oil or any other impurities can be carbonized
onto the bulb and cause damage to the reflector.
Be sure to use bulbs of the correct type and voltage.
Removing a defective bulb
To remove a defective bulb:
Switch off the ignition.
Open the hood.
Remove the plastic cover over the bulb (1) by turning it counterclockwise.
Remove the connector (2).
Loosen the retaining spring (3) by first moving it to the right and then moving it down, out of the way.
Pull out the defective bulb. Note the position of the guide lug on the base of the bulb (4).
Installing a new bulb
Installing a new bulb:
Insert the new bulb, without touching the glass, with the guide lug upward (1). The bulb will only seat properly in
this position.
Move the retaining spring up and push it slightly to the left until it seats properly (2).
Press the connector into place on the bulb (3).
Reinstall the plastic cover and turn it clockwise until it is correctly in place (4). "TOP" must be upward.
NOTE: If the vertical aim of your headlights needs to be adjusted for any reason (e.g., towing a trailer for extended
periods), this should be done by an authorized Volvo retailer.
ProCarManuals.com
Page 87 of 123

pg. 120 Replacing bulbs
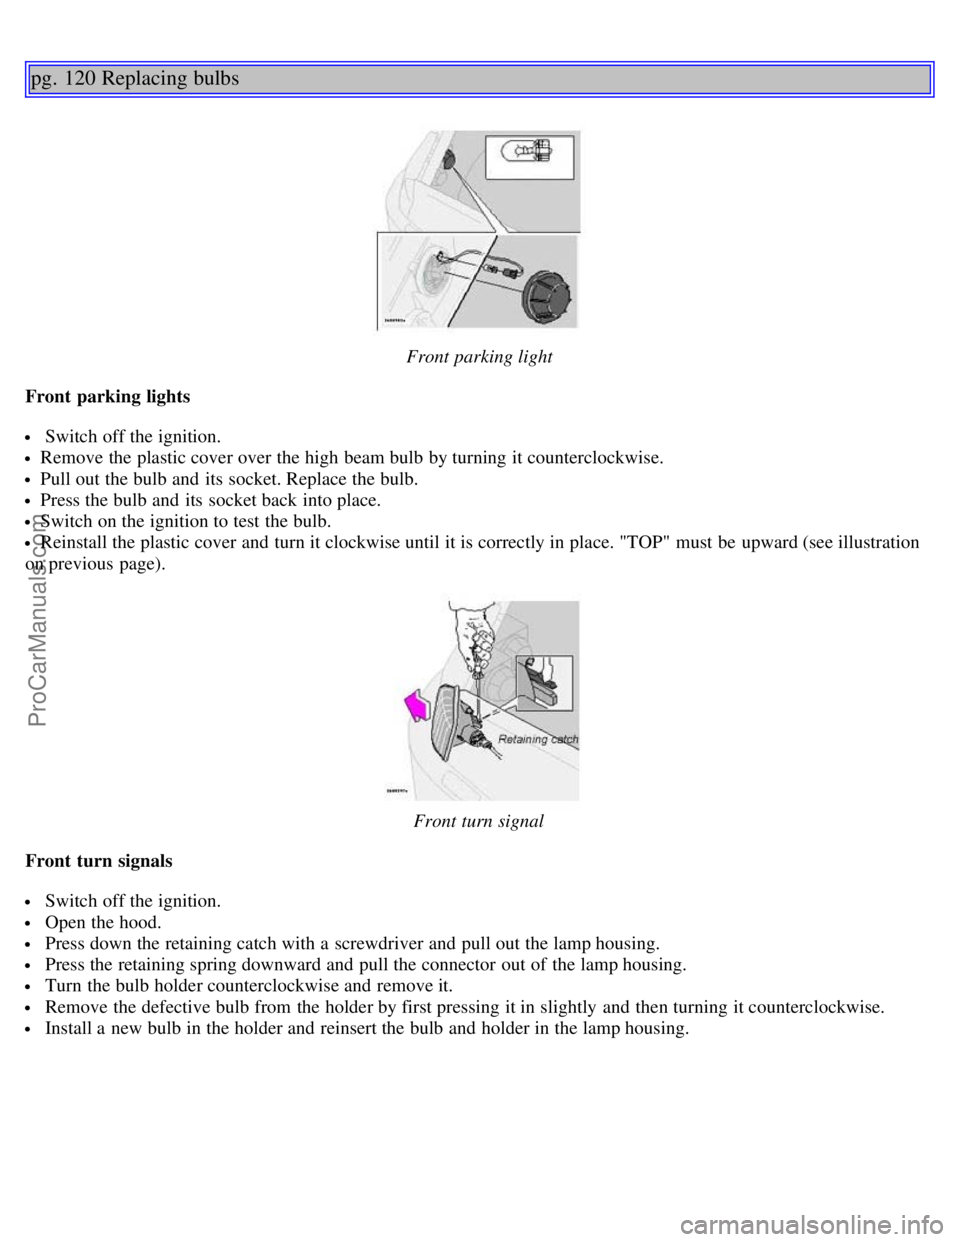
Front parking light
Front parking lights
Switch off the ignition.
Remove the plastic cover over the high beam bulb by turning it counterclockwise.
Pull out the bulb and its socket. Replace the bulb.
Press the bulb and its socket back into place.
Switch on the ignition to test the bulb.
Reinstall the plastic cover and turn it clockwise until it is correctly in place. "TOP" must be upward (see illustration
on previous page).
Front turn signal
Front turn signals
Switch off the ignition.
Open the hood.
Press down the retaining catch with a screwdriver and pull out the lamp housing.
Press the retaining spring downward and pull the connector out of the lamp housing.
Turn the bulb holder counterclockwise and remove it.
Remove the defective bulb from the holder by first pressing it in slightly and then turning it counterclockwise.
Install a new bulb in the holder and reinsert the bulb and holder in the lamp housing.
ProCarManuals.com
Page 115 of 123

Fuel filler cap..........74
Fuel filler door..........74
Fuel filler door - unlocking manually..........35
Fuel filter ..........133
Fuel gauge..........27
Fuel requirements..........72
Fuel system..........131, 133, 148
Fuel/emissions systems..........131
Fuses..........114 - 118
G
Gas cap..........74
Gasoline..........72
Gear indicator..........27
Geartronic ..........80
Generator..........149
Generator warning light..........28
Glossary of tire terminology..........105
H
Hand brake..........40
Handling..........85
Hazard warning flashers..........39
Head restraint - center rear..........3
Headlight bulbs - replacing..........119
Headlight wiper blades - replacing..........141
Headlights..........34
Heated front seats..........39
Heated rear window..........39
Heated sideview mirrors..........39
Heating..........47 - 49, 51
Hoisting the car..........134
Home Safe System..........62
HomeLink® ........169, 170, 171
Hood - opening..........135
I
Ignition switch..........38
Immobilizer (start inhibitor)..........65,75
Indicator lights..........28, 29
Inflatable curtain (IC)..........11
Inflation pressure tables..........101
Instrument illumination..........34
Instrument panel..........27
Instruments..........26
Integrated booster cushion ........ 15
Interior Air Quality system .........51
ProCarManuals.com
Page 116 of 123

Interior features - overview..........24
Interior lighting..........56
ISOFIX Child seat anchors........ 14
J
Jack..........59
, 110, 111
Jump starting..........92
K
Key - removing from ignition switch..........75
Keyless entry system..........63, 64
Keyless entry system - replacing batteries..........64
Keylock..........75
Keys..........62
Kickdown..........79, 80
L
Label information..........144
Laminated side windows..........128
LATCH/ISOFIX anchors........ 14
License plate lights - replacing..........123
Lifting the car..........134
Load carriers..........86
Locking and unlocking the car..........62
Locking steering wheel..........38
Long distance trip..........94
Long loads..........55
M
Maintenance service..........130
Malfunction indicator lamp..........29
Manually unlocking the fuel filler door..........35
Mirrors..........42
Mirrors, sideview - memory function..........42
Moonroof..........43
O
Occupant safety..........13
Octane rating..........72
Odometer..........27
Oil - engine..........93, 136, 137, 147
Oil pressure warning light ........ 28
Opening the hood..........135
Opening the trunk from the inside..........65
P
Paint touch-up..........126
Panic function (alarm)..........67
Park Assist..........83
Parking brake..........40
ProCarManuals.com