2005 VOLVO S80 change wheel
[x] Cancel search: change wheelPage 42 of 123
Use the switch on the front door armrests to lock/unlock the car from the inside.WARNING!
If the doors are locked while driving, this may hinder rapid access to the occupants of the car in the event of an
accident. (Also see information on "Child safety locks").
Note: To help prevent accidentally locking the keys in the car, the central locking system is designed to unlock the
doors immediately if the key is left in the ignition switch, the car is locked using the lock button on the door and the
door is then closed. A sound from the lock will be audible at this time.
Please note that this function will not unlock the doors if the engine is running.
Immobilizer (start inhibitor)
Each of the keys supplied with your car contains a coded transmitter. The code in the key is transmitted to an antenna
in the ignition switch where it is compared to the code stored in the start inhibitor module. The car will start only with
a properly coded key.
If you misplace a key, take the other keys to an authorized Volvo retailer for reprogramming as an antitheft measure.
This device complies with part 15 of the FCC rules. Operation is subject to the following condition: (1) This device
may not cause harmful interference, and (2) this device must accept any interference received, including interference
that may cause undesired operation.
Exterior Courtesy lights
Home Safe System
When you leave your car at night, you can make use of the courtesy lighting function:
Remove the key from the ignition switch.
Pull the turn signal lever towards the steering wheel (as when using the headlight flasher function).
Exit the car and lock the doors.
The headlights, parking lights, license plate lights and the lights in the sideview mirrors will now come on and remain
on for 30, 60 or 90 seconds (the time interval is at your discretion and can be changed by an authorized Volvo retailer).
Approach lighting
When approaching the car at night, press the yellow button in the central locking remote control (see illustration on
page 63
). This lights up the interior courtesy light, parking lights, license plate lights and the lights in the sideview
mirrors.
pg. 63 Remote keyless entry system
ProCarManuals.com
Page 60 of 123

If you select the (MAN)ual position while driving, the gear that was being used in the (D)rive position will also
initially be selected in (MAN)ual position.
Move the gear selector forward (toward "+") to shift to a higher gear or rearward (toward "-") to shift to a lower
gear.
If you hold the gear selector toward "-", the transmission will downshift one gear , and will utilize the braking power
of the engine. If the current speed is too high for using a lower gear, the downshift will not occur until the speed has
decreased enough to allow the lower gear to be used.
If you slow down to a very low speed, the transmission will automatically shift down.
When starting in the (MAN)ual position, 3rd gear is the highest gear that may be selected.
NOTE: Kickdown (see previous page) does not function when the transmission is in the manual shift (geartronic)
mode. The gear selector must be in D (Drive) position.
* Models with a 5-cylinder turbo engine have a 5-speed transmission. Fifth gear also has the lock-up function.
W Winter/Wet driving mode - enhanced vehicle traction
Mode W will only function if the gear selector is in the (D)rive position.
Press the button at the base of the gear selector to engage/disengage this driving mode. The position of this button
may vary slightly on certain models.
An LED in the button will light up to indicate that W is engaged and this will also be displayed in the instrument
panel (see page 27
).
This mode may be selected for starting/moving off on slippery roads.
pg. 82 Four -C active chassis system
Four-C (option)
Your car can be optionally equipped with the Four-C (Continuously Controlled Chassis Concept) system.
This system is based on a number of sensors that continuously monitor factors such as the car's lateral and vertical
movements, speed, and movements of the wheels. The sensors receive data up to 500 times per second, which is used
to provide extremely fast and precise adjustment of each shock absorber. The system adjusts the stiffness of the shock
absorbers approximately 100 times per second.
The button in the center console (see the illustration on page 31
) can be used at any time to switch between the two
driving modes: Comfort or Sport.
The system then adjusts the stiffness of the shock absorbers accordingly, for example when the type of road changes,
or if the driver wishes to change driving style. This adjustment takes place instantaneously.
Comfort
ProCarManuals.com
Page 67 of 123
WARNING!
- Under-inflation is the most common cause of tire failure and may result in severe tire cracking, tread separation, or
"blowout," with unexpected loss of vehicle control and increased risk of injury.
- Under-inflated tires reduce the load carrying capacity of your vehicle.
When weather temperature changes occur, tire inflation pressures also change. A 10-degree temperature drop causes a
corresponding drop of 1 psi (7 kPa) in inflation pressure. Check your tire pressures frequently and adjust them to the
proper pressure, which can be found on the vehicle's tire information placard or certification label.
Checking tire pressure
Cold tires
Inflation pressure should be checked when the tires are cold.
The tires are considered to be cold when they have the same temperature as the surrounding (ambient) air.
This temperature is normally reached after the car has been parked for at least 3 hours.
pg. 100 Wheels and tires
After driving a distance of approximately 1 mile (1.6 km), the tires are considered to be hot. If you have to drive
farther than this distance to pump your tire(s), check and record the tire pressure first and add the appropriate air
pressure when you get to the pump.
If checking tire pressure when the tire is hot, never "bleed" or reduce air pressure. The tires are hot from driving and it
is normal for pressures to increase above recommended cold pressures. A hot tire at or below recommended cold
inflation pressure could be significantly under-inflated.
To check inflation pressure:
1. Remove the cap from the valve on one tire, then firmly press the tire gauge onto the valve.
2. Add air to reach the recommended air pressure
3. Replace the valve cap.
4. Repeat this procedure for each tire, including the spare.
5. Visually inspect the tires to make sure there are no nails or other objects embedded that could puncture the tire and
cause an air leak.
6. Check the sidewalls to make sure there are no gouges, cuts, bulges or other irregularities.
NOTE:
• If you overfill the tire, release air by pushing on the metal stem in the center of the valve. Then recheck the pressure
with your tire gauge.
• Some spare tires require higher inflation pressure than the other tires. Consult the tire inflation table on page 101
or
see the inflation pressure placard.
pg. 101 Wheels and tires
ProCarManuals.com
Page 76 of 123

a temporary spare tire.
CAUTION!
The car must not be driven with wheels of different dimensions or with a spare tire other than the one that came with
the car. The use of different size wheels can seriously damage your car's transmission.
pg. 110 Changing wheels
Insert flat end of lug wrench and turn/pull straight out
Changing wheels
The spare wheel is located under the carpet on the trunk floor. The jack and crank are secured in the wheel recess.
There are two jack attachment points on each side of the car.
To change a wheel:
Engage the parking brake.
Put the gear selector in (P)ark.
Remove the wheel cap (where applicable) using the lug wrench in the tool bag.
With the car still on the ground, use the lug wrench to loosen the wheel bolts 1/2 -1 turn by exerting downward
pressure. Turn the bolts counterclockwise to loosen.
Loosen wheel bolts
Position the jack on the bar in the attachment ( A in the illustration below) and crank while simultaneously guiding
ProCarManuals.com
Page 77 of 123
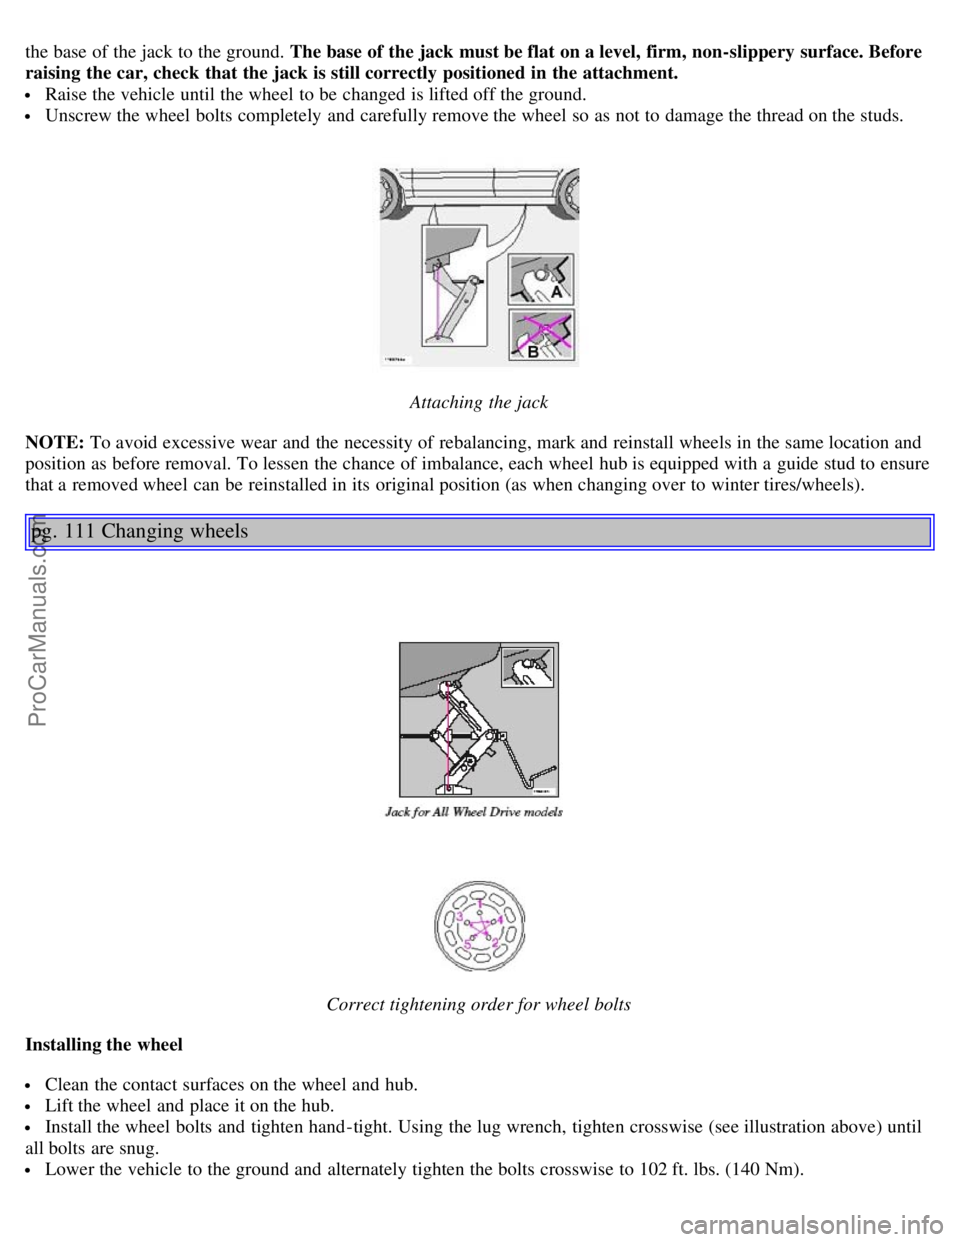
the base of the jack to the ground. The base of the jack must be flat on a level, firm, non-slippery surface. Before
raising the car, check that the jack is still correctly positioned in the attachment.
Raise the vehicle until the wheel to be changed is lifted off the ground.
Unscrew the wheel bolts completely and carefully remove the wheel so as not to damage the thread on the studs.
Attaching the jack
NOTE: To avoid excessive wear and the necessity of rebalancing, mark and reinstall wheels in the same location and
position as before removal. To lessen the chance of imbalance, each wheel hub is equipped with a guide stud to ensure
that a removed wheel can be reinstalled in its original position (as when changing over to winter tires/wheels).
pg. 111 Changing wheels
Correct tightening order for wheel bolts
Installing the wheel
Clean the contact surfaces on the wheel and hub.
Lift the wheel and place it on the hub.
Install the wheel bolts and tighten hand -tight. Using the lug wrench, tighten crosswise (see illustration above) until
all bolts are snug.
Lower the vehicle to the ground and alternately tighten the bolts crosswise to 102 ft. lbs. (140 Nm).
ProCarManuals.com
Page 93 of 123
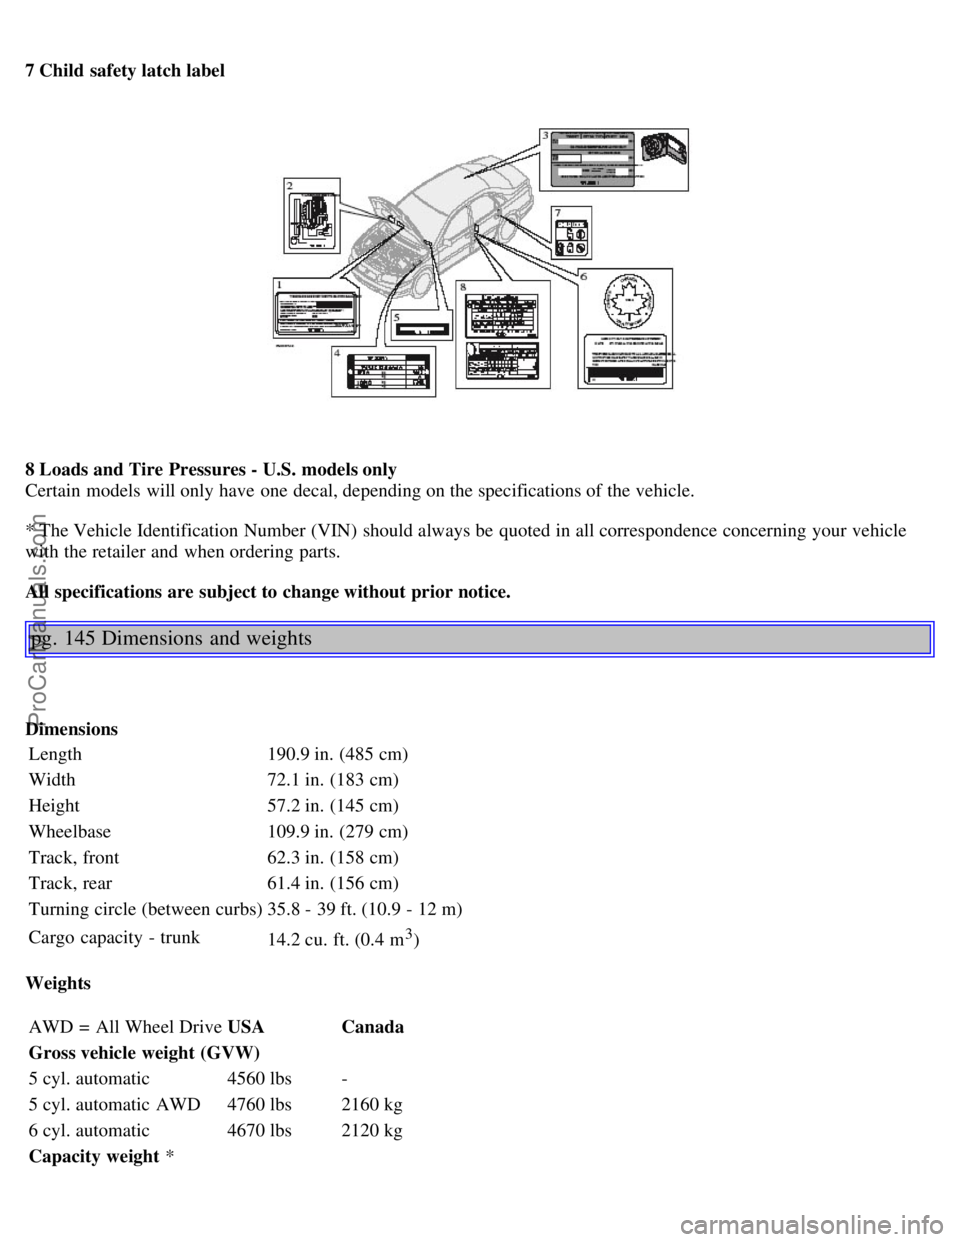
7 Child safety latch label
8 Loads and Tire Pressures - U.S. models only
Certain models will only have one decal, depending on the specifications of the vehicle.
* The Vehicle Identification Number (VIN) should always be quoted in all correspondence concerning your vehicle
with the retailer and when ordering parts.
All specifications are subject to change without prior notice.
pg. 145 Dimensions and weights
Dimensions
Length 190.9 in. (485 cm)
Width 72.1 in. (183 cm)
Height 57.2 in. (145 cm)
Wheelbase 109.9 in. (279 cm)
Track, front 62.3 in. (158 cm)
Track, rear 61.4 in. (156 cm)
Turning circle (between curbs) 35.8 - 39 ft. (10.9 - 12 m)
Cargo capacity - trunk 14.2 cu. ft. (0.4 m
3)
Weights AWD = All Wheel Drive USACanada
Gross vehicle weight (GVW)
5 cyl. automatic 4560 lbs-
5 cyl. automatic AWD 4760 lbs2160 kg
6 cyl. automatic 4670 lbs2120 kg
Capacity weight *
ProCarManuals.com
Page 96 of 123

Fuel
Minimum octane requirement - AKI 87 (RON 91)
Volume (fuel tank): 21.1 US gals (80 liters) on T6 models, or 18 US gal. (68 liters) on the S80 All Wheel Drive and
the S80 2.5T Front Wheel Drive.
Washer fluid reservoir
Volume: 6 cyl: 4.7 US qts. (4.5 liters)
All specifications are subject to change without prior notice.
pg. 148 Fuel system, Distributor ignition system, Suspension
Fuel system
The engine is equipped with a multiport fuel injection system.
Distributor ignition system
Firing order: 15-3-6-2-4
Distributor ignition setting: Not adjustable
Spark plugs: B 6284 T: P/N 271367-4 (or equivalent)
B 5254 T2: Champion RC8PYP 8 (or equivalent)
Spark plug gap: 0.028-0.032" (0.7-0.8 mm)
Tightening torque: 18.4 ft. lbs. (25 Nm)
WARNING!
The distributor ignition system operates at very high voltages. Special safety precautions must be followed to
prevent injury. Always turn the ignition off when:
Replacing distributor ignition components e.g. plugs, coil, etc.
Do not touch any part of the distributor ignition system while the engine is running. This may result in unintended
movements and body injury.
Front suspension
Spring strut suspension with integrated shock absorbers and control arms linked to the support frame. Power-assisted
rack and pinion steering. Safety type steering column.
The alignment specifications apply to an unladen car but include fuel, coolant and spare wheel.
Rear suspension
Individual rear wheel suspension with longitudinal support arms, double link arms and track rods.
Vehicle loading
The tires on your Volvo should perform to specifications at all normal loads when inflated as recommended on the tire
information label. The label is located on the inside of the fuel filler door and lists vehicle design limits. Do not load
your car beyond the load limits indicated.
WARNING!
Improperly inflated tires will reduce tire life, adversely affect vehicle handling and can possibly lead to failure
resulting in loss of vehicle control without prior warning.
All specifications are subject to change without prior notice.
ProCarManuals.com
Page 99 of 123
2 0 0 5
VOLVO S80
Chapter 10 - Audio systems
pg. 151 Audio systems
Introduction152
HU-650 overview153
HU-850 overview154
Audio functions HU-650/HU-850155
Radio functions HU-650/HU-850157
CD player HU-650162
Internal CD changer - HU-850163
External CD changer (option) - HU-650/HU-850164
Cassette deck HU-650165
Dolby Surround Pro Logic II HU-850166
Audio systems - specifications168
HomeLink® Universal Transceiver (option)169
pg. 152 Introduction
The audio system in your car is operated with the buttons and knobs in the system's front panel. Certain functions,
such as adjusting the volume, changing radio stations or tracks on a CD, etc, can also be controlled with the optional
steering wheel-mounted keypad.
The audio system is available in two versions:
HU-650
Features: AM/FM radio, single-disc CD player, cassette player, 4x25W output, six speakers.
HU-850
Features: AM/FM radio, integrated 6-disc CD changer, 4x50W or 4x70W output plus 25W Dolby Pro Logic II, eleven
speakers.
ProCarManuals.com