2005 VOLVO S40 engine
[x] Cancel search: enginePage 22 of 127

pg. 41 Symbols on the right side of the instrument panel
Symbols - right side of instrument panel
1. Turn signal indicator for trailer (certain models)
If you are towing a trailer, this light will flash simultaneously with the turn signals on the trailer. If the light
does not flash when signaling, one of the turn signals on the trailer or on the car are not functioning properly.
2. Parking brake applied
This light is on when the parking brake (hand brake) is applied. The parking brake lever is situated between
the front seats.
Canadian models are equipped with this symbol
.
3. Safety system warning light
If this light comes on while the car is being driven, or remains on for longer than approximately 10 seconds
after the car has been started, the safety system's diagnostic functions have detected a fault in a seat belt lock, SRS,
SIPS, and/or VIC system. Drive to an authorized Volvo retailer to have the system(s) inspected.
4. Oil pressure warning light
If the light comes on while driving, stop the car, stop the engine immediately, and check the engine oil level.
See if the oil level is normal and the light stays on after restart, have the car towed to the nearest authorized Volvo
retailer. After hard driving, the light may come on occasionally when the engine is idling. This is normal, provided it
goes off when the engine speed is increased.
5. Seat belt reminder
This symbol (and the seat belt reminder light above the rear view mirror) will light up if either front seat
occupant has not buckled his/her seat belt. If the car is not moving, the symbols will go out after approximately 6
seconds.
ProCarManuals.com
Page 23 of 127

6. Generator warning light
If the light comes on while the engine is running, have the charging system checked by an authorized Volvo
workshop.
7. Brake failure warning light
If this light comes on while driving or braking, stop the car as quickly as possible in a safe place, open the
hood, and check the brake fluid level in the reservoir. See page 148
for the location of the reservoir.
Canadian models are equipped with this symbol .
WARNING!
If the fluid level is below the MIN mark in the reservoir or if a "Brake failure - Service urgent" message is displayed
in the information display: DO NOT DRIVE. Have the car towed to an authorized Volvo retailer and have the brake
system inspected.
pg. 42 Symbols on the right side of the instrument panel
If the BRAKE and ABS warning lights come on at the same time, this could indicate a fault in the brake system.
In this case:
1. Stop the car in a suitable place and switch off the engine.
2. Restart the engine.
3. If both warning lights go off, no further action is required and the car can be driven.
4. If both lights remain on after the engine has been restarted, switch off the engine again and check the brake fluid
level. See page 148
for the location of the reservoir.
Door open warning
The driver will be alerted if one of the doors, the hood, or the trunk lid are open or ajar.
At low speeds
If the car is moving at a speed of less than approximately 4 m.p.h. (7 km/h), the Information symbol in the
instrument panel will light up and a message will be shown in the information display indicating which door(s), etc is
not completely closed.
At higher speeds
If the car is moving at a speed above approximately 4 m.p.h. (7 km/h), the Warning symbol in the
instrument panel will light up and a message will be shown in the information display indicating which door(s), etc is
not completely closed.
Hood and trunk
If the hood and/or trunk lid is not completely closed, the Information symbol in the instrument panel will
light up and a message will be displayed, regardless of the vehicle's speed.
pg. 43 Information display
ProCarManuals.com
Page 24 of 127

Messages
When an indicator or warning light in the instrument panel comes on, a message is also shown in the information
display. To read a message:
Press the READ button (A).
Pressing READ repeatedly enables you to scroll to any other messages that may be stored.
NOTE: If a message is displayed when e.g. you are using the trip computer, this message must be read before you can
access the trip computer.Message Meaning
STOP
SAFELY Stop and switch off the engine to help prevent the risk of serious damage.
STOP
ENGINE Stop and switch off the engine to help prevent the risk of serious damage.
SERVICE
URGENT Take your car to an authorized Volvo retailer for inspection as soon as possible.
SEE
MANUAL Refer to your owner's manual. For additional information, please contact your Volvo retailer.
SERVICE
REQUIRED Take your car to an authorized Volvo retailer for inspection at your convenience (but preferably
before the next scheduled maintenance service).
TIME FOR
REGULAR
SERVICE This message is affect by the number of miles/km driven, by the number of months, or by the
number of hours the engine has been run since the service function was reset at the most recent
regularly scheduled service.
pg. 44 Center console controls
ProCarManuals.com
Page 25 of 127

12 volt socket, stability system, auxiliary equipment
12 volt sockets
The 12 volt sockets can be used to plug in certain accessories such as cellular telephones, etc. The key must be in
position I (or higher) for the auxiliary socket to function. The auxiliary sockets can also be used for cigarette lighters,
which are available at your Volvo retailer.
NOTE: The cover should be kept on when the auxiliary socket is not in use.
Stability system STC or DSTC
The stability system - Stability and Traction Control (STC), or the optional Dynamic Stability and Traction Control
(DSTC) - activate automatically when the car is started. In certain situations, it may be necessary to disable the
system's anti-spin function, for example, while driving for a short period with tires of different dimensions.
To disable the anti-spin function:
Press the STC or DSTC button for approximately one second. The indicator light in the button will go out, and
STC/DSTC SPIN CONTROL OFF will be shown in the information display.
WARNING!
The car's handling and stability characteristics will be altered with the anti-spin function disabled.
NOTE: The anti-spin function will be automatically reactivated when the engine is started
Auxiliary equipment
The button to the right of the STC/DSTC button can be used for Volvo-installed optional or auxiliary equipment.
pg. 45 Lighting panel
ProCarManuals.com
Page 29 of 127

based on average fuel consumption during the last 20 miles (30 km) of driving and the amount of fuel remaining in the
tank when the reading was taken. When the driving distance on current fuel reserve is less than 12 miles (20 km), "---"
will be displayed in the information display.
Average fuel consumption
This value indicates fuel consumption since the last time the trip computer was reset (by pressing RESET, button C).
When the engine is switched off, information on fuel consumption is stored and remains in system memory until the
RESET (button C) is pressed again.
Current fuel consumption
This value indicates the current fuel consumption, based on readings taken once per second. When the car is not
moving, "---- " will be displayed.
Average speed
This value indicates average speed since the last time the trip computer was reset (by pressing RESET, button C).
When the engine is switched off, information on average speed is stored and remains in system memory until the
RESET (button C) is pressed again.
Current speed in m.p.h. (Canadian models only)
This function provides the driver with an instantaneous conversion of the car's current speed from km/h to m.p.h.
NOTE: Trip computer readings may vary slightly depending on the circumference of the tires on the car or on tire
inflation.
pg. 49 Cruise control (option)
Cruise control
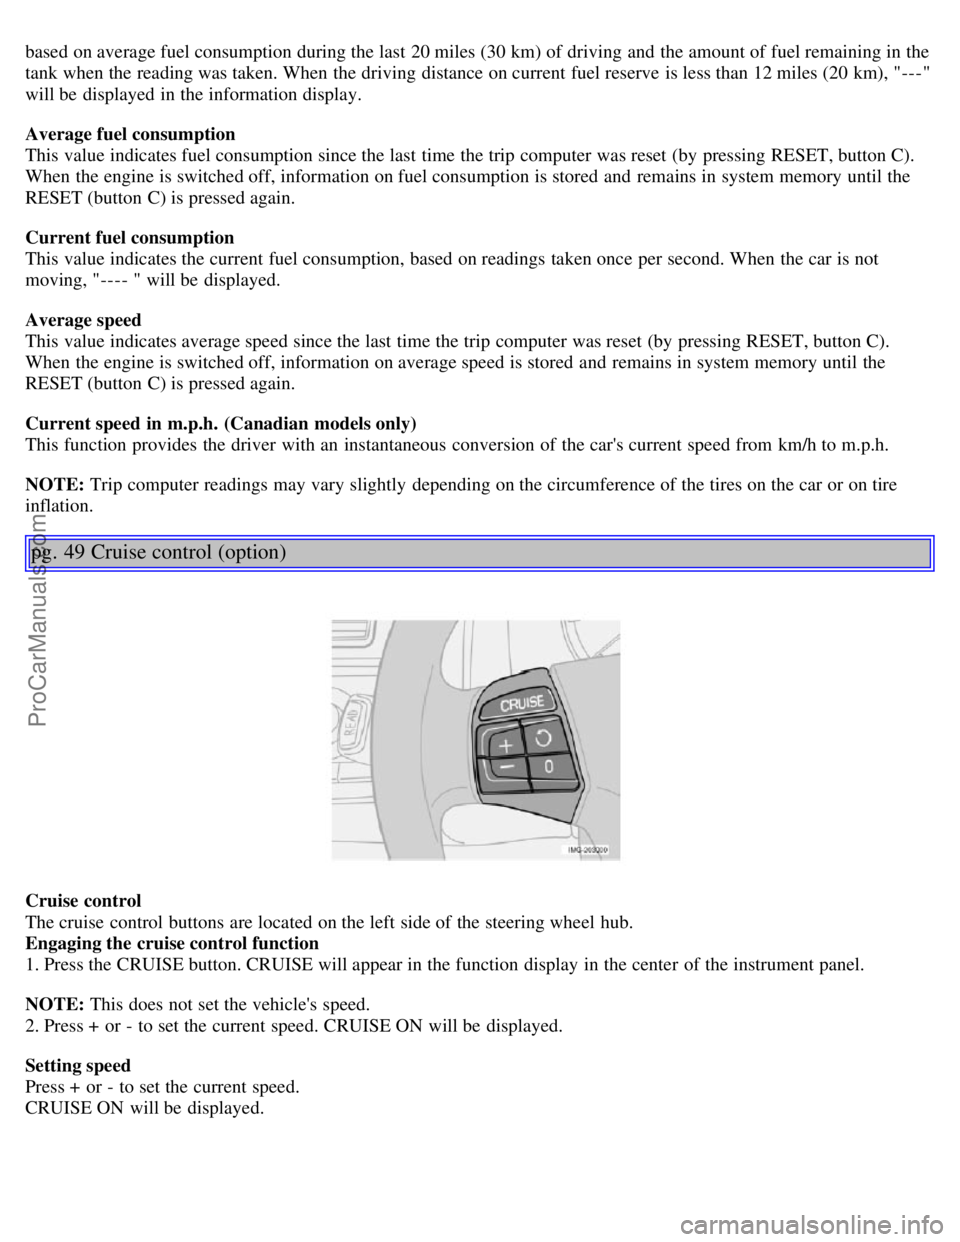
The cruise control buttons are located on the left side of the steering wheel hub.
Engaging the cruise control function
1. Press the CRUISE button. CRUISE will appear in the function display in the center of the instrument panel.
NOTE: This does not set the vehicle's speed.
2. Press + or - to set the current speed. CRUISE ON will be displayed.
Setting speed
Press + or - to set the current speed.
CRUISE ON will be displayed.
ProCarManuals.com
Page 44 of 127

If the ignition key is in position I or II.
During a 10 minute period after the doors have been unlocked if the door remains open.
If the door is closed and the ignition key is not yet in the ignition, or if the key is in position 0, the seat can be
adjusted or during a period of 40 seconds. The power passenger's seat can only be adjusted if the ignition key is in
position I or II, or if the engine is running.
Adjusting the seat
Controls 5, 6, and 7 on the side of the seat can be used to make adjustments.
5. Backrest tilt
6. Move this section of the control up or down to raise/lower the rear section of the seat. Move the control forward to
move the seat forward.
7. Move this section of the control up or down to raise/lower the front section of the seat. Move the control rearward
to move the seat rearward.
NOTE: The power seats have an overload protector that activates if a seat is blocked by any object. If this occurs,
switch off the ignition (key in position 0) and wait for approximately 20 seconds before operating the seat again.
Emergency stop
If the seat inadvertently begins to move, press any of the buttons to stop the seat.
Programming the seat memory, driver's seat only (option)
Three different seating positions can be stored in the seat's memory.
The following example explains how button 1 can be programmed. Buttons 2 and 3 can be programmed in the same
way.
To program (store) a seat position in button 1:
1. Use controls 5, 6, and 7 to adjust the seat to the desired position.
2. Press and hold down the M (memory) button.
3. With the M button depressed, press button 1 to store the seat's current position.
To move the seat to the position that it was in when button 1 was programmed, press and hold down button 1 until the
seat stops moving.
As a safety precaution, the seat will stop automatically if the button is released before the seat has reached the preset
position.
Central locking system remote control and driver's seat memory
The remote control transmitter can also be equipped with an optional function that controls the electrically operated
driver's seat in the following way:
1. Adjust the seat to the desired position.
2. When you leave the car, lock it using the remote control.
3. The next time the driver's door is unlocked with the same remote control and the driver's door is opened, the
pg. 80 Front seats
driver's seat will automatically move to the position that it was in when the door was most recently locked with that
remote control.
WARNING!
Because the driver's seat can be adjusted with the ignition off, children should never be left unattended in the car.
Movement of the seat can be STOPPED at any time by pressing any button on the power seat control panel.
Do not adjust the seat while driving. The seat should be adjusted so that the brake pedal can be depressed fully. In
addition, position the seat as far rearward as comfort and control allow.
The seat rails on the floor must not be obstructed in any way when the seat is in motion.
ProCarManuals.com
Page 45 of 127

Vanity mirror
Raise the cover to switch on the light.
pg. 81 Interior lighting
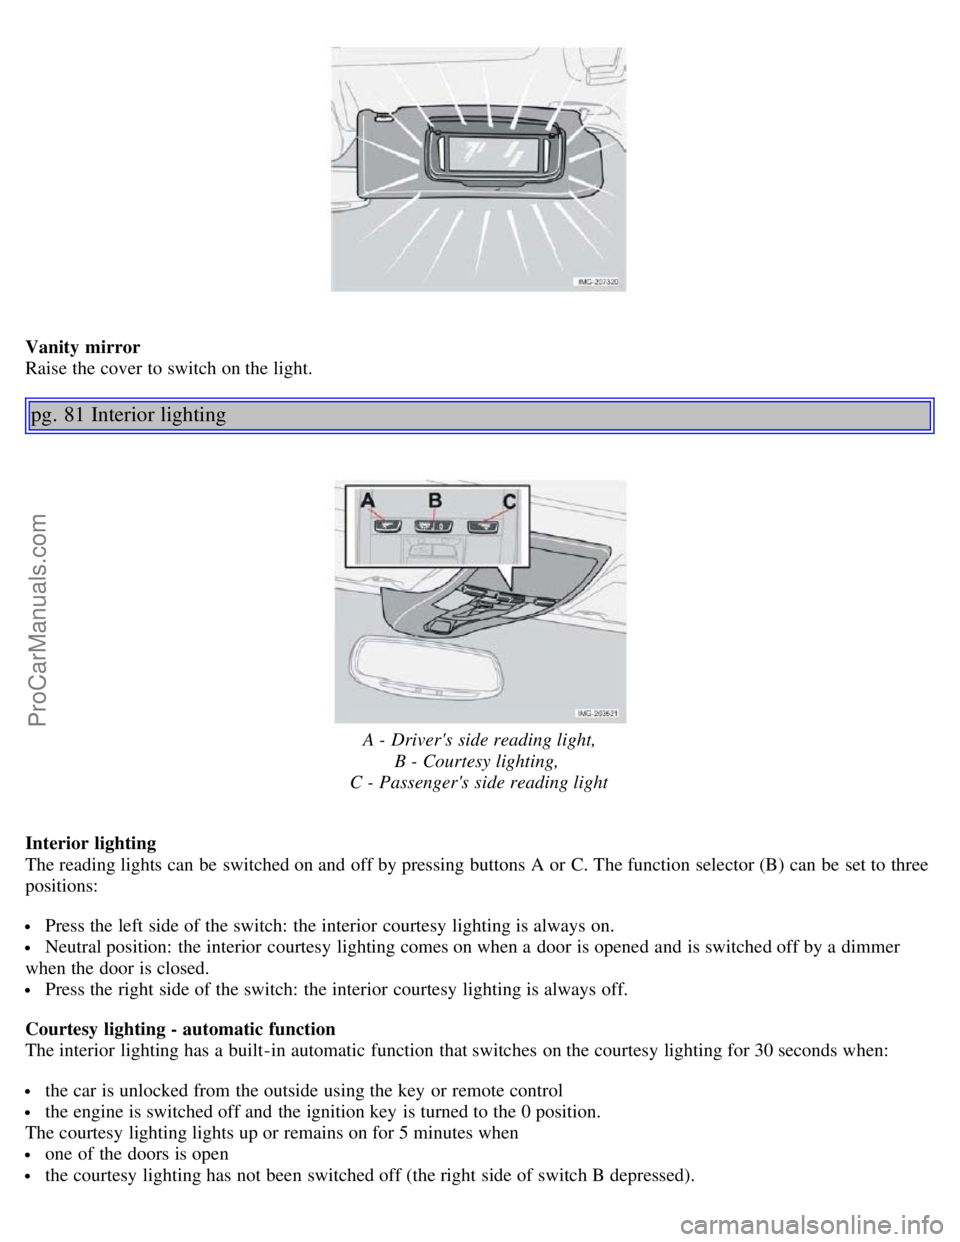
A - Driver's side reading light,B - Courtesy lighting,
C - Passenger's side reading light
Interior lighting
The reading lights can be switched on and off by pressing buttons A or C. The function selector (B) can be set to three
positions:
Press the left side of the switch: the interior courtesy lighting is always on.
Neutral position: the interior courtesy lighting comes on when a door is opened and is switched off by a dimmer
when the door is closed.
Press the right side of the switch: the interior courtesy lighting is always off.
Courtesy lighting - automatic function
The interior lighting has a built-in automatic function that switches on the courtesy lighting for 30 seconds when:
the car is unlocked from the outside using the key or remote control
the engine is switched off and the ignition key is turned to the 0 position.
The courtesy lighting lights up or remains on for 5 minutes when
one of the doors is open
the courtesy lighting has not been switched off (the right side of switch B depressed).
ProCarManuals.com
Page 46 of 127

The automatic lighting goes out when
the engine is started
the car is locked from the outside using the key or remote control.
If the courtesy lighting is not switched off manually, it will be turned off automatically 5 minutes after the engine has
been switched off.
The courtesy lighting can be switched on or off within 30 minutes after the key has been turned to position 0 by
pressing the switch briefly.
Rear reading lights (in ceiling)
Rear reading lights
The rear reading lights can be switched on or off by pressing the respective buttons. These lights switch off
automatically 10 minutes after the engine has been switched off.
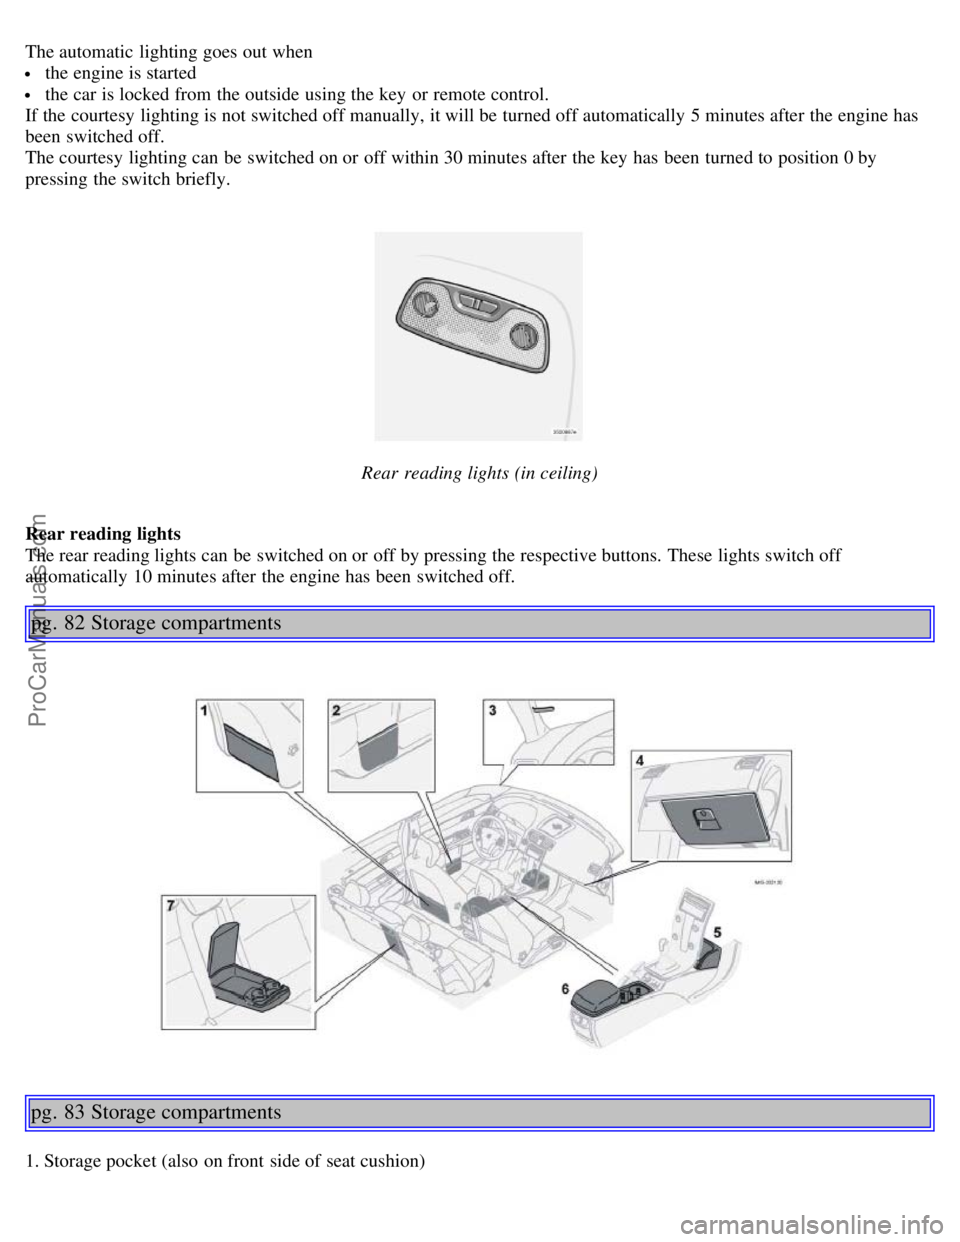
pg. 82 Storage compartments
pg. 83 Storage compartments
1. Storage pocket (also on front side of seat cushion)
ProCarManuals.com