Page 7 of 336
7
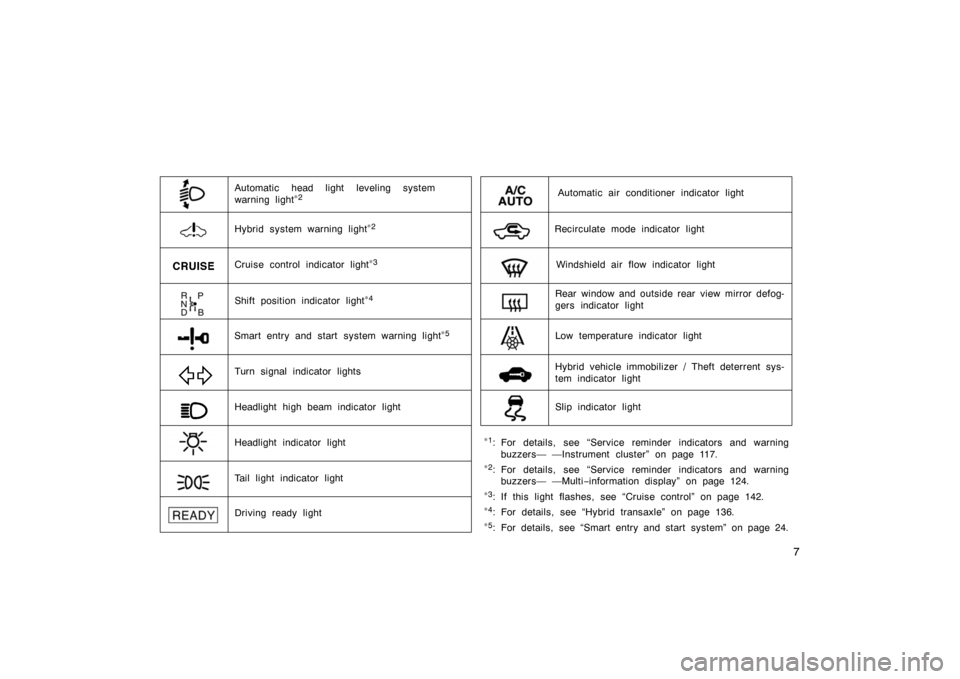
Hybrid vehicle immobilizer / Theft deterrent sys-
tem indicator light
Tail light indicator light Shift position indicator light
∗ 4
Driving ready light
Automatic air conditioner indicator light
Recirculate mode indicator light
Smart entry and start system warning light
∗ 5
Windshield air flow indicator light
Slip indicator light
Rear window and outside rear view mirror defog-
gers indicator light
Low temperature indicator light
Headlight high beam indicator light
Headlight indicator light Turn signal indicator lights
∗ 1: For details, see “Service reminder indicators and warning
buzzers— —Instrument cluster” on page 117.
∗2: For details, see “Service reminder indicators and warning
buzzers— —Multi −information display” on page 124.
∗
3: If this light flashes, see “Cruise control” on page 142.
∗4: For details, see “Hybrid transaxle” on page 136.
∗5: For details, see “Smart entry and start system” on page 24.
Cruise control indicator light∗3
Hybrid system warning light∗2
Automatic head light leveling system
warning light∗2
Page 101 of 336
101
OPERATION OF INSTRUMENTS AND
CONTROLS
Lights, Wipers and Defogger
Headlights and turn signals102
. . . . . . . . . . . . . . . . . . . . . . . . . . . . . . . . . .
Emergency flasherss 106
. . . . . . . . . . . . . . . . . . . . . . . . . . . . . . . . . . . . \
. . .
Instrument panel light control 107
. . . . . . . . . . . . . . . . . . . . . . . . . . . . . . . .
Front fog lights 107
. . . . . . . . . . . . . . . . . . . . . . . . . . . . . . . . . . . . \
. . . . . . . . .
Interior lights 107
. . . . . . . . . . . . . . . . . . . . . . . . . . . . . . . . . . . . \
. . . . . . . . . . .
Personal lights 108
. . . . . . . . . . . . . . . . . . . . . . . . . . . . . . . . . . . . \
. . . . . . . . .
Luggage compartment light 108
. . . . . . . . . . . . . . . . . . . . . . . . . . . . . . . . . .
Key slot light 109
. . . . . . . . . . . . . . . . . . . . . . . . . . . . . . . . . . . . \
. . . . . . . . . . .
Windshield wipers and washer 109
. . . . . . . . . . . . . . . . . . . . . . . . . . . . . . .
Rear window wiper and washer 11 0
. . . . . . . . . . . . . . . . . . . . . . . . . . . . . .
Rear window and outside rear view mirror defoggers 11 0
. . . . . . . . . . .
SECTION 2– 4
Page 107 of 336
107
23p006d
To adjust the brightness of the instru-
ment panel lights, turn the dial.
When the headlight switch is turned to the
first or second clickstop, the brightness of
the instrument cluster will be reduced
slightly unless the instrument panel light
control dial is turned fully on.
23p111
To turn on the fog lights, twist the
band of the headlight switch lever to
the position of the fog light. The fog
lights come on only when the head-
lights are on low beam.
The band automatically returns to the
“OFF” position after you release it.
23p126
Front
Rear
Instrument panel light control Front fog lightsInterior lights
Page 184 of 336
184
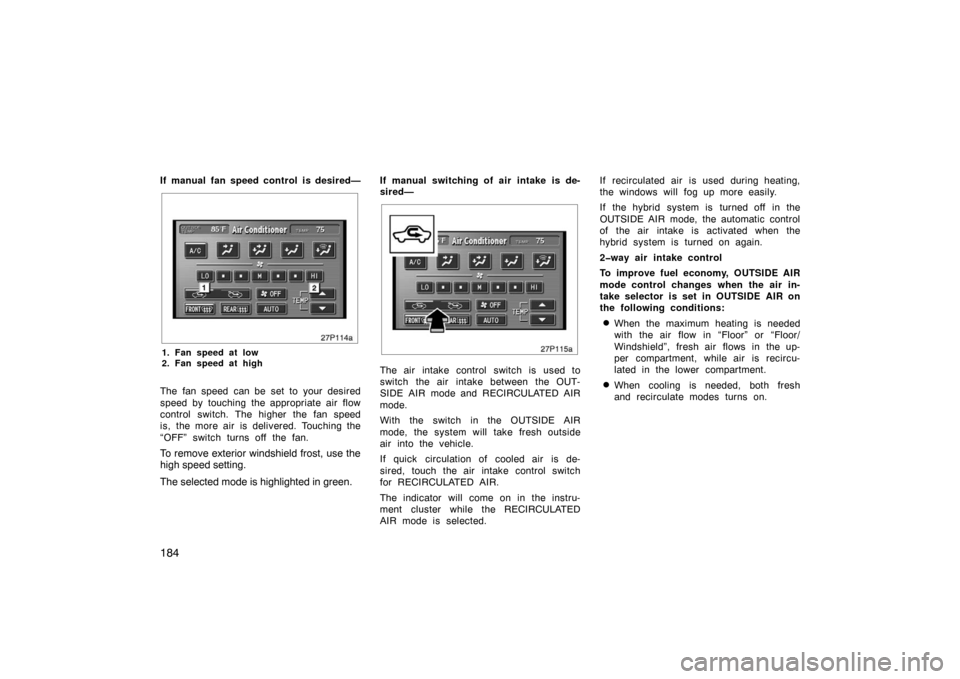
If manual fan speed control is desired—
27p114a
1. Fan speed at low
2. Fan speed at high
The fan speed can be set to your desired
speed by touching the appropriate air flow
control switch. The higher the fan speed
is, the more air is delivered. Touching the
“OFF” switch turns off the fan.
To remove exterior windshield frost, use the
high speed setting.
The selected mode is highlighted in green.
If manual switching of air intake is de-
sired—
27p115a
The air intake control switch is used to
switch the air intake between the OUT-
SIDE AIR mode and RECIRCULATED AIR
mode.
With the switch in the OUTSIDE AIR
mode, the system will take fresh outside
air into the vehicle.
If quick circulation of cooled air is de-
sired, touch the air intake control switch
for RECIRCULATED AIR.
The indicator will come on in the instru-
ment cluster while the RECIRCULATED
AIR mode is selected.If recirculated air is used during heating,
the windows will fog up more easily.
If the hybrid system is turned off in the
OUTSIDE AIR mode, the automatic control
of the air intake is activated when the
hybrid system is turned on again.
2�way air intake control
To improve fuel economy, OUTSIDE AIR
mode control changes when the air in-
take selector is set in OUTSIDE AIR on
the following conditions:
�When the maximum heating is needed
with the air flow in “Floor” or “Floor/
Windshield”, fresh air flows in the up-
per compartment, while air is recircu-
lated in the lower compartment.
�When cooling is needed, both fresh
and recirculate modes turns on.
Page 186 of 336
186
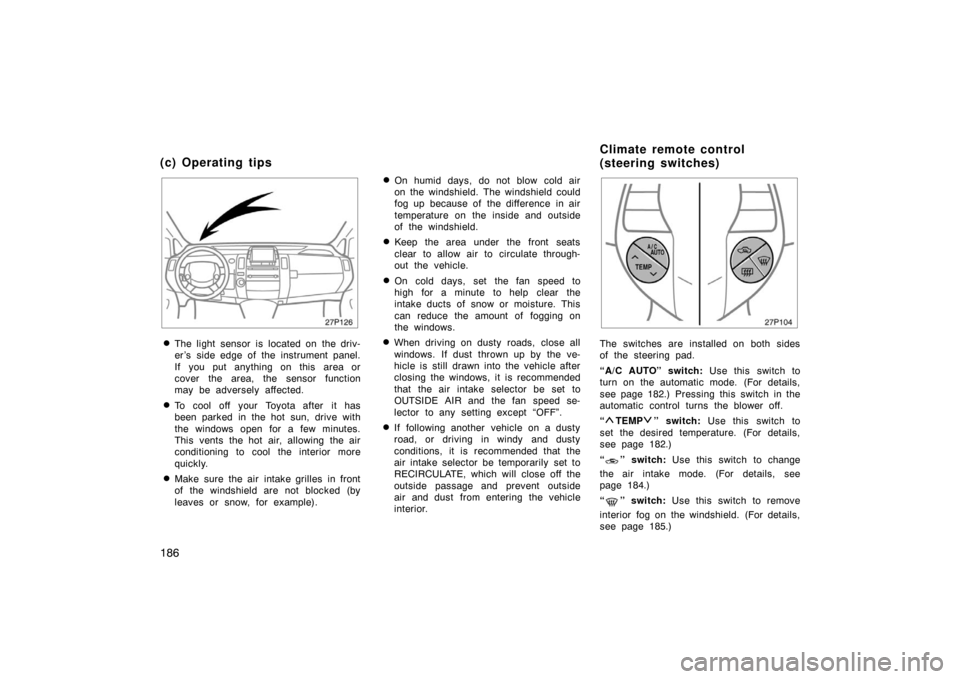
27p126
�The light sensor is located on the driv-
er ’s side edge of the instrument panel.
If you put anything on this area or
cover the area, the sensor function
may be adversely affected.
�To cool off your Toyota after it has
been parked in the hot sun, drive with
the windows open for a few minutes.
This vents the hot air, allowing the air
conditioning to cool the interior more
quickly.
�Make sure the air intake grilles in front
of the windshield are not blocked (by
leaves or snow, for example).
�On humid days, do not blow cold air
on the windshield. The windshield could
fog up because of the difference in air
temperature on the inside and outside
of the windshield.
�Keep the area under the front seats
clear to allow air to circulate through-
out the vehicle.
�On cold days, set the fan speed to
high for a minute to help clear the
intake ducts of snow or moisture. This
can reduce the amount of fogging on
the windows.
�When driving on dusty roads, close all
windows. If dust thrown up by the ve-
hicle is still drawn into the vehicle after
closing the windows, it is recommended
that the air intake selector be set to
OUTSIDE AIR and the fan speed se-
lector to any setting except “OFF”.
�If following another vehicle on a dusty
road, or driving in windy and dusty
conditions, it is recommended that the
air intake selector be temporarily set to
RECIRCULATE, which will close off the
outside passage and prevent outside
air and dust from entering the vehicle
interior.
27p104
The switches are installed on both sides
of the steering pad.
“A/C AUTO” switch: Use this switch to
turn on the automatic mode. (For details,
see page 182.) Pressing this switch in the
automatic control turns the blower off.
“
TEMP” switch: Use this switch to
set the desired temperature. (For details,
see page 182.)
“
” switch: Use this switch to change
the air intake mode. (For details, see
page 184.)
“
” switch: Use this switch to remove
interior fog on the windshield. (For details,
see page 185.)
(c) Operating tips C limat e remo t e co n t ro l
(steering switches)
Page 304 of 336
304
If any washer does not work, the wash-
er tank may be empty. Add washer
fluid.
You may use plain water as washer fluid.
However, in cold areas where tempera-
tures range below the freezing point, use
washer fluid containing antifreeze. This
product is available at your Toyota dealer
and most auto parts stores. Follow the
manufacturer ’s directions for how much to
mix with water.
NOTICE
Do not use engine antifreeze or any
other substitute because it may dam-
age your vehicle’s paint.
The following illustrations show how to
gain access to the bulbs. When replacing
a bulb, make sure the hybrid system and
light switch are off. Use bulbs with the
wattage ratings given in the table.
CAUTION
�To prevent burning yourself, do not
replace the light bulbs while they
are hot.
�Halogen bulbs have pressurized gas
inside and require special handling.
They can burst or shatter if
scratched or dropped. Hold a bulb
only by its plastic or metal case.
Do not touch the glass part of a
bulb with bare hands.
Vehicles with discharge headlights—
�Do not touch the high voltage sock-
et when the headlight turns on.
20000 V is momentarily generated
and may cause severe injury by
electric shock.
�Do not disassemble, repair or take
apart the headlight bulbs, connec-
tor, power supply circuits and ro-
tate components. Or you may be
injured by electric shocks. Call your
dealer when the headlights fail to
work or have to be replaced or dis-
posed of.
NOTICE
Only use a bulb of the listed type.
The inside of the lens of exterior lights
such as headlights may temporarily fog up
when the lense becomes wet in the rain
or in a car wash. This is not a problem
because the fogging is caused by the
temperature difference between the outside
and inside of the lense, just like the
windshield fogs up in the rain. However, if
there is a large drop of water on the
inside of the lense, or if there is water
pooled inside the light, contact your
Toyota dealer.
Adding washer fluid Replacing light bulbs—
Page 305 of 336
305
Light bulbsBulbNo.WTy p e
Headlights
Discharge headlights
Halogen headlights
—
—35
60/55A
B
Front fog lights900651C
Parking lights—5D
Front turn signal
lights—21D
Rear turn signal lights—21D
Tail lights—5D
Back −up lights744021D
License plate lights—5D
Interior lights—8E
Personal lights—5D
Door courtesy lights—5D
Vanity lights—5E
Luggage compart-
ment light—5E
A: D2R Discharge bulbs
B: HB2 Halogen bulbs
C: HB4 Halogen bulbs
D: Wedge base bulbs
E: Double end bulbs
—Headlights
83p030
1. Open the hood. Remove the clips
and take out the cover.
Remove and install the clips as shown in
the following illustrations.
83p031
Removing clip
83p032
Installing clip
Page 307 of 336
307
83p014a
4. Release the bulb retaining springand remove the bulb along with the
socket. Install a new bulb into the
socket and return the bulb retaining
spring to its original position.
To install a bulb, align the tabs of the
bulb with the cutout of the mounting hole.
83p015b
5. Install the bulb cover and turn it clockwise. Plug in the connector. If either the left or right front fog lights
burns out, contact your Toyota dealer.
NOTICE
Do not try to replace the front fog
light bulbs by yourself. You may dam-
age the vehicle.
—Front fog lights