Page 163 of 336
 Listening to the radio
Push these buttons to choose either an
AM or FM station.
“AM”, “FM1” or “FM2” appears on the dis-
play.Push and turn this knob to step up the
station band or")
163
(a) Listening to the radio
Push these buttons to choose either an
AM or FM station.
“AM”, “FM1” or “FM2” appears on the dis-
play.Push and turn this knob to step up the
station band or to step down.
Your radio automatically changes to stereo
reception when a stereo broadcast is re-
ceived. “ST” appears on the display. If the
signal becomes weak, the radio reduces
the amount of channel separation to pre-
vent the weak signal from creating noise.
If the signal becomes extremely weak, the
radio switches from stereo to mono recep-
tion. In this case, “ST” disappears from
the display.
26p141a
(b) Presetting a station1. Tune in the desired station.
2. Touch one of the station selector switches (1�6) and hold it until a
beep is heard. This sets the station
to the switch and the frequency ap-
pears on the switch.
Each switch can store FM1, FM2 and AM.
To change the preset station to a different
one, follow the same procedure.
The preset station memory is cancelled
when the power source is interrupted by
battery disconnection or a blown fuse.
Radio operation
Page 164 of 336
 Selecting a station
Tune in the desired station using one of
the following methods.
Preset tuning: Touch the switch (1 −6) for
the station you want. The switch (1 −6) is
highlighted in gre")
164
(c) Selecting a station
Tune in the desired station using one of
the following methods.
Preset tuning: Touch the switch (1 −6) for
the station you want. The switch (1 −6) is
highlighted in green and station frequency
appears on the display.
Manual tuning: Turn the “TUNE” knob
briefly. Each time you turn the knob, the
radio will step up or down to another fre-
quency.
Seek tuning: Push the “SEEK TRACK”
button on either side. The radio will begin
seeking up or down for a station of the
nearest frequency and will stop on recep-
tion. Each time you push the button, the
stations will be searched out one after
another.
26p126
Scan tuning: Push the “SCAN” button or
touch the “SCAN” switch (AM mode only)
briefly. “SCAN” appears on the display.
The radio will find the next station up or
down the band, stay there for a few se-
conds, and then scan again. To select a
station, push the “SCAN” button a second
time.
Preset scan tuning: Push the “SCAN”
button or touch the “SCAN” switch (AM
mode only) and hold it until you hear a
beep. “P. SCAN” appears on the display.
The radio will tune in the next preset sta-
tion up or down the band, stay there for
a few seconds, and then move to the next
preset station. To select a station, push
the “SCAN” button a second time.
26p142a
(d) RDS (Radio Data System)
(1) Program type
Each time you touch the “TYPE �” or
“TYPE �” switch, the program type
changes as in the following:
�ROCK
�EASY LIS (Easy listening)
�CLS JAZZ (Classical music and Jazz)
�R&B (Rhythm and Blues)
�INFORM (Information)
�RELIGION
�MISC
�ALERT (Emergency message)
Page 165 of 336
165
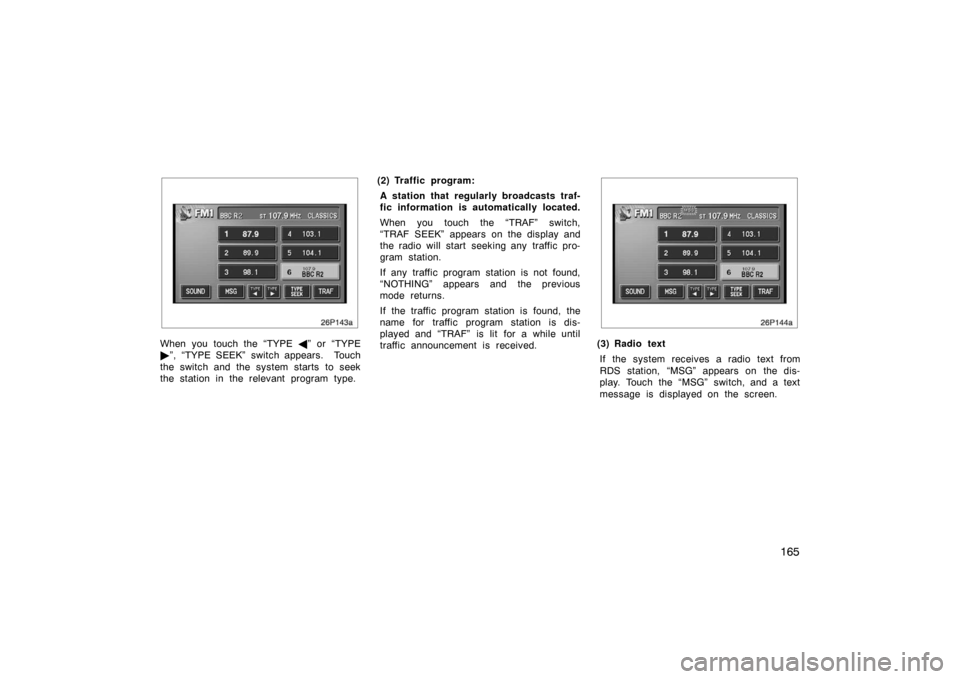
26p143a
When you touch the “TYPE
�” or “TYPE
� ”, “TYPE SEEK” switch appears. Touch
the switch and the system starts to seek
the station in the relevant program type. (2) Traffic program:
A station that regularly broadcasts traf-
fic information is automatically located.
When you touch the “TRAF” switch,
“TRAF SEEK” appears on the display and
the radio will start seeking any traffic pro-
gram station.
If any traffic program station is not found,
“NOTHING” appears and the previous
mode returns.
If the traffic program station is found, the
name for traffic program station is dis-
played and “TRAF” is lit for a while until
traffic announcement is received.
26p144a
(3) Radio textIf the system receives a radio text from
RDS station, “MSG” appears on the dis-
play. Touch the “MSG” switch, and a text
message is displayed on the screen.
Page 166 of 336

166
26p145b
In case a text message is not accepted
in a screen, you can touch the “MSG”
switch and hold it to display the rest of
the message.
When the system can show the station
name, “RDS” appears on the display.
Each time you touch the “MSG” switch,
indication on the display changes from the
band to the station name, a radio text in
this order. After six seconds passes, indi-
cation returns to the band.
26p127
(a) Playing a cassette tape
When you insert a cassette tape, the
exposed tape should face to the right.
The player will automatically start when
you insert a cassette tape. At this time,
“Tape” appears on the display.
If a metal or chrome equivalent cassette
tape is put in the cassette player, the
player will automatically recognize it and
“MTL” appears on the display.
To stop or eject the cassette tape, push
the “
” button.
26p146a
If a cassette is already in the slot, push
the “TAPE” button.
Dolby� Noise Reduction* feature: If you
are listening to a tape that was recorded
with Dolby � B Noise Reduction, touch the
“
” switch. The “” switch will be
highlighted in green. Touch the switch
again to turn off Dolby� B NR.
The Dolby NR mode reduces tape noise
by about 10 dB. For best sound reproduc-
tion, play your tapes with this switch on
or off according to the mode used for
recording the tape.
Cassette tape player operation
( Typ e 2 on ly)
Page 169 of 336
 Inserting or ejecting compact disc
Ty p e 1 :
When you insert a disc, the player will
automatically start. To eject the disc,
push t")
169
The hybrid system must be in “ACC” or
“IG−ON”.
(a) Inserting or ejecting compact disc
Ty p e 1 :
When you insert a disc, the player will
automatically start. To eject the disc,
push the “
” button.
Ty p e 2 :
�Setting a single compact disc:
1. Push the “LOAD” button briefly.
The umber indicators at both ends of the
slot blinking. The umber blinking indicators
changes to continuous green illumination. 2. Insert only one disc.
You can set a disc at the lowest empty
disc number.
After insertion, the set disc is automatical-
ly loaded.
If the label faces down, the disc cannot
be played. In this case, “CD CHECK” ap-
pears on the display.
If you need to insert the next disc, repeat
the same procedure to insert another disc.
�Setting all the discs:
1. Push the “LOAD” button until you hear a beep.
The umber indicators at both ends of the
slot blinking. The umber blinking indicators
changes to continuous green illumination. 2. Insert only one disc.
The umber indicators blink. 3. Insert the next disc after the umber blinking indicators changes to con-
tinuous green illumination.
4. Repeat this procedure until you in- sert all the discs.
To cancel the operation, push the “LOAD”
button.
Your automatic changer can store up to 6
discs.
If you do not insert the discs within 15
seconds after pushing the “LOAD” button,
the operation will be canceled automatical-
ly.NOTICE
Do not insert one disc stacked on top
of another one or feed them in con-
tinuously, to prevent discs from get-
ting stuck in the player.
Compact disc player operation
Page 170 of 336
170
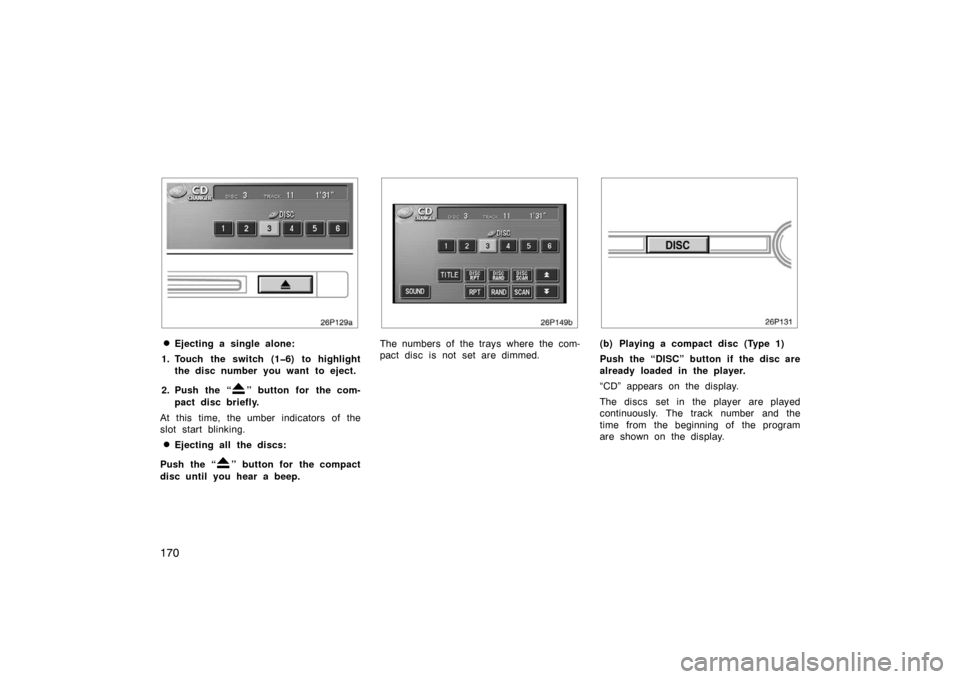
26p129a
�Ejecting a single alone:
1. Touch the switch (1�6) to highlight the disc number you want to eject.
2. Push the “
” button for the com-
pact disc briefly.
At this time, the umber indicators of the
slot start blinking.
�Ejecting all the discs:
Push the “
” button for the compact
disc until you hear a beep.
26p149b
The numbers of the trays where the com-
pact disc is not set are dimmed.(b) Playing a compact disc (Type 1)
Push the “DISC” button if the disc are
already loaded in the player.
“CD” appears on the display.
The discs set in the player are played
continuously. The track number and the
time from the beginning of the program
are shown on the display.
Page 171 of 336
 Playing a compact disc (Type 2)
Push the “TAPE·DISC” button if the
disc are already loaded in the player.
“CD CHANGER” appears on the display.
The discs set in the player are playe")
171
(b) Playing a compact disc (Type 2)
Push the “TAPE·DISC” button if the
disc are already loaded in the player.
“CD CHANGER” appears on the display.
The discs set in the player are played
continuously, starting with the last disc
you inserted. The disc number of the disc
currently being played, the track number
and the time from the beginning of the
program are shown on the display.
When play of one disc ends, the first
track of the following disc starts. When
play of the final disc ends, play of the
first disc starts again.
The player will skip any empty disc trays.
26p149b
(c) Selecting a desired disc (Type 2 only)
Touch the desired disc number.
The selected disc number is highlighted in
green.
The player will start playing the selected
disc from the first track.
26p151b
(d) Searching for a desired disc (Type 2 only)
Touch the “DISC SCAN” switch.
With “DISC SCAN” highlighted in green ,
the program at the beginning of each disc
will be played for 10 seconds. To continue
listening to the program of your choice,
touch the “DISC SCAN” switch a second
time.
After all the tracks are scanned in one
pass, normal play resumes.
Page 173 of 336

173
“RAND” switch: Use it for automatic and
random selection of the disc which you
are currently listening to.
When the switch is touched, the system
selects a track in the disc you are cur-
rently listening to. To cancel it, touch the
switch once again.
“ DISC RAND” switch (Type 2 only): Use
it for automatic track selection for all the
discs and play by the system.
When the switch is touched, the system
selects a track in the discs of all the
trays which are set and plays it. To can-
cel it, touch the switch once again.
When a track is skipped or the system is
inoperative, touch the switch to reset.
“TITLE” switch: Use it for displaying the
disc and track title while the CD −TEXT
disc is playing.
The switch is not displayed on the screen
while the CD −TEXT disc is not playing.
Up to 29 letters can be displayed. To
cancel it, touch the “TITLE OFF” switch. (h) If the player malfunctions
If the player or another unit equipped with
the player malfunctions, our audio system
will display one of the following error mes-
sages.
If “CD CHECK” appears on the display,
it indicates that the disc is dirty, damaged
or it was inserted up side down. Clean the
disc or insert it correctly.
If “CD ERROR” appears on the display,
the following causes are possible.
�There is trouble inside the system.
Eject the disc.
�The inside of the player unit may be
too hot due to the very high ambient
temperature. Eject the disc and allow
the player to cool down.
If the malfunction is not rectified, take
your vehicle to your Toyota dealer.
26p112
The switches are installed on the left side
of the steering pad.
“MODE” switch: Use this switch to
change the mode. If a tape or compact
disc is not inserted, the “TAPE” or “CD”
mode is skipped. When you push the
switch with the audio system turned off,
the audio system turns on.
“
” switches: Use this switches to ad-
just the volume. Push “+” to increase the
volume and “–” to decrease the volume.
The volume continues to increase or de-
crease while the switch is being pressed.
Audio remote controls
(steering switches)