Page 118 of 351
108
Headlight and turn signals
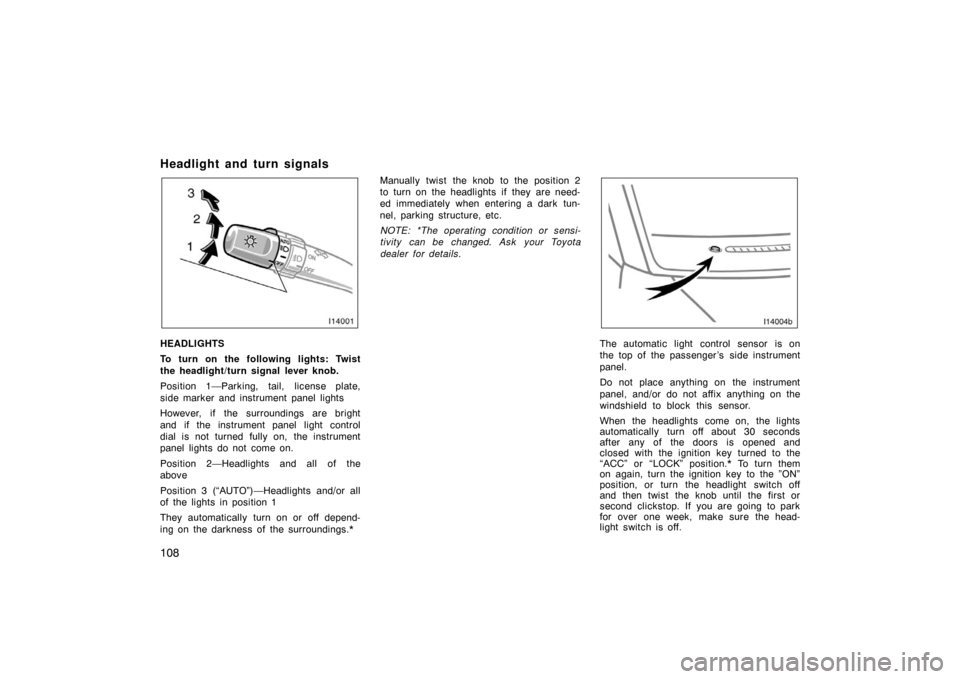
HEADLIGHTS
To turn on the following lights: Twist
the headlight/turn signal lever knob.
Position 1—Parking, tail, license plate,
side marker and instrument panel lights
However, if the surroundings are bright
and if the instrument panel light control
dial is not turned fully on, the instrument
panel lights do not come on.
Position 2—Headlights and all of the
above
Position 3 (“AUTO”)—Headlights and/or all
of the lights in position 1
They automatically turn on or off depend-
ing on the darkness of the surroundings.*Manually twist the knob to the position 2
to turn on the headlights if they are need-
ed immediately when entering a dark tun-
nel, parking structure, etc.
NOTE: *The operating condition or sensi-
tivity can be changed. Ask your Toyota
dealer for details.The automatic light control sensor is on
the top of the passenger ’s side instrument
panel.
Do not place anything on the instrument
panel, and/or do not affix anything on the
windshield to block this sensor.
When the headlights come on, the lights
automatically turn off about 30 seconds
after any of the doors is opened and
closed with the ignition key turned to the
“ACC” or “LOCK” position.* To turn them
on again, turn the ignition key to the ”ON”
position, or turn the headlight switch off
and then twist the knob until the first or
second clickstop. If you are going to park
for over one week, make sure the head-
light switch is off.
Page 119 of 351
109
When the headlight switch is on with all
the doors locked, pushing the “LOCK” but-
ton on the wireless remote control key
turns off the headlights.
NOTE: *The time before turning off the
lights can be changed. Ask your Toyota
dealer for details.
NOTICE
To prevent the battery from being dis-
charged, do not leave the lights on
for a long period when the engine is
not running.
Daytime running light system
The headlights turn on at reduced intensi-
ty when the parking brake is released with
the engine started, even with the light
switch in the “OFF” position. They will not
go off until the ignition switch is turned
off.
To turn on the other exterior lights and
instrument panel lights, twist the knob to
the position 1.
Twist the knob to the position 2 to turn
the headlights to full intensity for driving
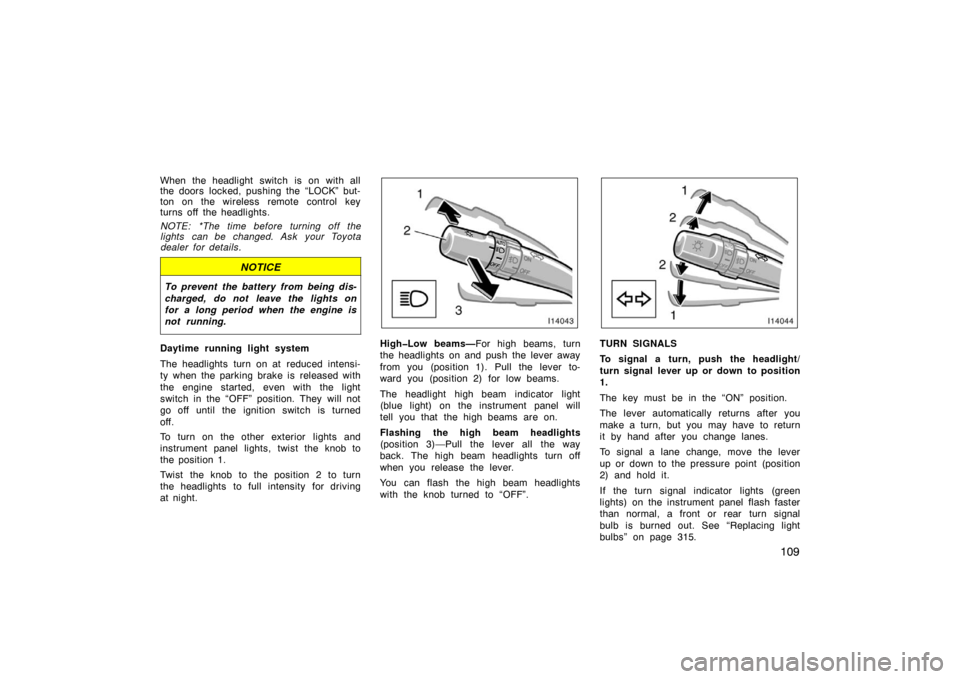
at night.HighLow beams—For high beams, turn
the headlights on and push the lever away
from you (position 1). Pull the lever to-
ward you (position 2) for low beams.
The headlight high beam indicator light
(blue light) on the instrument panel will
tell you that the high beams are on.
Flashing the high beam headlights
(position 3)—Pull the lever all the way
back. The high beam headlights turn off
when you release the lever.
You can flash the high beam headlights
with the knob turned to “OFF”.TURN SIGNALS
To signal a turn, push the headlight/
turn signal lever up or down to position
1.
The key must be in the “ON” position.
The lever automatically returns after you
make a turn, but you may have to return
it by hand after you change lanes.
To signal a lane change, move the lever
up or down to the pressure point (position
2) and hold it.
If the turn signal indicator lights (green
lights) on the instrument panel flash faster
than normal, a front or rear turn signal
bulb is burned out. See “Replacing light
bulbs” on page 315.
Page 120 of 351
11 0
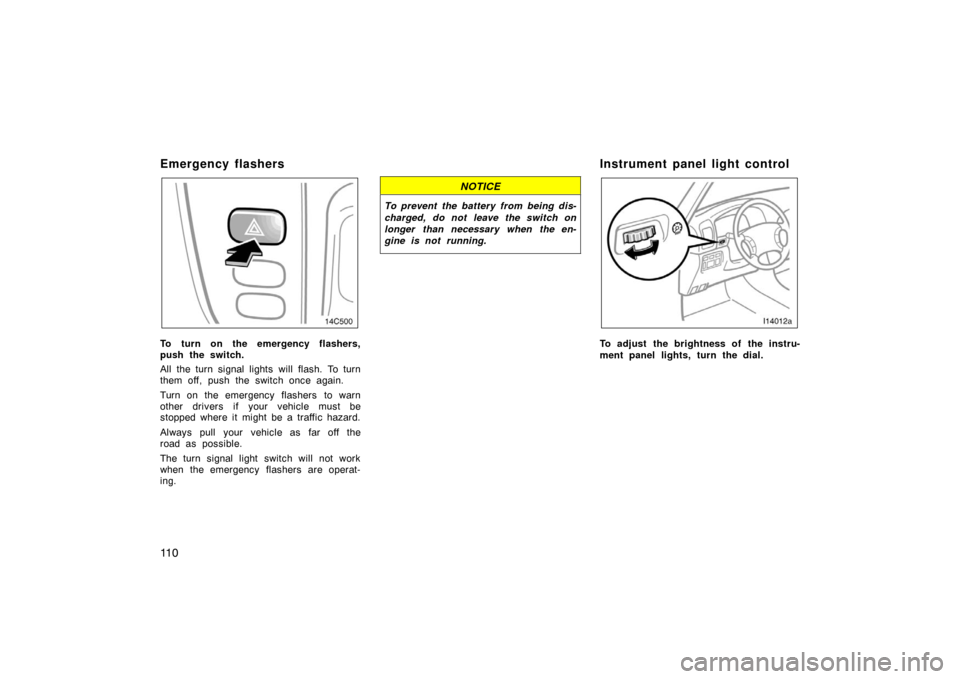
Emergency flashers
To turn on the emergency flashers,
push the switch.
All the turn signal lights will flash. To turn
them off, push the switch once again.
Turn on the emergency flashers to warn
other drivers if your vehicle must be
stopped where it might be a traffic hazard.
Always pull your vehicle as far off the
road as possible.
The turn signal light switch will not work
when the emergency flashers are operat-
ing.
NOTICE
To prevent the battery from being dis-
charged, do not leave the switch on
longer than necessary when the en-
gine is not running.
Instrument panel light control
To adjust the brightness of the instru-
ment panel lights, turn the dial.
Page 145 of 351
135
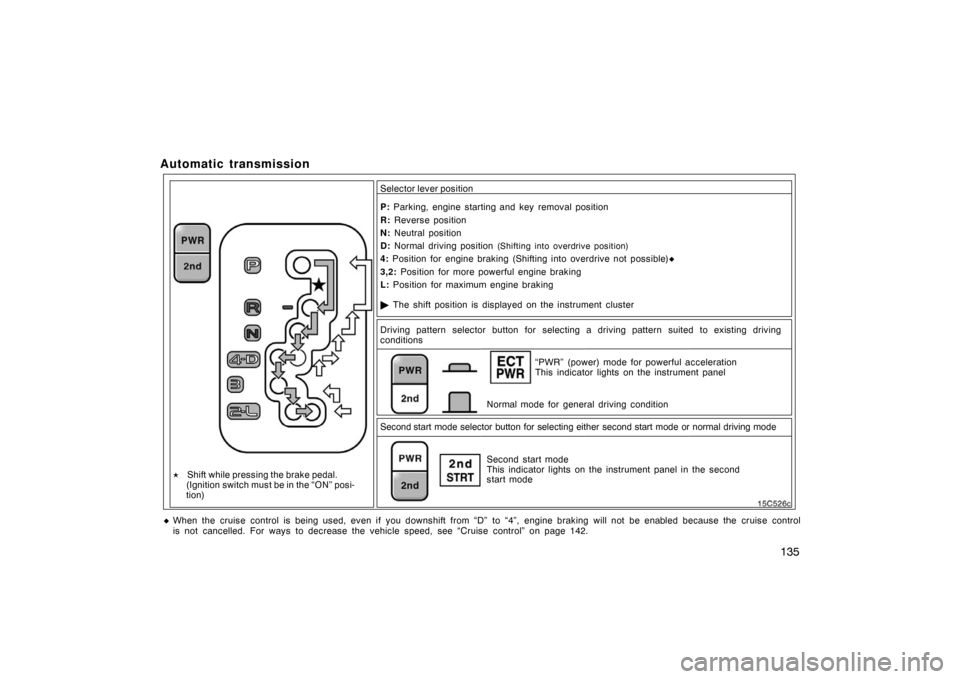
Automatic transmission
� The shift position is displayed on the instrument cluster
P:
Parking, engine starting and key removal position
R: Reverse position
N: Neutral position
D: Normal driving position
(Shifting into overdrive position)
4: Position for engine braking (Shifting into overdrive not possible)�
3,2: Position for more powerful engine braking
Driving pattern selector button for selecting a driving pattern suited to existing driving
conditions
Normal mode for general driving condition“PWR” (power) mode for powerful acceleration
This indicator lights on the instrument panel
Second start mode selector button for selecting either second start mode or no\
rmal driving mode Second start mode
This indicator lights on the instrument panel in the second
start mode
L:
Position for maximum engine braking
� Shift while pressing the brake pedal.
(Ignition switch must be in the “ON” posi-
tion) Selector lever position
�When the cruise control is being used, even if you downshift from “D” to “4”, engine braking will not be enabled because the cr
uise control
is not cancelled. For ways to decrease the vehicle speed, see “Cruise control” on page 142.
Page 152 of 351
142
Parking brake
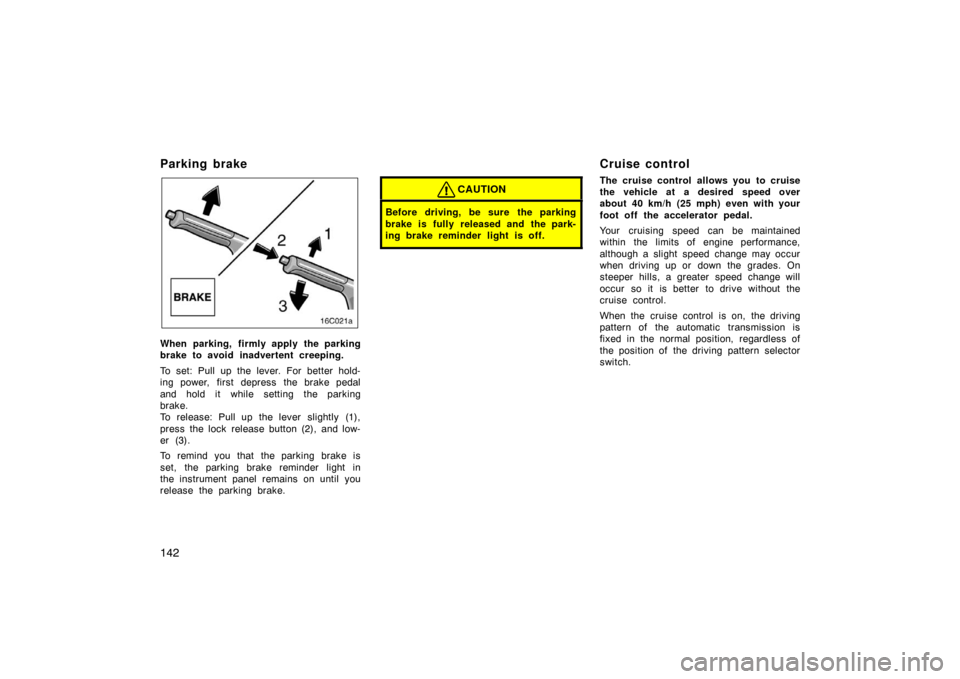
When parking, firmly apply the parking
brake to avoid inadvertent creeping.
To set: Pull up the lever. For better hold-
ing power, first depress the brake pedal
and hold it while setting the parking
brake.
To release: Pull up the lever slightly (1),
press the lock release button (2), and low-
er (3).
To remind you that the parking brake is
set, the parking brake reminder light in
the instrument panel remains on until you
release the parking brake.
CAUTION
Before driving, be sure the parking
brake is fully released and the park-
ing brake reminder light is off.
Cruise control
The cruise control allows you to cruise
the vehicle at a desired speed over
about 40 km/h (25 mph) even with your
foot off the accelerator pedal.
Your cruising speed can be maintained
within the limits of engine performance,
although a slight speed change may occur
when driving up or down the grades. On
steeper hills, a greater speed change will
occur so it is better to drive without the
cruise control.
When the cruise control is on, the driving
pattern of the automatic transmission is
fixed in the normal position, regardless of
the position of the driving pattern selector
switch.
Page 153 of 351
143
CAUTION
�To help maintain maximum control
of your vehicle, do not use the
cruise control when driving in
heavy or varying traffic, or on slip-
pery (rainy, icy or snow
–covered) or
winding roads.
�Avoid vehicle speed increases when
driving downhill. If the vehicle
speed is too fast in relation to the
cruise control set speed, cancel the
cruise control then downshift the
transmission to use engine braking
to slow down.
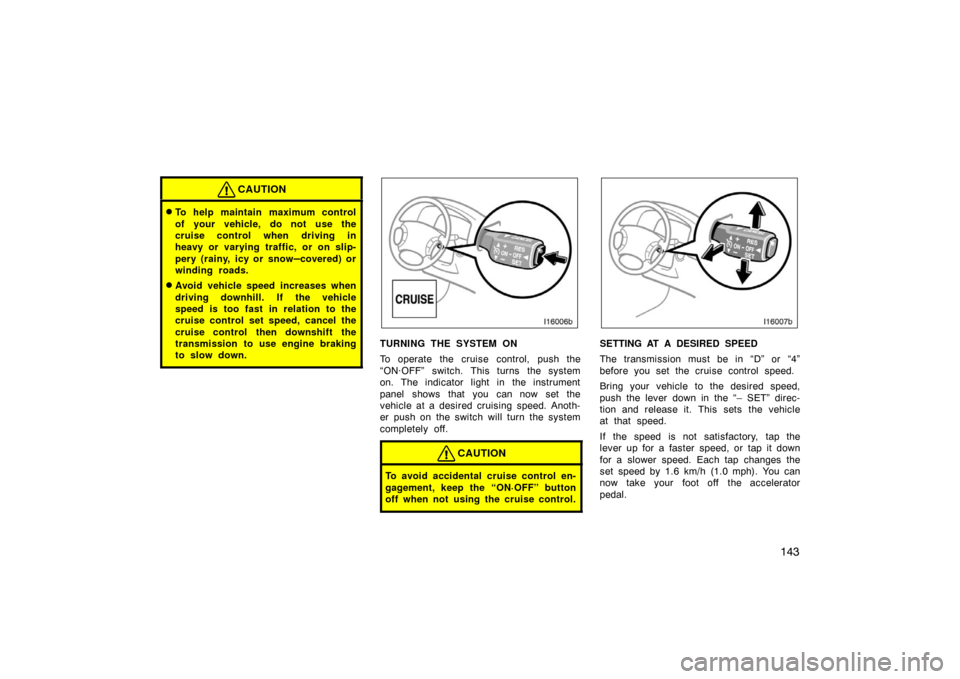
TURNING THE SYSTEM ON
To operate the cruise control, push the
“ON·OFF” switch. This turns the system
on. The indicator light in the instrument
panel shows that you can now set the
vehicle at a desired cruising speed. Anoth-
er push on the switch will turn the system
completely off.
CAUTION
To avoid accidental cruise control en-
gagement, keep the “ON·OFF” button
off when not using the cruise control.
SETTING AT A DESIRED SPEED
The transmission must be in “D” or “4”
before you set the cruise control speed.
Bring your vehicle to the desired speed,
push the lever down in the “– SET” direc-
tion and release it. This sets the vehicle
at that speed.
If the speed is not satisfactory, tap the
lever up for a faster speed, or tap it down
for a slower speed. Each tap changes the
set speed by 1.6 km/h (1.0 mph). You can
now take your foot off the accelerator
pedal.
Page 185 of 351
175
OPERATION OF INSTRUMENTS AND
CONTROLS
Air conditioning system
Front air conditioning system:Controls 176
. . . . . . . . . . . . . . . . . . . . . . . . . . . . . . . . . . . . .\
. . . . . . . . . . .
Air flow selector settings 180
. . . . . . . . . . . . . . . . . . . . . . . . . . . . . . . . . .
Operating tips 181
. . . . . . . . . . . . . . . . . . . . . . . . . . . . . . . . . . . . \
. . . . . . .
Instrument panel vents 183
. . . . . . . . . . . . . . . . . . . . . . . . . . . . . . . . . . .
Rear air conditioning system:
Controls 184
. . . . . . . . . . . . . . . . . . . . . . . . . . . . . . . . . . . . \
. . . . . . . . . . . .
Air flow selector settings 186
. . . . . . . . . . . . . . . . . . . . . . . . . . . . . . . . . .
For vehicle equipped with Navigation system, please refer to the
separate “ Navigation System Owner’s Manual”.
SECTION 1 9
Page 187 of 351
177
“AUTO” button
For automatic operation of the air condi-
tioning, press the “AUTO” button. An indi-
cator light will illuminate to show that the
automatic operation mode has been se-
lected.
In the automatic operation mode, the air
conditioning selects the most suitable fan
speed and air flow according to the tem-
perature.
You may use manual controls if you want
to select your own settings.
To turn off the automatic operation, press
the “MODE” or fan speed control button.
Fan speed control button
Push the “�” (increase) or “ �” (decrease)
button to adjust the fan speed.
In automatic operation, you do not have
to adjust the fan speed unless you desire
another fan speed mode.
Temperature selector knob
To increase the temperature, turn the knob
to right side, to decrease it, turn the knob
to left side. “MAX COLD” appears when you adjust to
maximum cooling, and “MAX HOT” ap-
pears when you adjust to maximum warm-
ing.
“OFF” button
Push the button to turn off the air condi-
tioning system.
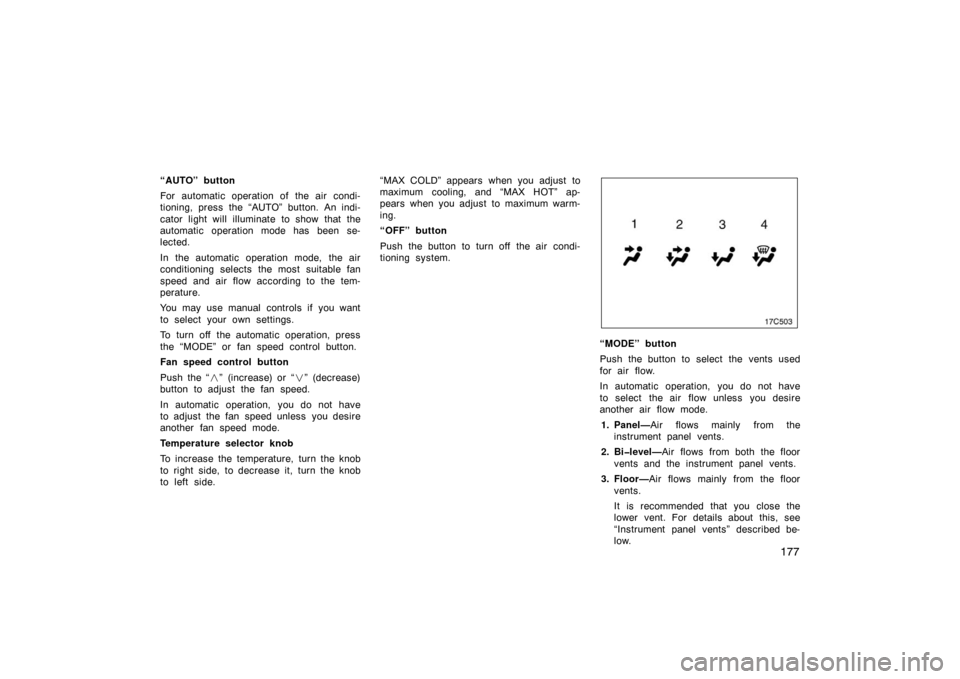
“MODE” button
Push the button to select the vents used
for air flow.
In automatic operation, you do not have
to select the air flow unless you desire
another air flow mode.
1. Panel— Air flows mainly from the
instrument panel vents.
2. Bilevel— Air flows from both the floor
vents and the instrument panel vents.
3. Floor— Air flows mainly from the floor
vents.
It is recommended that you close the
lower vent. For details about this, see
“Instrument panel vents” described be-
low.