Page 129 of 173

CD (See page 126)
DVD (See page 130)
The switches for radio, cassette tape and
disc player operation are displayed on the
function switch display screen when the
audio control")
11 9
TAPE (See page 124)
CD (See page 126)
DVD (See page 130)
The switches for radio, cassette tape and
disc player operation are displayed on the
function switch display screen when the
audio control mode is selected. Touch
them lightly and directly on the screen.
The selected switch is highlighted in green or
yellow.
INFORMATION
�If the system does not respond to a
touch of a switch, move your finger
away from the screen and then touch
it again.
�You cannot operate dimmed
switches.
�Wipe off fingerprints on the surface of
the display using a glass cleaning
cloth.
(b) Tone and balance
How good an audio program sounds to you is
largely determined by the mix of the treble,
midrange, and bass levels. In fact, different
kinds of music and vocal programs usually
sound better with different mixes of treble,
mid−range, and bass.
A good balance of the left and right stereo
channels and of the front and rear sound lev-
els is also important.
Keep in mind that if you are listening to a ste-
reo recording or broadcast, changing the
right/left balance will increase the volume of
one group of sounds while decreasing the vol-
ume of another.
Page 130 of 173

120
Touching the “SOUND” switch displayed
on the screen at the audio control mode
will display the sound control mode. Ad-
just the tone and balance as follows.
To adjust the tone, touch the “+” or “�”
switch on the screen. To adjust the bal-
ance between the front and rear speakers,
touch the “FRONT” or “REAR” switch on
the screen, and to adjust the balance be-
tween the left and right, touch the “L” or
“R” switch on the screen.
“BASS”: Adjusts low−pitched tones.
“MID”: Adjusts mid−pitched tones.
“TREB”: Adjusts high−pitched tones.
As the yellow display goes up, each tone is
more emphasized.(c) Your radio antenna
Mast type antenna—
To remove: Turn it counterclockwise carefully.
To install: Turn it clockwise securely.
NOTICE
�Mast type antenna:
To prevent damage to the antenna,
make sure it is removed before driv-
ing your Toyota through an automat-
ic car wash.
�On�glass antenna (built�in on the
rear quarter glass):
Attaching the film (especially con-
ductive or metallic type) on the rear
quarter glass will noticeably reduce
the sensitivity of the radio.
(d) Your cassette player
When you insert a cassette, the exposed tape
should face to the right.
NOTICE
Do not oil any part of the player and do
not insert anything other than cassette
tapes into the slot, or the tape player
may be damaged.
(e) Your compact disc player with chang-
er
When you insert a disc, push the “LOAD” but-
ton and gently push the disc in with the label
side up. (The player will automatically eject
a disc if the label side is down.) This compact
disc player can store up to six discs. The play-
er will play from track 1 through the end of the
disc. Then it will play from track 1 of the next
disc.
The player is intended for use with 12 cm (4.7
in.) discs only.
Page 131 of 173

121
NOTICE
�Do not stack up two discs for inser-
tion, or it will cause damage to the
compact disc player with changer. In-
sert only one compact disc into slot
at a time.
�Never try to disassemble or oil any
part of the compact disc player. Do
not insert anything other than a com-
pact disc into the slot.
(f) Your DVD player
You can enjoy the sound of the rear seat en-
tertainment system by pushing the “DISC”
button.
— Radio operation
(a) Listening to the radio
Push these buttons to choose either an
AM or FM station.
“AM”, “FM1” or “FM2” appears on the screen.
Turn the knob clockwise to step up the sta-
tion band or counterclockwise to step
down.
Your radio automatically changes to stereo
reception when a stereo broadcast is re-
ceived. “ST” appears on the screen. If the
signal becomes weak, the radio reduces the
amount of channel separation to prevent the
weak signal from creating noise. If the signal
becomes extremely weak, the radio switches
from stereo to mono reception. In this case,
“ST” disappears from the screen.
Page 132 of 173
 Presetting a station
1. Tune in the desired station.
2. Touch one of the switches (1 — 6) you
want and hold it until a beep is heard. This
sets the station to the switch and the fre-
quency")
122
(b) Presetting a station
1. Tune in the desired station.
2. Touch one of the switches (1 — 6) you
want and hold it until a beep is heard. This
sets the station to the switch and the fre-
quency appears on the switch.
Each radio mode (AM, FM1 or FM2) can store
up to 6 stations. To change the preset station
to a different one, follow the same procedure.
The preset station memory is cancelled when
the power source is interrupted by battery dis-
connection or a blown fuse.(c) Selecting a station
Tune in the desired station using one of the
following methods.
Preset tuning: Touch the switch (1 — 6) for
the station you want. The switch is high-
lighted in green and the station frequency ap-
pears on the screen.
Seek tuning: Push the “SEEK·TRACK” but-
ton on either side. The radio will begin seek-
ing up or down for a station of the nearest fre-
quency and will stop on reception. Each time
you push the button, the stations will be
searched automatically one after another.
To scan all the frequencies: Touch the
“SCAN” switch on the screen or push the
“SCAN” button briefly. “SCAN” appears on
the screen. The radio will find the next station
and stay there for a few seconds, and then
scan again. To select a station, touch the
“SCAN” switch or push the “SCAN” button
again.
To scan the preset stations: Touch the
“SCAN” switch on the screen or push the
“SCAN” button for longer than approximately
a second. “P. SCAN” appears on the screen.
The radio will tune in the next preset station,
stay there for a few seconds, and then move
to the next preset station. To select a station,
touch the “SCAN” switch or push the “SCAN”
button again.(d) Radio Data System
Your audio system is equipped with Radio
Data Systems (RDS). RDS mode provides
you to receive text messages from radio sta-
tions that utilize RDS transmitters.
When RDS is on, the radio can
— only select stations of a particular program
type,
— display messages from radio stations,
— search for a stronger signal station.
RDS features are available for the use only on
FM stations which broadcast RDS informa-
tion.
Page 133 of 173

123 “TYPE � �” switch:
If the system receives no RDS stations, “NO
PTY” appears on the display.
Each time you touch the “TYPE �” or “TYPE
�” switch, the program type changes as in
the following:
�ROCK
�MISC (Miscellaneous)
�Inform (Information)
�Easy Lis (Easy listening)
�Cls/Jazz (Classical music and Jazz)
�R & B (Rhythm and Blues)
�Religion
�Alert (Emergency message)
“TYPE SEEK” switch:
When a program is set, “TYPE SEEK” switch
appears. Touch the switch and the system
starts to seek the station in the relevant pro-
gram type.
If any type program station is not found,
“NOTHING” appears on the display.
“MSG” (MESSAGE) switch:
If the system receives a radio text from RDS
station, “MSG” appears on the display. Touch
the “MSG” switch, and a text message is dis-
played on the screen.
In case a text message is not accepted in a
screen, you can touch the “MSG” switch and
hold it to display the rest of the message.
When the system can show the station name,
“RDS” appears on the display. Each time you
touch the “MSG” switch, indication on the dis-
play changes from the band to the station
name, a radio text in this order. After six sec-
onds passes, indication returns to the band.
(e) Traffic announcement
“TRAF” switch:
A station that regularly broadcasts traffic in-
formation is automatically located.
When you push the “TRAF” switch, “TRAF
SEEK” appears on the display and the radio
will start seeking any traffic program station.
If any traffic program station is not found,
“NOTHING” appears on the display.
If the traffic program station is found, the
name for traffic program station is displayed
and “TRAF” is lit for a while until traffic an-
nouncement is received.
Page 134 of 173
 Inserting or ejecting a cassette tape
Put the cassette tape in the slot with the
exposed tape side to the right and lightly
push it in.
To stop and eject the")
124
— Cassette tape player
operation
(a) Inserting or ejecting a cassette tape
Put the cassette tape in the slot with the
exposed tape side to the right and lightly
push it in.
To stop and eject the cassette tape, push
the “
” button.
The player will automatically start when you
insert the cassette tape. At this time, “TAPE”
appears on the screen.
If a metal or chrome equivalent cassette tape
is put in the cassette player, the player will au-
tomatically recognize it and “MTL” appears
on the screen.
(b) Playing a cassette tape
Push the “TAPE” button if a cassette tape
is already in the slot.
Dolby�
B NR∗:
If you are listening to a tape that was recorded
with Dolby� Noise Reduction, touch the
switch on the screen. The symbol is high-
lighted in yellow.
The Dolby NR mode reduces tape noise by
about 10 dB. For best sound reproduction,
play your tapes with the Dolby NR on or off ac-
cording to the mode used for recording the
tape.
To play a tape recorded without Dolby NR,
touch the switch once again.
∗ Dolby noise reduction manufactured under
license from Dolby Laboratories Licensing
Corporation.
“DOLBY” and the double D sym-
bol are trademarks of Dolby Laboratories
Licensing Corporation.
Page 135 of 173
 Manual program selection
Program switch: Touch the “
��” switch
on the screen to select the other side of a cas-
sette tape. The display indicates which side
is currently selected (� indi")
125
(c) Manual program selection
Program switch: Touch the “
��” switch
on the screen to select the other side of a cas-
sette tape. The display indicates which side
is currently selected (� indicates top side, �
indicates bottom side).
Fast forward switch: Touch the “��”
switch on the screen to fast forward a cas-
sette tape. “FF” appears on the screen.
To stop fast forwarding, touch the same
switch or push the “TAPE” button.
Rewind switch: Touch the “��” switch on
the screen to rewind a cassette tape. “REW”
appears on the screen.
To stop rewinding, touch the same switch or
push the “TAPE” button.Auto�reverse feature: After the cassette
player reaches the end of a tape, it automati-
cally reverses and begins to play the other
side, regardless of whether the cassette was
playing or fast forwarding.
(d) Automatic program selection
“RPT” switch: The repeat feature automati-
cally replays the current program.
Touch the “RPT” switch while the program is
playing. When the program ends, it will auto-
matically be rewound and replayed. Touch
the switch again to turn off the repeat feature.
There must be at least 5 seconds of blank
space between programs for the repeat fea-
ture to work correctly.
“SKIP” switch: The skip feature allows you
to fast forward past long stretches of blank
tape. This is especially useful at the end of
cassettes.
Touch the “SKIP” switch. The player will auto-
matically skip any blank portions of 15 se-
conds or more and play the next program. To
cancel it, touch the switch once again.
“SEEK·TRACK” button: The automatic pro-
gram selection feature allows you to program
your cassette player to skip forward or back-
ward to locate the track you want to listen to.
You can skip up to 9 programs at a time.
Push this button on the “�” side to skip for-
ward. “FF” and the number will appear on the
screen. Push the button until the number of
programs you want to skip appears on the
screen. After that, the player will automatical-
ly skip forward.
When the end of the tape is reached, the play-
er automatically reverses sides and resumes
normal play.
Push this button on the “�” side to skip back-
ward. Push the button until “REW” and the
number of programs you want to skip appears
on the screen.
Page 136 of 173

126
�If you set “REW 1”, the player will rewind
to the beginning of the current program.
�When counting the number of programs
you want to rewind, remember to count
the current program as well. For example,
if you want to rewind to a program that is
two before the program you are listening
to, push this button until “REW 3” appears
on the screen.
When the beginning of the tape is reached,
the player automatically resumes normal
play.
There must be at least 5 seconds of blank
space between programs for this feature to
work correctly.
“RPT”, “SKIP” or Automatic program
selection features: These features may not
work well with some spoken word, live or clas-
sical recordings.
— Compact disc player with
changer operation
(a) Inserting compact discs
The ignition switch must be in the “ACC” or
“ON” position.
Your compact disc player with changer can
store up to 6 discs.
�Setting a single compact disc:
1. Push the “LOAD” button briefly.
You can set a disc at the lowest empty disc
number.2. The red indicators of the slot start
blinking. After the red indicators change
to green, insert only one disc. If you need
to insert the next disc, repeat the same
procedure to insert another disc.
After insertion, the set disc is automatically
loaded.
If the label faces down, the disc cannot be
played. In this case, “CD CHECK” appears
on the display.
�Setting all the discs:
1. Push the “LOAD” button until you hear
a beep.
2. The red indicators of the slot start
blinking. After the red indicators change
to green, insert only one disc. After the
disc is loaded, the red indicators of the
slot start blinking again. It changes to
green, you can insert the next disc. Re-
peat this procedure until you insert all the
disc.
If you do not insert the discs within 15 sec-
onds after pushing the “LOAD” button, the op-
eration will be canceled automatically.
 1
1 2
2 3
3 4
4 5
5 6
6 7
7 8
8 9
9 10
10 11
11 12
12 13
13 14
14 15
15 16
16 17
17 18
18 19
19 20
20 21
21 22
22 23
23 24
24 25
25 26
26 27
27 28
28 29
29 30
30 31
31 32
32 33
33 34
34 35
35 36
36 37
37 38
38 39
39 40
40 41
41 42
42 43
43 44
44 45
45 46
46 47
47 48
48 49
49 50
50 51
51 52
52 53
53 54
54 55
55 56
56 57
57 58
58 59
59 60
60 61
61 62
62 63
63 64
64 65
65 66
66 67
67 68
68 69
69 70
70 71
71 72
72 73
73 74
74 75
75 76
76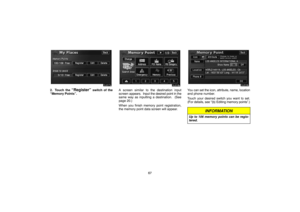 77
77 78
78 79
79 80
80 81
81 82
82 83
83 84
84 85
85 86
86 87
87 88
88 89
89 90
90 91
91 92
92 93
93 94
94 95
95 96
96 97
97 98
98 99
99 100
100 101
101 102
102 103
103 104
104 105
105 106
106 107
107 108
108 109
109 110
110 111
111 112
112 113
113 114
114 115
115 116
116 117
117 118
118 119
119 120
120 121
121 122
122 123
123 124
124 125
125 126
126 127
127 128
128 129
129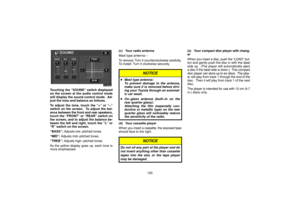 130
130 131
131 132
132 133
133 134
134 135
135 136
136 137
137 138
138 139
139 140
140 141
141 142
142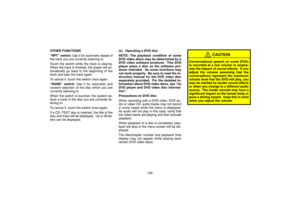 143
143 144
144 145
145 146
146 147
147 148
148 149
149 150
150 151
151 152
152 153
153 154
154 155
155 156
156 157
157 158
158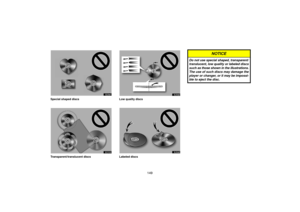 159
159 160
160 161
161 162
162 163
163 164
164 165
165 166
166 167
167 168
168 169
169 170
170 171
171 172
172