Page 2005 of 5135
1302Y±03
A77119
A77120
A77121
± INTAKETURBO CHARGER SYSTEM (1CD±FTV)
13±3
AVENSIS REPAIR MANUAL (RM1018E)
TURBO CHARGER SYSTEM (1CD±FTV)
PRECAUTION
1. MAINTENANCE PRECAUTION
(a) Do not stop the engine immediately after pulling a trailer,
or after driving at a high speed, or uphill drive. Let the en-
gine Idle for 20 to 120 seconds before turn the ignition
switch OFF (According as the driving condition, the idling
time varies).
(b) Avoid quick acceleration or quickly accelerating the en-
gine RPM immediately after the starting a cold engine.
(c) If the turbocharger is found to be defective, it must be re-
placed. Also, inspect a source of the trouble including
conditions of the turbocharger that having been used. Re-
pair or replace the followings as necessary:
(1) Engine oil (Level and quality)
(2) Oil lines leading to the turbocharger
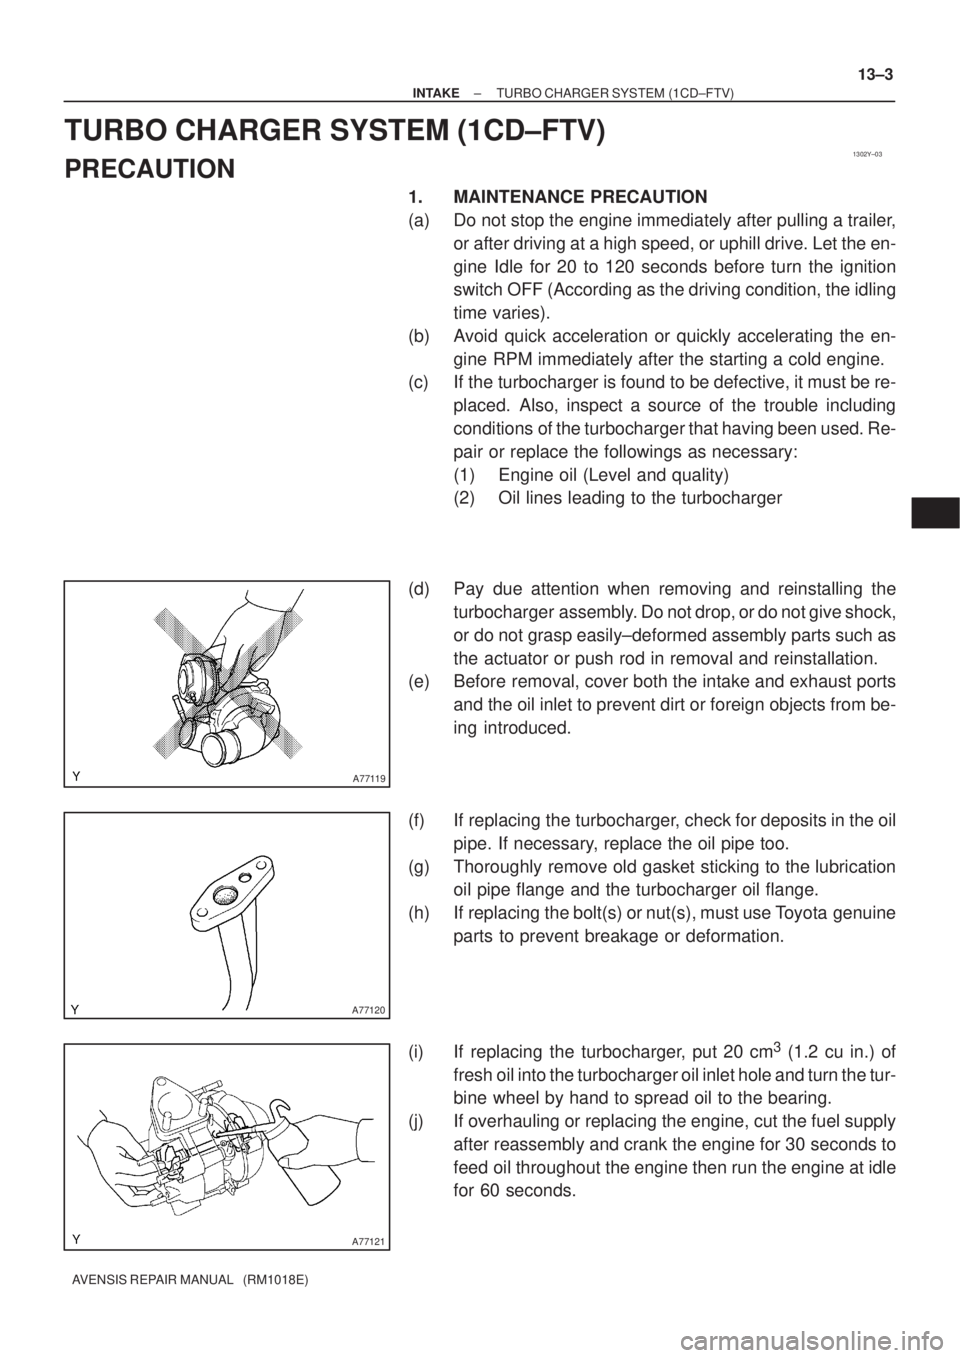
(d) Pay due attention when removing and reinstalling the
turbocharger assembly. Do not drop, or do not give shock,
or do not grasp easily±deformed assembly parts such as
the actuator or push rod in removal and reinstallation.
(e) Before removal, cover both the intake and exhaust ports
and the oil inlet to prevent dirt or foreign objects from be-
ing introduced.
(f) If replacing the turbocharger, check for deposits in the oil
pipe. If necessary, replace the oil pipe too.
(g) Thoroughly remove old gasket sticking to the lubrication
oil pipe flange and the turbocharger oil flange.
(h) If replacing the bolt(s) or nut(s), must use Toyota genuine
parts to prevent breakage or deformation.
(i) If replacing the turbocharger, put 20 cm
3 (1.2 cu in.) of
fresh oil into the turbocharger oil inlet hole and turn the tur-
bine wheel by hand to spread oil to the bearing.
(j) If overhauling or replacing the engine, cut the fuel supply
after reassembly and crank the engine for 30 seconds to
feed oil throughout the engine then run the engine at idle
for 60 seconds.
Page 2405 of 5135
17045±03
A56466
Recommended Viscosity (SAE)
BEFORE NEXT OIL CHANGE TEMPERATURE RANGE ANTICiPATED416 2738
0 20 40 60 80 100 ±29
±20±18 ±7 �C
�F20 W ± 50
15 W ± 40
10 W ± 30
5 W ± 30 PREFERRED
B14332
Oil Pressure Switch
B14333
Oil Pressure Gauge 17±20
± LUBRICATIONLUBRICATION SYSTEM (1CD±FTV)
AVENSIS REPAIR MANUAL (RM1018E)
LUBRICATION SYSTEM (1CD±FTV)
ON±VEHICLE INSPECTION
1. CHECK ENGINE OIL LEVEL
(a) After warm up the engine and then 5 minutes after the engine stop, oil level should be between the
low level and full level marks of the dipstick.
If low, check for leakage and add oil up to the full level mark.
NOTICE:
Do not fill with engine oil above the full level mark.
2. CHECK ENGINE OIL QUALITY
(a) Check the oil for deterioration, entry of water, discoloring
or thinning.
If the quality is visibly poor, replace the oil.
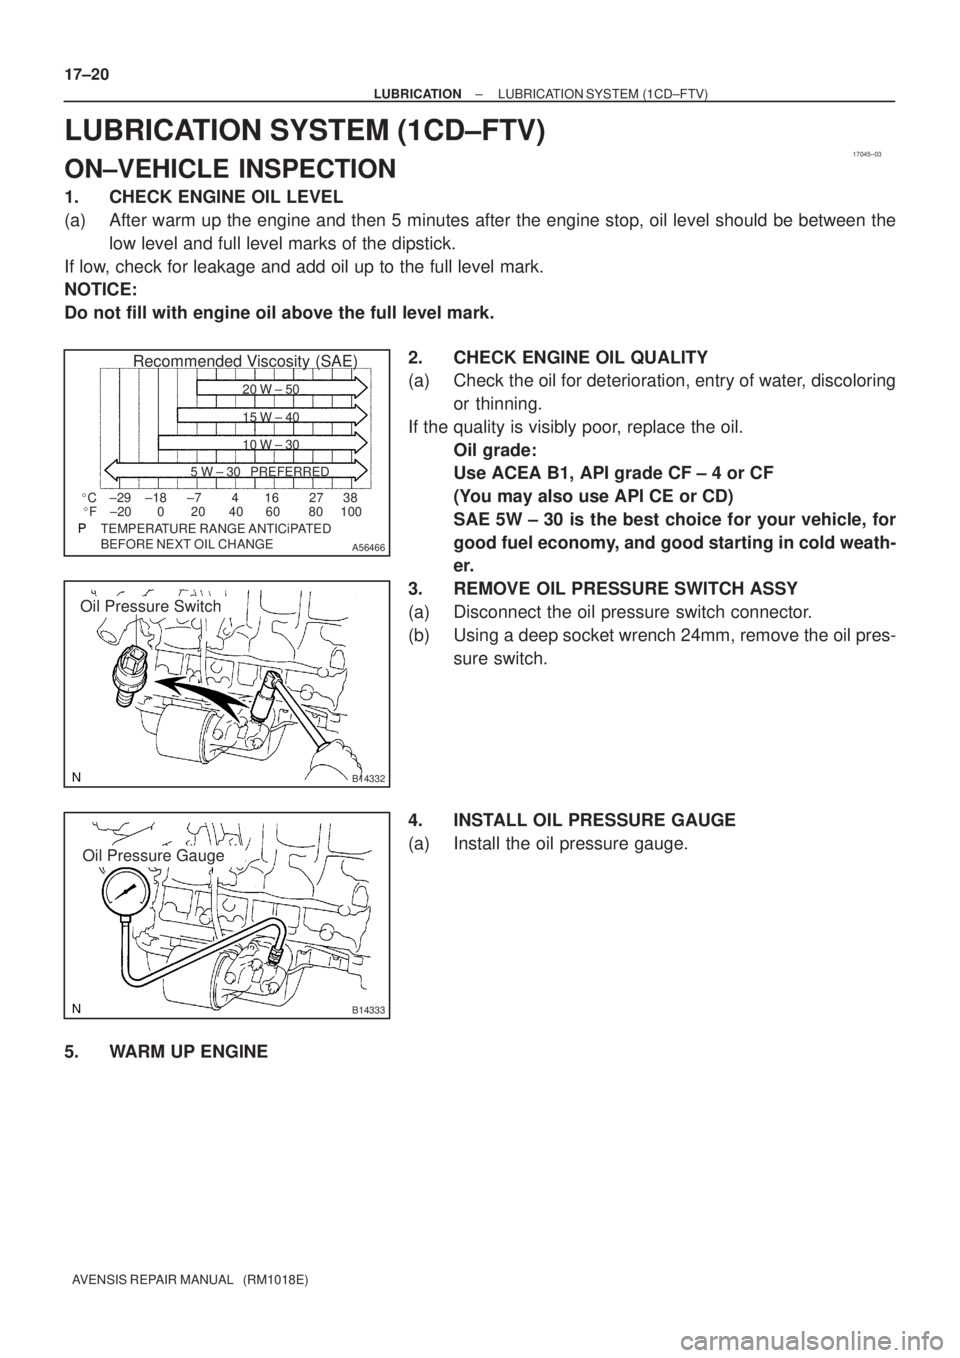
Oil grade:
Use ACEA B1, API grade CF ± 4 or CF
(You may also use API CE or CD)
SAE 5W ± 30 is the best choice for your vehicle, for
good fuel economy, and good starting in cold weath-
er.
3. REMOVE OIL PRESSURE SWITCH ASSY
(a) Disconnect the oil pressure switch connector.
(b) Using a deep socket wrench 24mm, remove the oil pres-
sure switch.
4. INSTALL OIL PRESSURE GAUGE
(a) Install the oil pressure gauge.
5. WARM UP ENGINE
Page 2406 of 5135
P13638
Adhesive
± LUBRICATIONLUBRICATION SYSTEM (1CD±FTV)
17±21
AVENSIS REPAIR MANUAL (RM1018E)
6. CHECK OIL PRESSURE
Oil pressure:
At idle29 kPa (0.3 kgf/cm2, 4.3 psi) or more
At 4,500 rpm245 to 588 kPa (2.5 to 6.0 kgf/cm2, 36 to 85 psi) or more
7. REMOVE OIL PRESSURE GAUGE
8. INSTALL OIL PRESSURE SWITCH ASSY
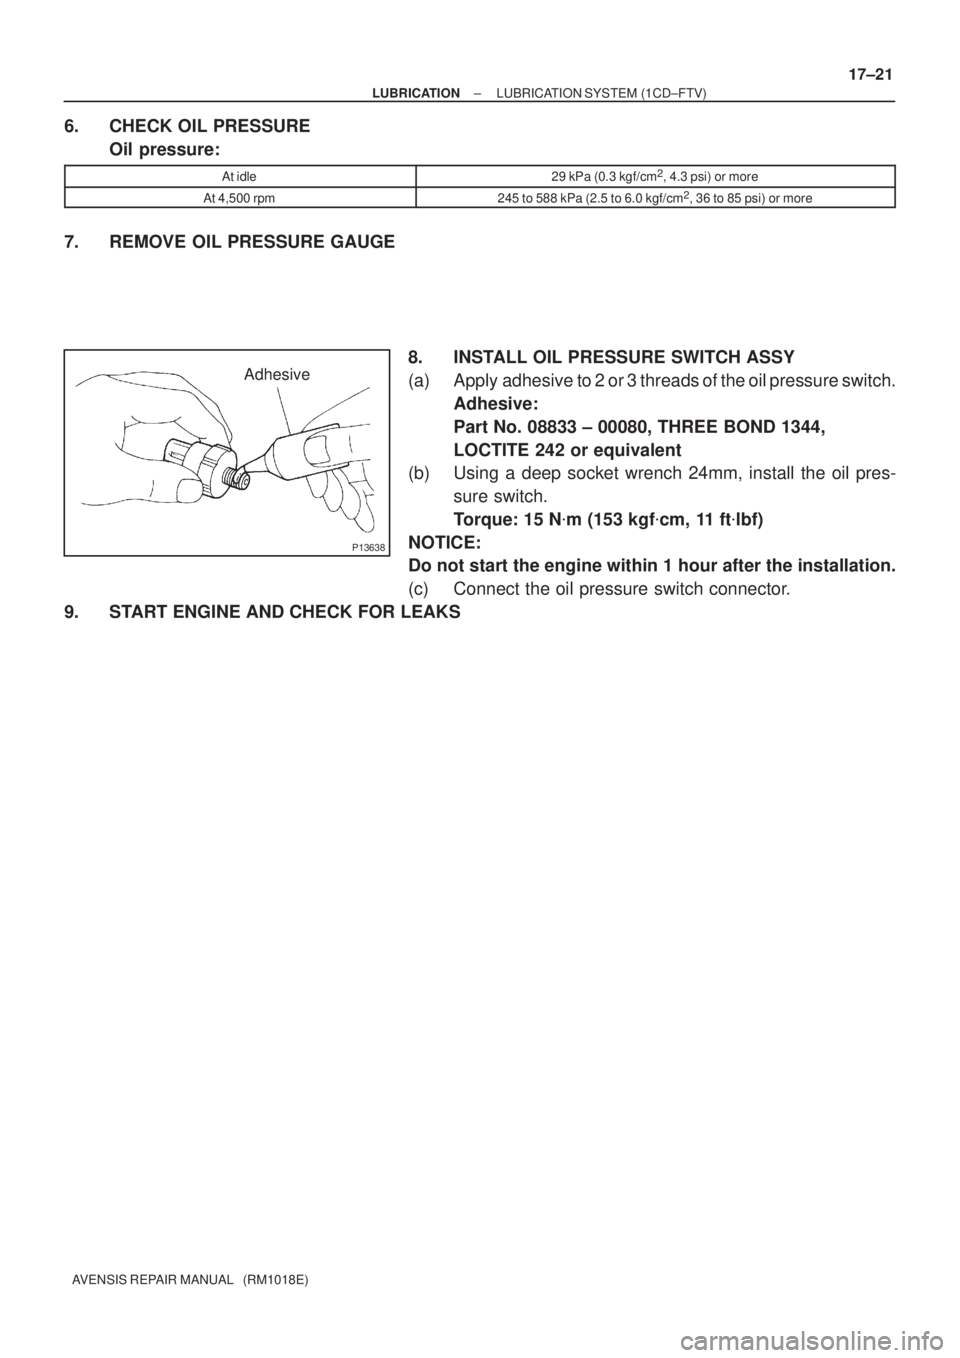
(a) Apply adhesive to 2 or 3 threads of the oil pressure switch.
Adhesive:
Part No. 08833 ± 00080, THREE BOND 1344,
LOCTITE 242 or equivalent
(b) Using a deep socket wrench 24mm, install the oil pres-
sure switch.
Torque: 15 N�m (153 kgf�cm, 11 ft�lbf)
NOTICE:
Do not start the engine within 1 hour after the installation.
(c) Connect the oil pressure switch connector.
9. START ENGINE AND CHECK FOR LEAKS
Page 4559 of 5135

1302Y−04
A77119
A77120
A77121
13−4− INTAKETURBO CHARGER SYSTEM (1CD−FTV)(From
September, 2003)
AVENSIS Supplement (RM1045E)
TURBO CHARGER SYSTEM (1CD−FTV)(From September,
2003)
PRECAUTION
1. MAINTENANCE PRECAUTION
(a) Do not stop the engine immediately after pulling a trailer,
or after high speed or uphill driving. Let the engine idle for
20 to 120 seconds before turning the ignition switch to
OFF (according as the driving condition, the idling time
varies).
(b) Avoid quickly accelerating the pedal or increasing the en-
gine speed immediately after starting a cold engine.
(c) If the turbocharger is found defective, it must be replaced.
Also, inspect the source of the trouble including condi-
tions of the turbocharger that having been used. Repair
or replace the followings if necessary:
(1) Engine oil (level and quality)
(2) Oil lines leading to the turbocharger
(d) Pay due attention when removing and reinstalling the
turbocharger assembly. Do not drop, grasp, or give shock
to the easily−deformed assembly parts such as the actua-
tor or push rod when removing or reinstalling.
(e) Before removing, cover both the intake and exhaust ports
and the oil inlet to prevent dirt or foreign objects from be-
ing introduced.
(f) If replacing the turbocharger, check the oil pipe for depos-
its. If necessary, replace the oil pipe, too.
(g) Thoroughly remove old gasket sticking to the lubrication
oil pipe flange and turbocharger oil flange.
(h) If replacing the bolt(s) or nut(s), Toyota genuine parts
must be used to prevent breakage or deformation.
(i) If replacing the turbocharger, put 20 cm
3(1.2 cu in.) of
fresh oil into the turbocharger oil inlet hole, then turn the
turbine wheel by hand to spread oil to the bearing.
(j) If overhauling or replacing the engine, cut the fuel supply
after reassembling and crank the engine for 30 seconds
to feed oil throughout the engine. Run the engine at idle
for 60 seconds.
Page 4756 of 5135

170IY−01
A56466
20 W−50
15 W−40
10 W−30
5W−30 PREFERRED
Before Next Oil Change Temperatuer Range Anticipated416 2738
0 20 40 60 80 100 −29
−20−18−7 _C
_F
Recommended Viscosity (SAE)
B14332
Oil Pressure Switch
B14333
Oil Pressure Gauge
− LUBRICATIONLUBRICATION SYSTEM (1CD−FTV)(From September,
2003)17−9
AVENSIS Supplement (RM1045E)
LUBRICATION SYSTEM (1CD−FTV)(From September, 2003)
ON−VEHICLE INSPECTION
1. CHECK ENGINE OIL LEVEL
(a) Warm up the engine. Stop the engine, then wait for 5 minutes.
(b) Check that the engine oil level is between the 2 marks on the oil level gage.
If low, check for leakage and add oil up to the upper mark.
NOTICE:
Do not fill with engine oil above the upper mark.
2. CHECK ENGINE OIL QUALITY
(a) Check the oil for deterioration, water intrusion, discoloring
or thinning.
If the quality is visibly poor, replace the oil.
Oil grade:
Use ACEA B1, API grade CF−4, CF or G−DLD−1.
(You may also use API CE or CD.)
SAE 5W−30 is the best choice for your vehicle in
terms of good fuel economy and good starting in cold
weather.
3. REMOVE OIL PRESSURE SWITCH ASSY
(a) Disconnect the oil pressure switch connector.
(b) Using a deep socket wrench 24mm, remove the oil pres-
sure switch.
4. INSTALL OIL PRESSURE GAUGE
(a) Install the oil pressure gauge.
5. WARM UP ENGINE
6. CHECK OIL PRESSURE
Oil pressure:
At idle29 kPa (0.3 kgf/cm2, 4.3 psi) or more
At 4,500 rpm245 to 588 kPa (2.5 to 6.0 kgf/cm2, 36 to 85 psi) or more
7. REMOVE OIL PRESSURE GAUGE
Page 4757 of 5135
P13638
Adhesive 17−10
− LUBRICATIONLUBRICATION SYSTEM (1CD−FTV)(From September,
2003)
AVENSIS Supplement (RM1045E)
8. INSTALL OIL PRESSURE SWITCH ASSY
(a) Apply adhesive to the 2 or 3 threads of the oil pressure
switch.
Adhesive:
Part No. 08833−00080, THREE BOND 1344,
LOCTITE 242 or equivalent
(b) Using a deep socket wrench 24mm, install the oil pres-
sure switch.
Torque: 15 N�m (153 kgf�cm, 11 ft�lbf)
NOTICE:
Do not start the engine within 1 hour after the installation.
(c) Connect the oil pressure switch connector.
9. START ENGINE AND CHECK FOR LEAKS