Page 3361 of 5135

B66968
B62423
1
2
B62422
B61441
±
ENGINE HOOD/DOOR FRONT DOOR
75±15
AVENSIS REPAIR MANUAL (RM1018E)
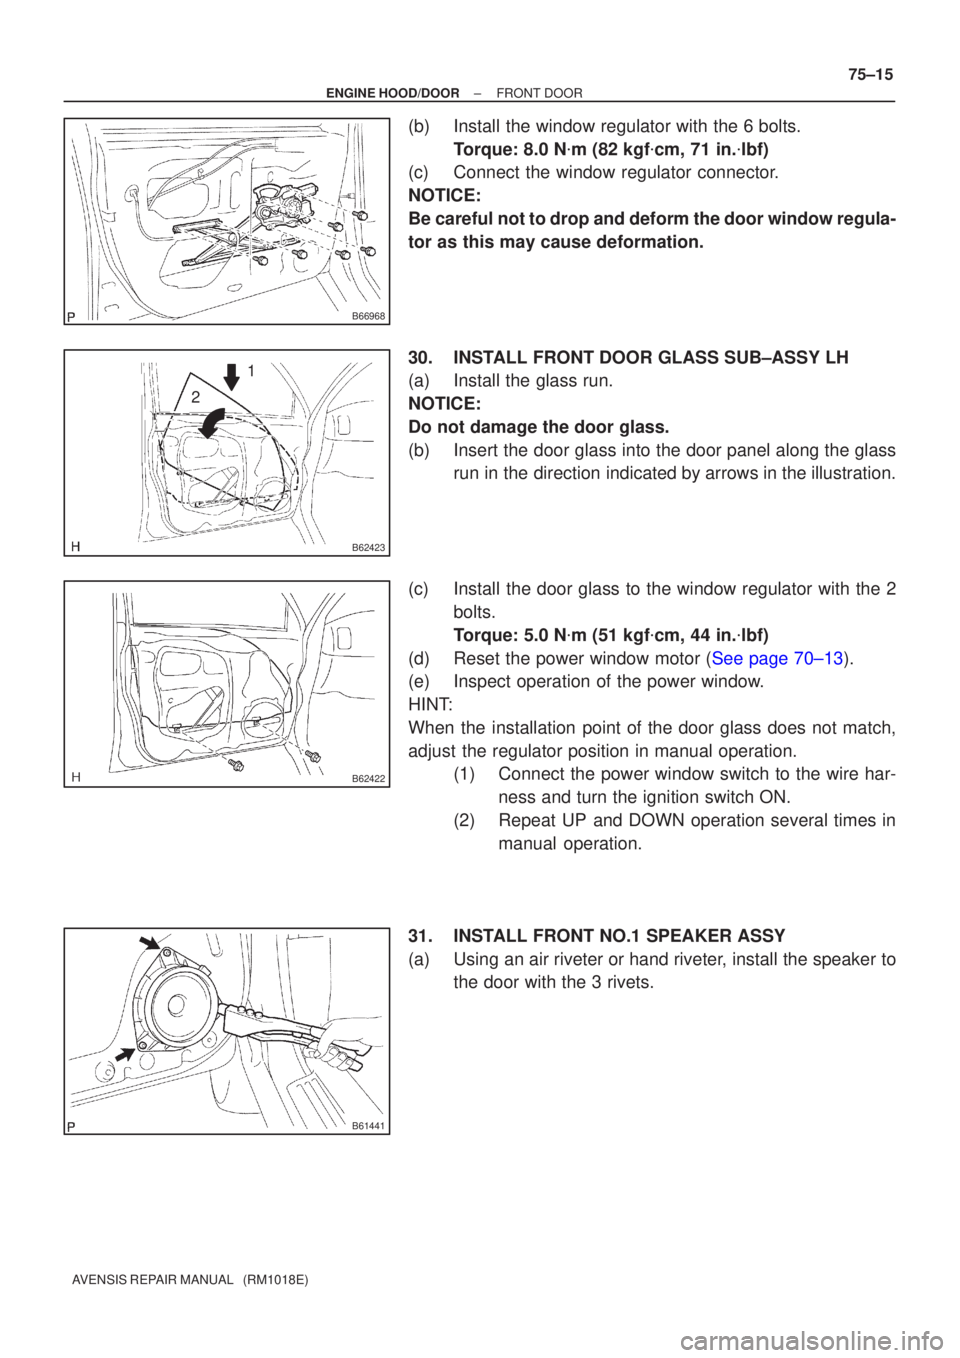
(b)Install the window regulator with the 6 bolts.
Torque: 8.0 N �m (82 kgf �cm, 71 in. �lbf)
(c)Connect the window regulator connector.
NOTICE:
Be careful not to drop and deform the door window regula-
tor as this may cause deformation.
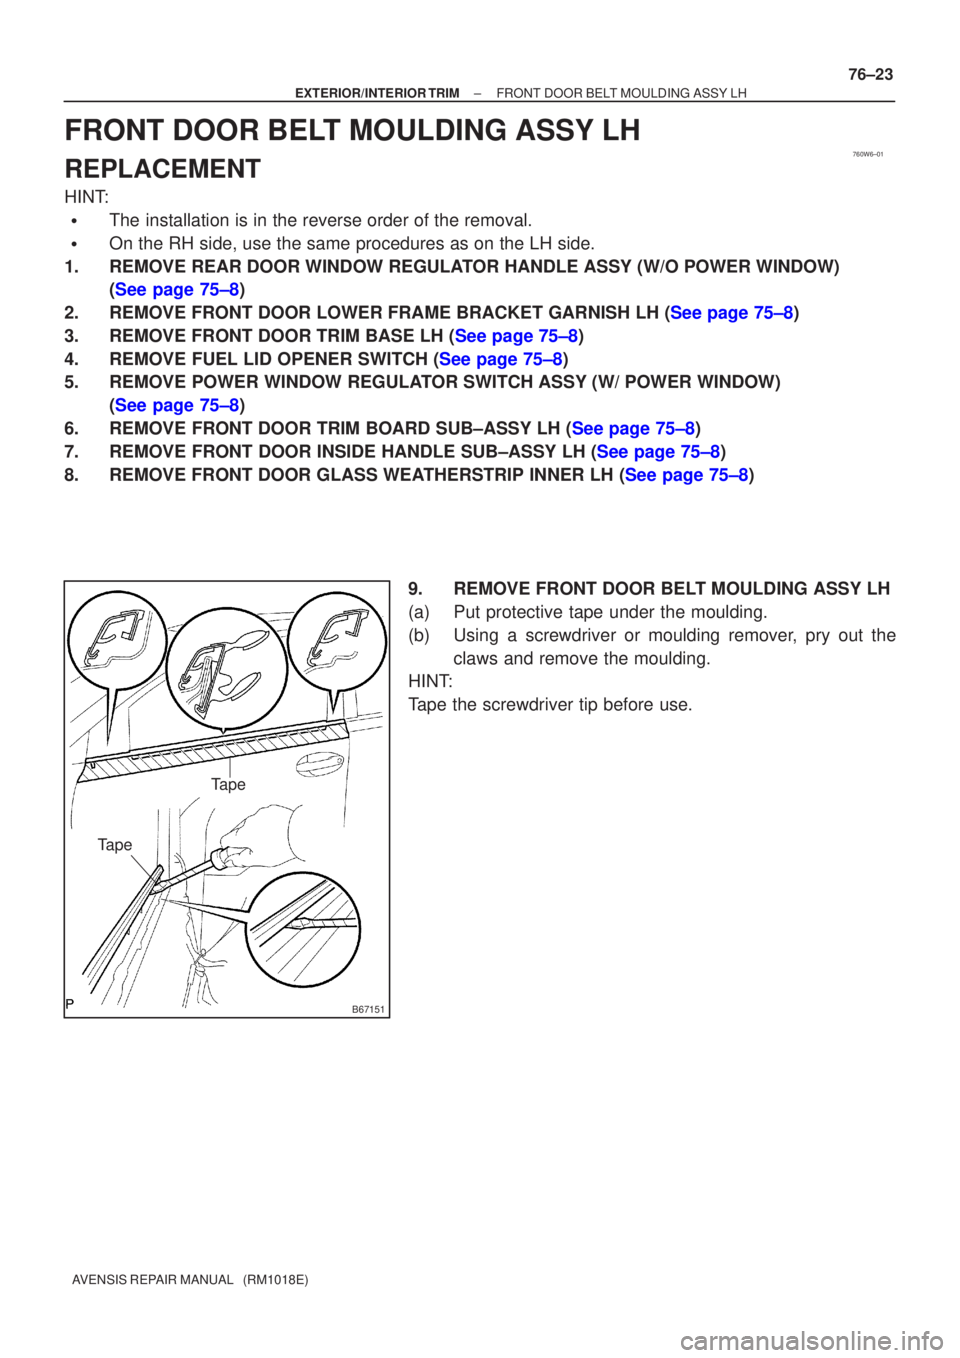
30.INSTALL FRONT DOOR GLASS SUB±ASSY LH
(a)Install the glass run.
NOTICE:
Do not damage the door glass.
(b)Insert the door glass into the door panel along the glass run in the direction indicated by arrows in the illustration.
(c)Install the door glass to the window regulator with the 2 bolts.
Torque: 5.0 N �m (51 kgf �cm, 44 in. �lbf)
(d)Reset the power window motor (See page 70±13).
(e) Inspect operation of the power window.
HINT:
When the installation point of the door glass does not match,
adjust the regulator position in manual operation. (1) Connect the power window switch to the wire har-
ness and turn the ignition switch ON.
(2) Repeat UP and DOWN operation several times in manual operation.
31. INSTALL FRONT NO.1 SPEAKER ASSY
(a) Using an air riveter or hand riveter, install the speaker to the door with the 3 rivets.
Page 3366 of 5135
750MV±01
B67988
Front Door Glass
Sub±assy LH Front Door Glass Run LH
Front Door Frame Sub±assy Rear Lower LH
8.0 (82, 71 in.´lbf)
Front Door Glass Weatherstrip Inner LH
Front Door Trim Board Sub±assy LH Front Door Armrest
Base Panel Upper
Courtesy Lamp
: Specified torque
N´m (kgf´cm, ft´lbf)Front No. 1 Speaker Assy Front Door Inside Handle Sub±assy LH
Fuel Lid Opener Switch
Front Door Trim Base LHClip
Power Window Regulator
Switch Assy Front Door Armrest Base Panel Upper
w/o Rear Power Window
Front Door Window Regulator
Sub±assy LH
8.0 (82, 71 in.´lbf)
Power Window Regulator
Master Switch Assy
Rivet
Non±reusable part ��
5.5 (56, 49 in.´lbf)
75±4
± ENGINE HOOD/DOORFRONT DOOR
AVENSIS REPAIR MANUAL (RM1018E)
FRONT DOOR
COMPONENTS
Page 3376 of 5135
B66546 B66546
Front Pillar Garnish RH
Cowl Side Trim
Board RH
Front Door Opening Trim
Weatherstrip RH
Front Door
Scuff Plate RH
Center Pillar Garnish
Lower RH
Center Pillar Garnish
Upper RH
Rear Door
Opening Trim
Weatherstrip RH
Rear Door
Scuff Plate RH
Front Door
Scuff Plate LH
Rear Door
Scuff Plate LH
Cowl Side Trim
Board LH
Front Door Opening Trim
Weatherstrip LHRear Door
Opening Trim
Weatherstrip LH
Center Pillar
Garnish
Lower LH Deck Floor
Box Rear
Tonneau Cover
Assy
Deck Board
Sub±assy
Deck Floor
Box Front
Deck Floor
Box RH
Deck Floor
Box LH
Deck Trim
Side Board RH
Deck Trim
Side Board LH
Roof Side
Garnish Inner RH
Roof Side
Garnish Inner LHRear Window Side
Garnish RH
Rear Window Side
Garnish LH Center Pillar
Garnish
Upper LH
Front Pillar Garnish LH
N�m (kgf�cm ft�lbf): Specified torque
74±12
± SLIDING ROOF/CONVERTIBLESLIDING ROOF
AVENSIS REPAIR MANUAL (RM1018E)
Page 3411 of 5135
760WZ±01
B70684
Front Pillar Garnish RH
Cowl Side Trim
Board RH
Front Door Opening Trim
Weatherstrip RH
Front Door
Scuff Plate RH
Center Pillar Garnish
Lower RH
Center Pillar Garnish
Upper RH
Rear Door
Opening Trim
Weatherstrip RH
Rear Door Scuff Plate RH
Front Door Scuff Plate LH
Rear Door Scuff Plate LH
Cowl Side Trim
Board LHFront Door Opening Trim
Weatherstrip LH
Rear Door
Opening Trim
Weatherstrip LH
Center Pillar Garnish Lower LH
Deck Floor
Box Rear
Tonneau Cover
Assy
Deck Board
Sub±assy
Deck Floor
Box Front
Deck Floor
Box RH
Deck Floor
Box LH
Deck Trim
Side Board RH
Deck Trim Side Board LH
Roof Side
Garnish Inner RH
Roof Side
Garnish Inner LHRear Window Side
Garnish RH
Rear Window Side
Garnish LH Center Pillar
Garnish
Upper LH
Front Pillar
Garnish LH
N�m (kgf�cm ft�lbf): Specified torque
41.2 (420, 30)
41.2 (420, 30)
± EXTERIOR/INTERIOR TRIMROOF HEADLINING ASSY (WAGON MODELS)
76±51
AVENSIS REPAIR MANUAL (RM1018E)
ROOF HEADLINING ASSY (WAGON MODELS)
COMPONENTS
Page 3440 of 5135
760W7±01
B67608
Tape
Tape
76±24
±
EXTERIOR/INTERIOR TRIM REAR DOOR BELT MOULDING ASSY LH
AVENSIS REPAIR MANUAL (RM1018E)
REAR DOOR BELT MOULDING ASSY LH
REPLACEMENT
HINT:
�The installation is in the reverse order of the removal.
�On the RH side, use the same procedures as on the LH side.
1.REMOVE REAR DOOR WINDOW REGULATOR HANDLE ASSY (See page 75±22)
2.REMOVE REAR DOOR TRIM BASE LH (See page 75±22)
3. REMOVE POWER WINDOW REGULATOR SWITCH ASSY REAR (W/ POWER WINDOW) (See page 75±22)
4.REMOVE REAR DOOR TRIM BOARD SUB±ASSY LH (See page 75±22)
5.REMOVE REAR DOOR GLASS WEATHERSTRIP INNER LH (See page 75±22)
6.REMOVE REAR DOOR SERVICE HOLE COVER LH (See page 75±22)
7. REMOVE REAR DOOR BELT MOULDING ASSY LH
(a) Put protective tape under the moulding.
(b) Using a screwdriver or moulding remover, pry out theclaws and remove the moulding.
HINT:
Tape the screwdriver tip before use.
Page 3441 of 5135

760W6±01
B67151
Tape
Tape
±
EXTERIOR/INTERIOR TRIM FRONT DOOR BELT MOULDING ASSY LH
76±23
AVENSIS REPAIR MANUAL (RM1018E)
FRONT DOOR BELT MOULDING ASSY LH
REPLACEMENT
HINT:
�The installation is in the reverse order of the removal.
�On the RH side, use the same procedures as on the LH side.
1.REMOVE REAR DOOR WINDOW REGULATOR HANDLE ASSY (W/O POWER WINDOW) (See page 75±8)
2.REMOVE FRONT DOOR LOWER FRAME BRACKET GARNISH LH (See page 75±8)
3.REMOVE FRONT DOOR TRIM BASE LH (See page 75±8)
4.REMOVE FUEL LID OPENER SWITCH (See page 75±8)
5. REMOVE POWER WINDOW REGULATOR SWITCH ASSY (W/ POWER WINDOW) (See page 75±8)
6.REMOVE FRONT DOOR TRIM BOARD SUB±ASSY LH (See page 75±8)
7.REMOVE FRONT DOOR INSIDE HANDLE SUB±ASSY LH (See page 75±8)
8.REMOVE FRONT DOOR GLASS WEATHERSTRIP INNER LH (See page 75±8)
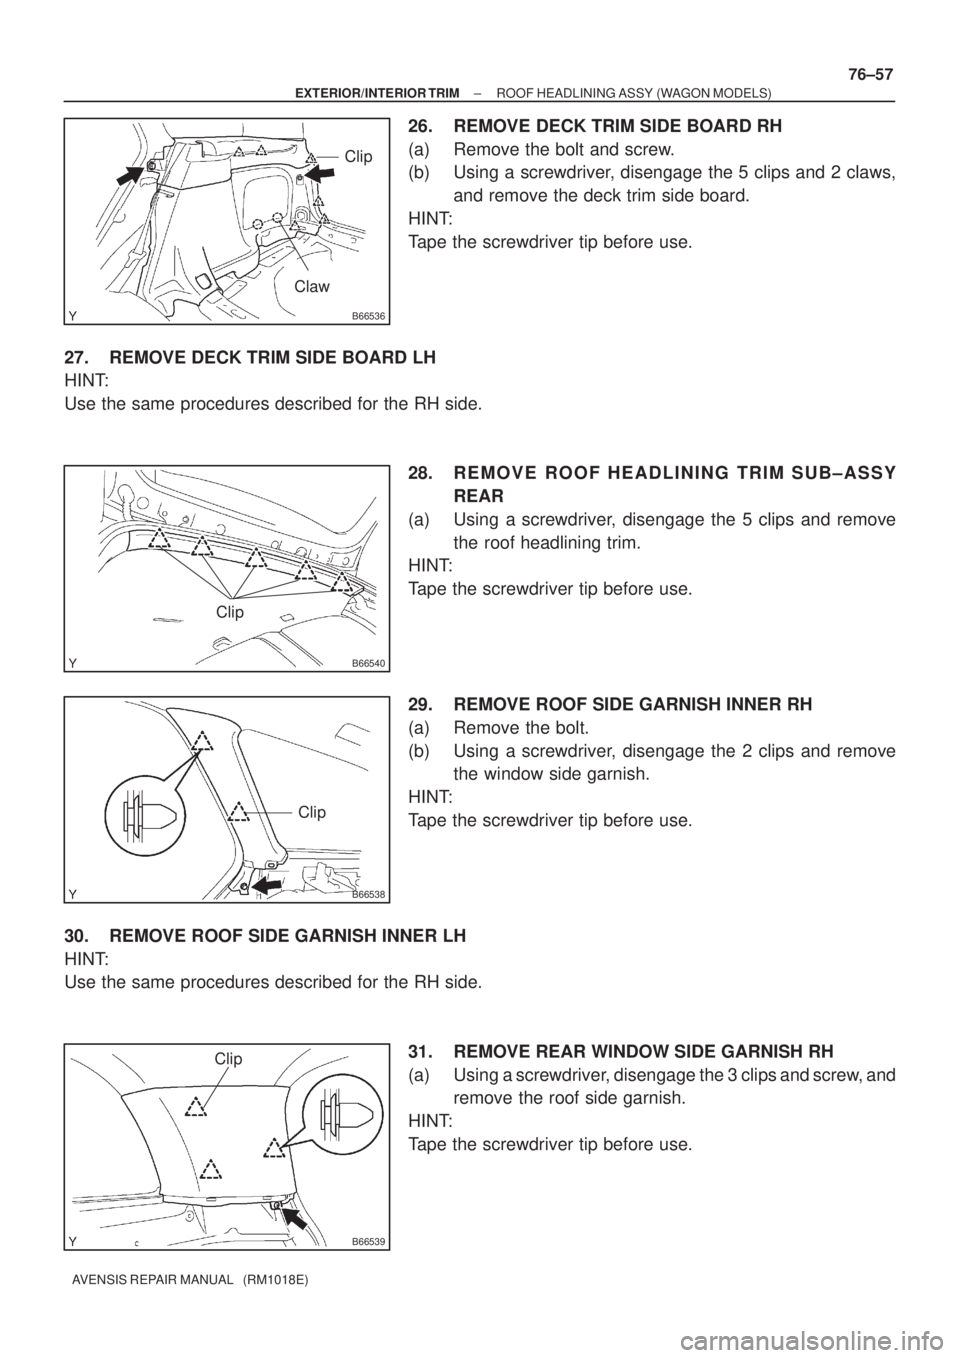
9. REMOVE FRONT DOOR BELT MOULDING ASSY LH
(a) Put protective tape under the moulding.
(b) Using a screwdriver or moulding remover, pry out theclaws and remove the moulding.
HINT:
Tape the screwdriver tip before use.
Page 3453 of 5135

B66536
Clip
Claw
B66540
Clip
B66538
Clip
B66539
Clip
± EXTERIOR/INTERIOR TRIMROOF HEADLINING ASSY (WAGON MODELS)
76±57
AVENSIS REPAIR MANUAL (RM1018E)
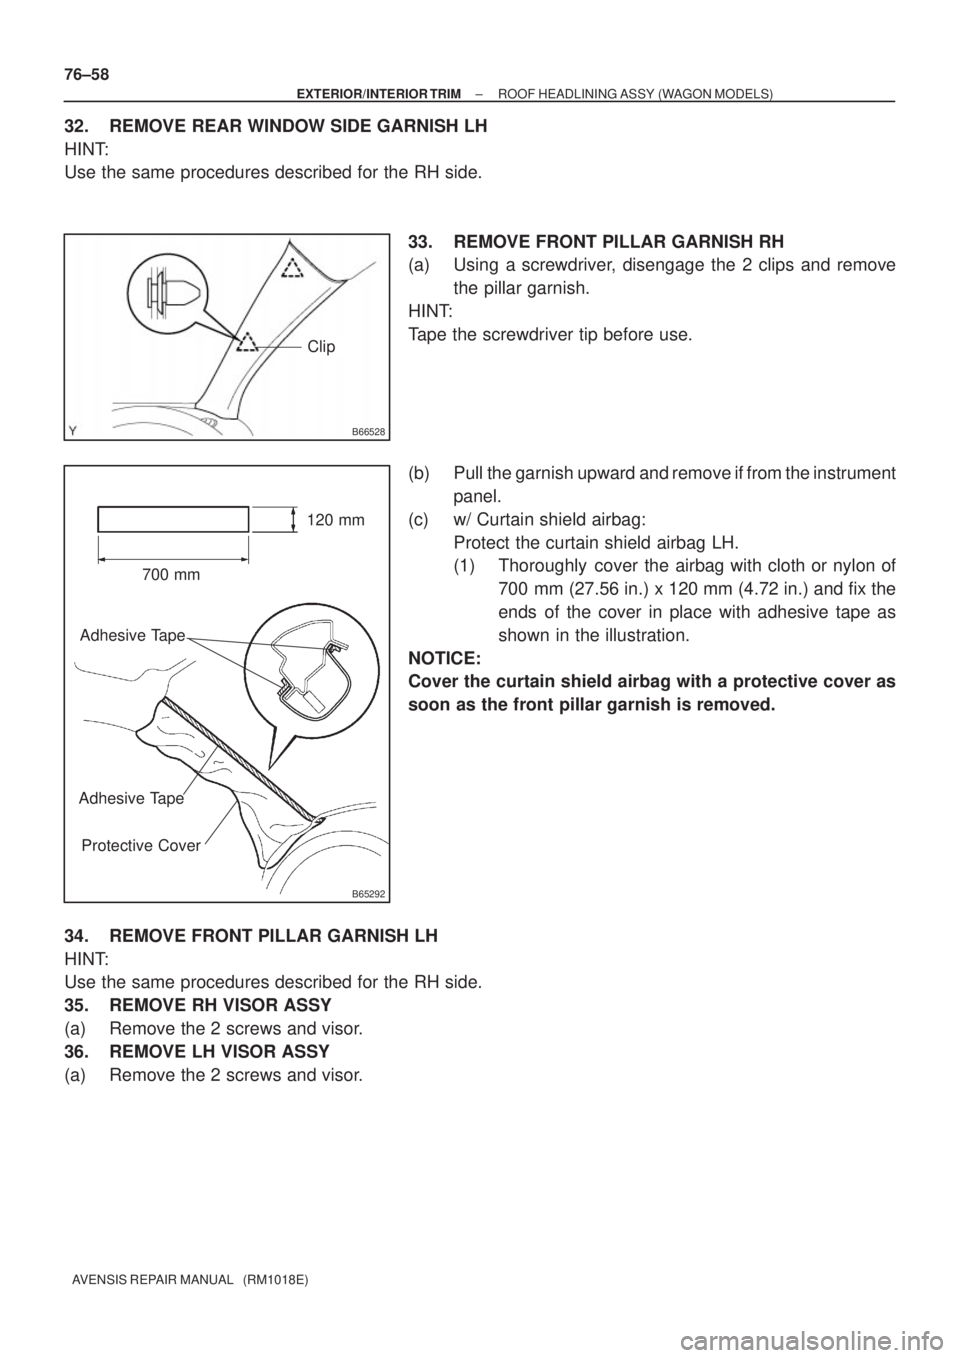
26. REMOVE DECK TRIM SIDE BOARD RH
(a) Remove the bolt and screw.
(b) Using a screwdriver, disengage the 5 clips and 2 claws,
and remove the deck trim side board.
HINT:
Tape the screwdriver tip before use.
27. REMOVE DECK TRIM SIDE BOARD LH
HINT:
Use the same procedures described for the RH side.
28. REMOVE ROOF HEADLINING TRIM SUB±ASSY
REAR
(a) Using a screwdriver, disengage the 5 clips and remove
the roof headlining trim.
HINT:
Tape the screwdriver tip before use.
29. REMOVE ROOF SIDE GARNISH INNER RH
(a) Remove the bolt.
(b) Using a screwdriver, disengage the 2 clips and remove
the window side garnish.
HINT:
Tape the screwdriver tip before use.
30. REMOVE ROOF SIDE GARNISH INNER LH
HINT:
Use the same procedures described for the RH side.
31. REMOVE REAR WINDOW SIDE GARNISH RH
(a) Using a screwdriver, disengage the 3 clips and screw, and
remove the roof side garnish.
HINT:
Tape the screwdriver tip before use.
Page 3454 of 5135

B66528
Clip
B65292
700 mm120 mm
Adhesive Tape
Adhesive Tape
Protective Cover
76±58
± EXTERIOR/INTERIOR TRIMROOF HEADLINING ASSY (WAGON MODELS)
AVENSIS REPAIR MANUAL (RM1018E)
32. REMOVE REAR WINDOW SIDE GARNISH LH
HINT:
Use the same procedures described for the RH side.
33. REMOVE FRONT PILLAR GARNISH RH
(a) Using a screwdriver, disengage the 2 clips and remove
the pillar garnish.
HINT:
Tape the screwdriver tip before use.
(b) Pull the garnish upward and remove if from the instrument
panel.
(c) w/ Curtain shield airbag:
Protect the curtain shield airbag LH.
(1) Thoroughly cover the airbag with cloth or nylon of
700 mm (27.56 in.) x 120 mm (4.72 in.) and fix the
ends of the cover in place with adhesive tape as
shown in the illustration.
NOTICE:
Cover the curtain shield airbag with a protective cover as
soon as the front pillar garnish is removed.
34. REMOVE FRONT PILLAR GARNISH LH
HINT:
Use the same procedures described for the RH side.
35. REMOVE RH VISOR ASSY
(a) Remove the 2 screws and visor.
36. REMOVE LH VISOR ASSY
(a) Remove the 2 screws and visor.