Page 105 of 136
Downloaded from www.Manualslib.com manuals search engine 10583K
Fuel Filter (Diesel engine)
(1) Fuel Filter
The fuel filter works as a water sedimentor
as well.
Drain water according to the Periodic
Maintenance Schedule. To drain water:
1) Place a pan or ample rag under the fuel
filter drain nozzle.
2) Loosen the drain knob. The water will be
drained.
3) Tighten the drain knob when the water
changes to the diesel fuel.
4) Tighten the drain knob.
NOTE:
Trust this job to be carried out at Maruti
Suzuki authorized dealer.
83K-07-030
Front Fog Light (if equipped)1) Insert a flat blade screwdriver into the
hole (2) and remove the clips (1) by
twist the driver as shown in the illustra-
tion.
83K-07-029D
83K-07-029E
2) Open the fender cover. Disconnect the
coupler with pushing the lock release.
Turn the bulb holder counterclockwise
and remove it.
INSPECTION AND MAINTENANCE
9-16
Page 106 of 136

Downloaded from www.Manualslib.com manuals search engine 10683K
INSPECTION AND MAINTENANCE
9-17BrakesBrake FluidCheck the brake fluid level by looking at the
reservoir in the engine compartment. Check
that the fluid level is between the “MAX”
and “MIN” lines. If the brake fluid level is
near the “MIN” line, fill it up to the “MAX”
line with Maruti Genuine brake fluid.
83K-07-031
EXAMPLEFailure to follow the guidelines below
can result in personal injury or seri-
ous damage to the brake system.
If the brake fluid in the reservoir
drops below a certain level, the
brake warning light on the instru-
ment panel will come on (the engine
must be running with the parking
w ww w
w WARNING
V VV V
V
w ww w
w WARNING
V VV V
Vbrake fully disengaged). If the light
comes on, immediately contact your
MARUTI SUZUKI dealer to inspect
the brake system.
A rapid fluid loss indicates a leak in
the brake system which should be
inspected by your MARUTI SUZUKI
dealer immediately.
Brake fluid can harm your eyes and
damage painted surfaces. Use cau-
tion when refilling the reservoir.
Do not use any fluid other than
specified brake fluid. Do not use
reclaimed fluid or fluid that has
been stored in old or open contain-
ers. It is essential that foreign parti-
cles and other liquids are kept out
of the brake fluid reservoir.
V VV V
V
Brake fluid is harmful or fatal if swal-
lowed, and harmful if it comes in con-
tact with skin or eyes. If swallowed,
do not induce vomiting. Immediately
contact a poison control center or a
physician. If brake fluid gets in eyes,
flush eyes with water and seek medi-
cal attention. Wash thoroughly after
handling. Solution can be poisonous
w ww w
w WARNING
V VV V
Vto animals. Keep out of the reach of
children and animals.NOTE:
With disc brakes, the fluid level can be
expected to gradually fall as the brake pads
wear.Brake PedalCheck if the brake pedal stops at the regu-
lar height without “spongy” feeling when you
depress it. If not, have the brake system
inspected by your MARUTI SUZUKI dealer.
If you doubt the brake pedal for the regular
height, check it as follows:
83K-07-032
Pedal to wall minimum distance “a”:
85 mm (3.3 in.)
w ww w
w WARNING
Page 107 of 136

Downloaded from www.Manualslib.com manuals search engine 10783K
INSPECTION AND MAINTENANCE
9-18
With the engine running, measure the dis-
tance between the brake pedal and floor
carpet when the pedal is depressed with
approximately 30 kg (66 lbs) of force. The
minimum distance required is as specified.
Since your vehicle’s brake system is self-
adjusting, there is no need for pedal
adjustment.
If the pedal to floor wall distance as mea-
sured above is less than the minimum dis-
tance required, have your vehicle inspec-ted
by your MARUTI SUZUKI dealer.NOTE:
When measuring the distance between the
brake pedal and floor wall, be sure not to
include the floor mat or rubber on the floor
wall in your measurement.
83K-07-033
Parking Brake
Ratchet tooth specification “b”:
4th – 9th
Lever pull force (1):
200 N (20 kg, 44 lbs)
w ww w
w WARNING
If you experience any of the following
problems with your vehicle’s brake
system, have the vehicle inspected
immediately by your MARUTI SUZUKI
dealer.
Poor braking performance
Uneven braking (Brakes not working
uniformly on all wheels.)
Excessive pedal travel
Brake dragging
Excessive noise
83K-07-034
EXAMPLE
Check the parking brake for proper adjust-
ment by counting the number of clicks made
by the ratchet teeth as you slowly pull up
on the parking brake lever to the point of
full engagement. The parking brake lever
should stop between the specified ratchet
teeth and the rear wheels should be
securely locked. If the parking brake is not
properly adjusted or the brakes drag after
the lever has been fully released, have the
parking brake inspected and/or adjusted by
your MARUTI SUZUKI dealer.Steering
EXAMPLE
Steering wheel play “c”:
0 – 30 mm (0.0 – 1.2 in.)
Check the play of the steering wheel by
gently turning it from left to right and mea-
suring the distance that it moves before you
feel slight resistance. The play should be
between the specified values.
Check that the steering wheel turns easily
and smoothly without rattling by turning it
all the way to the right and to the left while
83K-07-035
Page 108 of 136

Downloaded from www.Manualslib.com manuals search engine 10883K
INSPECTION AND MAINTENANCE
9-19driving very slowly in an open area. If the
amount of free play is outside the specifi-
cation or you find anything else to be
wrong, an inspection must be performed by
your MARUTI SUZUKI dealer.TyresThe front and rear tyre pressure specifica-
tions for your vehicle are listed on the Tyre
Information Label. Both the front and rear
tyres should have the specified tyre pres-
sure.
83K-07-036
w ww w
w WARNING
Air pressures should be checked
when the tyres are cold or you may
get inaccurate readings.
Check the inflation pressure from
time to time while inflating the tyre
gradually, until the specified pres-
sure is obtained.
Never underinflate or overinflate the
tyres.
Underinflation can cause unusual
handling characteristics or can
cause the rim to slip on the tire
bead, resulting in an accident or
damage to the tyre or rim.
Overinflation can cause the tyre to
burst, resulting in personal injury.
Overinflation can also cause
unusual handling characteristics
which may result in an accident.
EXAMPLE
83K-07-037
EXAMPLE
Tyre Inspection
Inspect your vehicle’s tyres at least once a
month by performing the following checks:
1) Measure the air pressure with a tire
gauge. Adjust the pressure if necessary.
Remember to check the spare tyre, too.(1) Tread wear indicator
(2) Indicator location mark
2) Check that the depth of the tread groove
is more than 1.6 mm (0.06 in.). To help
you check this, the tyres have molded-
in tread wear indicators in the grooves.
When the indicators appear on the tread
surface, the remaining depth of the tread
is 1.6 mm (0.06 in.) or less and the tyre
should be replaced.
3) Check for abnormal wear, cracks and
damage. Any tyres with cracks or other
damage s hould be replaced. If any tyres
show abnormal wear, have them inspected
by your MARUTI SUZUKI dealer.
Hitting curbs and running over rocks
can damage tyres and affect wheel
alignment. Be sure to have tyres and
wheel alignment checked periodically
by your MARUTI SUZUKI dealer.
w ww w
w WARNING
4) Check for loose wheel nuts.
5) Check that there are no nails, stones or
other objects sticking into the tyres.
w ww w
w WARNING
Your MARUTI SUZUKI is equipped
with tyres which are all the same
type and size. This is important to
V VV V
V
Page 109 of 136

Downloaded from www.Manualslib.com manuals search engine 10983K
INSPECTION AND MAINTENANCE
9-20
ensure proper steering and handling
of the vehicle. Never mix tyres of
different size or type on the four
wheels of your vehicle. The size and
type of tyres used should be only
those approved by MARUTI SUZUKI
as standard or optional equipment
for your vehicle.
Replacing the wheels and tyres
equipped on your vehicle with cer-
tain combinations of aftermarket
wheels and tyres can significantly
change the steering and handling
characteristics of your vehicle.
Therefore, use only those wheel and
tyre combinations which are
approved by MARUTI SUZUKI for
your vehicle.
w ww w
w WARNINGCAUTION
Replacing the original tyres with tyres
of a different size may result in false
speedometer or odometer readings.
Check with your MARUTI SUZUKI
dealer before purchasing replacement
tyres that differ in size from the
original tyres.V VV V
V
Tire RotationTo avoid uneven wear of your tyres and to
prolong their life, rotate the tyres as
illustrated. Tyres should be rotated as rec-
ommended in the periodic maintenance
schedule. After rotation, adjust front and
rear tyre pressures to the specification listed
on your vehicle’s Tyre Information Label.Wheel BalancingIf the vehicle vibrates abnormally on smooth
road, have the wheels balanced at Maruti
Suzuki authorized workshop.Wheel AlignmentIn case of abnormal tyre wear or pulling
towards one side, have the wheel aligned
at Maruti Suzuki authorized workshop.
Tubeless Tyres (If equipped)
The vehicle is equipped with Tubeless Tyres.
In tubeless tyre, a thin layer of butyl rubber
83K-07-038
is used for lining the inside of the tubeless
tyre. This layer is to prevent air loss and
fulfilling the purpose of tube. The air pressure
is maintained by the sealing between tyre
bead and wheel rim. Tubeless tyres are
having advantage of slow air loss and
preventing sudden deflation while driving.Care and maintenance tips for tube-
less tyres1. Always maintain recommended inflation
pressure. Driving continously at low
inflation pressure can lead to tyre damage.
2. In case any leakage is found, check for
any nail penetration/valve core damage
or rim bent. Damaged wheel must not
be used.
3. In case tyre has run at low pressue, it
must be inspected for any defect.
4. Whenver new tyre is fitted, replace the
valve.
5. If continous high speed driving is
required, increase tyres pressure by 5
psi over recommended inflation pressure.
6. Never run the tyre beyond TWI (Tread
wear indicator). The tyre is recommen-ded
to be replaced when the remaining tread
has worn to this point. The indicators are
spaced across the tread around the tyre
marked by a triagular symbol (TWI).
7. Always prefer tubeless tyre mounting
machine. In case of manual mounting-
tyre/wheel rim damage may occur.
Page 110 of 136

Downloaded from www.Manualslib.com manuals search engine 11083K
INSPECTION AND MAINTENANCE
9-21
83K-07-039
8. In case of any problem, please get in
touch with MARUTI SUZUKI authorised
dealer.Full Wheel Cover (if equipped)
w ww w
w WARNING
Batteries produce flammable hydro-
gen gas. Keep flames and sparks
away from the battery or an explosion
may occur. Never smoke when
working in the vicinity of the battery.
When checking or servicing the
battery, disconnect the negative
cable. Be careful not to cause a
V VV V
V
w ww w
w WARNING
short circuit by allowing metal
objects to contact the battery posts
and the vehicle at the same time.
To avoid harm to yourself or dam-
age to your vehicle or battery, fol-
low the jump starting instructions in
the “EMERGENCY SERVICE” section
of this manual if it is necessary to
jump start your vehicle.V VV V
V
Petrol
83K-07-040-41
EXAMPLE
The level of the battery solution must be
kept above the line between MAX and MIN.
If the level is found to be below the line,
add distilled water to bring level above line.
You should periodically check the battery,
battery terminals, and battery hold down
bracket for corrosion. Remove corrosion
using a stiff brush and ammonia mixed with
water, or baking soda mixed with water.
After removing corrosion, rinse with clean
water.If your vehicle is not going to be
driven for a month or longer, disconnect the
cable from the negative terminal of the
battery to help prevent discharge.
EXAMPLE
TYPE-1TYPE-2Insert a piece of cloth between the spokes
of the wheel cover and try to pull the cover
outward (as shown in figure). Take out the
detached wheel cover from the wheel rim. For
installation first match the slot at the wheel
cover with the air filling nozzle of the wheel.
Apply equal pressure at the circumference of
the wheel cover to fix it in the wheel rim.Battery
TYPE-1
83K-07-42
EXAMPLEDiesel
TYPE-2
Page 111 of 136

Replacement of the batter")
Downloaded from www.Manualslib.com manuals search engine 11183K
INSPECTION AND MAINTENANCE
9-22
83K-07-043
83K-07-044
Fuses in the Engine Compartment(For Petrol Engine Model)
Replacement of the battery
83K-07-42A
EXAMPLETo remove the battery:
1) Disconnect the negative cable (1).
2) Disconnect the positive cable (2).
3) Remove the retainer bolts (3) and
remove the retainer (4).
4) Remove the battery along with cover
assembly (5) (if equipped).
To install the battery:
1) Install the battery in the reverse order
of removal.
2) Tighten the retainer bolt and battery
cables securely.NOTE:
When the battery is disconnected, some of
the vehicle’s function will be initialized and/
or deactivated.
These function are required to reset after
the battery is reconnected.
FusesYour vehicle has three types of fuses, as
described below:
Main fuse
The main fuse takes current directly from
the battery.
Primary fuses
These fuses are between the main fuse and
individual fuses, and are for electrical load
groups.
Individual fuses
These fuses are for individual electrical cir-
cuits.
(1) 80A All electric load
(2) 50A Power window, Ignition,
Wiper, Starter
(3) 50A Tail light, Rear defogger,
Door lock, Hazard/Horn,
Dome
(4) – Radiator fan relay #1
(5) – Radiator fan relay #2
(6) – Radiator fan relay #3
(7) – Starting motor relay
(8) – Main relay
(9) – Blank
(10) – Front fog light relay
(11) – Fuel pump relayMAIN FUSE/PRIMARY FUSE(For Petrol Engine Model)
Page 112 of 136
 – Air compressor relay
(13) – A/T Relay
(14) 30A Heater fuse
(15) 15A Fuel injection fuse
(16) 1")
Downloaded from www.Manualslib.com manuals search engine 11283K
INSPECTION AND MAINTENANCE
9-23(12) – Air compressor relay
(13) – A/T Relay
(14) 30A Heater fuse
(15) 15A Fuel injection fuse
(16) 10A Air compressor fuse
(17) 15A A/T controller supply
(18) 15A Brake light switch fuse
(19) 30A ABS control module fuse
(20) 30A Starting motor fuse
(21) – Blank
(22) 50A P o w e r steering control
module fuse
(23) 30A Ignition switch fuse
(24) 30A Radiator fan fuse
(25) – Blank
(26) 30AABS control module (fuse)
(27) – Blank
(28) – Blank
(29) 15A Front fog light fuse
(30) 15A Headlight (Left) fuse
(31) 15A Headlight (Right) fuse
(32) 80AHeater, Air compressor,
Power steering
(33) 80ARadiator fan, Front fog
light, Head light
83K-07-046
Fuse in the Engine Compartment(For Diesel Engine Model)
83K-07-045
(For Diesel Engine Model)(1) 30A Starting motor fuse
(2) 10A Air compressor fuse
(3) 15A Fuel pump fuse
(4) 30A FI fuse
(5) 30A Heater fuse
(6) 30A Radiator fan fuse
(7) 50A Power steering control
module fuse
(8) – Radiator fan relay #1
(9) – Radiator fan relay #2
(10) – Radiator fan relay #3
(11) – Air compressor relay
(12) – Starting motor relay
(13) 30A ABS control module fuse
(14) 30A ABS control module fuse
(15) 15A Brake light switch fuse
(16) 15A Headlight (Right) fuse
(17) 15A Headlight (Left) fuseMAIN FUSE/PRIMARY FUSE
83K-07-047
 1
1 2
2 3
3 4
4 5
5 6
6 7
7 8
8 9
9 10
10 11
11 12
12 13
13 14
14 15
15 16
16 17
17 18
18 19
19 20
20 21
21 22
22 23
23 24
24 25
25 26
26 27
27 28
28 29
29 30
30 31
31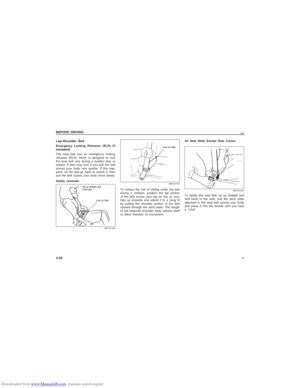 32
32 33
33 34
34 35
35 36
36 37
37 38
38 39
39 40
40 41
41 42
42 43
43 44
44 45
45 46
46 47
47 48
48 49
49 50
50 51
51 52
52 53
53 54
54 55
55 56
56 57
57 58
58 59
59 60
60 61
61 62
62 63
63 64
64 65
65 66
66 67
67 68
68 69
69 70
70 71
71 72
72 73
73 74
74 75
75 76
76 77
77 78
78 79
79 80
80 81
81 82
82 83
83 84
84 85
85 86
86 87
87 88
88 89
89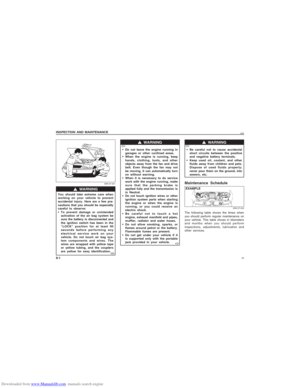 90
90 91
91 92
92 93
93 94
94 95
95 96
96 97
97 98
98 99
99 100
100 101
101 102
102 103
103 104
104 105
105 106
106 107
107 108
108 109
109 110
110 111
111 112
112 113
113 114
114 115
115 116
116 117
117 118
118 119
119 120
120 121
121 122
122 123
123 124
124 125
125 126
126 127
127 128
128 129
129 130
130 131
131 132
132 133
133 134
134 135
135
(1) Fuel Filter
The fuel filter works as a water sedimentor
as well.
Drain water according to the Periodic
M")