2005 SUZUKI JIMNY Connector
[x] Cancel search: ConnectorPage 9 of 687

Downloaded from www.Manualslib.com manuals search engine 0A-4 GENERAL INFORMATION
Servicing and handling
WARNING:
Many of service procedures require disconnection of “Air
Bag” fuse and all air bag (inflator) module(s) from initia-
tor circuit to avoid an accidental deployment.
Driver and Passenger Air Bag (Inflator) Modules
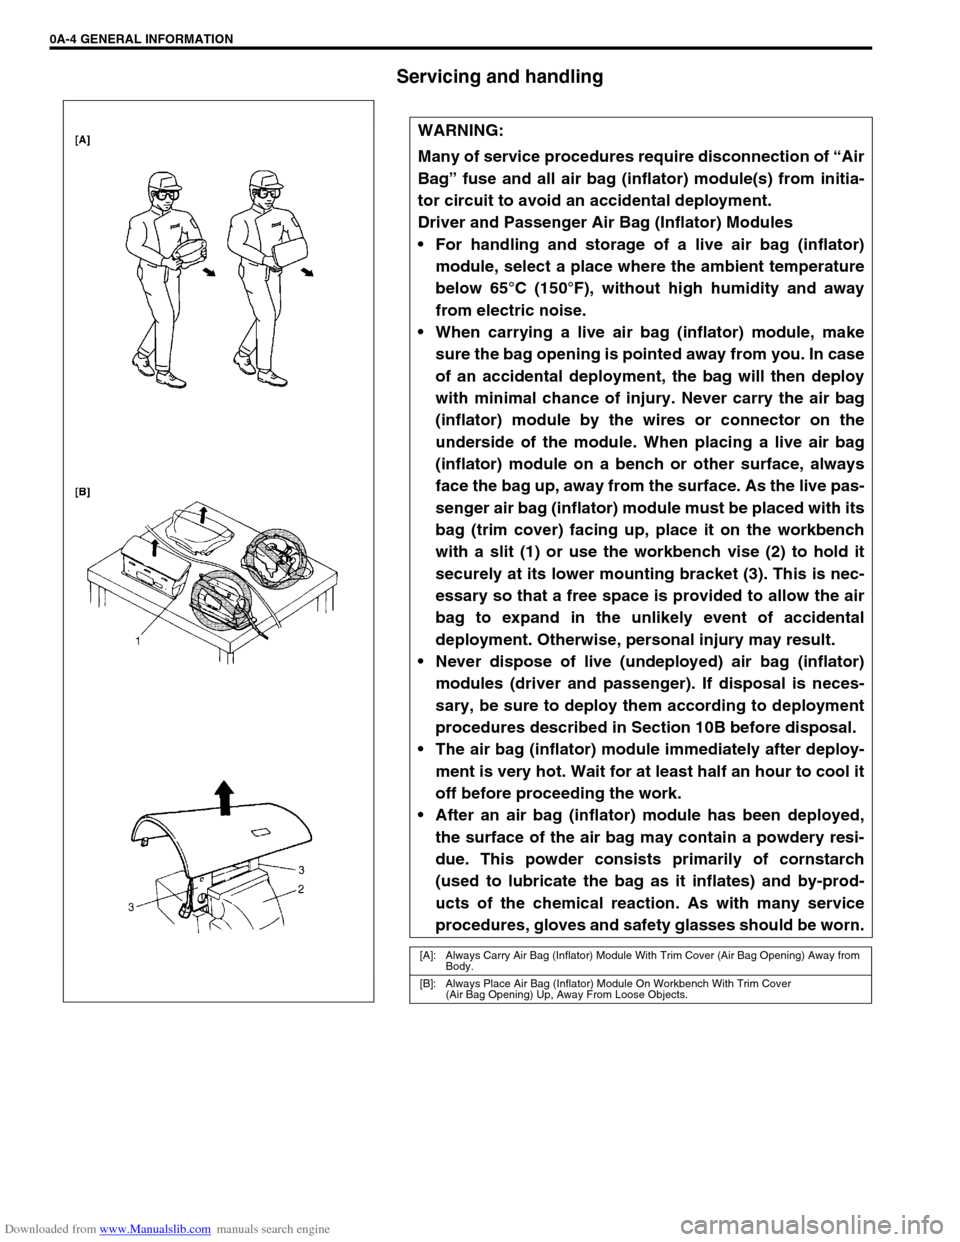
For handling and storage of a live air bag (inflator)
module, select a place where the ambient temperature
below 65°C (150°F), without high humidity and away
from electric noise.
When carrying a live air bag (inflator) module, make
sure the bag opening is pointed away from you. In case
of an accidental deployment, the bag will then deploy
with minimal chance of injury. Never carry the air bag
(inflator) module by the wires or connector on the
underside of the module. When placing a live air bag
(inflator) module on a bench or other surface, always
face the bag up, away from the surface. As the live pas-
senger air bag (inflator) module must be placed with its
bag (trim cover) facing up, place it on the workbench
with a slit (1) or use the workbench vise (2) to hold it
securely at its lower mounting bracket (3). This is nec-
essary so that a free space is provided to allow the air
bag to expand in the unlikely event of accidental
deployment. Otherwise, personal injury may result.
Never dispose of live (undeployed) air bag (inflator)
modules (driver and passenger). If disposal is neces-
sary, be sure to deploy them according to deployment
procedures described in Section 10B before disposal.
The air bag (inflator) module immediately after deploy-
ment is very hot. Wait for at least half an hour to cool it
off before proceeding the work.
After an air bag (inflator) module has been deployed,
the surface of the air bag may contain a powdery resi-
due. This powder consists primarily of cornstarch
(used to lubricate the bag as it inflates) and by-prod-
ucts of the chemical reaction. As with many service
procedures, gloves and safety glasses should be worn.
[A]: Always Carry Air Bag (Inflator) Module With Trim Cover (Air Bag Opening) Away from
Body.
[B]: Always Place Air Bag (Inflator) Module On Workbench With Trim Cover
(Air Bag Opening) Up, Away From Loose Objects.
Page 10 of 687

Downloaded from www.Manualslib.com manuals search engine GENERAL INFORMATION 0A-5
WARNING:
SDM
During service procedures, be very careful when handling a Sensing and Diagnostic Module (SDM).
Never strike or jar the SDM.
Never power up the air bag system when the SDM is not rigidly attached to the vehicle. All SDM and
mounting bracket fasteners must be carefully torqued and the arrow must be pointing toward the
front of the vehicle to ensure proper operation of the air bag system.
The SDM could be activated when powered while not rigidly attached to the vehicle which could
cause deployment and result in personal injury.
WARNING:
Driver and Passenger Seat Belt Pretensioners (If
equipped)
For handling and storage of a live seat belt preten-
sioner, select a place where the ambient temperature
below 65°C (150°F), without high humidity and away
from electric noise.
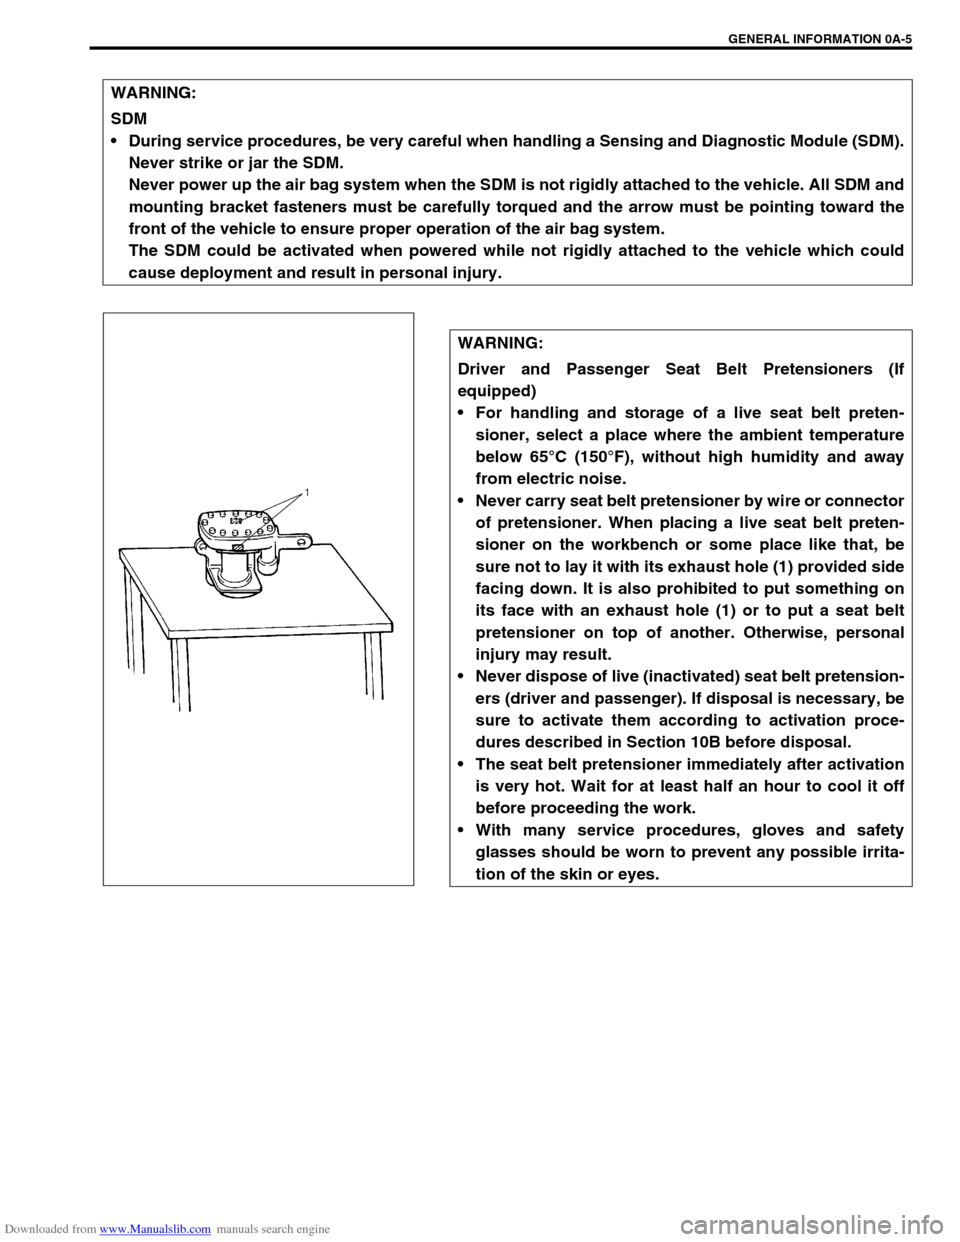
Never carry seat belt pretensioner by wire or connector
of pretensioner. When placing a live seat belt preten-
sioner on the workbench or some place like that, be
sure not to lay it with its exhaust hole (1) provided side
facing down. It is also prohibited to put something on
its face with an exhaust hole (1) or to put a seat belt
pretensioner on top of another. Otherwise, personal
injury may result.
Never dispose of live (inactivated) seat belt pretension-
ers (driver and passenger). If disposal is necessary, be
sure to activate them according to activation proce-
dures described in Section 10B before disposal.
The seat belt pretensioner immediately after activation
is very hot. Wait for at least half an hour to cool it off
before proceeding the work.
With many service procedures, gloves and safety
glasses should be worn to prevent any possible irrita-
tion of the skin or eyes.
Page 11 of 687

Downloaded from www.Manualslib.com manuals search engine 0A-6 GENERAL INFORMATION
CAUTION:
Even when the accident was light enough not to cause air bags to activate, be sure to inspect sys-
tem parts and other related parts according to instructions under “Repair and Inspection Required
after an Accident” in Section 10B.
When servicing parts other than air bag system, if shocks may be applied to air bag system compo-
nent parts, remove those parts beforehand.
When handling the air bag (inflator) modules (driver and passenger), seat belt pretensioners (driver
and passenger) or SDM, be careful not to drop it or apply an impact to it. If an excessive impact was
applied (e.g., dropped from a height of 90 cm (3 feet) or more), never attempt disassembly or repair
but replace it with a new one.
When grease, cleaning agent, oil, water, etc. has got onto air bag (inflator) modules (driver and pas-
senger) or seat belt pretensioners (drive and passenger), wipe off immediately with a dry cloth.
Air bag wire harness can be identified easily as it is covered with a yellow protection tube. Be very
careful when handling it.
When an open in air bag wire harness, damaged wire harness, connector or terminal is found,
replace wire harness, connectors and terminals as an assembly.
Do not apply power to the air bag system unless all components are connected or a diagnostic
chart requests it, as this will set a diagnostic trouble code.
Never use air bag system component parts from another vehicle.
When using electric welding, be sure to disconnect air bag (inflator) module connectors (driver and
passenger) and seat belt pretensioner connectors (driver and passenger) respectively.
Never expose air bag system component parts directly to hot air (drying or baking the vehicle after
painting) or flames.
WARNING / CAUTION labels are attached on each part of air bag system components. Be sure to
follow the instructions.
After vehicle is completely repaired, perform “Air Bag Diagnostic System Check” in Section 10B.
Page 14 of 687

Downloaded from www.Manualslib.com manuals search engine GENERAL INFORMATION 0A-9
When disconnecting vacuum hoses, attach a tag
describing the correct installation positions so that the
hoses can be reinstalled correctly.
After servicing fuel, oil, coolant, vacuum, exhaust or
brake systems, check all lines related to the system for
leaks.
For vehicles equipped with fuel injection systems, never
disconnect the fuel line between the fuel pump and
injector without first releasing the fuel pressure, or fuel
can be sprayed out under pressure.
When performing a work that produces a heat exceeding
80°C (176°F) in the vicinity of the electrical parts, remove
the heat sensitive electrical part(s) beforehand.
Use care not to expose connectors and electrical parts
to water which will be a cause of a trouble.
Always be careful not to handle electrical parts (com-
puter, relay, etc.) in a rough manner or drop them.
Page 15 of 687

Downloaded from www.Manualslib.com manuals search engine 0A-10 GENERAL INFORMATION
Precautions For Catalytic Converter
For vehicles equipped with a catalytic converter, use only unleaded gasoline and be careful not to let a
large amount of unburned gasoline enter the converter or it can be damaged.
Conduct a spark jump test only when necessary, make it as short as possible, and do not open the
throttle.
Conduct engine compression checks within the shortest possible time.
Avoid situations which can result in engine misfire (e.g. starting the engine when the fuel tank is
nearly empty.)
Precautions For Electrical Circuit Service
When replacing a fuse, make sure to use a fuse of the
specified capacity. Use of a fuse with a larger capacity
will cause a damage to the electrical parts and a fire.
When disconnecting and connecting coupler, make sure
to turn ignition switch OFF, or electronic parts may get
damaged.
When disconnecting connectors, never pull the wiring
harnesses. Unlock the connector lock first and then pull
them apart by holding connectors themselves.
Page 16 of 687

Downloaded from www.Manualslib.com manuals search engine GENERAL INFORMATION 0A-11
When connecting connectors, also hold connectors and
push them together until they lock securely (a click is
heard).
When installing the wiring harness, fix it with clamps so
that no slack is left.
When installing vehicle parts, be careful so that the wir-
ing harness is not interfered with or caught by any other
part.
To avoid damage to the harness, protect its part which
may contact against a part forming a sharp angle by
winding tape or the like around it.
Be careful not to touch the electrical terminals of parts
which use microcomputers (e.g. electronic control unit
like as ECM, PCM, P/S controller, etc.). The static elec-
tricity from your body can damage these parts.
Page 17 of 687

Downloaded from www.Manualslib.com manuals search engine 0A-12 GENERAL INFORMATION
Never connect any tester (voltmeter, ohmmeter, or what-
ever) to electronic control unit when its coupler is dis-
connected. Attempt to do it may cause damage to it.
Never connect an ohmmeter to electronic control unit
with its coupler connected to it. Attempt to do it may
cause damage to electronic control unit and sensors.
Be sure to use a specified voltmeter / ohmmeter. Other-
wise, accurate measurements may not be obtained or
personal injury may result.
When taking measurements at electrical connectors
using a tester probe (2), be sure to insert the probe from
the wire harness side (backside) of the connector (1).
When connecting meter probe (2) from terminal side of
coupler (1) because it can’t be connected from harness
side, use extra care not to bend male terminal of coupler
of force its female terminal open for connection.
In case of such coupler as shown connect probe as
shown to avoid opening female terminal.
Never connect probe where male terminal is supposed
to fit.
When checking connection of terminals, check its male
half for bend and female half for excessive opening and
both for locking (looseness), corrosion, dust, etc.
Before measuring voltage to check for electrical system,
check to make sure that battery voltage is 11V or higher.
Such terminal voltage check at low battery voltage will
lead to erroneous diagnosis.
Page 18 of 687

Downloaded from www.Manualslib.com manuals search engine GENERAL INFORMATION 0A-13
Electrical Circuit Inspection Procedure
While there are various electrical circuit inspection methods,
described here is a general method to check its open and short
circuit by using an ohmmeter and a voltmeter.
Open circuit check
Possible causes for the open circuit are as follows. As the cause
is in the connector or terminal in many cases, they need to be
checked particularly carefully.
Loose connection of connector
Poor contact of terminal (due to dirt, corrosion or rust on it,
poor contact tension, entry of foreign object etc.)
Wire harness being open
When checking system circuits including an electronic control unit
such as ECM, TCM, ABS control module, etc., it is important to
perform careful check, starting with items which are easier to
check.
1) Disconnect negative cable from battery
2) Check each connector at both ends of the circuit being
checked for loose connection. Also check lock condition of
connector if equipped with connector lock.
3) Using a test male terminal, check both terminals of the circuit
being checked for contact tension of its female terminal.
Check each terminal visually for poor contact (possibly
caused by dirt, corrosion, rust entry of foreign object, etc.).
At the same time, check to make sure that each terminal is
locked in the connector fully.
4) Using the following continuity check or voltage check proce-
dure, check the wire harness for open circuit and poor con-
nection with its terminals. Locate abnormality, if any.
1. Check contact tension by inserting and removing just for once
1. Looseness of crimping
2. Open
3. Thin wire (single strand of wire)