2005 SUBARU LEGACY ECO mode
[x] Cancel search: ECO modePage 184 of 627

3-13
Instruments and controls
– CONTINUED –
NOTE
You will see the “ ” sign in the fuel gauge
meter.
This indicates that the fuel filler door (lid) is locat-
ed on the right side of the vehicle. !Low fuel warning light
The low fuel warning light comes on when the tank is
nearly empty [About 2.6 US gal (10 liters, 2.2 lmp gal)].
It only operates when the ignition switch is in the “ON” position.
NOTE
This light does not go out unless the tank is re- plenished up to an internal fuel quantity of about
4.0 US gal (15 liters, 3.3 lmp gal). !
Temperature gauge
A) Normal operating range
The temperature gauge shows engine coolant temper-
ature when the ignition switch is in the “ON” position.
The coolant temperature will vary in accordance with
the outside temperature and driving conditions.
We recommend that you drive moderately until the
pointer of the temperature gauge reaches near the
middle of the range. Engine operation is optimum with
UB3526AA
A
UB3527BB
Page 187 of 627

3-16
Instruments and controls
!
Odometer
This meter displays the odometer when the ignition
switch is in the “LOCK”, “ACC” or “ON” position.
The odometer shows the total distance that the vehicle
has been driven.
If you press the trip knob when the ignition switch is in
the “LOCK” position, the odometer/trip meter will light
up. If you do not press the trip knob within 10 seconds
of illumination of the odometer/trip meter, the odome-
ter/trip meter will go off.
Also, if you open and close the driver’s door within 10
seconds of illumination of the odometer/trip meter, the
odometer/trip meter will go off. !
Double trip meter
This meter displays the two trip meters when the igni-
tion switch is in the “LOCK”, “ACC” or “ON” position.
The trip meter shows the distance that the vehicle has
been driven since you last set it to zero.
To change the mode indication, briefly push the knob.
Each press of the knob changes the mode indication
alternately.
UB3523BAUB3524AA
Page 189 of 627

3-18
Instruments and controls
Do not operate the engine with the pointer of
the tachometer in the red zone. In this range,
fuel injection will be cut by the engine control
module to protect the engine from overrevving.
The engine will resume running normally after
the engine speed is reduced below the red
zone.
NOTE (3.0-liter models only)
To protect the engine while the “P” or “N” position
is selected, the engine is controlled such that the
engine speed does not become too high even if
the accelerator pedal is pressed hard.
!
Fuel gauge
The fuel gauge shows the approximate amount of fuel
remaining in the tank.
The gauge does not return to “E” even though the ig-
nition switch is in the “ACC” or “LOCK” position.
The gauge may move slightly during braking, turning
or acceleration due to fuel level movement in the tank.
If you press the trip knob while the ignition switch is in
the “LOCK” position, the fuel gauge’s dial will light up
and the needle will indicate the amount of fuel remain-
ing in the tank.
If, while the fuel gauge needle is indicating the amount
of fuel remaining in the tank, you (a) do not press the
UB3212AA
Page 191 of 627

3-20
Instruments and controls
We recommend that you drive moderately until the
pointer of the temperature gauge reaches near the
middle of the range. Engine operation is optimum with
the engine coolant at this temperature range and high
revving operation when the engine is not warmed up
enough should be avoided.
If the pointer exceeds the normal operating
range, safely stop the vehicle as soon as possi-
ble.
See the “In case of emergency” in chapter 9.
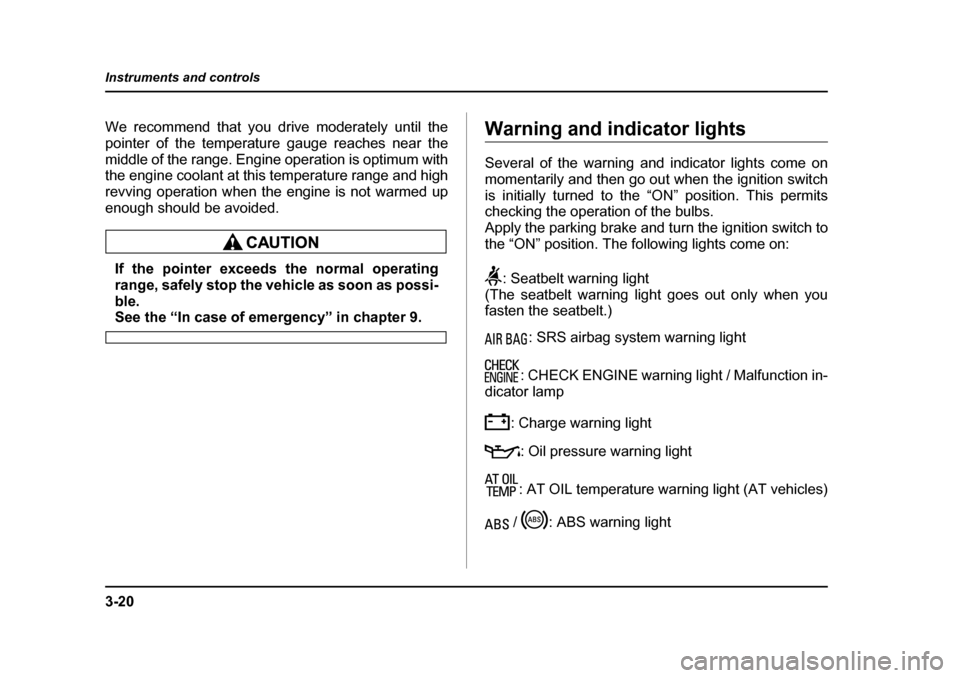
Warning and indicator lights
Several of the warning and indicator lights come on
momentarily and then go out when the ignition switch
is initially turned to the “ON” position. This permits
checking the operation of the bulbs.
Apply the parking brake and turn the ignition switch to
the “ON” position. The following lights come on:
: Seatbelt warning light
(The seatbelt warning light goes out only when you
fasten the seatbelt.)
: SRS airbag system warning light
: CHECK ENGINE warning light / Malfunction in-
dicator lamp
: Charge warning light: Oil pressure warning light
: AT OIL temperature warning light (AT vehicles)
/ : ABS warning light
Page 194 of 627

3-23
Instruments and controls
– CONTINUED –
seconds later (21 seconds after turning ON the ignition
switch), the warning lights will alternate between flash-
ing and steady illumination at 15-second intervals, and
the chime will sound while the warning light(s) is/are
flashing.
Alternate flashing and steady illumination of the warn-
ing lights and sounding of the chime will continue until
both driver and front passenger fasten their seatbelts.
NOTE "If the driver and/or front passenger unfasten(s)
the seatbelt(s) after fastening, the seatbelt warn-
ing device operates as follows according to the
vehicle speed. "At speeds lower than approximately 9 mph (15
km/h)
The warning light(s) for unfastened seatbelt(s)
will alternate between flashing and steady illu-
mination at 15-second intervals. The chime will
not sound. " At approximately 9 mph (15 km/h) or higher
speeds
The warning light(s) for unfastened seatbelt(s)
will alternate between flashing and steady illu-
mination at 15-second intervals and the chime
will sound while the warning light(s) is/are flash-
ing.
" If you unfasten and refasten driver’s seatbelt three times within six seconds after turning ON
the ignition switch, the warning operation that fol-lows the 6-second warning after turning ON the ig-
nition switch is canceled. When the ignition switch
is turned ON next time, however, the complete se-
quence of warning operation resumes.
If there is no passenger on the front passenger’s seat,
the seatbelt warning device for front passenger’s seat
will be deactivated. The front passenger’s occupant
detection system monitors whether or not there is a
passenger on the front passenger’s seat. Observe the
following precautions. Failure to do so may prevent
the device from functioning correctly or cause the de-
vice to fail."
Do not install any accessory such as a table or TV
onto the seatback." Do not store a heavy load in the seatback pocket.
" Do not allow the rear seat occupant to place his/her
hands or legs on the front passenger’s seatback, or al-
low him/her to pull the seatback." Do not use front seats with their backward-forward
position and seatback not being locked into place se-
curely. If any of them are not locked securely, adjust
them again. For adjusting procedure, refer to the
“Manual seat” in the front seats section in Chapter 1 in
this owner’s manual. (Models equipped with manualseats only)
Page 195 of 627

3-24
Instruments and controls
If the seatbelt warning device for front passenger’s
seat does not function correctly (e.g., it is activated
even when the front passenger’s seat is empty or it is
deactivated even when the front passenger has not
fastened his/her seatbelt), take the following actions."
Ensure that no article is placed on the seat other
than the child restraint system and the child occupant." Ensure that there is no article left in the seatback
pocket. " Ensure that the backward-forward position and
seatback of front passenger’s seat are locked into
place securely by moving the seat back and forth.
(Models equipped with manual seats only)
If still the seatbelt warning device for front passenger’s
seat does not function correctly after taking relevant
corrective actions described above, immediately con-
tact your SUBARU dealer for an inspection. ! SRS airbag system warning light
When the ignition switch is turned to the “ON” position,
the SRS airbag system warning light will come on for
about seven seconds and go out. This shows the SRS
frontal airbag and SRS side airbag and SRS curtain
airbag and seatbelt pretensioners are in normal oper-
ation. If this light comes on while driving or remains illuminat-
ed even after a period of about 7 seconds from when
the ignition has been turned on, it may indicate that the
SRS frontal airbag system or SRS side airbag system
(if equipped) or SRS curtain airbag or seatbelt preten-
sioner system is not working properly. Contact your
nearest SUBARU dealer immediately. !
Front passenger’s frontal airbag ON
and OFF indicators
“ ”: Front passenger’s frontal airbag ON
indicator
PASS AIR BAGPASS AIR BAGONONOUT.DISPOFF
PASS AIR BAG
OFFON
UB3208EA
ON or
Page 206 of 627

3-35
Instruments and controls
– CONTINUED –
section in chapter 11. !High beam indicator light
This light shows that the headlights are in the high
beam mode.
This indicator light also comes on when the headlight
flasher is operated. ! Cruise control indicator light
The cruise control indicator light comes on when the
ignition switch is turned to the “ON” position and goes
out after about three seconds.
This light comes on when the “CRUISE” main switch
is pressed.
If you move the cruise control lever while turning the
ignition switch “ON”, the cruise control function is de-
activated and the “CRUISE” indicator light flashes. To
reactivate the cruise control function, turn the ignition
switch back to the “ACC” or “LOCK” position, and then
turn it again to the “ON” position. ! Cruise control set indicator light
The cruise control set indicator light comes on when
the ignition switch is turned to the “ON” position and
goes out after about three seconds.
This light comes on when vehicle speed has been set. !
Headlight indicator light
This indicator light comes on when the light switch is
turned to the “ ” position (to turn on the parking
lights) or to the “ ” position (to turn on the head-
lights). ! Front fog light indicator light
This indicator light is on while the front fog lights are on.
Page 231 of 627

3-60
Instruments and controls
dicator light (green) located to the right of the button
will illuminate."
By pressing and releasing the right button, the com-
pass display is toggled on or off. When the compass is
on, an illuminated compass reading will appear in the
lower part of the mirror.
Even with the mirror in anti-glare mode, the mirror sur-
face turns bright if the transmission is shifted into re-
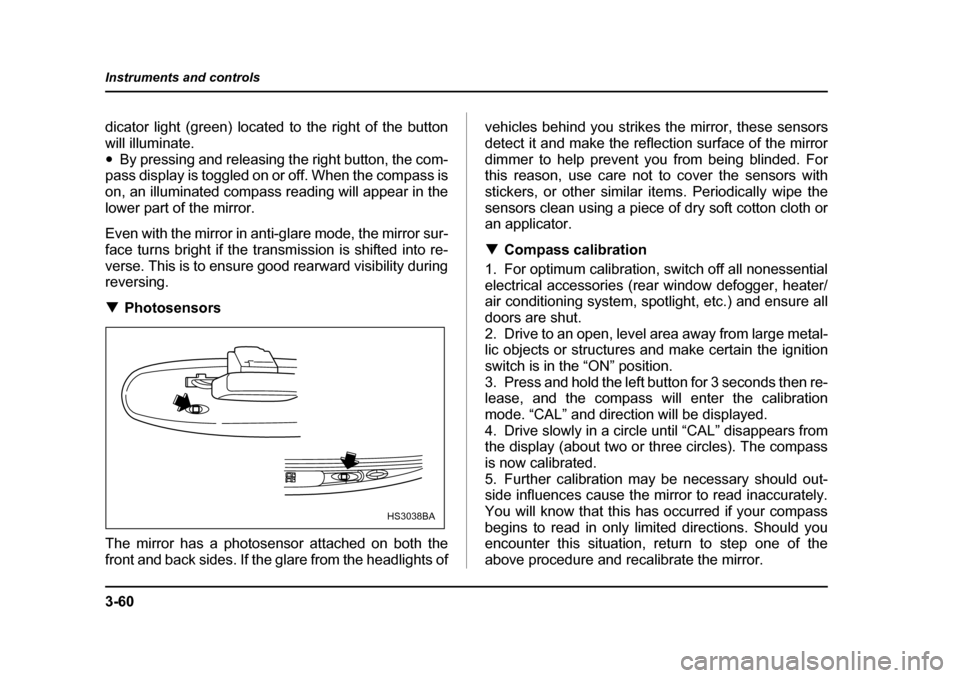
verse. This is to ensure good rearward visibility during reversing. ! Photosensors
The mirror has a photosensor attached on both the
front and back sides. If the glare from the headlights of vehicles behind you strikes the mirror, these sensors
detect it and make the reflection surface of the mirror
dimmer to help prevent you from being blinded. For
this reason, use care not to cover the sensors with
stickers, or other similar items. Periodically wipe the
sensors clean using a piece of dry soft cotton cloth or
an applicator. !
Compass calibration
1. For optimum calibration, switch off all nonessential
electrical accessories (rear window defogger, heater/
air conditioning system, spotlight, etc.) and ensure all
doors are shut.
2. Drive to an open, level area away from large metal-
lic objects or structures and make certain the ignition
switch is in the “ON” position.
3. Press and hold the left button for 3 seconds then re-
lease, and the compass will enter the calibration
mode. “CAL” and direction will be displayed.
4. Drive slowly in a circle until “CAL” disappears from
the display (about two or three circles). The compass
is now calibrated.
5. Further calibration may be necessary should out-
side influences cause the mirror to read inaccurately.
You will know that this has occurred if your compass
begins to read in only limited directions. Should you
encounter this situation, return to step one of the
above procedure and recalibrate the mirror.
HS3038BA