Page 263 of 477
7-6
Starting and operating
weather, which may cause injury.
3. Stop filling the tank after the fuel filler pump auto-
matically stops. Do not add any more fuel.
4. Put the cap back on, turn it clockwise until you hear
a clicking noise. Be certain not to catch the tether un-
der the cap while tightening.
5. Close the fuel filler lid completely.
If you spill any fuel on the painted surface, rinse it off
immediately. Otherwise, the painted surface could be
damaged.
NOTE
If the fuel filler cap is not tightened until it clicks or
if the tether is caught under the cap, the CHECK
ENGINE warning light may come on. Refer to the
“Warning and indicator lights” section located in
chapter 3.
�y Never add any cleaning agents to the fuel
tank. The addition of a cleaning agent may
cause damage to the fuel system. �y Make sure that the cap is tightened until it
clicks to prevent fuel spillage in the event of an
accident. �y
Do not let fuel spill on the exterior surfaces of
the vehicle. Fuels may cause paint damage,
which is not covered under the SUBARU Limit-
ed Warranty. �y Always use a genuine SUBARU fuel filler cap.
If you use the wrong cap, it may not fit or have
proper venting, and your fuel tank and emis-
sion control system might be damaged.
Page 341 of 477
9-4
In case of emergency
A) Jack
B) Jack handle
C) Spare tire
5. Take out the spare tire, jack, and wheel nut wrench.
The spare tire is stored under the floor of the cargo ar-
ea.
To remove the spare tire:
Open the lid and hang the hook provided on the under
side of the lid on the rear edge of the roof to keep the
lid open.
Remove the storage bucket. Turn the attaching bolt
counterclockwise, then take spare tire out. A) Storage bucket
B) Attaching bolt
C) Spare tire
The jack is stored under the left side of the cargo floor.
A
C
B
HS9005BC
A
BC
HS9004BC
Page 342 of 477
9-5
In case of emergency
– CONTINUED –
To take out the jack:
First raise the cargo tie-down hook on the rear-left side
of the cargo area and pull the tab to open the lid, turn
the jack screw counterclockwise to loosen it, then re-
move the jack. To take out the jack handle:
Open the rear-left and center lids in the cargo area by
pulling their tabs.
HS9006BAHS9007BA
Page 345 of 477
9-8
In case of emergency
surface of the wheel and hub with a cloth.
11.Put on the spare tire. Replace the wheel nuts.
Tighten them by hand.
Do not use oil or grease on the wheel studs or
nuts when the spare tire is installed. This could
cause the nuts to become loose and lead to an
accident.
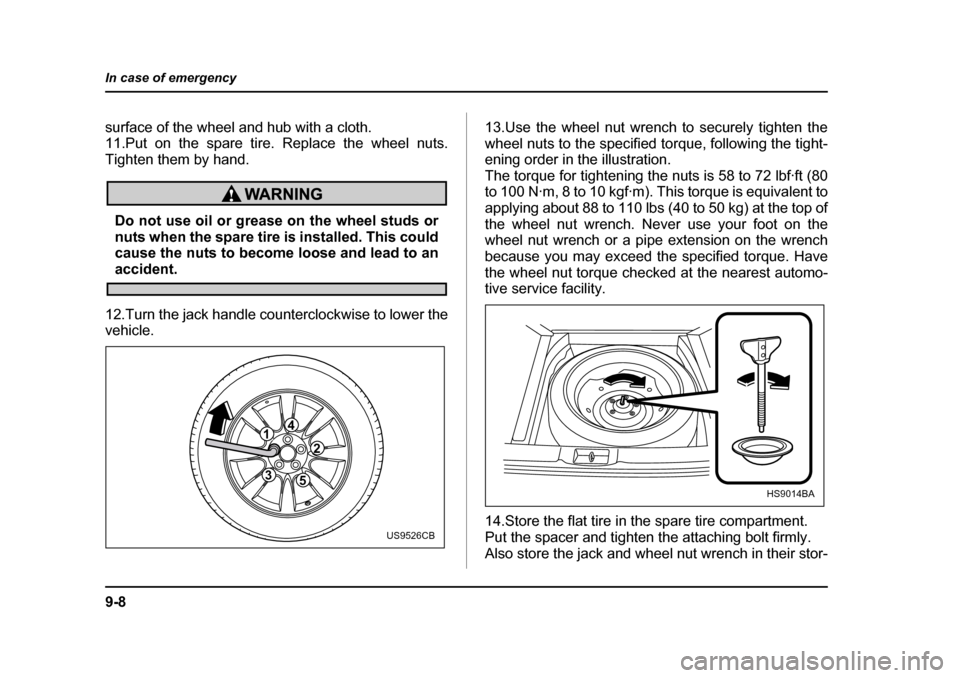
12.Turn the jack handle counterclockwise to lower the
vehicle. 13.Use the wheel nut wrench to securely tighten the
wheel nuts to the specified torque, following the tight-
ening order in the illustration.
The torque for tightening the nuts is 58 to 72 lbf·ft (80
to 100 N·m, 8 to 10 kgf·m). This torque is equivalent to
applying about 88 to 110 lbs (40 to 50 kg) at the top of
the wheel nut wrench. Never use your foot on the
wheel nut wrench or a pipe extension on the wrench
because you may exceed the specified torque. Have
the wheel nut torque checked at the nearest automo-
tive service facility.
14.Store the flat tire in the spare tire compartment.
Put the spacer and tighten the attaching bolt firmly.
Also store the jack and wheel nut wrench in their stor-
3
412
5
US9526CB
HS9014BA
Page 349 of 477
9-12
In case of emergency
Engine overheating
Never attempt to remove the radiator cap until
the engine has been shut off and has fully
cooled down. When the engine is hot, the cool-
ant is under pressure. Removing the cap while
the engine is still hot could release a spray of
boiling hot coolant, which could burn you very
seriously.
If the engine overheats, safely pull off the road and
stop the vehicle in a safe place. �„ If steam is coming from the engine
compartment
Turn the engine off and get everyone away from the
vehicle until it cools down. �„ If no steam is coming from the engine
compartment
1. Keep the engine running at idling speed.
2. Open the hood to ventilate the engine compart- ment. Confirm that the cooling fan is turning. If the fan is not
turning, immediately turn the engine off and contact
your authorized dealer for repair.
3. After the engine coolant temperature has dropped,
turn off the engine.
If the temperature gauge stays at the overheated
zone, turn the engine off.
4. After the engine has fully cooled down, check the
coolant level in the reserve tank.
If the coolant level is below the “LOW” mark, add cool-
ant up to the “FULL” mark.
5. If there is no coolant in the reserve tank, add cool-
ant to the reserve tank. Then remove the radiator cap
and fill the radiator with coolant.
If you remove the radiator cap from a hot radiator, first
wrap a thick cloth around the radiator cap, then turn
the cap counterclockwise slowly without pressing
down until it stops. Release the pressure from the ra-
diator. After the pressure has been fully released, re-
move the cap by pressing down and turning it.
Page 355 of 477
9-18
In case of emergency
Moonroof – if the moonroof cannot be
closed
If the moonroof cannot be closed with the moonroof
switch, you can close the sunroof manually.
1. Remove the plug on the roof trim located to the rear
of the moonroof by inserting the end of a flat-head
screwdriver between the roof and plug and prying it off.
2. Insert a hex-headed wrench in the end of the motor shaft.
To close the moonroof, turn the wrench counterclock-wise.
Have your vehicle checked and repaired by an autho-
rized SUBARU dealer.
HS9022CA
HS9022BA
Page 376 of 477
11-11
Maintenance and service
– CONTINUED –
a bad smell, smoke, and/or a fire.
If you check the oil level just after stopping the engine,
wait a few minutes for the oil to drain back into the oil
pan before checking the level.
Just after driving or while the engine is warm, the en-
gine oil level reading may be in a range between the
upper level and the notch mark. This is caused by ther-
mal expansion of the engine oil.
To prevent overfilling the engine oil, do not add any
additional oil above the upper level when the engine is cold. �„ Changing the oil and oil filter
Change the oil and oil filter according to the mainte-
nance schedule in the “Warranty and Maintenance Booklet”.
The engine oil and oil filter must be changed more fre-
quently than listed in the maintenance schedule when
driving on dusty roads, when short trips are frequently
made, when towing a trailer, or when driving in ex-
tremely cold whether.
1. Warm up the engine by letting the engine idle for
about 10 minutes to ease draining the engine oil.
2. Park the vehicle on a level surface and stop the en- gine.
3. Remove the oil filler cap.
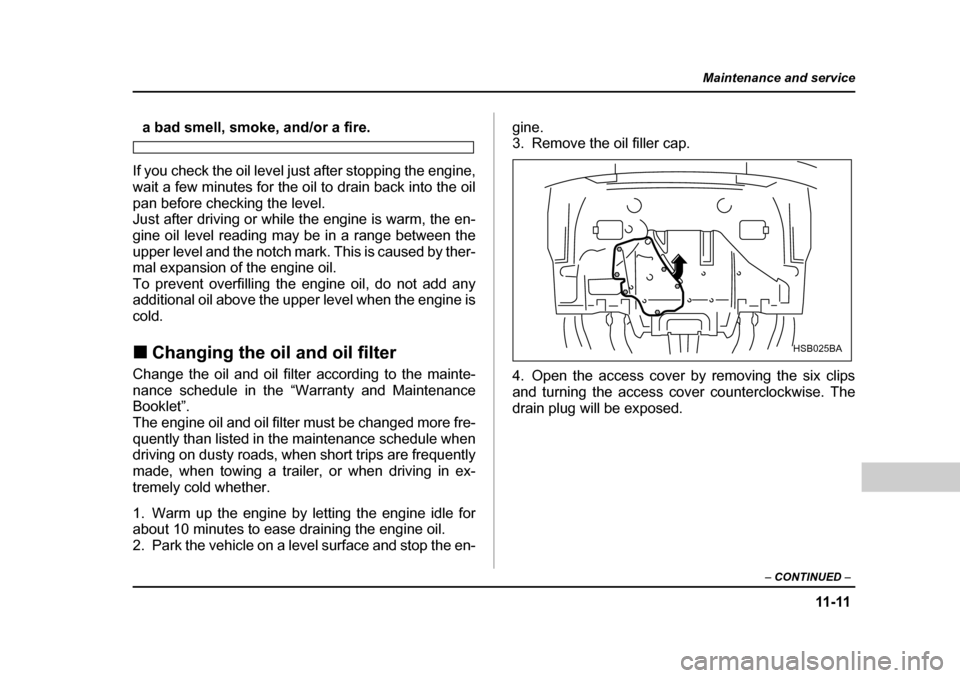
4. Open the access cover by removing the six clips
and turning the access cover counterclockwise. The
drain plug will be exposed.
HSB025BA
Page 378 of 477
11 -1 3
Maintenance and service
– CONTINUED –
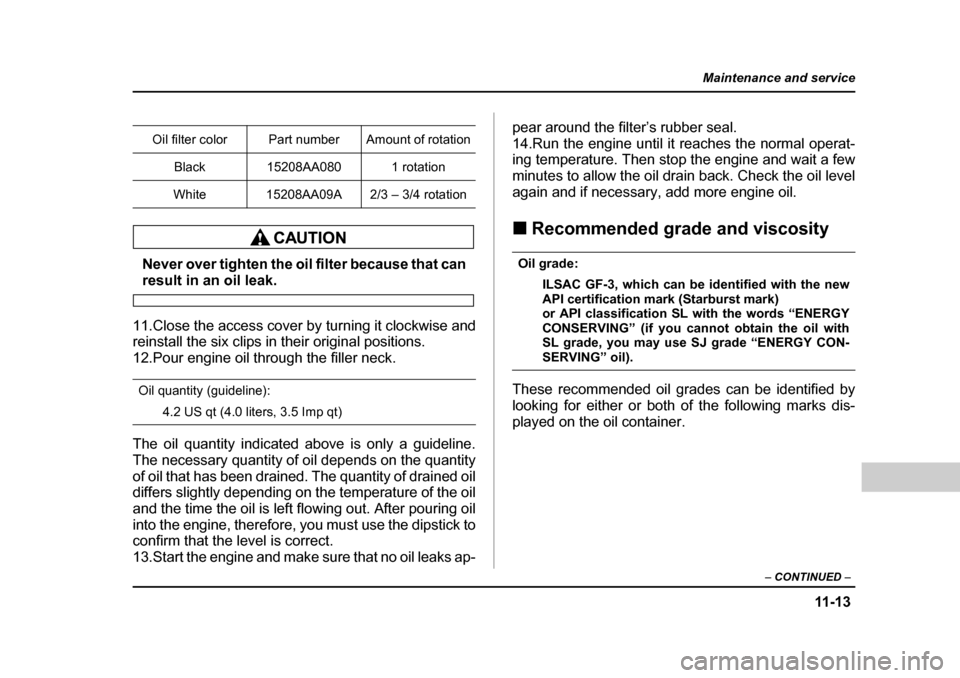
Never over tighten the oil filter because that can
result in an oil leak.
11.Close the access cover by turning it clockwise and
reinstall the six clips in their original positions.
12.Pour engine oil through the filler neck.
Oil quantity (guideline):
4.2 US qt (4.0 liters, 3.5 Imp qt)
The oil quantity indicated above is only a guideline.
The necessary quantity of oil depends on the quantity
of oil that has been drained. The quantity of drained oil
differs slightly depending on the temperature of the oil
and the time the oil is left flowing out. After pouring oil
into the engine, therefore, you must use the dipstick to
confirm that the level is correct.
13.Start the engine and make sure that no oil leaks ap- pear around the filter’s rubber seal.
14.Run the engine until it reaches the normal operat-
ing temperature. Then stop the engine and wait a few
minutes to allow the oil drain back. Check the oil level
again and if necessary, add more engine oil. �„
Recommended grade and viscosity
Oil grade:
ILSAC GF-3, which can be identified with the new
API certification mark (Starburst mark)
or API classification SL with the words “ENERGY
CONSERVING” (if you cannot obtain the oil with
SL grade, you may use SJ grade “ENERGY CON-
SERVING” oil).
These recommended oil grades can be identified by
looking for either or both of the following marks dis-
played on the oil container.
Oil filter color Part number Amount of rotation
Black 15208AA080 1 rotation
White 15208AA09A 2/3 – 3/4 rotation